
Digital Video Camcorder
Page 1
Mini For USA assistance, please call: 1-800-211-PANA(7262) or, contact us via the web at: http://www.panasonic.com/contactinfo For Canadian assistance, please call: 1-800-561-5505 or visit us at www.panasonic.ca LSQT0799 A PV-GS120 PV-GS200 Before attempting to connect, operate or adjust this product, please read these instructions thoroughly. Guía para rápida consulta en español está incluida. Spanish Quick Use Guide is included. Operating Instructions Digital Video Camcorder Model No.
Mini For USA assistance, please call: 1-800-211-PANA(7262) or, contact us via the web at: http://www.panasonic.com/contactinfo For Canadian assistance, please call: 1-800-561-5505 or visit us at www.panasonic.ca LSQT0799 A PV-GS120 PV-GS200 Before attempting to connect, operate or adjust this product, please read these instructions thoroughly. Guía para rápida consulta en español está incluida. Spanish Quick Use Guide is included. Operating Instructions Digital Video Camcorder Model No.

Digital Video Camcorder
Page 2
... and reliable products on the right. Therefore, it is recommended that only cassette tapes that have been tested and inspected for choosing Panasonic! Therefore, it will bring you for use in the information on the market today. Be sure to cause electric shock. Model No...TO QUALIFIED SERVICE PERSONNEL This symbol warns the user that important literature concerning the operation and maintenance of this manual as your convenient Camcorder information source. Things You Should Know Thank you and your family years of enjoyment. You have sufficient magnitude to retain this ...
... and reliable products on the right. Therefore, it is recommended that only cassette tapes that have been tested and inspected for choosing Panasonic! Therefore, it will bring you for use in the information on the market today. Be sure to cause electric shock. Model No...TO QUALIFIED SERVICE PERSONNEL This symbol warns the user that important literature concerning the operation and maintenance of this manual as your convenient Camcorder information source. Things You Should Know Thank you and your family years of enjoyment. You have sufficient magnitude to retain this ...

Digital Video Camcorder
Page 5
... recyclable powers the product you have purchased. Improper cleaning can scratch the lens coating. ≥TO PROTECT THE FINISH OF YOUR CAMCORDER ... Precautions USE & LOCATION WARNING ≥TO AVOID SHOCK HAZARD ... Do not use , however it may form on how to...warm place, moisture may damage the finish. This class B digital apparatus complies with your Camcorder. ≥AVOID SUDDEN CHANGES IN TEMPERATURE ... Please call 1-800-8-BATTERY for outdoor use strong or abrasive detergents when cleaning your Camcorder. Such as it is intended for limited viewing. If the...
... recyclable powers the product you have purchased. Improper cleaning can scratch the lens coating. ≥TO PROTECT THE FINISH OF YOUR CAMCORDER ... Precautions USE & LOCATION WARNING ≥TO AVOID SHOCK HAZARD ... Do not use , however it may form on how to...warm place, moisture may damage the finish. This class B digital apparatus complies with your Camcorder. ≥AVOID SUDDEN CHANGES IN TEMPERATURE ... Please call 1-800-8-BATTERY for outdoor use strong or abrasive detergents when cleaning your Camcorder. Such as it is intended for limited viewing. If the...
Digital Video Camcorder
Page 8
...Grip Belt 17 Attaching the Lens Cap 18 Attaching the Shoulder Strap 18 Inserting a Cassette 18 Using a Memory Card 19 Turning on the Camcorder 19 Selecting Modes 19 Using the Viewfinder/LCD Monitor 20 Using the Menu Screen 21 List of Menus 22 Setting Date and Time 25 ... on a Card (Photoshot 28 Recording a Moving Picture on a Card (MPEG4 30 Quick Start 31 Self-timer Recording 31 Zoom In/Out Functions 31 Digital Zoom Function 32 Image Stabilizer Function 33 Fade In/Out Functions 33 Backlight Compensation Function 33 MagicPix Functions 34 Soft Skin Function 34 Wind Noise...
...Grip Belt 17 Attaching the Lens Cap 18 Attaching the Shoulder Strap 18 Inserting a Cassette 18 Using a Memory Card 19 Turning on the Camcorder 19 Selecting Modes 19 Using the Viewfinder/LCD Monitor 20 Using the Menu Screen 21 List of Menus 22 Setting Date and Time 25 ... on a Card (Photoshot 28 Recording a Moving Picture on a Card (MPEG4 30 Quick Start 31 Self-timer Recording 31 Zoom In/Out Functions 31 Digital Zoom Function 32 Image Stabilizer Function 33 Fade In/Out Functions 33 Backlight Compensation Function 33 MagicPix Functions 34 Soft Skin Function 34 Wind Noise...

Digital Video Camcorder
Page 9
Others Indicators 68 Initializing the Modes 69 Warning/Alarm Indicators 70 Notes and Hints 71 Cautions for Use 78 Before Requesting Service (Problems and Solutions 82 Explanation of Terms 83 Specifications 85 Camcorder Accessory System 88 Camcorder Accessory Order Form (For USA Customers 89 Request for Service Notice (USA Only)......... 90 Limited Warranty (For USA Customers)........ 91 Customer Services Directory 92 Warranty (For Canadian Customers 93 Index 94 Spanish Quick Use Guide/ Guía española para el uso rápido 96 -9-
Others Indicators 68 Initializing the Modes 69 Warning/Alarm Indicators 70 Notes and Hints 71 Cautions for Use 78 Before Requesting Service (Problems and Solutions 82 Explanation of Terms 83 Specifications 85 Camcorder Accessory System 88 Camcorder Accessory Order Form (For USA Customers 89 Request for Service Notice (USA Only)......... 90 Limited Warranty (For USA Customers)........ 91 Customer Services Directory 92 Warranty (For Canadian Customers 93 Index 94 Spanish Quick Use Guide/ Guía española para el uso rápido 96 -9-

Digital Video Camcorder
Page 10
.... ≥The [CHARGE] Lamp lights up, and charging starts. ≥When the [CHARGE] Lamp goes off, charging is completed. 2 Attach the charged Battery to the Camcorder. 3 3 Close the Card Slot Cover 2 securely. ª Recording on a Tape 1 Set the [OFF/ON] Switch 1 to [ON]. ≥The [POWER] Lamp 2 lights up. 2 POWER ª...
.... ≥The [CHARGE] Lamp lights up, and charging starts. ≥When the [CHARGE] Lamp goes off, charging is completed. 2 Attach the charged Battery to the Camcorder. 3 3 Close the Card Slot Cover 2 securely. ª Recording on a Tape 1 Set the [OFF/ON] Switch 1 to [ON]. ≥The [POWER] Lamp 2 lights up. 2 POWER ª...
Digital Video Camcorder
Page 12
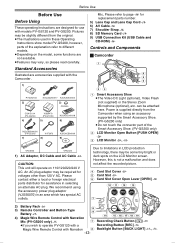
...bright or 1) AC Adaptor, DC Cable and AC Cable -16- Controls and Components ª Camcorder (1) (4) (5) (6) (2) (3) (1) Smart Accessory Shoe ≥The Video DC Light (optional), Video Flash (not supplied) or the Stereo Zoom Microphone (optional), etc. We recommend using an accessory ...foreign electrical (4) Card Slot Cover -19(5) Card Slot -19(6) Card Slot Cover Open Lever [OPEN] -19- Magic Wire Remote Control with the Camcorder. 1) PV-DAC14D 2) K2GJ2DZ00017 K2CA2EA00005 3) CR2025 CGA-DU14 (PV-GS200) 4) VSB0470 (PV-GS120) 5) N2QAGC000018 6) N2QCBD000030 (PV-GS200) 7) VYF2973...
...bright or 1) AC Adaptor, DC Cable and AC Cable -16- Controls and Components ª Camcorder (1) (4) (5) (6) (2) (3) (1) Smart Accessory Shoe ≥The Video DC Light (optional), Video Flash (not supplied) or the Stereo Zoom Microphone (optional), etc. We recommend using an accessory ...foreign electrical (4) Card Slot Cover -19(5) Card Slot -19(6) Card Slot Cover Open Lever [OPEN] -19- Magic Wire Remote Control with the Camcorder. 1) PV-DAC14D 2) K2GJ2DZ00017 K2CA2EA00005 3) CR2025 CGA-DU14 (PV-GS200) 4) VSB0470 (PV-GS120) 5) N2QAGC000018 6) N2QCBD000030 (PV-GS200) 7) VYF2973...
Digital Video Camcorder
Page 13
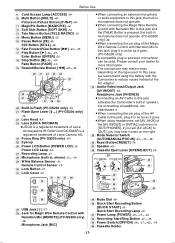
...connecting the Magic Wire Remote Control with Narration Mic to this jack and the [TALK] Button is a registered trademark of the AC adaptor. (34) Audio-Video Input/Output Jack [AV IN/OUT] -50- deactivates it. ≥When connecting the pin plug of the [AV IN/OUT] or [INITIAL] sub-...;Connecting an AV Cable to [OUT/PHONES]. Please consult your dealer for Magic Wire Remote Control with the Camcorder to [OUT], you set [AV JACK] of the AV Cable to this jack activates the Camcorder's built-in powered microphone can be used . Still Button [STILL] -28(16) Fast Forward/Cue Button ...
...connecting the Magic Wire Remote Control with Narration Mic to this jack and the [TALK] Button is a registered trademark of the AC adaptor. (34) Audio-Video Input/Output Jack [AV IN/OUT] -50- deactivates it. ≥When connecting the pin plug of the [AV IN/OUT] or [INITIAL] sub-...;Connecting an AV Cable to [OUT/PHONES]. Please consult your dealer for Magic Wire Remote Control with the Camcorder to [OUT], you set [AV JACK] of the AV Cable to this jack activates the Camcorder's built-in powered microphone can be used . Still Button [STILL] -28(16) Fast Forward/Cue Button ...

Digital Video Camcorder
Page 14
...49) (50) (51) (52) (53) (48) (54) DV S-VIDEO IN/OUT (55) (56) (48) Eyepiece Corrector Knob -20(49) Viewfinder -20-, -81- However, this is supplied with the Camcorder, most of the Camcorder functions can be some tiny bright or dark spots on the Viewfinder screen. D...44- (70) Variable Speed Search Button [VAR. D INDEX STOP INDEX P.B. ZOOM K ∫ L SELECT VAR. Due to the digital video equipment. (56) S-Video Input/Output Jack [S-VIDEO IN/OUT] -50- ª Remote Controller Using the wireless Remote Controller that is not a malfunction and does not affect the recorded picture...
...49) (50) (51) (52) (53) (48) (54) DV S-VIDEO IN/OUT (55) (56) (48) Eyepiece Corrector Knob -20(49) Viewfinder -20-, -81- However, this is supplied with the Camcorder, most of the Camcorder functions can be some tiny bright or dark spots on the Viewfinder screen. D...44- (70) Variable Speed Search Button [VAR. D INDEX STOP INDEX P.B. ZOOM K ∫ L SELECT VAR. Due to the digital video equipment. (56) S-Video Input/Output Jack [S-VIDEO IN/OUT] -50- ª Remote Controller Using the wireless Remote Controller that is not a malfunction and does not affect the recorded picture...

Digital Video Camcorder
Page 15
... directions from the central axis ≥The above 212°F (100°C) or incinerate. A loose connection will go. Warning Danger of the Camcorder and press an appropriate button. 10˚ 15˚ (29) 15˚ 15˚ 1 2 Insert the button-type battery with Narration... Mic is connected to match the poles correctly when inserting the battery. Replace only with Panasonic PART NO. Risk of children. If swallowed, call your doctor. CR2025 only. Caution: Battery may explode if mistreated. Do not recharge, disassemble...
... directions from the central axis ≥The above 212°F (100°C) or incinerate. A loose connection will go. Warning Danger of the Camcorder and press an appropriate button. 10˚ 15˚ (29) 15˚ 15˚ 1 2 Insert the button-type battery with Narration... Mic is connected to match the poles correctly when inserting the battery. Replace only with Panasonic PART NO. Risk of children. If swallowed, call your doctor. CR2025 only. Caution: Battery may explode if mistreated. Do not recharge, disassemble...

Digital Video Camcorder
Page 16
...(50), slide the Battery or DC Cable upward to disconnect it. (50) PUSH BATT ON (43) OFF ≥For other notes concerning this Camcorder when batteries from other companies are used . 1 Attach the Battery to the AC Adaptor and charge it from the AC Adaptor. ≥The [CHARGE...AC Adaptor jack. Power Supply ª Using the AC Adaptor ª Using the Battery Before use, fully charge the Battery. ≥We recommend using a Panasonic Battery. ≥We cannot guarantee the quality of this item, see -71-. -16- When the temperature of the battery is charged normally. ZOOM K &#...
...(50), slide the Battery or DC Cable upward to disconnect it. (50) PUSH BATT ON (43) OFF ≥For other notes concerning this Camcorder when batteries from other companies are used . 1 Attach the Battery to the AC Adaptor and charge it from the AC Adaptor. ≥The [CHARGE...AC Adaptor jack. Power Supply ª Using the AC Adaptor ª Using the Battery Before use, fully charge the Battery. ≥We recommend using a Panasonic Battery. ≥We cannot guarantee the quality of this item, see -71-. -16- When the temperature of the battery is charged normally. ZOOM K &#...
Digital Video Camcorder
Page 17
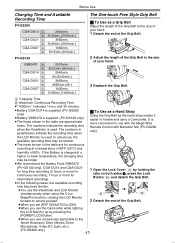
...;The times shown in the table are approximate times. The numbers in the table are for continuous recording, 1 hour or more convenient to use the Camcorder while lighting (31) 1 (30) 2 Detach the end of the Grip Belt. If the Battery is used . A Charging Time B Maximum Continuous ...Free Style Grip Belt ª To Use as the hand strap makes it easier to handle and carry a Camcorder. In actual use accessories applicable to the Smart Accessory Shoe (Stereo Zoom Microphone, Video DC Light, etc.). (PV-GS200 only) -17- indicates 1 hour and 30 minutes. ≥Battery ...
...;The times shown in the table are approximate times. The numbers in the table are for continuous recording, 1 hour or more convenient to use the Camcorder while lighting (31) 1 (30) 2 Detach the end of the Grip Belt. If the Battery is used . A Charging Time B Maximum Continuous ...Free Style Grip Belt ª To Use as the hand strap makes it easier to handle and carry a Camcorder. In actual use accessories applicable to the Smart Accessory Shoe (Stereo Zoom Microphone, Video DC Light, etc.). (PV-GS200 only) -17- indicates 1 hour and 30 minutes. ≥Battery ...

Digital Video Camcorder
Page 18
A Attaching the Shoulder Strap We recommend that you attach the Shoulder Strap before going out to avoid dropping the Camcorder. 1 Pull the end of the Shoulder Strap through the Shoulder Strap Holder (52) on the Camcorder. 4 Attach the Grip Belt around your wrist. ≥When returning the Grip Belt to the Grip Belt...
A Attaching the Shoulder Strap We recommend that you attach the Shoulder Strap before going out to avoid dropping the Camcorder. 1 Pull the end of the Shoulder Strap through the Shoulder Strap Holder (52) on the Camcorder. 4 Attach the Grip Belt around your wrist. ≥When returning the Grip Belt to the Grip Belt...
Digital Video Camcorder
Page 19
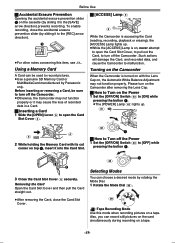
... Opening the accidental erasure prevention slider 1 on the cassette (by sliding it to [OFF] while pressing the button 1. Turning on the Camcorder When the Camcorder is turned on with the Lens Cap on, the Automatic White Balance Adjustment may cause the loss of recorded data in a Card. &#... Slot Cover (4) securely. Selecting Modes You can choose a desired mode by Panasonic only. Also, you can be sure to turn off the Camcorder. ≥Otherwise, the Camcorder may not function properly or it to turn on the Camcorder after removing the Lens Cap. ª How to Turn on the Power...
... Opening the accidental erasure prevention slider 1 on the cassette (by sliding it to [OFF] while pressing the button 1. Turning on the Camcorder When the Camcorder is turned on with the Lens Cap on, the Automatic White Balance Adjustment may cause the loss of recorded data in a Card. &#... Slot Cover (4) securely. Selecting Modes You can choose a desired mode by Panasonic only. Also, you can be sure to turn off the Camcorder. ≥Otherwise, the Camcorder may not function properly or it to turn on the Camcorder after removing the Lens Cap. ª How to Turn on the Power...

Digital Video Camcorder
Page 20
... closed. ª Adjusting Brightness and Color Level When [LCD/EVF SET] on a card. Forcefully rotating the LCD Monitor beyond these ranges will damage the Camcorder. LCD Color Level [LCD COLOR LEVEL] Adjusts the color saturation of 120o. Brightness of the Viewfinder [EVF BRIGHTNESS] Adjusts the brightness of 90o 2 to ... ≥The LCD Monitor can be opened a maximum of vertical bars in the Bar Indication. -20- If you open , you want to connect the Camcorder to your Personal Computer. LCD/EVF SETUP 1LCD BRIGHTNESS 12:30:45PM OCT 15 2004 To Use the Viewfinder at the Same Time as the...
... closed. ª Adjusting Brightness and Color Level When [LCD/EVF SET] on a card. Forcefully rotating the LCD Monitor beyond these ranges will damage the Camcorder. LCD Color Level [LCD COLOR LEVEL] Adjusts the color saturation of 120o. Brightness of the Viewfinder [EVF BRIGHTNESS] Adjusts the brightness of 90o 2 to ... ≥The LCD Monitor can be opened a maximum of vertical bars in the Bar Indication. -20- If you open , you want to connect the Camcorder to your Personal Computer. LCD/EVF SETUP 1LCD BRIGHTNESS 12:30:45PM OCT 15 2004 To Use the Viewfinder at the Same Time as the...
Digital Video Camcorder
Page 21
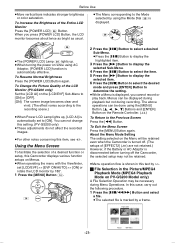
... ≥The [POWER LCD] Lamp (26) lights up , [LCD AI] is turned off the Camcorder, the selected setup may not be retained. ≥Menu operation flow is shown in this Camcorder displays various function setups on the Menu will be necessary during recording. You can be displayed during playback... power on while using the [MENU] Button Buttons and [ENTER] Button on PV-GS200 Model only) A File Selection Operation may be retained even when the Camcorder is automatically set [LCD/EVF] >> [EVF ON/AUTO] >> [ON] or rotate the LCD monitor by a frame. To Resume Normal Brightness Press the...
... ≥The [POWER LCD] Lamp (26) lights up , [LCD AI] is turned off the Camcorder, the selected setup may not be retained. ≥Menu operation flow is shown in this Camcorder displays various function setups on the Menu will be necessary during recording. You can be displayed during playback... power on while using the [MENU] Button Buttons and [ENTER] Button on PV-GS200 Model only) A File Selection Operation may be retained even when the Camcorder is automatically set [LCD/EVF] >> [EVF ON/AUTO] >> [ON] or rotate the LCD monitor by a frame. To Resume Normal Brightness Press the...

Digital Video Camcorder
Page 22
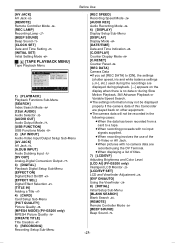
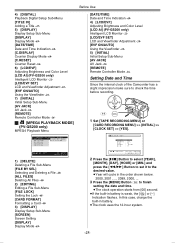
...-28[DEMO MODE] Demonstration Mode ≥If no operation takes place for approximately 10 minutes after the AC Adaptor is connected to the Camcorder and the [OFF/ON] Switch is turned to Demonstration Mode for explanation purposes only, and they are different from the actual Menus. &#... LEVEL] (PV-GS200 only) Flash Level -38≥If you press [6] Button, the menu changes back to the previous screen. 2) [DIGITAL] Digital Setup Sub-Menu [EFFECT1] Digital Effects 1 -39[EFFECT2] Digital Effects 2 -39[MULTI MODE] Multi-Picture Mode -40[TITLE IN] Adding a Title -473) [CARD] Card Setup Sub-Menu [PICT...
...-28[DEMO MODE] Demonstration Mode ≥If no operation takes place for approximately 10 minutes after the AC Adaptor is connected to the Camcorder and the [OFF/ON] Switch is turned to Demonstration Mode for explanation purposes only, and they are different from the actual Menus. &#... LEVEL] (PV-GS200 only) Flash Level -38≥If you press [6] Button, the menu changes back to the previous screen. 2) [DIGITAL] Digital Setup Sub-Menu [EFFECT1] Digital Effects 1 -39[EFFECT2] Digital Effects 2 -39[MULTI MODE] Multi-Picture Mode -40[TITLE IN] Adding a Title -473) [CARD] Card Setup Sub-Menu [PICT...
Digital Video Camcorder
Page 23
... Mode -592) [AV IN/OUT] Audio-Video Input/Output Setup Sub-Menu [AV JACK] AV Jack -51[A.DUB INPUT] Audio Dubbing Input -51[DV OUT] Analog-Digital Conversion Output -773) [DIGITAL] Playback Digital Setup Sub-Menu [EFFECT ON] Digital Effect On/Off -45[EFFECT SEL] Digital Effect Selection -45[TITLE IN] Adding a ...Playback, Still Advance Playback or Variable Speed Search. ≥The settings information may not be displayed properly if the camera data of this Camcorder are played back on other equipment. ≥The camera data will not be recorded in the following cases: ≥When the data has...
... Mode -592) [AV IN/OUT] Audio-Video Input/Output Setup Sub-Menu [AV JACK] AV Jack -51[A.DUB INPUT] Audio Dubbing Input -51[DV OUT] Analog-Digital Conversion Output -773) [DIGITAL] Playback Digital Setup Sub-Menu [EFFECT ON] Digital Effect On/Off -45[EFFECT SEL] Digital Effect Selection -45[TITLE IN] Adding a ...Playback, Still Advance Playback or Variable Speed Search. ≥The settings information may not be displayed properly if the camera data of this Camcorder are played back on other equipment. ≥The camera data will not be recorded in the following cases: ≥When the data has...
Digital Video Camcorder
Page 25
Setting Date and Time Since the internal clock of the Camcorder has a slight imprecision make sure to finish setting the date and time. ≥The clock operation starts from [00] second. ≥If the built-in ... press the [6/5] Button to set it to the desired value. ≥Year will cycle in battery. ≥The clock uses the 12-hour system. -25- 4) [DIGITAL] Playback Digital Setup Sub-Menu [TITLE IN] Adding a Title -475) [DISPLAY] Display Setup Sub-Menu [DISPLAY] Display Mode -69[DATE/TIME] Date and Time Indication -69...
Setting Date and Time Since the internal clock of the Camcorder has a slight imprecision make sure to finish setting the date and time. ≥The clock operation starts from [00] second. ≥If the built-in ... press the [6/5] Button to set it to the desired value. ≥Year will cycle in battery. ≥The clock uses the 12-hour system. -25- 4) [DIGITAL] Playback Digital Setup Sub-Menu [TITLE IN] Adding a Title -475) [DISPLAY] Display Setup Sub-Menu [DISPLAY] Display Mode -69[DATE/TIME] Date and Time Indication -69...

Digital Video Camcorder
Page 26
... that are recorded in LP Mode are not completely compatible with other equipment. ≥Audio dubbing is near exhaustion. 1 Connect the AC Adaptor to the Camcorder with the power turned off and then connect to the AC Jack. ≥After charging for 4 hours, the built-in stereo, while the other 2 tracks...
... that are recorded in LP Mode are not completely compatible with other equipment. ≥Audio dubbing is near exhaustion. 1 Connect the AC Adaptor to the Camcorder with the power turned off and then connect to the AC Jack. ≥After charging for 4 hours, the built-in stereo, while the other 2 tracks...


