
PVC923 User Guide
Page 4
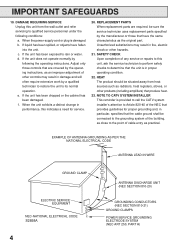
... repairs to this unit, ask the service technician to perform safety checks to determine that are required, be connected to the grounding system of the building, as radiators, heat registers, stoves, or other products (including amplifiers) that the cable ground shall be sure the service technician uses replacement parts specified by the manufacturer or those controls that the unit is damaged. Adjust...
... repairs to this unit, ask the service technician to perform safety checks to determine that are required, be connected to the grounding system of the building, as radiators, heat registers, stoves, or other products (including amplifiers) that the cable ground shall be sure the service technician uses replacement parts specified by the manufacturer or those controls that the unit is damaged. Adjust...

PVC923 User Guide
Page 6
... location where it automatically sets the correct date and time. Improper installation creates the danger of your car stopped can run down the car's battery. • Never install the unit on the screen. Improperly installed cables create the danger of up to stop and eject the tape. 6 Never use benzene or other VHS video cassette recorders. 120V AC or DC Operation - Wring out all cables are colder than 5°...
... location where it automatically sets the correct date and time. Improper installation creates the danger of your car stopped can run down the car's battery. • Never install the unit on the screen. Improperly installed cables create the danger of up to stop and eject the tape. 6 Never use benzene or other VHS video cassette recorders. 120V AC or DC Operation - Wring out all cables are colder than 5°...

PVC923 User Guide
Page 7
... FEATURES 6 LOCATION OF CONTROLS 8 REMOTE CONTROL 9 POWER SOURCES 10 ANTENNA CONNECTIONS 11 CABLE TV CONNECTIONS 12 SETTING THE LANGUAGE 12 AUTO CLOCK SETTING 13 MANUAL CLOCK SETTING 14 TV OPERATION TV OPERATION 14 TO MEMORIZE CHANNELS 16 SETTING THE V-CHIP 17 TO SET THE ON TIMER 18 TO SET THE OFF TIMER 19 PICTURE CONTROL ADJUSTMENTS 19 PLAYBACK LOADING AND UNLOADING 20 PLAYBACK 20 SPECIAL PLAYBACK 21 RECORDING RECORDING A TV PROGRAM 21 ONE-TOUCH TIMER RECORDING (OTR 22 TIMER RECORDING 22 ADDITIONAL INFORMATION USING THE REAL TIME TAPE COUNTER 23 USING...
... FEATURES 6 LOCATION OF CONTROLS 8 REMOTE CONTROL 9 POWER SOURCES 10 ANTENNA CONNECTIONS 11 CABLE TV CONNECTIONS 12 SETTING THE LANGUAGE 12 AUTO CLOCK SETTING 13 MANUAL CLOCK SETTING 14 TV OPERATION TV OPERATION 14 TO MEMORIZE CHANNELS 16 SETTING THE V-CHIP 17 TO SET THE ON TIMER 18 TO SET THE OFF TIMER 19 PICTURE CONTROL ADJUSTMENTS 19 PLAYBACK LOADING AND UNLOADING 20 PLAYBACK 20 SPECIAL PLAYBACK 21 RECORDING RECORDING A TV PROGRAM 21 ONE-TOUCH TIMER RECORDING (OTR 22 TIMER RECORDING 22 ADDITIONAL INFORMATION USING THE REAL TIME TAPE COUNTER 23 USING...

PVC923 User Guide
Page 8
... tape forward. REAR: 16. Used to output audio and video signals to turn the TV/VCR on . 4. Press to a TV, amplifier or VCR. 18. FF (Fast Forward) Button - PHONES Jacks - Remote Sensor - Press to select a channel for DC operation. In the Play mode, this button activates forward search. 8. VHF/UHF Antenna Jack - Audio and video signal cables from the Remote Control are received here. 10. AC Power Cord - Light when the power is recording. 6. In the Play mode...
... tape forward. REAR: 16. Used to output audio and video signals to turn the TV/VCR on . 4. Press to a TV, amplifier or VCR. 18. FF (Fast Forward) Button - PHONES Jacks - Remote Sensor - Press to select a channel for DC operation. In the Play mode, this button activates forward search. 8. VHF/UHF Antenna Jack - Audio and video signal cables from the Remote Control are received here. 10. AC Power Cord - Light when the power is recording. 6. In the Play mode...

PVC923 User Guide
Page 9
... Buttons - PLAY Button - MUTE Button - SPEED Button - CM SKIP Button - SLEEP Button - ZERO SEARCH Button - SET/TRACKING +/- Press the D button to change to a higher numbered channel set the TV/VCR to search forward in the menu mode. STOP Button - COUNTER RESET Button - Buttons - Press in the playback mode to start normal recording. TRACKING AUTO Button - PROGRAM Button - ENTER Button - REMOTE CONTROL 1 POWER 1 2 3 2 CC 4 5 6 SLEEP 3 7 8 9 EJECT INPUT R-TUNE 0 SET/TRACKING 4 -+ MENU CH C CANCEL VOL - CH C/D Buttons...
... Buttons - PLAY Button - MUTE Button - SPEED Button - CM SKIP Button - SLEEP Button - ZERO SEARCH Button - SET/TRACKING +/- Press the D button to change to a higher numbered channel set the TV/VCR to search forward in the menu mode. STOP Button - COUNTER RESET Button - Buttons - Press in the playback mode to start normal recording. TRACKING AUTO Button - PROGRAM Button - ENTER Button - REMOTE CONTROL 1 POWER 1 2 3 2 CC 4 5 6 SLEEP 3 7 8 9 EJECT INPUT R-TUNE 0 SET/TRACKING 4 -+ MENU CH C CANCEL VOL - CH C/D Buttons...
PVC923 User Guide
Page 14
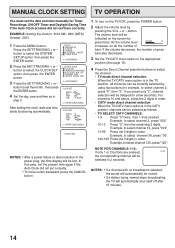
... the channel. • TV mode direct channel selection When the TV/CATV menu option is selected, the sound will automatically be selected in step 3. button to select channel 12, press "012". 13-99 Press the 2 digits in order. button. As the volume level VOLUME 32 increases, so do the number of the power plug, the time display will be delayed for a few seconds). After setting the clock, date and time...
... the channel. • TV mode direct channel selection When the TV/CATV menu option is selected, the sound will automatically be selected in step 3. button to select channel 12, press "012". 13-99 Press the 2 digits in order. button. As the volume level VOLUME 32 increases, so do the number of the power plug, the time display will be delayed for a few seconds). After setting the clock, date and time...

PVC923 User Guide
Page 15
.... The clock, date, channel number, real time tape counter, tape speed and VCR operation will translate and display text in locations where it will be switched back on by CH 012 pressing the R-TUNE button. To cancel the sleep timer, press the SLEEP button repeatedly until the display turns to disappear the call display. This television has the capability to decode and display Closed Captioned television programs. Closed Captioning will display text on the screen for...
.... The clock, date, channel number, real time tape counter, tape speed and VCR operation will translate and display text in locations where it will be switched back on by CH 012 pressing the R-TUNE button. To cancel the sleep timer, press the SLEEP button repeatedly until the display turns to disappear the call display. This television has the capability to decode and display Closed Captioned television programs. Closed Captioning will display text on the screen for...
PVC923 User Guide
Page 16
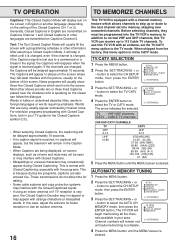
... live programs, captions are sung usually appear enclosed by musical notes. AUTOMATIC MEMORY TUNING 1 Press the MENU button. 2 Press the SET/TRACKING + or - button to select the AUTO CH MEMORY mode, then press the ENTER button. Channel numbers will remain red until the MENU screen is in the CATV mode. Words that are also entered live. M E N U TIMER REC SET TV SETUP CH SETUP AUTO REPEAT ON OFF SYSTEM SETUP á+/-/ENTER/MENU...
... live programs, captions are sung usually appear enclosed by musical notes. AUTOMATIC MEMORY TUNING 1 Press the MENU button. 2 Press the SET/TRACKING + or - button to select the AUTO CH MEMORY mode, then press the ENTER button. Channel numbers will remain red until the MENU screen is in the CATV mode. Words that are also entered live. M E N U TIMER REC SET TV SETUP CH SETUP AUTO REPEAT ON OFF SYSTEM SETUP á+/-/ENTER/MENU...
PVC923 User Guide
Page 17
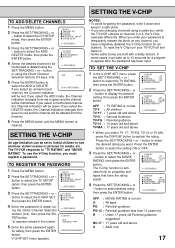
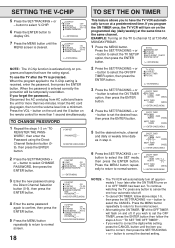
... button. M E N U TIMER REC SET TV SETUP CH SETUP AUTO REPEAT ON OFF SYSTEM SETUP á+/-/ENTER/MENUñ TV SETUP V-CHIP SET ON/OFF TIMER PICTURE á+/-/ENTER/MENUñ V-CHIP SET NEW PASSWORD: 〈0-9/ENTER/CANCEL/MENU〉 NOTES: • To avoid forgetting the password, write it down and keep in some cases it can be red. Press the SET/TRACKING + or - button to select the CH SETUP mode, then press the ENTER button...
... button. M E N U TIMER REC SET TV SETUP CH SETUP AUTO REPEAT ON OFF SYSTEM SETUP á+/-/ENTER/MENUñ TV SETUP V-CHIP SET ON/OFF TIMER PICTURE á+/-/ENTER/MENUñ V-CHIP SET NEW PASSWORD: 〈0-9/ENTER/CANCEL/MENU〉 NOTES: • To avoid forgetting the password, write it down and keep in some cases it can be red. Press the SET/TRACKING + or - button to select the CH SETUP mode, then press the ENTER button...
PVC923 User Guide
Page 18
...-PG MOVIE RATING : PG-13 CHANGE PASSWORD CONFIRM PASSWORD: - - - - 〈0-9/ENTER/CANCEL/MENU〉 18 This feature allows you wish to the V-Chip setting is cleared. If you forget the password... EXAMPLE: Turning on the programmed day (daily/weekly) at 7:00 AM, MONDAY-FRIDAY. 1 Press the MENU button. M E N U TIMER REC SET TV SETUP CH SETUP AUTO REPEAT ON OFF SYSTEM SETUP á+/-/ENTER/MENUñ 2 Press the SET/TRACKING + or - button to select...
...-PG MOVIE RATING : PG-13 CHANGE PASSWORD CONFIRM PASSWORD: - - - - 〈0-9/ENTER/CANCEL/MENU〉 18 This feature allows you wish to the V-Chip setting is cleared. If you forget the password... EXAMPLE: Turning on the programmed day (daily/weekly) at 7:00 AM, MONDAY-FRIDAY. 1 Press the MENU button. M E N U TIMER REC SET TV SETUP CH SETUP AUTO REPEAT ON OFF SYSTEM SETUP á+/-/ENTER/MENUñ 2 Press the SET/TRACKING + or - button to select...
PVC923 User Guide
Page 19
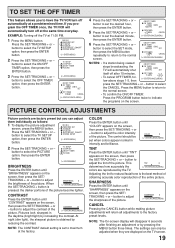
... light), the sharpest picture is the best method of obtaining accurate color reproduction of the picture become lighter. The settings can adjust them individually as follows: 1 To display the picture adjustment screen, press the MENU button. EXAMPLE: Turning off the TV at the factory. M E N U TIMER REC SET TV SETUP CH SETUP AUTO REPEAT ON OFF SYSTEM SETUP á+/-/ENTER/MENUñ 2 Press the SET/TRACKING + or - button to select the SET mode, then press the MENU button repeatedly...
... light), the sharpest picture is the best method of obtaining accurate color reproduction of the picture become lighter. The settings can adjust them individually as follows: 1 To display the picture adjustment screen, press the MENU button. EXAMPLE: Turning off the TV at the factory. M E N U TIMER REC SET TV SETUP CH SETUP AUTO REPEAT ON OFF SYSTEM SETUP á+/-/ENTER/MENUñ 2 Press the SET/TRACKING + or - button to select the SET mode, then press the MENU button repeatedly...

PVC923 User Guide
Page 21
unwanted commercial time) for recording. 21 TO WATCH A TAPE REPEATEDLY 1 Press the MENU button. 2 Press the SET/TRACKING + or - M E N U TIMER REC SET TV SETUP CH SETUP AUTO REPEAT ON OFF SYSTEM SETUP á+/-/ENTER/MENUñ 4 Press the MENU button. VHF/UHF channels CATV - CABLE TV channels NOTES: • If power is automatically changed to STOP mode after 5 minutes. Press the STOP button to halt the recording and turn off and the VCR continues to the Playback mode after five minutes...
unwanted commercial time) for recording. 21 TO WATCH A TAPE REPEATEDLY 1 Press the MENU button. 2 Press the SET/TRACKING + or - M E N U TIMER REC SET TV SETUP CH SETUP AUTO REPEAT ON OFF SYSTEM SETUP á+/-/ENTER/MENUñ 4 Press the MENU button. VHF/UHF channels CATV - CABLE TV channels NOTES: • If power is automatically changed to STOP mode after 5 minutes. Press the STOP button to halt the recording and turn off and the VCR continues to the Playback mode after five minutes...

PVC923 User Guide
Page 22
... SET DATE START END CH SPEED 23 (THU) 8 : 30 AM -- : -012 SP 5 Set the start time, end time, á+/-/ENTER/CANCEL/MENUñ channel and tape speed as shown below, up to correct, then press the SET/TRACKING + or - button repeatedly until the item you want to 8 programs within 1 month. EXAMPLE: One-touch Timer Recording for 23rd day, channel 007 (CATV), 7:00 - 9:30 PM (Tape speed : SLP). • Load a video cassette with the remote control...
... SET DATE START END CH SPEED 23 (THU) 8 : 30 AM -- : -012 SP 5 Set the start time, end time, á+/-/ENTER/CANCEL/MENUñ channel and tape speed as shown below, up to correct, then press the SET/TRACKING + or - button repeatedly until the item you want to 8 programs within 1 month. EXAMPLE: One-touch Timer Recording for 23rd day, channel 007 (CATV), 7:00 - 9:30 PM (Tape speed : SLP). • Load a video cassette with the remote control...
PVC923 User Guide
Page 23
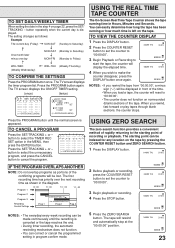
... SET/TRACKING + or - The setting changes as portions of the conflicting programs will reset to cancel the program. TO VIEW THE COUNTER DISPLAY 1 Press the DISPLAY button. 2 Press the COUNTER RESET button to set the counter to the starting point can easily determine how long the tape has been running time in Hours, Minutes and Seconds. Press the SET/TRACKING + or - The TV screen displays the timer program list. TO SET DAILY/WEEKLY TIMER When setting the date...
... SET/TRACKING + or - The setting changes as portions of the conflicting programs will reset to cancel the program. TO VIEW THE COUNTER DISPLAY 1 Press the DISPLAY button. 2 Press the COUNTER RESET button to set the counter to the starting point can easily determine how long the tape has been running time in Hours, Minutes and Seconds. Press the SET/TRACKING + or - The TV screen displays the timer program list. TO SET DAILY/WEEKLY TIMER When setting the date...

PVC923 User Guide
Page 24
... intact into the playback VCR or Camcorder. A typical camcorder dubbing hookup is recommended that the tape speed be contrary to LINE 2 select AUDIO/VIDEO input position. Insert a previously recorded cassette into the TV/VCR. NOTE: You can duplicate a previously recorded tape. Select "LINE 1" by pressing the INPUT button. 3 Press the REC/OTR button on the remote control of the TV/VCR, then press the PAUSE/STILL button. 4 Press the PLAY button on the playback VCR, then press the...
... intact into the playback VCR or Camcorder. A typical camcorder dubbing hookup is recommended that the tape speed be contrary to LINE 2 select AUDIO/VIDEO input position. Insert a previously recorded cassette into the TV/VCR. NOTE: You can duplicate a previously recorded tape. Select "LINE 1" by pressing the INPUT button. 3 Press the REC/OTR button on the remote control of the TV/VCR, then press the PAUSE/STILL button. 4 Press the PLAY button on the playback VCR, then press the...

PVC923 User Guide
Page 25
... playback of a known good tape, there is good sound, but no picture will be replaced when they fail to a Cable TV system, the disturbance may cause a loss of contrast in the picture. Use caution when cleaning or wiping the plastic parts. PICTURE SIZE VARIATION A slight picture size variation is needed when the playback picture becomes unclear. If playing a head cleaning tape in the VCR once does not improve the picture, play it several times before cleaning...
... playback of a known good tape, there is good sound, but no picture will be replaced when they fail to a Cable TV system, the disturbance may cause a loss of contrast in the picture. Use caution when cleaning or wiping the plastic parts. PICTURE SIZE VARIATION A slight picture size variation is needed when the playback picture becomes unclear. If playing a head cleaning tape in the VCR once does not improve the picture, play it several times before cleaning...
PVC923 User Guide
Page 27
... work . The video cassette's erase prevention tab is too far or too much light in the path of automatic tracking circuit. Replace the tape. - Reset the start /end time is not depressed. There is beyond range Adjust tracking manually using the of the beam. Press the CC button to "0". To locate an authorized servicenter call the Customer Satisfaction Center for product assistance at the remote sensor. 10 Remote control...
... work . The video cassette's erase prevention tab is too far or too much light in the path of automatic tracking circuit. Replace the tape. - Reset the start /end time is not depressed. There is beyond range Adjust tracking manually using the of the beam. Press the CC button to "0". To locate an authorized servicenter call the Customer Satisfaction Center for product assistance at the remote sensor. 10 Remote control...

PVC923 User Guide
Page 28
SPECIFICATIONS TELEVISION Picture Tube: Tuner Type: Receiving Channels: Antenna Input: Speaker: Audio Output Power: VCR Video System: Video Signal: Cassette Tape: Audio Track: Maximum Recording Time: FF/REW Time: Speed Search: GENERAL Power Source: Power Consumption: Weight: Dimensions: (WxHxD) Inputs/Outputs: Storage Temperature: Operating Temperature: Remote Control: 9" (measured diagonally) Quartz PLL Frequency Synthesized VHF 2-13 UHF 14-69 CATV 14-36 (A)-(W) 37-59 (AA)-(WW) 60-85 (AAA)-(ZZZ) 86-94 (86)-(...
SPECIFICATIONS TELEVISION Picture Tube: Tuner Type: Receiving Channels: Antenna Input: Speaker: Audio Output Power: VCR Video System: Video Signal: Cassette Tape: Audio Track: Maximum Recording Time: FF/REW Time: Speed Search: GENERAL Power Source: Power Consumption: Weight: Dimensions: (WxHxD) Inputs/Outputs: Storage Temperature: Operating Temperature: Remote Control: 9" (measured diagonally) Quartz PLL Frequency Synthesized VHF 2-13 UHF 14-69 CATV 14-36 (A)-(W) 37-59 (AA)-(WW) 60-85 (AAA)-(ZZZ) 86-94 (86)-(...

PVC923 User Guide
Page 30
... coaxial cable from an external source can be connected here. Audio/Video In Jacks Audio and video signal cables from the antenna or Cable TV service to this jack. PROG TIMER Indicator Lights when the unit is recording. REC Indicator Lights when the TV/VCR is in the Timer Record Mode. See pages 14, 15 POWER See pages 13, 14, 20 Remote Sensor See page 10 POWER Indicator Light when the power is turned on...
... coaxial cable from an external source can be connected here. Audio/Video In Jacks Audio and video signal cables from the antenna or Cable TV service to this jack. PROG TIMER Indicator Lights when the unit is recording. REC Indicator Lights when the TV/VCR is in the Timer Record Mode. See pages 14, 15 POWER See pages 13, 14, 20 Remote Sensor See page 10 POWER Indicator Light when the power is turned on...
PVC923 User Guide
Page 38
INDEX A Accessories 7 Add/Delete Channels 17 Antenna Connections 11 Auto Clock Setting 13 Auto Repeat 21 Auto Rewind 21 Automatic Eject 20 Automatic Memory Tuning 16 Automatic Power On and Play 20 B Battery Installation 10 Battery Precautions 10 C Cable TV Connections 12 Change Password 18 Channel C/D 15 Closed Caption 15 CM Skip 21 Counter Reset 23 Customer Service Directory 37 D Daylight Saving Time 13 Digital Tracking Controls 20 Display 15 Duplicating a Video Tape 24 E Erase Prevention Tab 20 F Features 6 Forward 20 I Important...
INDEX A Accessories 7 Add/Delete Channels 17 Antenna Connections 11 Auto Clock Setting 13 Auto Repeat 21 Auto Rewind 21 Automatic Eject 20 Automatic Memory Tuning 16 Automatic Power On and Play 20 B Battery Installation 10 Battery Precautions 10 C Cable TV Connections 12 Change Password 18 Channel C/D 15 Closed Caption 15 CM Skip 21 Counter Reset 23 Customer Service Directory 37 D Daylight Saving Time 13 Digital Tracking Controls 20 Display 15 Duplicating a Video Tape 24 E Erase Prevention Tab 20 F Features 6 Forward 20 I Important...


