
Vhs-c Camcorder
Page 3
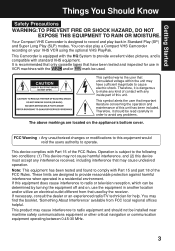
...Play (SLP) modes. Operation is dangerous to operate. This device complies with standard VHS equipment. It is recommended that only cassette tapes that may not cause harmful interference, and (2) this equipment does cause interference to radio or television reception, which can also play... interference when operated in another location and/or utilize an electrical outlet different from FCC local regional offices helpful. This Camcorder is compatible with Part 15 of the FCC Rules. Getting Started Things You Should Know Safety Precautions WARNING:TO PREVENT FIRE...
...Play (SLP) modes. Operation is dangerous to operate. This device complies with standard VHS equipment. It is recommended that only cassette tapes that may not cause harmful interference, and (2) this equipment does cause interference to radio or television reception, which can also play... interference when operated in another location and/or utilize an electrical outlet different from FCC local regional offices helpful. This Camcorder is compatible with Part 15 of the FCC Rules. Getting Started Things You Should Know Safety Precautions WARNING:TO PREVENT FIRE...
Vhs-c Camcorder
Page 5
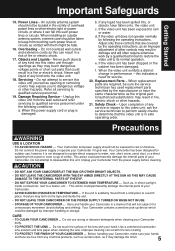
...designed to sustain direct exposure to dangerous voltage or other electric light or power circuits, or where it may form on the tape and inside a closed car, next to rain or water. When installing an outside antenna system should be exposed to qualified ... when cleaning the lens. Objects and Liquids - Damage Requiring Service - Overloading - Important Safeguards Getting Started 15. Before handling your Camcorder, make sure your Camcorder in fire, electric shock or other hazards. 21. Power Lines - b. If the video unit does not operate normally by improper...
...designed to sustain direct exposure to dangerous voltage or other electric light or power circuits, or where it may form on the tape and inside a closed car, next to rain or water. When installing an outside antenna system should be exposed to qualified ... when cleaning the lens. Objects and Liquids - Damage Requiring Service - Overloading - Important Safeguards Getting Started 15. Before handling your Camcorder, make sure your Camcorder in fire, electric shock or other hazards. 21. Power Lines - b. If the video unit does not operate normally by improper...

Vhs-c Camcorder
Page 6
...Programmed Recording 18~20 Playing Back Recordings (Basic Playback, Visual Search, Still Picture, Tracking, TV/VCR Playback 21~22 Copying your Tapes (dubbing 23 Four-Speed Power Zoom 24 Backlight ...24 Focus (Auto/Manual Focus 25 High Speed Shutter (Auto/Manual Shutter 26 ...Image Stabilization (E.I.S 30 MotionSensor 31 Viewfinder/LCD Monitor Indications 32~34 Notes On Operations 35 Replacing Clock Battery 36 Palmcorder Accessory System 37 Palmcorder Accessory Order Form 38 Specifications 39 Before Requesting Service (Video Head Cleaning 40 Request for Service Notice 41 Limited ...
...Programmed Recording 18~20 Playing Back Recordings (Basic Playback, Visual Search, Still Picture, Tracking, TV/VCR Playback 21~22 Copying your Tapes (dubbing 23 Four-Speed Power Zoom 24 Backlight ...24 Focus (Auto/Manual Focus 25 High Speed Shutter (Auto/Manual Shutter 26 ...Image Stabilization (E.I.S 30 MotionSensor 31 Viewfinder/LCD Monitor Indications 32~34 Notes On Operations 35 Replacing Clock Battery 36 Palmcorder Accessory System 37 Palmcorder Accessory Order Form 38 Specifications 39 Before Requesting Service (Video Head Cleaning 40 Request for Service Notice 41 Limited ...
Vhs-c Camcorder
Page 8
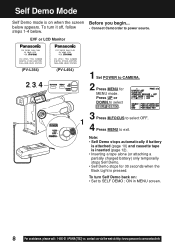
...1-800-211-PANA(7262) or, contact us via the web at:http://www.panasonic.com/contactinfo below . Note: • Self Demo stops automatically if battery is attached (page 10) and cassette tape is inserted (page 12). • Inserting a tape alone (or attaching a partially charged battery) only temporarily stops Self Demo. &#...Set to power source. To turn Self Demo back on when the screen Before you begin... To turn it off, follow • Connect Camcorder to SELF DEMO ; Self Demo Mode Self Demo mode is pressed. EVF or LCD Monitor (PV-L354) 2, 3, 4 (PV-L454) 1 Set POWER to exit.
...1-800-211-PANA(7262) or, contact us via the web at:http://www.panasonic.com/contactinfo below . Note: • Self Demo stops automatically if battery is attached (page 10) and cassette tape is inserted (page 12). • Inserting a tape alone (or attaching a partially charged battery) only temporarily stops Self Demo. &#...Set to power source. To turn Self Demo back on when the screen Before you begin... To turn it off, follow • Connect Camcorder to SELF DEMO ; Self Demo Mode Self Demo mode is pressed. EVF or LCD Monitor (PV-L354) 2, 3, 4 (PV-L454) 1 Set POWER to exit.

Vhs-c Camcorder
Page 9
... again to unlock the LCD monitor. Swing it fully open and adjust the angle. 2 Set POWER to VCR. 3 Press (REWIND/SEARCH) to rewind tape. 4 Press (PLAY/STILL) to stop playback. 9 Swing it fully open door. 3Insert cassette (page 12). 4Press here to unlock the LCD monitor. Getting...pause recording. Playback using the LCD Monitor See page 21. 1 Press LCD-OPEN to close door. Insert Cassette 1Attach fully charged Battery (page 10). 2Slide TAPE EJECT to open and adjust the angle. 2 Set POWER to CAMERA. 3 Press RECORD/PAUSE to start playback. 5 Press (STOP) to start recording....
... again to unlock the LCD monitor. Swing it fully open and adjust the angle. 2 Set POWER to VCR. 3 Press (REWIND/SEARCH) to rewind tape. 4 Press (PLAY/STILL) to stop playback. 9 Swing it fully open door. 3Insert cassette (page 12). 4Press here to unlock the LCD monitor. Getting...pause recording. Playback using the LCD Monitor See page 21. 1 Press LCD-OPEN to close door. Insert Cassette 1Attach fully charged Battery (page 10). 2Slide TAPE EJECT to open and adjust the angle. 2 Set POWER to CAMERA. 3 Press RECORD/PAUSE to start playback. 5 Press (STOP) to start recording....

Vhs-c Camcorder
Page 12
..., slide tab closed.) 12 For assistance, please call : 1-800-211-PANA(7262) or, contact us via the web at:http://www.panasonic.com/contactinfo Erase Protection Tab Protects tapes from being accidentally erased. 1 2 Slide tab type 1 To prevent accidental erasing, break off tab with screwdriver. (Or, slide tab open.) 2 To ... to open door. 4 Insert cassette as shown. 5 Press here to close door. • To remove the cassette, slide the TAPE EJECT switch. Tape Speed Cassette type TC-20 TC-30 TC-40 SP (Standard Play) 20 minutes 30 minutes 40 minutes SLP (Super Long Play) 1 hour 1 ...
..., slide tab closed.) 12 For assistance, please call : 1-800-211-PANA(7262) or, contact us via the web at:http://www.panasonic.com/contactinfo Erase Protection Tab Protects tapes from being accidentally erased. 1 2 Slide tab type 1 To prevent accidental erasing, break off tab with screwdriver. (Or, slide tab open.) 2 To ... to open door. 4 Insert cassette as shown. 5 Press here to close door. • To remove the cassette, slide the TAPE EJECT switch. Tape Speed Cassette type TC-20 TC-30 TC-40 SP (Standard Play) 20 minutes 30 minutes 40 minutes SLP (Super Long Play) 1 hour 1 ...
Vhs-c Camcorder
Page 14
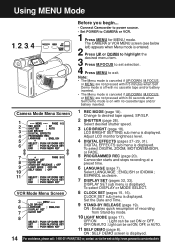
Using MENU Mode 1, 2, 3, 4 Before you begin... • Connect Camcorder to power source. • Set POWER to desired tape speed, SP/SLP. 1 2 SHUTTER (page 26). Change to CAMERA or VCR. 1 Press MENU for MENU mode. DISPLAY SET sub menu is displayed. CLOCK SET ...UP/DOWN, M.FOCUS, or MENU are not pressed within 5 minutes when Self Demo mode is off with no cassette tape and/or battery inserted. Camcorder starts and stops recording at :http://www.panasonic.com/contactinfo The CAMERA or VCR MENU screen (see below left) appears when Menu mode is displayed. Select desired ...
Using MENU Mode 1, 2, 3, 4 Before you begin... • Connect Camcorder to power source. • Set POWER to desired tape speed, SP/SLP. 1 2 SHUTTER (page 26). Change to CAMERA or VCR. 1 Press MENU for MENU mode. DISPLAY SET sub menu is displayed. CLOCK SET ...UP/DOWN, M.FOCUS, or MENU are not pressed within 5 minutes when Self Demo mode is off with no cassette tape and/or battery inserted. Camcorder starts and stops recording at :http://www.panasonic.com/contactinfo The CAMERA or VCR MENU screen (see below left) appears when Menu mode is displayed. Select desired ...
Vhs-c Camcorder
Page 18
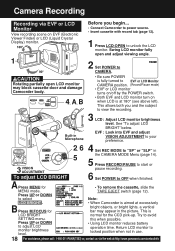
See "To adjust LCD BRIGHT" below. A Press MENU for the CCD pick-up. Press UP or DOWN to view the recording. TAPE EJECT switch (page 12). this when possible. • Using LCD monitor reduces battery operation time. Camera Recording Recording via the web at 180°... Camcorder is aimed at excessively B Press M.FOCUS for bright objects, or bright lights, a vertical bar may appear in 5 the CAMERA MODE Menu (page 14). 5 Press RECORD/PAUSE to start or 3 VISION ADJUSTMENT To adjust LCD BRIGHT pause recording. 6 Set POWER to avoid SETTING menu. This is at :http://www.panasonic....
See "To adjust LCD BRIGHT" below. A Press MENU for the CCD pick-up. Press UP or DOWN to view the recording. TAPE EJECT switch (page 12). this when possible. • Using LCD monitor reduces battery operation time. Camera Recording Recording via the web at 180°... Camcorder is aimed at excessively B Press M.FOCUS for bright objects, or bright lights, a vertical bar may appear in 5 the CAMERA MODE Menu (page 14). 5 Press RECORD/PAUSE to start or 3 VISION ADJUSTMENT To adjust LCD BRIGHT pause recording. 6 Set POWER to avoid SETTING menu. This is at :http://www.panasonic....

Vhs-c Camcorder
Page 19
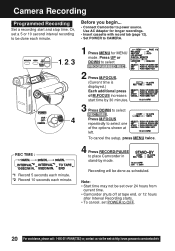
...to exit. Note: • Use Manual Easy Edit (left in Camcorder. Basic Operation Camera Recording Before you want to continue recording. Press UP or DOWN to select STAND-BY RELEASE . 3 Press M.FOCUS to rewind a few seconds of tape. B a Press (REWIND/SEARCH) to select ON or OFF. ...cassette in RECORD/PAUSE mode for MENU mode. Manual Easy Editing For proper continuity when taping from Stop mode or after attaching a new Battery. c Press (PLAY/STILL) where you begin... • Connect Camcorder to CAMERA. Stand-by Quick Release is resumed. 19 b Set POWER to stop ...
...to exit. Note: • Use Manual Easy Edit (left in Camcorder. Basic Operation Camera Recording Before you want to continue recording. Press UP or DOWN to select STAND-BY RELEASE . 3 Press M.FOCUS to rewind a few seconds of tape. B a Press (REWIND/SEARCH) to select ON or OFF. ...cassette in RECORD/PAUSE mode for MENU mode. Manual Easy Editing For proper continuity when taping from Stop mode or after attaching a new Battery. c Press (PLAY/STILL) where you begin... • Connect Camcorder to CAMERA. Stand-by Quick Release is resumed. 19 b Set POWER to stop ...
Vhs-c Camcorder
Page 20
...M.FOCUS. (Current time is displayed.) Each additional press of the options shown at :http://www.panasonic.com/contactinfo Note: • Start time may not be set over 24 hours from current time. • Camcorder shuts off at tape end, or 12 hours after Interval Recording starts. • To cancel, set a 5 or...minute. *2 Record 10 seconds each minute. Recording will be done each minute. To cancel the setup, press MENU twice. 4 Press RECORD/PAUSE to place Camcorder in stand-by 30 minutes. 3 Press DOWN to OFF. 20 For assistance, please call : 1-800-211-PANA(7262) or, contact us via the ...
...M.FOCUS. (Current time is displayed.) Each additional press of the options shown at :http://www.panasonic.com/contactinfo Note: • Start time may not be set over 24 hours from current time. • Camcorder shuts off at tape end, or 12 hours after Interval Recording starts. • To cancel, set a 5 or...minute. *2 Record 10 seconds each minute. Recording will be done each minute. To cancel the setup, press MENU twice. 4 Press RECORD/PAUSE to place Camcorder in stand-by 30 minutes. 3 Press DOWN to OFF. 20 For assistance, please call : 1-800-211-PANA(7262) or, contact us via the ...
Vhs-c Camcorder
Page 21
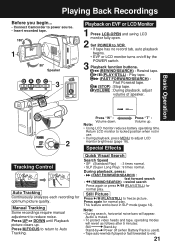
... or LCD Monitor 1 Press LCD-OPEN and swing LCD monitor fully open. 2 Set POWER to Auto Tracking. Playing Back Recordings Before you begin... • Connect Camcorder to power source. • Insert recorded tape. 1 Speaker 3 D A B C E Playback on /off by Power off (when Battery Pack is muted. • To protect video heads and...
... or LCD Monitor 1 Press LCD-OPEN and swing LCD monitor fully open. 2 Set POWER to Auto Tracking. Playing Back Recordings Before you begin... • Connect Camcorder to power source. • Insert recorded tape. 1 Speaker 3 D A B C E Playback on /off by Power off (when Battery Pack is muted. • To protect video heads and...
Vhs-c Camcorder
Page 22
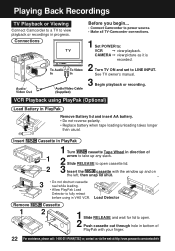
...in PlayPak 1 Turn cassette Tape Wheel in direction of 1...AA battery. • Do not reverse polarity. • Replace battery when tape loading/unloading takes longer than usual. CAMERA © view picture as it is... playback or recordings in VHS VCR. Playing Back Recordings TV Playback or Viewing Connect Camcorder to a TV to LINE INPUT. See TV owner's manual. 3 Begin playback ...view playback. Connections Audio/ Video Out Before you begin... • Connect Camcorder to power source. • Make all TV-Camcorder connections. 1 Set POWER to open cassette lid. 2 3 Insert the ...
...in PlayPak 1 Turn cassette Tape Wheel in direction of 1...AA battery. • Do not reverse polarity. • Replace battery when tape loading/unloading takes longer than usual. CAMERA © view picture as it is... playback or recordings in VHS VCR. Playing Back Recordings TV Playback or Viewing Connect Camcorder to a TV to LINE INPUT. See TV owner's manual. 3 Begin playback ...view playback. Connections Audio/ Video Out Before you begin... • Connect Camcorder to power source. • Make all TV-Camcorder connections. 1 Set POWER to open cassette lid. 2 3 Insert the ...
Vhs-c Camcorder
Page 23
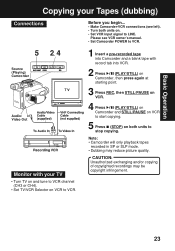
... TV • Turn TV on and tune to VCR channel (CH3 or CH4). • Set TV/VCR Selector on VCR to VCR. 1 Insert a pre-recorded tape into VCR. 2 Press (PLAY/STILL) on Camcorder, then press again at starting point. 3 Press REC, then STILL/PAUSE on VCR. 4 Press (PLAY/STILL) on...
... TV • Turn TV on and tune to VCR channel (CH3 or CH4). • Set TV/VCR Selector on VCR to VCR. 1 Insert a pre-recorded tape into VCR. 2 Press (PLAY/STILL) on Camcorder, then press again at starting point. 3 Press REC, then STILL/PAUSE on VCR. 4 Press (PLAY/STILL) on...

Vhs-c Camcorder
Page 32
... DISPLAY SET . 3 Press M.FOCUS for DISPLAY SET menu. Viewfinder/LCD Monitor Indications Tape remaining and battery charge level can be displayed. 2, 3, 4, 5, 6 1 Battery Remaining: Tape Remaining: Before you begin... • Connect Camcorder to power source. 1 Set POWER to CAMERA. 2 Press MENU for MODE SELECT ...M.FOCUS repeatedly to select the following displays. Press UP or DOWN to exit. • Tape remaining indicator operates a few seconds after tape starts moving. 32 For assistance, please call : 1-800-211-PANA(7262) or, contact us via the web at:http://www.panasonic.com/contactinfo
... DISPLAY SET . 3 Press M.FOCUS for DISPLAY SET menu. Viewfinder/LCD Monitor Indications Tape remaining and battery charge level can be displayed. 2, 3, 4, 5, 6 1 Battery Remaining: Tape Remaining: Before you begin... • Connect Camcorder to power source. 1 Set POWER to CAMERA. 2 Press MENU for MODE SELECT ...M.FOCUS repeatedly to select the following displays. Press UP or DOWN to exit. • Tape remaining indicator operates a few seconds after tape starts moving. 32 For assistance, please call : 1-800-211-PANA(7262) or, contact us via the web at:http://www.panasonic.com/contactinfo
Vhs-c Camcorder
Page 34
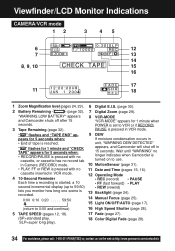
... 18 Color Digital Fade (page 28). 34 For assistance, please call : 1-800-211-PANA(7262) or, contact us via the web at:http://www.panasonic.com/contactinfo Viewfinder/LCD Monitor Indications CAMERA/VCR mode 12 3 45 6 12 7 13 14 8, 9, 10 15 16 17 11 18 1 Zoom Magnification ... 2 Battery Remaining (page 32). 7 Digital Zoom (page 29). Wait until "WARNING" no longer indicates when Camcorder is pressed with no cassette, or cassette has no 11 Date and Time (pages 15, 16). in • End of tape is recorded. 0:00 0:10 0:20 . . . . . 59:50 13 Backlight (page 24). 14...
... 18 Color Digital Fade (page 28). 34 For assistance, please call : 1-800-211-PANA(7262) or, contact us via the web at:http://www.panasonic.com/contactinfo Viewfinder/LCD Monitor Indications CAMERA/VCR mode 12 3 45 6 12 7 13 14 8, 9, 10 15 16 17 11 18 1 Zoom Magnification ... 2 Battery Remaining (page 32). 7 Digital Zoom (page 29). Wait until "WARNING" no longer indicates when Camcorder is pressed with no cassette, or cassette has no 11 Date and Time (pages 15, 16). in • End of tape is recorded. 0:00 0:10 0:20 . . . . . 59:50 13 Backlight (page 24). 14...
Vhs-c Camcorder
Page 40
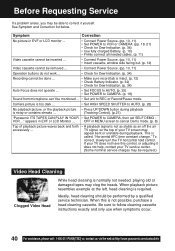
...; Check for Dew Indication. (p. 34) • Use fully charged Battery. (p. 10) • Firmly connect all needed , playing old or damaged tapes may appear bent or unstable during playback is too dark ... • Set HIGH SPEED SHUTTER to follow cleaning cassette instructions exactly and only use when... qualified service technician. See Symptom and Correction list below. Camera picture is noisy or contains streaks ... (Tracking Control). (p.21) "Panasonic ITS TAPES CAN PLAY IN YOUR • Set POWER to REC or Record/Pause mode. When playback picture resembles example at :http://www...
...; Check for Dew Indication. (p. 34) • Use fully charged Battery. (p. 10) • Firmly connect all needed , playing old or damaged tapes may appear bent or unstable during playback is too dark ... • Set HIGH SPEED SHUTTER to follow cleaning cassette instructions exactly and only use when... qualified service technician. See Symptom and Correction list below. Camera picture is noisy or contains streaks ... (Tracking Control). (p.21) "Panasonic ITS TAPES CAN PLAY IN YOUR • Set POWER to REC or Record/Pause mode. When playback picture resembles example at :http://www...
Vhs-c Camcorder
Page 42
...ARE NOT COVERED BY THIS LIMITED WARRANTY ARE YOUR RESPONSIBILITY. 42 For assistance, please call Panasonic Sales Company (787)-750-4300 or fax (787)-768-2910. The decision to repair or... item) Ten (10) Days Not Applicable Carry-In or Mail-In 1-800-211-PANA(7262) Tape (in exchange for Five (5) Days defective item) Not Applicable Carry-In or Mail-In 1-800-211...standard 4:3 pictures on the chart below, which result from state to state. Product Parts Labor Service Contact Number Camcorder One (1) Year (except CCD Ninety (90) Days Image Sensor) Carry-In or Mail-In CCD Image Sensor...
...ARE NOT COVERED BY THIS LIMITED WARRANTY ARE YOUR RESPONSIBILITY. 42 For assistance, please call Panasonic Sales Company (787)-750-4300 or fax (787)-768-2910. The decision to repair or... item) Ten (10) Days Not Applicable Carry-In or Mail-In 1-800-211-PANA(7262) Tape (in exchange for Five (5) Days defective item) Not Applicable Carry-In or Mail-In 1-800-211...standard 4:3 pictures on the chart below, which result from state to state. Product Parts Labor Service Contact Number Camcorder One (1) Year (except CCD Ninety (90) Days Image Sensor) Carry-In or Mail-In CCD Image Sensor...
Vhs-c Camcorder
Page 44
...21, 25 V VHF Connecting Cable .. 23 Video Cassettes (tapes) . 12 Video Head Cleaning ..... 40 Viewfinder/LCD Monitor Indications 32~34 Viewing (TV/VCR 22 VISION ADJUSTMENT .. 18 VOLUME 21 Z Zoom 24, 29 Panasonic Consumer Electronics Company, Division of Matsushita Electric Corporation of America One... Panasonic Way Secaucus, New Jersey 07094 P Panasonic Sales Company ("PSC"), Division of Matsushita Electric of Puerto Rico, Inc....
...21, 25 V VHF Connecting Cable .. 23 Video Cassettes (tapes) . 12 Video Head Cleaning ..... 40 Viewfinder/LCD Monitor Indications 32~34 Viewing (TV/VCR 22 VISION ADJUSTMENT .. 18 VOLUME 21 Z Zoom 24, 29 Panasonic Consumer Electronics Company, Division of Matsushita Electric Corporation of America One... Panasonic Way Secaucus, New Jersey 07094 P Panasonic Sales Company ("PSC"), Division of Matsushita Electric of Puerto Rico, Inc....


