
Vhs-c Camcorder
Page 2
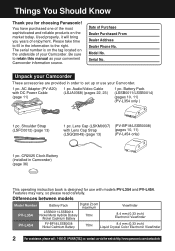
... at:http://www.panasonic.com/contactinfo Audio/Video Cable (LSJA0368) (pages 22, 23) 1 pc. Serial No. Battery Pack (LSSB0011/LSSB0014) (pages 10, 11) (PV-L354 only ) 1 pc. Please take time to fill in Camcorder) (page 36) This operating instruction book is on the tag located on the market today. CR2025 Clock Battery (installed in the information to set up or use with models PV-L354 and PV-L454. Model No. You...
... at:http://www.panasonic.com/contactinfo Audio/Video Cable (LSJA0368) (pages 22, 23) 1 pc. Serial No. Battery Pack (LSSB0011/LSSB0014) (pages 10, 11) (PV-L354 only ) 1 pc. Please take time to fill in Camcorder) (page 36) This operating instruction book is on the tag located on the market today. CR2025 Clock Battery (installed in the information to set up or use with models PV-L354 and PV-L454. Model No. You...
Vhs-c Camcorder
Page 3
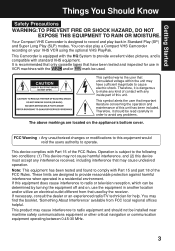
...changes or modifications to provide excellent video pictures, and is recommended that only cassette tapes that uninsulated voltage within the unit may cause undesired operation. This device complies with any kind of contact with Part 15 of this equipment would void the users authority to record and play a Compact VHS Camcorder recording on your VHS VCR using...offices helpful. This product may find the booklet, 'Something About Interference' available from that important literature concerning the operation and maintenance of the FCC Rules. Therefore, it should be installed ...
...changes or modifications to provide excellent video pictures, and is recommended that only cassette tapes that uninsulated voltage within the unit may cause undesired operation. This device complies with any kind of contact with Part 15 of this equipment would void the users authority to record and play a Compact VHS Camcorder recording on your VHS VCR using...offices helpful. This product may find the booklet, 'Something About Interference' available from that important literature concerning the operation and maintenance of the FCC Rules. Therefore, it should be installed ...
Vhs-c Camcorder
Page 5
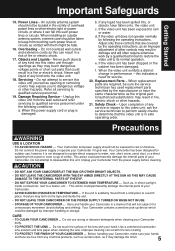
... connect the power supply or operate your Camcorder in a manner that could be sure the service technician has used replacement parts specified by the manufacturer or have fallen onto, the video unit. Store and handle your Camcorder if it may touch dangerous voltage points or short out parts that will often require extensive work by the operating instructions, as opening or removing covers may result in direct...
... connect the power supply or operate your Camcorder in a manner that could be sure the service technician has used replacement parts specified by the manufacturer or have fallen onto, the video unit. Store and handle your Camcorder if it may touch dangerous voltage points or short out parts that will often require extensive work by the operating instructions, as opening or removing covers may result in direct...

Vhs-c Camcorder
Page 6
... Straps, Lens Cap 13 Using MENU Mode 14 Setting the Clock (Time Zone, Auto Daylight Saving Time 15~16 AccuBrite™ Built-in Light (Using the Light, Replacing the Bulb 17 Camera Recording (Basic, Stand-by, Programmed Recording 18~20 Playing Back Recordings (Basic Playback, Visual Search, Still Picture, Tracking, TV/VCR Playback 21~22 Copying your Tapes (dubbing 23 Four-Speed Power Zoom 24 Backlight ...24 Focus (Auto/Manual Focus 25 High Speed Shutter (Auto/Manual Shutter 26 Auto Fade ...27 Color Digital Fade 28 Digital Zoom ...29 Digital Electronic Image Stabilization...
... Straps, Lens Cap 13 Using MENU Mode 14 Setting the Clock (Time Zone, Auto Daylight Saving Time 15~16 AccuBrite™ Built-in Light (Using the Light, Replacing the Bulb 17 Camera Recording (Basic, Stand-by, Programmed Recording 18~20 Playing Back Recordings (Basic Playback, Visual Search, Still Picture, Tracking, TV/VCR Playback 21~22 Copying your Tapes (dubbing 23 Four-Speed Power Zoom 24 Backlight ...24 Focus (Auto/Manual Focus 25 High Speed Shutter (Auto/Manual Shutter 26 Auto Fade ...27 Color Digital Fade 28 Digital Zoom ...29 Digital Electronic Image Stabilization...
Vhs-c Camcorder
Page 8
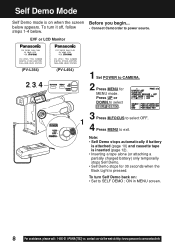
... turn Self Demo back on when the screen Before you begin... Note: • Self Demo stops automatically if battery is attached (page 10) and cassette tape is inserted (page 12). • Inserting a tape alone (or attaching a partially charged battery) only temporarily stops Self Demo. • Self Demo stops for MENU mode. EVF or LCD Monitor (PV-L354) 2, 3, 4 (PV-L454) 1 Set POWER to exit. Self Demo Mode Self Demo mode is pressed. To turn it off, follow • Connect Camcorder to...
... turn Self Demo back on when the screen Before you begin... Note: • Self Demo stops automatically if battery is attached (page 10) and cassette tape is inserted (page 12). • Inserting a tape alone (or attaching a partially charged battery) only temporarily stops Self Demo. • Self Demo stops for MENU mode. EVF or LCD Monitor (PV-L354) 2, 3, 4 (PV-L454) 1 Set POWER to exit. Self Demo Mode Self Demo mode is pressed. To turn it off, follow • Connect Camcorder to...

Vhs-c Camcorder
Page 9
Getting Started Quick Operation Guide Charging the Battery Pack Charge Battery Pack fully before operation (page 10). 1 Plug in AC Adaptor. 2 Insert Battery. Insert Cassette 1Attach fully charged Battery (page 10). 2Slide TAPE EJECT to open and adjust the angle. 2 Set POWER to VCR. 3 Press (REWIND/SEARCH) to rewind tape. 4 Press (PLAY/STILL) to stop playback. 9 Swing it fully open and adjust the angle. 2 Set POWER to CAMERA. 3 Press RECORD/PAUSE to start playback. 5 Press (STOP) to start recording. CHARGE Lamp flashes, then stays lit when charging is...
Getting Started Quick Operation Guide Charging the Battery Pack Charge Battery Pack fully before operation (page 10). 1 Plug in AC Adaptor. 2 Insert Battery. Insert Cassette 1Attach fully charged Battery (page 10). 2Slide TAPE EJECT to open and adjust the angle. 2 Set POWER to VCR. 3 Press (REWIND/SEARCH) to rewind tape. 4 Press (PLAY/STILL) to stop playback. 9 Swing it fully open and adjust the angle. 2 Set POWER to CAMERA. 3 Press RECORD/PAUSE to start playback. 5 Press (STOP) to start recording. CHARGE Lamp flashes, then stays lit when charging is...

Vhs-c Camcorder
Page 10
....panasonic.com/contactinfo B Press Battery down and slide in Light decreases operating time. Note: • Charging takes about 4 hours (PV-L354) or about 7.5 hours (PV-L454) when Battery Refresh is used . b Press and snap into top of mounting a surface. POWER Lamp lights. 2 Insert Battery. A fully charged Battery provides a maximum of about 1 hour (PV-L354) or 2 hours (PV-L454) of continuous use (LCD monitor off . Using the Built-in direction of arrow. Charging the Battery Pack Charge Battery...
....panasonic.com/contactinfo B Press Battery down and slide in Light decreases operating time. Note: • Charging takes about 4 hours (PV-L354) or about 7.5 hours (PV-L454) when Battery Refresh is used . b Press and snap into top of mounting a surface. POWER Lamp lights. 2 Insert Battery. A fully charged Battery provides a maximum of about 1 hour (PV-L354) or 2 hours (PV-L454) of continuous use (LCD monitor off . Using the Built-in direction of arrow. Charging the Battery Pack Charge Battery...
Vhs-c Camcorder
Page 11
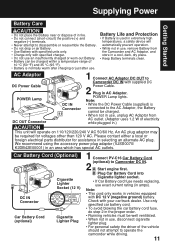
... V (negative ground) battery. B Plug Car Battery Cord into Cigarette lighter socket. • If Car Battery cord fuse needs replacing, use , unplug AC Adaptor from the Camcorder and AC Adaptor, and store in a cool, dark, dry place. • Keep Battery terminals clean. Supplying Power Getting Started Battery Care CAUTION • Do not place the Battery near or dispose of in fire. • Do not connect (short-circuit...
... V (negative ground) battery. B Plug Car Battery Cord into Cigarette lighter socket. • If Car Battery cord fuse needs replacing, use , unplug AC Adaptor from the Camcorder and AC Adaptor, and store in a cool, dark, dry place. • Keep Battery terminals clean. Supplying Power Getting Started Battery Care CAUTION • Do not place the Battery near or dispose of in fire. • Do not connect (short-circuit...

Vhs-c Camcorder
Page 12
... Long Play) 1 hour 1 hour 30 minutes 2 hours • SLP playback may contain more picture noise. Record/Playback Time Use tapes with adhesive tape. (Or, slide tab closed.) 12 For assistance, please call : 1-800-211-PANA(7262) or, contact us via the web at:http://www.panasonic.com/contactinfo Erase Protection Tab Protects tapes from being accidentally erased. 1 2 Slide tab type 1 To prevent accidental erasing, break...
... Long Play) 1 hour 1 hour 30 minutes 2 hours • SLP playback may contain more picture noise. Record/Playback Time Use tapes with adhesive tape. (Or, slide tab closed.) 12 For assistance, please call : 1-800-211-PANA(7262) or, contact us via the web at:http://www.panasonic.com/contactinfo Erase Protection Tab Protects tapes from being accidentally erased. 1 2 Slide tab type 1 To prevent accidental erasing, break...
Vhs-c Camcorder
Page 14
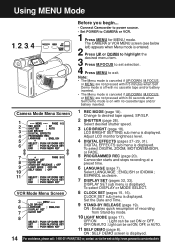
...). Camera Mode Menu Screen 1 REC MODE (page 18). Set the Date and Time. 9 STAND-BY RELEASE (page 19). Change to exit. CLOCK SET sub menu is displayed. VCR Mode Menu Screen 3 6 7 8 8 CLOCK SET (pages 15, 16). OFF/ON/AUTO : Light can be set ON or OFF. Using MENU Mode 1, 2, 3, 4 Before you begin... • Connect Camcorder to power source. • Set POWER to highlight the 3 desired menu item. ON : SELF DEMO screen is displayed. To select DISPLAY or MODE SELECT. Select desired shutter speed. 2 3 LCD BRIGHT (page 18). 3 LCD BRIGHT SETTING...
...). Camera Mode Menu Screen 1 REC MODE (page 18). Set the Date and Time. 9 STAND-BY RELEASE (page 19). Change to exit. CLOCK SET sub menu is displayed. VCR Mode Menu Screen 3 6 7 8 8 CLOCK SET (pages 15, 16). OFF/ON/AUTO : Light can be set ON or OFF. Using MENU Mode 1, 2, 3, 4 Before you begin... • Connect Camcorder to power source. • Set POWER to highlight the 3 desired menu item. ON : SELF DEMO screen is displayed. To select DISPLAY or MODE SELECT. Select desired shutter speed. 2 3 LCD BRIGHT (page 18). 3 LCD BRIGHT SETTING...

Vhs-c Camcorder
Page 16
... M.FOCUS is not observed in your area, set to OFF by doing the following. Note: • Auto DST does not function if time zone is preset to DEC 31, 2099. Repeat for minute, month, day, and year. The Camcorder is set to Hawaii or Samoa (see "Setting Date and Time" (below). 3b Auto Daylight Saving Time Clock will auto-adjust to fix. Setting the Clock 3a Setting the Time...
... M.FOCUS is not observed in your area, set to OFF by doing the following. Note: • Auto DST does not function if time zone is preset to DEC 31, 2099. Repeat for minute, month, day, and year. The Camcorder is set to Hawaii or Samoa (see "Setting Date and Time" (below). 3b Auto Daylight Saving Time Clock will auto-adjust to fix. Setting the Clock 3a Setting the Time...
Vhs-c Camcorder
Page 17
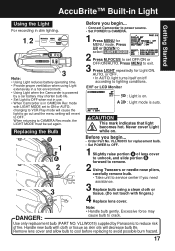
... bulb gently. Use only replacement bulb (PART NO. EVF or LCD Monitor A : Light is in CAMERA Rec mode with LIGHT MODE set to ON or AUTO, changing to VCR Play mode will cause the light to go out and the menu setting will decrease bulb life. Handle new bulb with fingers.) 4 Replace lens cover. Replacing the Bulb B 1 A 2 3 Before you need assistance. 3 Replace bulb using Light extensively in a hot environment. • Using Light when the Camcorder is powered by Panasonic to reduce...
... bulb gently. Use only replacement bulb (PART NO. EVF or LCD Monitor A : Light is in CAMERA Rec mode with LIGHT MODE set to ON or AUTO, changing to VCR Play mode will cause the light to go out and the menu setting will decrease bulb life. Handle new bulb with fingers.) 4 Replace lens cover. Replacing the Bulb B 1 A 2 3 Before you need assistance. 3 Replace bulb using Light extensively in a hot environment. • Using Light when the Camcorder is powered by Panasonic to reduce...

Vhs-c Camcorder
Page 19
... within 24 hours. Press RECORD/ PAUSE to record. 4 Press MENU to review recording. b Press (PLAY/STILL) to exit. Stand-by pressing RECORD/ PAUSE two times. Press UP or DOWN to select STAND-BY RELEASE . 3 Press M.FOCUS to VCR. Easy Edit Stand-by For a smooth transition between scenes if recording is set to CAMERA. b Set POWER to OFF and leave cassette in RECORD/PAUSE mode for MENU mode. Note: • Use Manual Easy Edit (left in...
... within 24 hours. Press RECORD/ PAUSE to record. 4 Press MENU to review recording. b Press (PLAY/STILL) to exit. Stand-by pressing RECORD/ PAUSE two times. Press UP or DOWN to select STAND-BY RELEASE . 3 Press M.FOCUS to VCR. Easy Edit Stand-by For a smooth transition between scenes if recording is set to CAMERA. b Set POWER to OFF and leave cassette in RECORD/PAUSE mode for MENU mode. Note: • Use Manual Easy Edit (left in...
Vhs-c Camcorder
Page 20
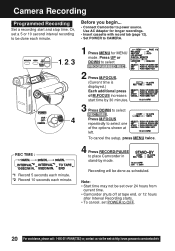
... set over 24 hours from current time. • Camcorder shuts off at tape end, or 12 hours after Interval Recording starts. • To cancel, set a 5 or 10 second interval recording to CAMERA. REC TIME : 1, 2, 3 4 1 Press MENU for longer recordings. • Insert cassette with record tab (page 12). • Set POWER to be done as scheduled. Before you begin... • Connect Camcorder to select one of M.FOCUS increases start and stop time...
... set over 24 hours from current time. • Camcorder shuts off at tape end, or 12 hours after Interval Recording starts. • To cancel, set a 5 or 10 second interval recording to CAMERA. REC TIME : 1, 2, 3 4 1 Press MENU for longer recordings. • Insert cassette with record tab (page 12). • Set POWER to be done as scheduled. Before you begin... • Connect Camcorder to select one of M.FOCUS increases start and stop time...
Vhs-c Camcorder
Page 21
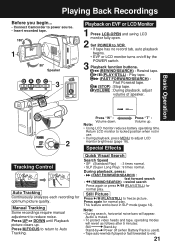
... VCR. • If tape has no record tab, auto playback begins. • EVF or LCD monitor turns on EVF or LCD Monitor 1 Press LCD-OPEN and swing LCD monitor fully open. 2 Set POWER to end. 21 C (FAST FORWARD/SEARCH) : Fast Forward tape. Press again for normal play . A (REWIND/SEARCH) : Rewind tape. Note: • Using LCD monitor reduces battery operating time. Quick Visual Search Search Speed • SP (Standard Play) : 3 times normal. • SLP (Super Long Play) : 9 times normal. Volume...
... VCR. • If tape has no record tab, auto playback begins. • EVF or LCD monitor turns on EVF or LCD Monitor 1 Press LCD-OPEN and swing LCD monitor fully open. 2 Set POWER to end. 21 C (FAST FORWARD/SEARCH) : Fast Forward tape. Press again for normal play . A (REWIND/SEARCH) : Rewind tape. Note: • Using LCD monitor reduces battery operating time. Quick Visual Search Search Speed • SP (Standard Play) : 3 times normal. • SLP (Super Long Play) : 9 times normal. Volume...
Vhs-c Camcorder
Page 23
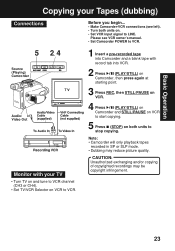
... and/or copying of copyrighted recordings may reduce picture quality. Please see VCR owner's manual. • Set Camcorder POWER to VCR. 5 2, 4 Source (Playing) Camcorder Audio/ Video Out Monitor with your Tapes (dubbing) Connections Before you begin... • Make Camcorder-VCR connections (see left). • Turn both units on both units to LINE. Note: • Camcorder will only playback tapes recorded in SP or SLP mode. • Dubbing may be copyright infringement. 23 Basic Operation Copying your TV...
... and/or copying of copyrighted recordings may reduce picture quality. Please see VCR owner's manual. • Set Camcorder POWER to VCR. 5 2, 4 Source (Playing) Camcorder Audio/ Video Out Monitor with your Tapes (dubbing) Connections Before you begin... • Make Camcorder-VCR connections (see left). • Turn both units on both units to LINE. Note: • Camcorder will only playback tapes recorded in SP or SLP mode. • Dubbing may be copyright infringement. 23 Basic Operation Copying your TV...
Vhs-c Camcorder
Page 34
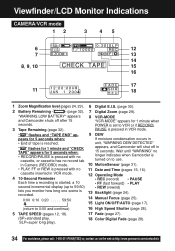
...). 14 Manual Focus (page 25). 15 Light ON/OFF/AUTO (page 17). (return to use. " " flashes and "TAPE END" ap- 9 DEW pears for 1 minute when POWER is set to VCR or if RECORD/ PAUSE is reached. Wait until "WARNING" no longer indicates when Camcorder is pressed with no cassette, or cassette has no 11 Date and Time (pages 15, 16). unit, "WARNING DEW DETECTED" " " flashes for 1 minute and "CHECK TAPE...
...). 14 Manual Focus (page 25). 15 Light ON/OFF/AUTO (page 17). (return to use. " " flashes and "TAPE END" ap- 9 DEW pears for 1 minute when POWER is set to VCR or if RECORD/ PAUSE is reached. Wait until "WARNING" no longer indicates when Camcorder is pressed with no cassette, or cassette has no 11 Date and Time (pages 15, 16). unit, "WARNING DEW DETECTED" " " flashes for 1 minute and "CHECK TAPE...
Vhs-c Camcorder
Page 40
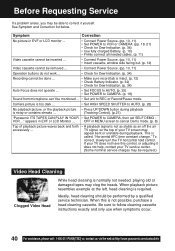
... not needed cables. (p. 11) Video cassette cannot be inserted ... • Connect Power Source. (pp. 10, 11) • Insert cassette, window side facing out. (p. 12) Video cassette cannot be removed ... • Connect Power Source. (pp. 10, 11) Operation buttons do not work ... • Check for Dew Indication. (p. 34) Auto Focus does not operate ... • Set FOCUS to AUTO. (p. 25) • Set POWER to CAMERA. (p. 18) Sound from microphone can't be monitored ... • Set unit to REC or Record/Pause mode. Be sure to follow cleaning cassette instructions...
... not needed cables. (p. 11) Video cassette cannot be inserted ... • Connect Power Source. (pp. 10, 11) • Insert cassette, window side facing out. (p. 12) Video cassette cannot be removed ... • Connect Power Source. (pp. 10, 11) Operation buttons do not work ... • Check for Dew Indication. (p. 34) Auto Focus does not operate ... • Set FOCUS to AUTO. (p. 25) • Set POWER to CAMERA. (p. 18) Sound from microphone can't be monitored ... • Set unit to REC or Record/Pause mode. Be sure to follow cleaning cassette instructions...
Vhs-c Camcorder
Page 42
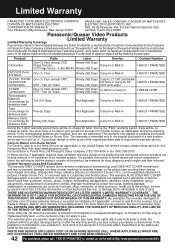
... removed for lost time, cost of having someone remove or re-install an installed unit if applicable, or travel to and from the servicer, loss of media or images, data or other memory or recorded content. Product Parts Labor Service Contact Number Camcorder One (1) Year (except CCD Ninety (90) Days Image Sensor) Carry-In or Mail-In CCD Image Sensor - 6 (Six) Months Ninety (90) Days 1-800-211-PANA(7262) DVD/VCR...
... removed for lost time, cost of having someone remove or re-install an installed unit if applicable, or travel to and from the servicer, loss of media or images, data or other memory or recorded content. Product Parts Labor Service Contact Number Camcorder One (1) Year (except CCD Ninety (90) Days Image Sensor) Carry-In or Mail-In CCD Image Sensor - 6 (Six) Months Ninety (90) Days 1-800-211-PANA(7262) DVD/VCR...
Vhs-c Camcorder
Page 44
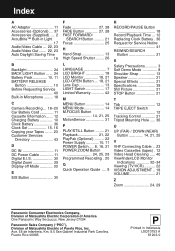
... POWER ZOOM Button 24, 25, 29 Programmed Recording . 20 Q Quick Operation Guide .... 9 R RECORD/PAUSE Button 18 Record/Playback Time ... 12 Replacing Clock Battery . 36 Request for Service Notice 41 REWIND/SEARCH Button 21 S Safety Precautions 3 Self Demo Mode 8 Shoulder Strap 13 Speaker 21 Special Effects 21 Specifications 39 Still Picture 21 STOP Button 21 T Tab 12 TAPE EJECT Switch 12 Tracking Control 21 Tripod Mounting Hole ..... 36 U UP (FAR) / DOWN (NEAR) Button 14, 21, 25 V VHF Connecting Cable .. 23 Video Cassettes (tapes) . 12 Video Head Cleaning...
... POWER ZOOM Button 24, 25, 29 Programmed Recording . 20 Q Quick Operation Guide .... 9 R RECORD/PAUSE Button 18 Record/Playback Time ... 12 Replacing Clock Battery . 36 Request for Service Notice 41 REWIND/SEARCH Button 21 S Safety Precautions 3 Self Demo Mode 8 Shoulder Strap 13 Speaker 21 Special Effects 21 Specifications 39 Still Picture 21 STOP Button 21 T Tab 12 TAPE EJECT Switch 12 Tracking Control 21 Tripod Mounting Hole ..... 36 U UP (FAR) / DOWN (NEAR) Button 14, 21, 25 V VHF Connecting Cable .. 23 Video Cassettes (tapes) . 12 Video Head Cleaning...


