
PTL200U User Guide
Page 1
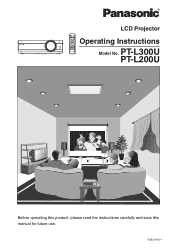
R LCD Projector POWER LIGHT INPUT VIDEO CMPNT PC COMPONENT KEYSTONE MENU ENTER NORMAL FREEZE MODE MEMORY ASPECT PICTURE USER MUTE VOLUME SD SD MENU TIME LCD PROJECTOR Operating Instructions Model No. PT-L300U PT-L200U Before operating this product, please read the instructions carefully and save this manual for future use. TQBJ 0120-1
R LCD Projector POWER LIGHT INPUT VIDEO CMPNT PC COMPONENT KEYSTONE MENU ENTER NORMAL FREEZE MODE MEMORY ASPECT PICTURE USER MUTE VOLUME SD SD MENU TIME LCD PROJECTOR Operating Instructions Model No. PT-L300U PT-L200U Before operating this product, please read the instructions carefully and save this manual for future use. TQBJ 0120-1
PTL200U User Guide
Page 4
... Operation Starting to use 22 Turning on the power 22 Turning off the power 23 On-screen menus 24 Menu screens 24 Menu operation guide 26 Unavailable on-screen menu items...26 Returning to the previous screen....26 Returning a setting to the factory default ...27 Using the freeze function 27 Correcting keystone distortion.......28 Setting the ASPECT 30 Selecting the picture mode 32 Using the shutter function 33 Changing the display language......33 Muting the sound 33 Adjusting the picture...
... Operation Starting to use 22 Turning on the power 22 Turning off the power 23 On-screen menus 24 Menu screens 24 Menu operation guide 26 Unavailable on-screen menu items...26 Returning to the previous screen....26 Returning a setting to the factory default ...27 Using the freeze function 27 Correcting keystone distortion.......28 Setting the ASPECT 30 Selecting the picture mode 32 Using the shutter function 33 Changing the display language......33 Muting the sound 33 Adjusting the picture...

PTL200U User Guide
Page 5
... into the lens. B If the installation location is emitted from the wall outlet. Installation work , please contact an Authorized Service Center. B Contact an Authorized Service Center for repairs. Do not overload the wall outlet. Clean the power cord plug regularly to take the full weight of the projector in this light, it in a place which can be carried out by using too many adapters), overheating may...
... into the lens. B If the installation location is emitted from the wall outlet. Installation work , please contact an Authorized Service Center. B Contact an Authorized Service Center for repairs. Do not overload the wall outlet. Clean the power cord plug regularly to take the full weight of the projector in this light, it in a place which can be carried out by using too many adapters), overheating may...

PTL200U User Guide
Page 9
Remote control unit (N2QAFA000002 x1) Video/Audio cable [3.0 AAA batteries for m (9´10˝), remote control unit (x2) K2KA2FA00001 x1] POWER LIGHT INPUT VIDEO CMPNT PC COMPONENT KEYSTONE MENU ENTER NORMAL FREEZE MODE MEMORY ASPECT PICTURE USER MUTE VOLUME SD SD MENU TIME LCD PROJECTOR Power cord Carrying bag (K2CG3FR00001 x 1) (TPEP008 x1) 9 Preparation Accessories Check that all of the accessories shown below have been included with your projector.
Remote control unit (N2QAFA000002 x1) Video/Audio cable [3.0 AAA batteries for m (9´10˝), remote control unit (x2) K2KA2FA00001 x1] POWER LIGHT INPUT VIDEO CMPNT PC COMPONENT KEYSTONE MENU ENTER NORMAL FREEZE MODE MEMORY ASPECT PICTURE USER MUTE VOLUME SD SD MENU TIME LCD PROJECTOR Power cord Carrying bag (K2CG3FR00001 x 1) (TPEP008 x1) 9 Preparation Accessories Check that all of the accessories shown below have been included with your projector.

PTL200U User Guide
Page 10
... the lens cover before moving the projector, use In order to get the best picture quality If outside light or light from fingerprints or anything else, this will be magnified and projected onto the screen. Cautions regarding setting-up Observe the following at high elevations (above 1400 m), set the FAN CONTROL to HIGH. (Refer to page 40.) Failure to observe this projector at all times when setting up the projector...
... the lens cover before moving the projector, use In order to get the best picture quality If outside light or light from fingerprints or anything else, this will be magnified and projected onto the screen. Cautions regarding setting-up Observe the following at high elevations (above 1400 m), set the FAN CONTROL to HIGH. (Refer to page 40.) Failure to observe this projector at all times when setting up the projector...

PTL200U User Guide
Page 12
MAIN POWER switch (pages 22 and 23) . Location and function of the projector. + Air filter (page 53) , Remote control signal receptor (page 17) - Press to adjust the angle of tilt of each part Projector &%$ # 0 /. ' - ' ( , + ) * # Speaker $ Zoom ring (page 23) % Focus ring (page 23) & Projection lens ' Air inlet ports Do not cover this port. ( Front adjustable legs(L/R) (page 22) ) Lens cover * Leg adjuster buttons(L/R) (page 22) This button is being accessed for reading or writing the data in the...
MAIN POWER switch (pages 22 and 23) . Location and function of the projector. + Air filter (page 53) , Remote control signal receptor (page 17) - Press to adjust the angle of tilt of each part Projector &%$ # 0 /. ' - ' ( , + ) * # Speaker $ Zoom ring (page 23) % Focus ring (page 23) & Projection lens ' Air inlet ports Do not cover this port. ( Front adjustable legs(L/R) (page 22) ) Lens cover * Leg adjuster buttons(L/R) (page 22) This button is being accessed for reading or writing the data in the...

PTL200U User Guide
Page 13
... projection of an image, the cooling fan will cause this company are given below. Preparation Projector $ # ' % & # Air outlet port Do not cover this port, otherwise burns or damage could result. $ Connector panel (page 16) % Power input socket (AC IN) (page 22) The accessory power cord is compatible with the Microsaver Security System from Kensington. B By using the OPTION menu to set "LAMP POWER" to LOW, the operating sound of the air...
... projection of an image, the cooling fan will cause this company are given below. Preparation Projector $ # ' % & # Air outlet port Do not cover this port, otherwise burns or damage could result. $ Connector panel (page 16) % Power input socket (AC IN) (page 22) The accessory power cord is compatible with the Microsaver Security System from Kensington. B By using the OPTION menu to set "LAMP POWER" to LOW, the operating sound of the air...

PTL200U User Guide
Page 14
..., the power supply will illuminate or flash. $ LAMP indicator (page 52) This indicator illuminates when it illuminates green when projection of an image begins. & POWER button (pages 22 and 23) ' MENU button (page 24) This button is used to accept and to display menu screens. POWER LIGHT INPUT VIDEO CMPNT PC COMPONENT KEYSTONE MENU ENTER NORMAL FREEZE MODE MEMORY ASPECT PICTURE USER MUTE VOLUME SD SD MENU TIME / * + 0 1 2 3 LCD PROJECTOR + 456 B The remote control unit and the projector itself have the same control buttons available. # TEMP indicator (page...
..., the power supply will illuminate or flash. $ LAMP indicator (page 52) This indicator illuminates when it illuminates green when projection of an image begins. & POWER button (pages 22 and 23) ' MENU button (page 24) This button is used to accept and to display menu screens. POWER LIGHT INPUT VIDEO CMPNT PC COMPONENT KEYSTONE MENU ENTER NORMAL FREEZE MODE MEMORY ASPECT PICTURE USER MUTE VOLUME SD SD MENU TIME / * + 0 1 2 3 LCD PROJECTOR + 456 B The remote control unit and the projector itself have the same control buttons available. # TEMP indicator (page...

PTL200U User Guide
Page 22
... MODE MEMORY ASPECT PICTURE USER MUTE VOLUME SD SD MENU TIME SD CARD *"DVI" is pressed. Starting to use Turning on the power Please ensure that all preparations have been completed before turning on the power. (Refer to pages 18 - 21.) # Remove the lens cover. $ Connect the accessory power cord. % Press the MAIN POWER switch to the "|" side to select the input signal. The power indicator on the projector will illuminate red. & Press the POWER button. The power indicator...
... MODE MEMORY ASPECT PICTURE USER MUTE VOLUME SD SD MENU TIME SD CARD *"DVI" is pressed. Starting to use Turning on the power Please ensure that all preparations have been completed before turning on the power. (Refer to pages 18 - 21.) # Remove the lens cover. $ Connect the accessory power cord. % Press the MAIN POWER switch to the "|" side to select the input signal. The power indicator on the projector will illuminate red. & Press the POWER button. The power indicator...

PTL200U User Guide
Page 23
... to switch off while the projector is being projected. (The power indicator on the projector will turn on straight away after a short period. (During this time, the power indicator on the projector will flash orange.) B When the projector is in any way cut power to the projector while the cooling fan is illuminated red), the projector will take some time to adjust the projected image focus and size. In such cases, the lamp unit will turn the power...
... to switch off while the projector is being projected. (The power indicator on the projector will turn on straight away after a short period. (During this time, the power indicator on the projector will flash orange.) B When the projector is in any way cut power to the projector while the cooling fan is illuminated red), the projector will take some time to adjust the projected image focus and size. In such cases, the lamp unit will turn the power...

PTL200U User Guide
Page 26
... the MENU button while the MAIN MENU screen is being input. Menu operation guide # Press the MENU button. If you press the MENU button while a menu screen is pressed. Returning to change or adjust the setting. Selected items will not work even if the ENTER button is being displayed, the display will turn green when any selective arrow or bar-scale, press the ENTER button. For items without any adjustment changes the setting from the factory set value. The menu screen...
... the MENU button while the MAIN MENU screen is being input. Menu operation guide # Press the MENU button. If you press the MENU button while a menu screen is pressed. Returning to change or adjust the setting. Selected items will not work even if the ENTER button is being displayed, the display will turn green when any selective arrow or bar-scale, press the ENTER button. For items without any adjustment changes the setting from the factory set value. The menu screen...

PTL200U User Guide
Page 29
.... For PT-L200U Vertical keystone distortion can be corrected by following procedures. # Use the KEYSTONE button to the previous screen. Press the Ibutton. $ Press the MENU button to return to obtain image balance. However, the greater the correction amount, the more the picture quality will deteriorate, and the harder it will also change when correction of keystone correction required is carried...
.... For PT-L200U Vertical keystone distortion can be corrected by following procedures. # Use the KEYSTONE button to the previous screen. Press the Ibutton. $ Press the MENU button to return to obtain image balance. However, the greater the correction amount, the more the picture quality will deteriorate, and the harder it will also change when correction of keystone correction required is carried...
PTL200U User Guide
Page 39
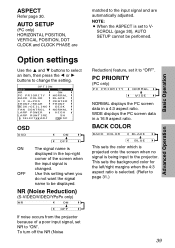
... signal name to page 31.) 39 Basic Operation Advanced Operation Option settings Use the F and G buttons to the projector. PC PRIORITY (PC only) PC PRIORITY NORMAL [ WIDE NORMAL displays the PC screen data in a 16:9 aspect ratio. This sets the background color for the left/right margins when the 4:3 aspect ratio is being input to select an item, then press the I N G DESK FAN CONTROL NORMAL LAMP POWER HIGH LAMP...
... signal name to page 31.) 39 Basic Operation Advanced Operation Option settings Use the F and G buttons to the projector. PC PRIORITY (PC only) PC PRIORITY NORMAL [ WIDE NORMAL displays the PC screen data in a 16:9 aspect ratio. This sets the background color for the left/right margins when the 4:3 aspect ratio is being input to select an item, then press the I N G DESK FAN CONTROL NORMAL LAMP POWER HIGH LAMP...

PTL200U User Guide
Page 43
... image data. Displaying the SD menu Press the SD button to change the display to the SD menu shown above). B If the SD menu is not displayed when the SD button is pressed, -press the SD MENU button repeatedly until it is displayed or -the previous menu screen or image on SD memory cards can be used to return to a previous screen (up to the SD CARD screen. PICTURE SLIDE SHOW VIDEO PICTURE...
... image data. Displaying the SD menu Press the SD button to change the display to the SD menu shown above). B If the SD menu is not displayed when the SD button is pressed, -press the SD MENU button repeatedly until it is displayed or -the previous menu screen or image on SD memory cards can be used to return to a previous screen (up to the SD CARD screen. PICTURE SLIDE SHOW VIDEO PICTURE...

PTL200U User Guide
Page 52
... LAMP POWER then contact an Remedy has been set to replace the lamp unit. B If the main power turns off the MAIN the operation time until the lamp unit POWER switch by following the nearing 1800 turning the power procedure given hours. (when back on again. LAMP indicator Indicator display Illuminated (red) It is turned on? B Does "REPLACE Possible cause LAMP" appear on the screen after the projector is nearly time to turn off the MAIN POWER switch by...
... LAMP POWER then contact an Remedy has been set to replace the lamp unit. B If the main power turns off the MAIN the operation time until the lamp unit POWER switch by following the nearing 1800 turning the power procedure given hours. (when back on again. LAMP indicator Indicator display Illuminated (red) It is turned on? B Does "REPLACE Possible cause LAMP" appear on the screen after the projector is nearly time to turn off the MAIN POWER switch by...

PTL200U User Guide
Page 53
.... Use a vacuum cleaner to replace the air filter. Others Air filter 53 Please consult your fingernails under the air filter and pull the air filter out of the projector. B If the dust cannot be drawn into the vacuum cleaner. ' Install the air filter. Cleaning and replacing the air filter If the air filter becomes clogged with dust, the internal temperature of the projector will rise, the TEMP indicator will flash and the projector power will turn the projector upside down. & Clean...
.... Use a vacuum cleaner to replace the air filter. Others Air filter 53 Please consult your fingernails under the air filter and pull the air filter out of the projector. B If the dust cannot be drawn into the vacuum cleaner. ' Install the air filter. Cleaning and replacing the air filter If the air filter becomes clogged with dust, the internal temperature of the projector will rise, the TEMP indicator will flash and the projector power will turn the projector upside down. & Clean...

PTL200U User Guide
Page 54
... usage hours explained above . If the LOW setting is not supplied with the product number indicated above are not slippery when using the screwdriver. Even when the full life of the bulb has not been exhausted, the brightness of the light will be less and life of the lamp will gradually decline. Replacing the lamp unit Warning The lamp unit should only be replaced by warranty...
... usage hours explained above . If the LOW setting is not supplied with the product number indicated above are not slippery when using the screwdriver. Even when the full life of the bulb has not been exhausted, the brightness of the light will be less and life of the lamp will gradually decline. Replacing the lamp unit Warning The lamp unit should only be replaced by warranty...

PTL200U User Guide
Page 55
... cover fixing screws at all, no matter standby mode. Lamp unit cover % Use a Phillips screwdriver to the procedure given in cleared at the bottom of the lamp unit and gently pull it out from the projector. On-screen display Lamp indicator warning light More than 1800 hours More than 2000 hours (The lamp will turn off the power" on page 23, and then disconnect the power cord plug from the wall outlet and check...
... cover fixing screws at all, no matter standby mode. Lamp unit cover % Use a Phillips screwdriver to the procedure given in cleared at the bottom of the lamp unit and gently pull it out from the projector. On-screen display Lamp indicator warning light More than 1800 hours More than 2000 hours (The lamp will turn off the power" on page 23, and then disconnect the power cord plug from the wall outlet and check...

PTL200U User Guide
Page 56
... COLOR BLACK 4:3 H-POS CENTER FRONT/REAR FRONT D E S K / C E I L I N G DESK FAN CONTROL NORMAL LAMP POWER HIGH TIME RESET [POWER OFF] SELECT ADJ ESC The "LAMP RUNTIME" will reset the cumulative usage time for the lamp unit to securely tighten the lamp unit cover fixing screws. NOTE: B If the MENU button is projected onto the screen. * Press the MENU button to display the MAIN MENU screen, and then press the F and G buttons to move the cursor to select "OPTION". ɹM E N U KEYSTONE PICTURE...
... COLOR BLACK 4:3 H-POS CENTER FRONT/REAR FRONT D E S K / C E I L I N G DESK FAN CONTROL NORMAL LAMP POWER HIGH TIME RESET [POWER OFF] SELECT ADJ ESC The "LAMP RUNTIME" will reset the cumulative usage time for the lamp unit to securely tighten the lamp unit cover fixing screws. NOTE: B If the MENU button is projected onto the screen. * Press the MENU button to display the MAIN MENU screen, and then press the F and G buttons to move the cursor to select "OPTION". ɹM E N U KEYSTONE PICTURE...

PTL200U User Guide
Page 57
B The MAIN POWER switch is connected to the lens. No picture appears. B TEMP indicator is illuminated or flashing. (Refer to page 51.) B LAMP indicator is fuzzy. B The video signal input source may not be at the minimum possible setting. (Refer to page 22.) B The BRIGHT adjustment setting may be heard. B The input selection setting may not be correct. (Refer to page 34.) The picture is illuminated or flashing. (Refer to the wall...
B The MAIN POWER switch is connected to the lens. No picture appears. B TEMP indicator is illuminated or flashing. (Refer to page 51.) B LAMP indicator is fuzzy. B The video signal input source may not be at the minimum possible setting. (Refer to page 22.) B The BRIGHT adjustment setting may be heard. B The input selection setting may not be correct. (Refer to page 34.) The picture is illuminated or flashing. (Refer to the wall...


