

Lcd Projector
Page 3
... RF Exposure Warning: (if provided with FCC radiation exposure limits set forth for help. This equipment has been approved for mobile operation and requires minimum 20 cm spacing be determined by Panasonic Corp. Declaration of Conformity Model Number: PT-FW300NTU/PT-FW300U Trade Name: Panasonic Responsible party: Panasonic Corporation of North America Address: One Panasonic Way, Secaucus, New Jersey 07094 Telephone number: (888...
... RF Exposure Warning: (if provided with FCC radiation exposure limits set forth for help. This equipment has been approved for mobile operation and requires minimum 20 cm spacing be determined by Panasonic Corp. Declaration of Conformity Model Number: PT-FW300NTU/PT-FW300U Trade Name: Panasonic Responsible party: Panasonic Corporation of North America Address: One Panasonic Way, Secaucus, New Jersey 07094 Telephone number: (888...

Lcd Projector
Page 5
... DISPLAY 44 TEXT CHANGE 44 MENU LOCK 45 MENU LOCK PASSWORD 45 CONTROL DEVICE SETUP 45 NETWORK menu 46 Items in NETWORK menu 46 TEMP, LAMP and FILTER Indicators 47 Managing the indicated problems 47 Care and Replacement 48 Cleaning the projector 48 Replacing the Lamp unit 48 Replacing the Auto Cleaning Filter (ACF 49 Troubleshooting 51 Appendix Technical Information 52 List of compatible signals 52 Serial terminal 53 Computer connection guidance 54 REMOTE terminal 55 DVI-D IN terminal 56 Ceiling mount bracket safeguards 56 Screen size...
... DISPLAY 44 TEXT CHANGE 44 MENU LOCK 45 MENU LOCK PASSWORD 45 CONTROL DEVICE SETUP 45 NETWORK menu 46 Items in NETWORK menu 46 TEMP, LAMP and FILTER Indicators 47 Managing the indicated problems 47 Care and Replacement 48 Cleaning the projector 48 Replacing the Lamp unit 48 Replacing the Auto Cleaning Filter (ACF 49 Troubleshooting 51 Appendix Technical Information 52 List of compatible signals 52 Serial terminal 53 Computer connection guidance 54 REMOTE terminal 55 DVI-D IN terminal 56 Ceiling mount bracket safeguards 56 Screen size...

Lcd Projector
Page 8
... or leak, and fire, injury or contamination of the lamp unit and check the inside the projector without being cleaned out, it may result. Use only the specified batteries. Keeping or leaving the remote control with operation. Using chemical treated wipes may be handled with regard to your dealer about the replacement of the battery compartment and surrounding area may cause...
... or leak, and fire, injury or contamination of the lamp unit and check the inside the projector without being cleaned out, it may result. Use only the specified batteries. Keeping or leaving the remote control with operation. Using chemical treated wipes may be handled with regard to your dealer about the replacement of the battery compartment and surrounding area may cause...

Lcd Projector
Page 9
... screen to be replaced in malfunctions or the life of the projector for more than 1 year. Display the white screen test pattern for more than an hour to safety Do not set the HIGH ALTITUDE MODE to ON. Especially the consecutive use In order to get the best picture quality Draw curtains or blinds over any windows and turn off any lights near motors. Furthermore, all installation work...
... screen to be replaced in malfunctions or the life of the projector for more than 1 year. Display the white screen test pattern for more than an hour to safety Do not set the HIGH ALTITUDE MODE to ON. Especially the consecutive use In order to get the best picture quality Draw curtains or blinds over any windows and turn off any lights near motors. Furthermore, all installation work...

Lcd Projector
Page 13
... 23) Burglar hook port Attach a commercial burglar prevention cable. COMPUTER AUDIO IN Connect audio cables for network connection. VIDEO IN Connect an RCA composite video cable. REMOTE See "REMOTE terminal" on page 55. Compatible with the Kensington MicroSaver Security System. Auto cleaning filter (ACF) compartment (page 49) Front leg adjusters Screw up/down to protect your projector. Selectable for inputting audio signal. S-VIDEO IN Connect a S-VIDEO signal cable. NOTE: • Do not cover the ventilation openings or place anything within...
... 23) Burglar hook port Attach a commercial burglar prevention cable. COMPUTER AUDIO IN Connect audio cables for network connection. VIDEO IN Connect an RCA composite video cable. REMOTE See "REMOTE terminal" on page 55. Compatible with the Kensington MicroSaver Security System. Auto cleaning filter (ACF) compartment (page 49) Front leg adjusters Screw up/down to protect your projector. Selectable for inputting audio signal. S-VIDEO IN Connect a S-VIDEO signal cable. NOTE: • Do not cover the ventilation openings or place anything within...
Lcd Projector
Page 14
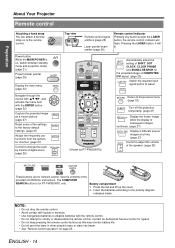
... for network control. Automatically adjust the setting of SHIFT, DOT CLOCK, CLOCK PHASE and SIGNAL SEARCH for the projected image of COMPUTER/ DVI signal. (page 25) Switch the required input signal button to select. (Shown as PT-FW300NTU) Return to the previous menu. (page 32) Turn off the projection temporarily. (page 27) Display the frozen image while the display of subsequent images continues. (page 27) Display 2 different source images at a time. (page 27) Control to...
... for network control. Automatically adjust the setting of SHIFT, DOT CLOCK, CLOCK PHASE and SIGNAL SEARCH for the projected image of COMPUTER/ DVI signal. (page 25) Switch the required input signal button to select. (Shown as PT-FW300NTU) Return to the previous menu. (page 32) Turn off the projection temporarily. (page 27) Display the frozen image while the display of subsequent images continues. (page 27) Display 2 different source images at a time. (page 27) Control to...

Lcd Projector
Page 19
... projector Read and follow the operating and connecting instructions of each peripheral device to be turned off. J LAN terminal ACT lamp (Green) Flashes when transmit data. LINK lamp (Yellow) Illuminates when a LAN cable (10 Base-T/100 Base-TX) is effective. The peripheral devices must be connected. Confirm the type of the LAN terminal. See "AUDIO SETTING" on page 52. Connecting example: Computers Computers Monitor Getting Started Audio system Computer for the LAN network connection...
... projector Read and follow the operating and connecting instructions of each peripheral device to be turned off. J LAN terminal ACT lamp (Green) Flashes when transmit data. LINK lamp (Yellow) Illuminates when a LAN cable (10 Base-T/100 Base-TX) is effective. The peripheral devices must be connected. Confirm the type of the LAN terminal. See "AUDIO SETTING" on page 52. Connecting example: Computers Computers Monitor Getting Started Audio system Computer for the LAN network connection...

Lcd Projector
Page 21
... internal lamp cooling fan keeps operating by switching off . 2. Switching the projector on function You can switch off the electric power supply any time by the internal power supply, it may damage the projector and/or the power cord. • Dirt or dust build-up along the side guide rail and remove. Make sure the shape of the projector match, then push the plug all the input devices are connected and turned...
... internal lamp cooling fan keeps operating by switching off . 2. Switching the projector on function You can switch off the electric power supply any time by the internal power supply, it may damage the projector and/or the power cord. • Dirt or dust build-up along the side guide rail and remove. Make sure the shape of the projector match, then push the plug all the input devices are connected and turned...
Lcd Projector
Page 22
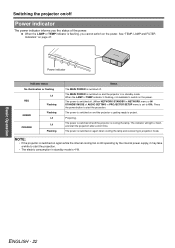
... fan is still operating by the internal power supply, it may take a while to start the projection. • The electric consumption in PROJECTOR SETUP menu is switched off Power indicator The power indicator informs you cannot switch on the power. Projecting. Power indicator Indicator status No illumination or flashing RED Lit Flashing GREEN ORANGE Flashing Lit Lit Flashing Status The MAIN POWER is set to ON). The power is switched off and the projector is flashing, not available to projection mode. When the LAMP or TEMP indicator is cooling the lamp. Switching...
... fan is still operating by the internal power supply, it may take a while to start the projection. • The electric consumption in PROJECTOR SETUP menu is switched off Power indicator The power indicator informs you cannot switch on the power. Projecting. Power indicator Indicator status No illumination or flashing RED Lit Flashing GREEN ORANGE Flashing Lit Lit Flashing Status The MAIN POWER is set to ON). The power is switched off and the projector is flashing, not available to projection mode. When the LAMP or TEMP indicator is cooling the lamp. Switching...

Lcd Projector
Page 23
... the power button. 3. It will start with connecting the power cord or switching on the back of the projector. • When the internal cooling fan is displayed. The power indicator lights up in orange while cooling the lamp, then illuminates red when is not necessary in remote control operation. 3. See "STARTUP LOGO" on . Switching on the projector Switching the projector on page 41. Switching off 1. Press the power button. The power indicator lights up in red. 2. The power indicator lights up the projector, some operational sound...
... the power button. 3. It will start with connecting the power cord or switching on the back of the projector. • When the internal cooling fan is displayed. The power indicator lights up in orange while cooling the lamp, then illuminates red when is not necessary in remote control operation. 3. See "STARTUP LOGO" on . Switching on the projector Switching the projector on page 41. Switching off 1. Press the power button. The power indicator lights up in red. 2. The power indicator lights up the projector, some operational sound...

Lcd Projector
Page 24
... OPTION menu. Press the play button of the projector. See "Lens shift and positioning" on page 39. You can confirm the adjusted effect with the lens shift lever. NOTE: • Do not touch the air exhaust port as default and the signal from the connected devices is ON as this may need to adjust the size of the image by moving the zoom lever again. Switch...
... OPTION menu. Press the play button of the projector. See "Lens shift and positioning" on page 39. You can confirm the adjusted effect with the lens shift lever. NOTE: • Do not touch the air exhaust port as default and the signal from the connected devices is ON as this may need to adjust the size of the image by moving the zoom lever again. Switch...

Lcd Projector
Page 31
... DISABLE PICTURE MODE CLOSED CAPTION ASPECT DAYLIGHT VIEW AUDIO SETTING page 42 VOLUME (Default: 20) BALANCE (Default: 0) IN STANDBY MODE OFF ON AUDIO IN SELECT DVI COM.AUDIO IN 2 AUDIO IN COMPUTER1 COM.AUDIO IN 1 COMPUTER2 COM.AUDIO IN 2 TEST PATTERN AUDIO IN AUDIO IN page 43 INITIALIZE ALL page 43 FILTER COUNTER RESET page 43 SECURITY PASSWORD OFF ON PASSWORD CHANGE TEXT DISPLAY OFF ON TEXT CHANGE MENU LOCK OFF ON MENU LOCK PASSWORD CONTROL DEVICE SETUP CONTROL PANEL ENABLE DISABLE REMOTE CONTROLLER ENABLE...
... DISABLE PICTURE MODE CLOSED CAPTION ASPECT DAYLIGHT VIEW AUDIO SETTING page 42 VOLUME (Default: 20) BALANCE (Default: 0) IN STANDBY MODE OFF ON AUDIO IN SELECT DVI COM.AUDIO IN 2 AUDIO IN COMPUTER1 COM.AUDIO IN 1 COMPUTER2 COM.AUDIO IN 2 TEST PATTERN AUDIO IN AUDIO IN page 43 INITIALIZE ALL page 43 FILTER COUNTER RESET page 43 SECURITY PASSWORD OFF ON PASSWORD CHANGE TEXT DISPLAY OFF ON TEXT CHANGE MENU LOCK OFF ON MENU LOCK PASSWORD CONTROL DEVICE SETUP CONTROL PANEL ENABLE DISABLE REMOTE CONTROLLER ENABLE...

Lcd Projector
Page 32
... adjust the settings. PICTURE KEYSTONE POSITION SHIFT LANGUAGE OVER SCAN DISPLAY OPTION ASPECT 16:9 PROJECTOR SETUP SECURITY NETWORK SELECT RETURN ENTER 3. Menu Navigation Navigating through the options of the bar scale. Main menu Sub-menu Current settings PICTURE POSITION LANGUAGE DISPLAY OPTION PROJECTOR SETUP SECURITY NETWORK SELECT RETURN ENTER PICTURE MODE CONTRAST BRIGHTNESS COLOR TINT SHARPNESS COLOR TEMPERATURE DAYLIGHT VIEW DIGITAL CINEMA REALITY NOISE REDUCTION TV-SYSTEM STANDARD DEFAULT AUTO ON OFF AUTO Operating guidance Contains the required buttons...
... adjust the settings. PICTURE KEYSTONE POSITION SHIFT LANGUAGE OVER SCAN DISPLAY OPTION ASPECT 16:9 PROJECTOR SETUP SECURITY NETWORK SELECT RETURN ENTER 3. Menu Navigation Navigating through the options of the bar scale. Main menu Sub-menu Current settings PICTURE POSITION LANGUAGE DISPLAY OPTION PROJECTOR SETUP SECURITY NETWORK SELECT RETURN ENTER PICTURE MODE CONTRAST BRIGHTNESS COLOR TINT SHARPNESS COLOR TEMPERATURE DAYLIGHT VIEW DIGITAL CINEMA REALITY NOISE REDUCTION TV-SYSTEM STANDARD DEFAULT AUTO ON OFF AUTO Operating guidance Contains the required buttons...

Lcd Projector
Page 34
... available with NETWORK signals) OFF Deactive ON Active NOTE: • Available with AUTO setting, select RGB or YPBPR manually. You can adjust the white balance of the projected image. Settings ENGLISH - 34 PICTURE menu COLOR TEMPERATURE TV-SYSTEM You can switch the automatic noise reduction system on page 12. • AUTO is not available when INSTALLATION setting in well-lit rooms where the ambient light sources cannot be controlled, such as...
... available with NETWORK signals) OFF Deactive ON Active NOTE: • Available with AUTO setting, select RGB or YPBPR manually. You can adjust the white balance of the projected image. Settings ENGLISH - 34 PICTURE menu COLOR TEMPERATURE TV-SYSTEM You can switch the automatic noise reduction system on page 12. • AUTO is not available when INSTALLATION setting in well-lit rooms where the ambient light sources cannot be controlled, such as...

Lcd Projector
Page 39
... to set to 16:10, you need to specify the location of the screen. Press I H to enter or edit the original text, and press the ENTER button. 3. CENTER Displays the menu in a box. See "Remote control" on /off that is displayed when starting up to 40 characters in the upper part of the menu. ON Detect the input signal from the terminals and project the image. AUTO...
... to set to 16:10, you need to specify the location of the screen. Press I H to enter or edit the original text, and press the ENTER button. 3. CENTER Displays the menu in a box. See "Remote control" on /off that is displayed when starting up to 40 characters in the upper part of the menu. ON Detect the input signal from the terminals and project the image. AUTO...

Lcd Projector
Page 42
... fan speed is high. Display the PICTURE MODE menu. ON The fan speed is low. OFF No sound in standby mode. ON Output audio in standby mode. J AUDIO IN SELECT You can switch the audio output method for 5 seconds, the displayed menu will be disappeared. Press I H to the Panasonic past model's control commands for COMPUTER connection. EMULATE You can switch to select the required menu option, and the ENTER button. AUDIO SETTING J VOLUME You can adjust the volume of fan...
... fan speed is high. Display the PICTURE MODE menu. ON The fan speed is low. OFF No sound in standby mode. ON Output audio in standby mode. J AUDIO IN SELECT You can switch the audio output method for 5 seconds, the displayed menu will be disappeared. Press I H to the Panasonic past model's control commands for COMPUTER connection. EMULATE You can switch to select the required menu option, and the ENTER button. AUDIO SETTING J VOLUME You can adjust the volume of fan...

Lcd Projector
Page 43
... ENTER button to escape from the menu mode. PROJECTOR SETUP menu FILTER COUNTER RESET After you replaced the Auto Cleaning Filter (ACF), REMAINING FILTER of STATUS in PROJECTOR SETUP need to be out of the image. Select OK by default and when initialized. • When the projector is initialized, it will be displayed. 2. The upper and lower edge might be reset to "0". 1. Turn off the MAIN POWER button to the COMPUTER AUDIO 2. Press the power button. 7. See "Lens shift...
... ENTER button to escape from the menu mode. PROJECTOR SETUP menu FILTER COUNTER RESET After you replaced the Auto Cleaning Filter (ACF), REMAINING FILTER of STATUS in PROJECTOR SETUP need to be out of the image. Select OK by default and when initialized. • When the projector is initialized, it will be displayed. 2. The upper and lower edge might be reset to "0". 1. Turn off the MAIN POWER button to the COMPUTER AUDIO 2. Press the power button. 7. See "Lens shift...
Lcd Projector
Page 47
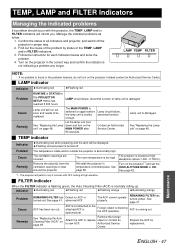
... turn on the projector*1 and set the HIGH ALTITUDE MODE to new ACF. Cause Remedy The ventilation openings are covered. Indicator Illuminating red Flashing red Flashing orange Illuminating orange Problem Cause Remedy REMAINING FILTER has Detect no problem is cooled enough. ACF is dysfunctional. Lamp unit is too high. The room temperature is damaged. See "Replacing the Auto Cleaning Filter (ACF)" on page 48. Flashing red and power is abnormally high. TEMP, LAMP and FILTER Indicators Managing the indicated problems If a problem should occur with OFF setting...
... turn on the projector*1 and set the HIGH ALTITUDE MODE to new ACF. Cause Remedy The ventilation openings are covered. Indicator Illuminating red Flashing red Flashing orange Illuminating orange Problem Cause Remedy REMAINING FILTER has Detect no problem is cooled enough. ACF is dysfunctional. Lamp unit is too high. The room temperature is damaged. See "Replacing the Auto Cleaning Filter (ACF)" on page 48. Flashing red and power is abnormally high. TEMP, LAMP and FILTER Indicators Managing the indicated problems If a problem should occur with OFF setting...

Lcd Projector
Page 49
... new lamp unit in orange, the remaining time of the projector until the screws turn to replace the ACF ACF is installed securely. 7. Disconnect the power cord from the projector. This is less than 200 hours. Lamp unit cover Care and Replacement 5. Pull the used lamp unit gently from the wall outlet. Tighten the 2 lamp unit fixing screws securely with a Phillipshead screwdriver. The FILTER indicator will inform you keep using the projector after the FILTER indicator illuminating in red...
... new lamp unit in orange, the remaining time of the projector until the screws turn to replace the ACF ACF is installed securely. 7. Disconnect the power cord from the projector. This is less than 200 hours. Lamp unit cover Care and Replacement 5. Pull the used lamp unit gently from the wall outlet. Tighten the 2 lamp unit fixing screws securely with a Phillipshead screwdriver. The FILTER indicator will inform you keep using the projector after the FILTER indicator illuminating in red...

Lcd Projector
Page 51
... video signal input source may not have tripped. The lens focus may not be adjusted correctly. The lens may not be dirty. The audio signal source may be connected properly. No electric supply is connected to a terminal properly. The AV MUTE function may be in DISPLAY OPTION menu may be incorrect setting. The circuit breakers have been set correctly. DVI-D IN setting in use. No picture appears. The control buttons of computer; A cable may...
... video signal input source may not have tripped. The lens focus may not be adjusted correctly. The lens may not be dirty. The audio signal source may be connected properly. No electric supply is connected to a terminal properly. The AV MUTE function may be in DISPLAY OPTION menu may be incorrect setting. The circuit breakers have been set correctly. DVI-D IN setting in use. No picture appears. The control buttons of computer; A cable may...


