Panasonic PTAE4000 Support and Manuals
Get Help and Manuals for this Panasonic item

View All Support Options Below
Free Panasonic PTAE4000 manuals!
Problems with Panasonic PTAE4000?
Ask a Question
Free Panasonic PTAE4000 manuals!
Problems with Panasonic PTAE4000?
Ask a Question
Panasonic PTAE4000 Videos

Projetor Panasonic PTAE4000 - Troca da lâmpada e Instalação
Duration: :10
Total Views: 244
Duration: :10
Total Views: 244
Exclusive Panasonic PTAE4000 Projector Launch
Duration: 5:16
Total Views: 25,239
Duration: 5:16
Total Views: 25,239
Popular Panasonic PTAE4000 Manual Pages
Operating Instructions - Page 1

IIIIIIII
Functional Instructions
LCD Projector
Model No. For your own safety, please read "Precautions with regard to safety" of the operating instructions carefully before operating your projector. PT-AE4000U
Thank you for purchasing this Panasonic product. TQBJ0313
ENGLISH
Operating Instructions - Page 3
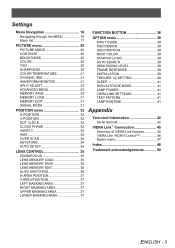
... 32 DOT CLOCK 32 CLOCK PHASE 32 ASPECT 32 WSS 34 OVER SCAN 34 KEYSTONE 34 AUTO SETUP 34
LENS CONTROL 35 ZOOM/FOCUS 35 LENS MEMORY LOAD 35 LENS MEMORY SAVE 35 LENS MEMORY EDIT...38
OPTION menu 39 INPUT GUIDE 39 OSD DESIGN 39 OSD POSITION 39 BACK COLOR 39 STARTUP LOGO 39 AUTO SEARCH 39 HDMI SIGNAL LEVEL 39 FRAME RESPONSE 39 INSTALLATION 39 TRIGGER 1/2 SETTING 40 SLEEP 41 HIGH ...
Operating Instructions - Page 8
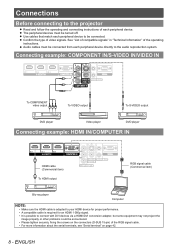
...the audio reproduction system. CCoonnnecntioencs tions
Before connecting to the projector
Read and follow the operating and connecting instructions of video signals. See "List of compatible signals" in "Technical Information" of the RGB signal cable....some equipment may not project the
image properly or other problems could be turned off. ENGLISH
The peripheral devices must be connected.
Operating Instructions - Page 10
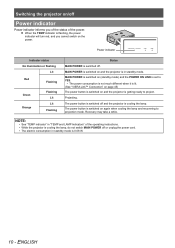
... getting ready to project. MAIN POWER is switched on (standby mode) and the POWER ON LINK is set to projection mode. Recovery may take a while.
NOTE:
•• See "TEMP indicator" in ... button is flashing, the power indicator will turn red, and you of the status of the operating instructions.
•• While the projector is cooling the lamp, do not switch MAIN POWER off and ...
Operating Instructions - Page 11

... cause burns, fire or damage to the ECO-MODE. See "STARTUP LOGO" on the external temperature.
•• You can reduce the operational sound by setting the LAMP POWER in orange while cooling the lamp, then illuminates red when it is displayed. The power indicator lights up in green after flashing...
Operating Instructions - Page 14
...
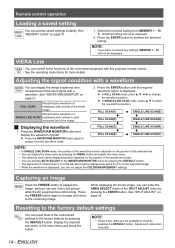
222 Press the ENTER button until the required waveform option is displayed. See the operating instructions for more details. In SINGLE LINE SCAN mode, press ▲ ▼ to the...not saved any settings, MEMORY 1 - 16 will not be displayed.
See "WAVEFORM MONITOR" on the projected image.
•• While the waveform is lower than 0 % in each menu item manually.
14 -...
Operating Instructions - Page 15
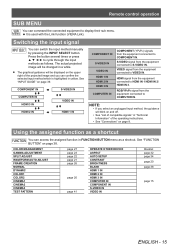
...page 23 page 22 page 21 page 26
page 20
page 41
OPERATE OTHER DEVICE ASPECT AUTO SETUP CONTRAST BRIGHTNESS BLANK HDMI 1 IN HDMI 2 IN HDMI 3 IN COMPUTER IN COMPONENT IN ... method manually by pressing the INPUT SELECT button. See "INPUT GUIDE" on page 8.
RGB/YPBPR signal from the equipment connected to COMPUTER IN. See "FUNCTION BUTTON" on the upper right of the operating instructions.
&#...
Operating Instructions - Page 16
...the screen.
If there is called up item will be displayed. Current setting
BRIGHTNESS
0-
+
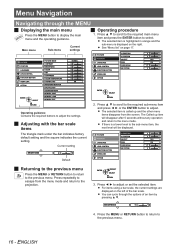
JJ Operating procedure
111 Press ▲ ▼ to scroll...with the bar scale items
The triangle mark under the bar indicates factory default setting and the square indicates the current setting. PICTURE POSITION LANGUAGE LENS CONTROL FUNCTION BUTTON VIERA LINK OPTION
H-POSITION V-POSITION ASPECT...
Operating Instructions - Page 23
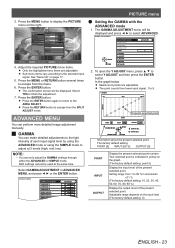
...button again to return to 9.
NOTE:
•• You can perform more detailed image adjustment manually. Both settings cannot be used at 3 levels (high, mid, low). The point counts from 1 to...333 Press the MENU button to select Y ADJUST and then press the ENTER button. PT-AE4000U PICTURE POSITION LANGUAGE LENS CONTROL FUNCTION BUTTON VIERA LINK OPTION
ENTER
SELECT RETURN
PICTURE MODE...
Operating Instructions - Page 30
... MEMORY NAME INPUT
ALL DELETE
SECAM PAL-N
NTSC 4.43
PAL-M
PAL
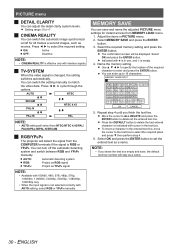
NOTE:
•• AUTO setting will be displayed.
Press ◄ ► to enter and press the ENTER button. Indicated with ... and name the adjusted PICTURE menu settings for 24 frames a second images, such as a name.
30 -
You can switch the setting manually to delete the last entered character or indicated with...
Operating Instructions - Page 34
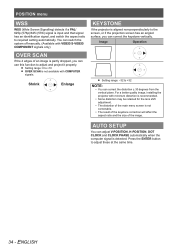
...installing...manually. (Available with COMPUTER signals. Setting range: 0 to +10 OVER SCAN is not correctable.
•• The result of the keystone correction will affect the aspect ratio and the size of an image is input and that signal has an identification signal, and switch the aspect ratio to required setting automatically.
AUTO SETUP...is partly dropped, you can correct the keystone...
Operating Instructions - Page 38
...the projection temporarily for electrical power save while the input source is factory default setting.
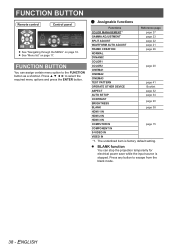
ENGLISH FUNCTION BUTTON
Remote control
Control panel
See "Navigating through the MENU"...page 20
CINEMA1
CINEMA2
CINEMA3
TEST PATTERN
page 41
OPERATE OTHER DEVICE
Booklet
ASPECT
page 32
AUTO SETUP
page 34
CONTRAST BRIGHTNESS
page 20
BLANK
page 38
HDMI 1 IN
HDMI 2 IN
HDMI 3 ...
Operating Instructions - Page 45
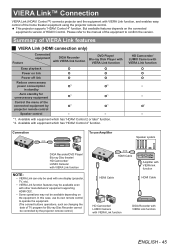
This projector supports "HDAVI Control 4" function.
In this case, use Amplifier
Speaker system
DIGA Recorder/DVD ...
Connection
To use its own remote control to the manual of HDAVI Control. VIERA Link™ Connection
VIERA Link (HDAVI Control™) connects projector and the equipment with other manufacturers' equipment supporting HDMI CEC.
•• Some operations may be...
Operating Instructions - Page 46

....) with other manufacturers' equipment supporting Link function. JJ Preparations
Use fully wired HDMI compliant cable. Select the input mode to models incorporating "HDAVI Control" and "VIERA Link". Set up the projector Switch the projector ON. Select VIERA LINK SETTINGS in the Setup Menu. (Please read the manual of the equipment for these setup.) Set up the connected equipment...
Operating Instructions - Page 47
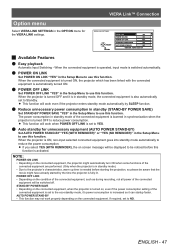
...POWER OFF LINK is fully lit. VIERA Link™ Connection
Option menu
Select VIERA LINK SETTINGS in the Setup Menu to use this function.
AUTO POWER STAND-BY •• This function may ... during recording, not all power of the connected equipment is in the Setup Menu to reduce the power consumption. QQ POWER OFF LINK
Set POWER OFF LINK "YES" in standby mode.) •• Due ...
Panasonic PTAE4000 Reviews
We have not received any reviews for Panasonic yet.