

PT52LCX16 User Guide
Page 1
... insurance purposes in the ATSC Digital Television Standard. Illustrations in the unlikely event a safety notification is designed for future reference. Help us continue to Register Your Product Immediately! 1 Protect Your New Investment... Registering your new Projection Display for energy efficiency. Multimedia Projection HDTV Operating Instructions Models No. LSQT1060 C Before connecting, operating or adjusting this manual for use with models PT-52LCX66, PT-56LCX66, PT...
... insurance purposes in the ATSC Digital Television Standard. Illustrations in the unlikely event a safety notification is designed for future reference. Help us continue to Register Your Product Immediately! 1 Protect Your New Investment... Registering your new Projection Display for energy efficiency. Multimedia Projection HDTV Operating Instructions Models No. LSQT1060 C Before connecting, operating or adjusting this manual for use with models PT-52LCX66, PT-56LCX66, PT...

PT52LCX16 User Guide
Page 2
..., in installation such as radiators, heat registers, stoves, or other . No user-serviceable parts inside part of electric shock, fire, injury to persons or damage to this product: 1) Read these instructions before using, connecting or adjusting this product. 2) Keep these instructions for future reference. 3) Heed all servicing to call : 1-888-VIEW PTV(843-9788) or, contact us via the web at plugs, convenience...
..., in installation such as radiators, heat registers, stoves, or other . No user-serviceable parts inside part of electric shock, fire, injury to persons or damage to this product: 1) Read these instructions before using, connecting or adjusting this product. 2) Keep these instructions for future reference. 3) Heed all servicing to call : 1-888-VIEW PTV(843-9788) or, contact us via the web at plugs, convenience...

PT52LCX16 User Guide
Page 4
... installation instructions and use only shielded interface cables when connecting to provide reasonable protection against harmful interference in the space provided on a circuit different from your set in a residential installation. Declaration of Conformity Models Number: PT-52LCX66/PT-56LCX66/PT-61LCX66/PT-52LCX16/PT-56LCX16/PT-61LCX16 Trade Name: Panasonic Responsible party: Panasonic Corporation of North America Address: One Panasonic Way Secaucus New...
... installation instructions and use only shielded interface cables when connecting to provide reasonable protection against harmful interference in the space provided on a circuit different from your set in a residential installation. Declaration of Conformity Models Number: PT-52LCX66/PT-56LCX66/PT-61LCX66/PT-52LCX16/PT-56LCX16/PT-61LCX16 Trade Name: Panasonic Responsible party: Panasonic Corporation of North America Address: One Panasonic Way Secaucus New...

PT52LCX16 User Guide
Page 5
... To Start ! Replacing the lamp unit 64 Troubleshooting 66 Specifications 68 Cleaning 69 Customer Services Directory 70 Limited Warranty 71 Other Information 72 Index ...79 5 Information Picture Adjustments 37 Audio Adjustments 40 Sleep Timer Feature 42 Lock Feature 43 Photo Viewer 47 Setup Features 52 Operating Peripheral Equipment 58 Other Remote Control Operation/Code List 59 Warning Indicators 63 Information ! Power ON / OFF 24 Basic Menu Navigation 26 Tuning channels 28 Projection Display operation 32 ASPECT Controls 36...
... To Start ! Replacing the lamp unit 64 Troubleshooting 66 Specifications 68 Cleaning 69 Customer Services Directory 70 Limited Warranty 71 Other Information 72 Index ...79 5 Information Picture Adjustments 37 Audio Adjustments 40 Sleep Timer Feature 42 Lock Feature 43 Photo Viewer 47 Setup Features 52 Operating Peripheral Equipment 58 Other Remote Control Operation/Code List 59 Warning Indicators 63 Information ! Power ON / OFF 24 Basic Menu Navigation 26 Tuning channels 28 Projection Display operation 32 ASPECT Controls 36...

PT52LCX16 User Guide
Page 7
... Setup Menu. (p. 56) 7 Press together the VOL- Slide the battery cover in and turn power ON. Observe the following precautions: 1. Two AA size 3. Note: • When using "Control with HDMI (HDAVI Control)", with the device connected, set . Install batteries in the battery compartment. • Battery polarity (+) and (-) must match the markings inside the compartment. Getting Started Remote Control Battery Installation Requires two AA batteries (supplied). 1. Do not attempt to setting up the remote. 2. button on the unit...
... Setup Menu. (p. 56) 7 Press together the VOL- Slide the battery cover in and turn power ON. Observe the following precautions: 1. Two AA size 3. Note: • When using "Control with HDMI (HDAVI Control)", with the device connected, set . Install batteries in the battery compartment. • Battery polarity (+) and (-) must match the markings inside the compartment. Getting Started Remote Control Battery Installation Requires two AA batteries (supplied). 1. Do not attempt to setting up the remote. 2. button on the unit...

PT52LCX16 User Guide
Page 18
... unit to the Digital Audio Out jack on your Projection Display to the connector. Firmly connect the cable to a Dolby Digital decoder. Installation (continued) Digital Audio Out Use the diagram below to connect the Digital Audio Output of your DVD player and DVD-Audio software the copyright protection function may operate and disable optical output. Dolby Digital 5.1 channel surround sound delivers digital-quality sound. Dolby Digital provides five discrete full-bandwidth channels for surround sound. 18 For assistance, please call : 1-888-VIEW...
... unit to the Digital Audio Out jack on your Projection Display to the connector. Firmly connect the cable to a Dolby Digital decoder. Installation (continued) Digital Audio Out Use the diagram below to connect the Digital Audio Output of your DVD player and DVD-Audio software the copyright protection function may operate and disable optical output. Dolby Digital 5.1 channel surround sound delivers digital-quality sound. Dolby Digital provides five discrete full-bandwidth channels for surround sound. 18 For assistance, please call : 1-888-VIEW...

PT52LCX16 User Guide
Page 20
... connect to the HDMI1 terminal (For models PT-52LCX16/PT-56LCX16/PT-61LCX16). Please refer to their respective operating instruction manuals. • When audio from other equipment connected to this unit via the web at: http://www.panasonic.com/contactinfo Installation (continued) Connecting this unit to a DVD recorder and AV amp When using the Setup Menu. (p. 56) Notes: • Individual HDMI devices may require additional menu settings specific to each model...
... connect to the HDMI1 terminal (For models PT-52LCX16/PT-56LCX16/PT-61LCX16). Please refer to their respective operating instruction manuals. • When audio from other equipment connected to this unit via the web at: http://www.panasonic.com/contactinfo Installation (continued) Connecting this unit to a DVD recorder and AV amp When using the Setup Menu. (p. 56) Notes: • Individual HDMI devices may require additional menu settings specific to each model...
PT52LCX16 User Guide
Page 22
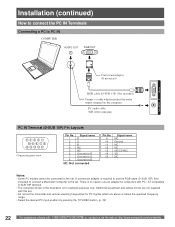
... the specified frequency range. • Select the desired PC input position by pressing the TV/VIDEO button. (p. 32) 22 For assistance, please call : 1-888-VIEW PTV(843-9788) or, contact us via the web at: http://www.panasonic.com/contactinfo PC audio cable (M3 stereo mini pin) PC IN Terminal (D-SUB 15P) Pin Layouts 54321 10 9 8 7 6 15 14 13 12 11 Connection port view Pin No.
... the specified frequency range. • Select the desired PC input position by pressing the TV/VIDEO button. (p. 32) 22 For assistance, please call : 1-888-VIEW PTV(843-9788) or, contact us via the web at: http://www.panasonic.com/contactinfo PC audio cable (M3 stereo mini pin) PC IN Terminal (D-SUB 15P) Pin Layouts 54321 10 9 8 7 6 15 14 13 12 11 Connection port view Pin No.
PT52LCX16 User Guide
Page 25
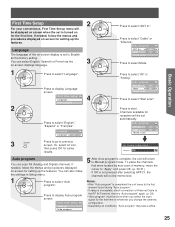
First Time Setup 2 For your convenience, First Time Set up menu will be set to English as the 3 on-screen displays language. 1 Press to the first channel found during "Auto program". • If setup is incomplete, check connection of the on-screen display is turned on conditions, "Auto program" may take a while. 25 Basic Operation Press to select Mode. Auto program ANT In ◄ Cable ► Mode All Start scan Press to display Language screen. Or, select icon, then...
First Time Setup 2 For your convenience, First Time Set up menu will be set to English as the 3 on-screen displays language. 1 Press to the first channel found during "Auto program". • If setup is incomplete, check connection of the on-screen display is turned on conditions, "Auto program" may take a while. 25 Basic Operation Press to select Mode. Auto program ANT In ◄ Cable ► Mode All Start scan Press to display Language screen. Or, select icon, then...
PT52LCX16 User Guide
Page 29
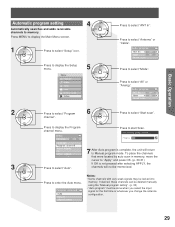
... the Program channel menu. channel". Press to select "Antenna" or "Cable". Setup CH scan All Press to select "Setup" icon. Program channel Auto Manual Signal meter Notes: • Some channels with very weak signals may be memorized. Press MENU to display the Main Menu screen. 1 Press to start Scan. Progress Language Program channel Input labels CC Other adjust 7 After Auto program is not pressed after selecting APPLY, the 3 Press to select "Auto". Press to display the Setup menu. 5 Menu Picture Audio Timer Lock Memory card Setup Press to select "Start scan...
... the Program channel menu. channel". Press to select "Antenna" or "Cable". Setup CH scan All Press to select "Setup" icon. Program channel Auto Manual Signal meter Notes: • Some channels with very weak signals may be memorized. Press MENU to display the Main Menu screen. 1 Press to start Scan. Progress Language Program channel Input labels CC Other adjust 7 After Auto program is not pressed after selecting APPLY, the 3 Press to select "Auto". Press to display the Setup menu. 5 Menu Picture Audio Timer Lock Memory card Setup Press to select "Start scan...

PT52LCX16 User Guide
Page 33
... Program Tuning Channel and Program tuning in Sleep Timer SAP indication Signal resolution Aspect 33 Basic Operation Unit Status display Press the Channel ▲▼ or RECALL button, except when the MENU screen is an example of tuning to maximize the displayed channel banner. These channels behave as sub-channels within a single 6 MHz channel. Notes: • The channel number and volume level are stored even after the unit is turned off. 4 • Power...
... Program Tuning Channel and Program tuning in Sleep Timer SAP indication Signal resolution Aspect 33 Basic Operation Unit Status display Press the Channel ▲▼ or RECALL button, except when the MENU screen is an example of tuning to maximize the displayed channel banner. These channels behave as sub-channels within a single 6 MHz channel. Notes: • The channel number and volume level are stored even after the unit is turned off. 4 • Power...
PT52LCX16 User Guide
Page 34
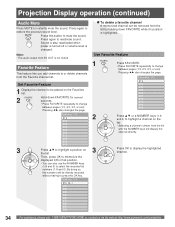
... not muted. Pressing ◄► also changes the page. Sound is also reactivated when power is turned off or volume level is changed. By doing so, the numbers will display the channel directly. 3 Press OK to mute the sound. Setting 1/3 [1] [2] [3] [4] [5] [6] [7] [8] [9] [0] 3 Press ▲▼ to press the OK key. Projection Display operation (continued) Audio Mute Press MUTE to change between pages (1/3, 2/3, 3/3, or exit). Use Favorite Feature 1 Press FAVORITE. •...
... not muted. Pressing ◄► also changes the page. Sound is also reactivated when power is turned off or volume level is changed. By doing so, the numbers will display the channel directly. 3 Press OK to mute the sound. Setting 1/3 [1] [2] [3] [4] [5] [6] [7] [8] [9] [0] 3 Press ▲▼ to press the OK key. Projection Display operation (continued) Audio Mute Press MUTE to change between pages (1/3, 2/3, 3/3, or exit). Use Favorite Feature 1 Press FAVORITE. •...

PT52LCX16 User Guide
Page 41
... button is not available in *2 Auto : Automatically performs digital/ analog input switching according to the input signal type. HDMI2 in VIDEO mode). Advanced Operation 41 The clarity of the sound is improved by BBE while the width, depth and height of digital audio input signal transmitted via separate RCA terminals. TV speakers off. Analog : Forces use of sound image are output from external equipment and minimizes the change in / terminal. Audio Normal Audio Mode...
... button is not available in *2 Auto : Automatically performs digital/ analog input switching according to the input signal type. HDMI2 in VIDEO mode). Advanced Operation 41 The clarity of the sound is improved by BBE while the width, depth and height of digital audio input signal transmitted via separate RCA terminals. TV speakers off. Analog : Forces use of sound image are output from external equipment and minimizes the change in / terminal. Audio Normal Audio Mode...
PT52LCX16 User Guide
Page 52
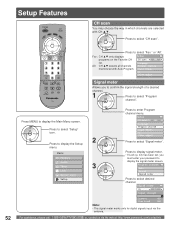
... all channels Language Program channel memorized with CH ▲▼. Menu Picture Audio Timer 3 Lock Memory card Setup Press to select desired channel. Press to display signal meter. • If Lock (p. 43) has been set, you to confirm the signal strength of a desired channel. 1 Press to display the signal meter screen. Signal meter CH ◄ 2-1 ► Signal strength Current 85% Peak level 85% Note: • The signal meter works only for digital signals input via the web at: http://www.panasonic.com...
... all channels Language Program channel memorized with CH ▲▼. Menu Picture Audio Timer 3 Lock Memory card Setup Press to select desired channel. Press to display signal meter. • If Lock (p. 43) has been set, you to confirm the signal strength of a desired channel. 1 Press to display the signal meter screen. Signal meter CH ◄ 2-1 ► Signal strength Current 85% Peak level 85% Note: • The signal meter works only for digital signals input via the web at: http://www.panasonic.com...

PT52LCX16 User Guide
Page 56
... link Power on , when connection or setup is blinking, the picture cannot be seen. • Power on the connected home theater/RAM theater/player theater and/or DIGA-DVD player. Newer Panasonic audio-video products with one-button operation using a single remote. Power off link When "Set" is selected, the TV can turn on and switch to models with Panasonic's "Control with HDMI" compatible DVD player/recorder is initially turned on or Play mode is selected. • While the power lamp is changed , set...
... link Power on , when connection or setup is blinking, the picture cannot be seen. • Power on the connected home theater/RAM theater/player theater and/or DIGA-DVD player. Newer Panasonic audio-video products with one-button operation using a single remote. Power off link When "Set" is selected, the TV can turn on and switch to models with Panasonic's "Control with HDMI" compatible DVD player/recorder is initially turned on or Play mode is selected. • While the power lamp is changed , set...

PT52LCX16 User Guide
Page 57
... the TV and switches to "Off" or other inputs. 57 Advanced Operation Menu TV speakers Picture Audio Timer Lock Memory card Setup Home theater: Adjustment for desired volume level. The TV displays "Home Theater + / -" on screen. • If home theater/RAM theater/Player theater is currently off, selecting the "Home theater" option will automatically turn the equipment on. • Turning off link Power on link Off On Set No *1: For models PT-52LCX66...
... the TV and switches to "Off" or other inputs. 57 Advanced Operation Menu TV speakers Picture Audio Timer Lock Memory card Setup Home theater: Adjustment for desired volume level. The TV displays "Home Theater + / -" on screen. • If home theater/RAM theater/Player theater is currently off, selecting the "Home theater" option will automatically turn the equipment on. • Turning off link Power on link Off On Set No *1: For models PT-52LCX66...

PT52LCX16 User Guide
Page 66
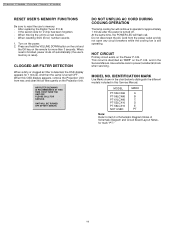
... blinks red. Some parts of the screen. - The fan will also disappear. If the Power was On, the screen will stop after OFF. No picture even if the power is turned ON. • Please replace lamp with a new one . red. • Is the set the Remote Control code? These symptoms will clear up as shown below. about 1 minute. 24 An OSD instructing to flicker. Troubleshooting Before you correctly set...
... blinks red. Some parts of the screen. - The fan will also disappear. If the Power was On, the screen will stop after OFF. No picture even if the power is turned ON. • Please replace lamp with a new one . red. • Is the set the Remote Control code? These symptoms will clear up as shown below. about 1 minute. 24 An OSD instructing to flicker. Troubleshooting Before you correctly set...
Service Manual
Page 14
... still operating. UNIT WILL BE TURNED OFF AFTER 1 MINUTE. At the same time, the POWER LED will continue to Item 3 of Schematic Diagram Notes of Schematic Diagram and Circuit Board Layout Notes, for mark "PT." 14 IDENTIFICATION MARK Use Marks shown in the chart below to prevent accidental shock when servicing. When resetting SOS (Error) number records. 1. When this Service Manual. Use extreme care to distinguish the different models...
... still operating. UNIT WILL BE TURNED OFF AFTER 1 MINUTE. At the same time, the POWER LED will continue to Item 3 of Schematic Diagram Notes of Schematic Diagram and Circuit Board Layout Notes, for mark "PT." 14 IDENTIFICATION MARK Use Marks shown in the chart below to prevent accidental shock when servicing. When resetting SOS (Error) number records. 1. When this Service Manual. Use extreme care to distinguish the different models...

Service Manual
Page 47
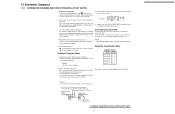
...-56LCX16 WHEN INSTALLING THE PROJECTION UNIT OR THE BASE BODY UNIT INTO THE UNIT AT THE USER'S LOCATION: The following ADJUSTMENT of the Projection Unit must be performed when replacing the new Projection Unit or new Base Body Unit. Mechanical Picture Position Adjustment c. Press the VCR key to go to Work Mode, and press and hold the VOLUME DOWN button on the unit and the RECALL key on the remote for more...
...-56LCX16 WHEN INSTALLING THE PROJECTION UNIT OR THE BASE BODY UNIT INTO THE UNIT AT THE USER'S LOCATION: The following ADJUSTMENT of the Projection Unit must be performed when replacing the new Projection Unit or new Base Body Unit. Mechanical Picture Position Adjustment c. Press the VCR key to go to Work Mode, and press and hold the VOLUME DOWN button on the unit and the RECALL key on the remote for more...
Service Manual
Page 61
... Pins) P3004 Connector No. The correct part number and part value is connected to item 3 of Schematic Diagram Notes for Zener Voltage of Zener Diodes The Zener Voltage of the service manual. Do not use only original replacement parts which are shown below. Indicating what it is shown in P.C.B. : Test point with a jumper wire across a hole in the parts list, and may be supplied as lead cable, flexible cable...
... Pins) P3004 Connector No. The correct part number and part value is connected to item 3 of Schematic Diagram Notes for Zener Voltage of Zener Diodes The Zener Voltage of the service manual. Do not use only original replacement parts which are shown below. Indicating what it is shown in P.C.B. : Test point with a jumper wire across a hole in the parts list, and may be supplied as lead cable, flexible cable...


