
Multi Media Display
Page 66
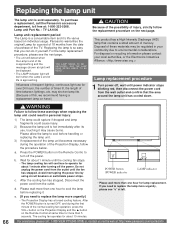
... life is a consumable item and it may be displayed. c. Please wait more than one hour for lamp replacement. For assistance, please call the Panasonic accessory department, toll free at : http://www.panasonic.com/contactinfo Panasonic warranties the original Lamp for a period of 18 months from the wall ...the Projection Display and the ▲ button on the Remote Control at same time for more than 5 seconds. If you need to cool before replacing it yourself. THE LAMP NEEDS TO BE REPLACED, AND THE LAMP HOUR METER NEEDS TO BE RESET. • The LAMP indicator light...
... life is a consumable item and it may be displayed. c. Please wait more than one hour for lamp replacement. For assistance, please call the Panasonic accessory department, toll free at : http://www.panasonic.com/contactinfo Panasonic warranties the original Lamp for a period of 18 months from the wall ...the Projection Display and the ▲ button on the Remote Control at same time for more than 5 seconds. If you need to cool before replacing it yourself. THE LAMP NEEDS TO BE REPLACED, AND THE LAMP HOUR METER NEEDS TO BE RESET. • The LAMP indicator light...
Multi Media Display
Page 67
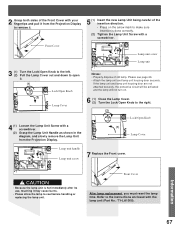
...lamp replacement, you must reset the lamp time. Please see page 66. • Attach the lamp unit and lamp unit housing door securely. Refer to the right. (2) Lock/Open Knob 4 (1) Loosen the Lamp Unit Screw with a screwdriver. (2) Grasp the Lamp Unit Handle as shown in the diagram, and slowly remove the Lamp Unit from the Projection Display... Display. (1) Lamp Cover Lamp unit handle (1) 7 Replace the Front cover. (2) Lamp unit screw CAUTION • Because the lamp unit is done correctly. (2) Tighten the Lamp Unit Screw with a screwdriver. If the lamp unit and lamp unit...
...lamp replacement, you must reset the lamp time. Please see page 66. • Attach the lamp unit and lamp unit housing door securely. Refer to the right. (2) Lock/Open Knob 4 (1) Loosen the Lamp Unit Screw with a screwdriver. (2) Grasp the Lamp Unit Handle as shown in the diagram, and slowly remove the Lamp Unit from the Projection Display... Display. (1) Lamp Cover Lamp unit handle (1) 7 Replace the Front cover. (2) Lamp unit screw CAUTION • Because the lamp unit is done correctly. (2) Tighten the Lamp Unit Screw with a screwdriver. If the lamp unit and lamp unit...
Multi Media Display
Page 79
... E EAS 7, 8 H HDMI 8, 22, 32, 38, 43 HDMI input terminals 11, 22 HDTV 8 I Input 1, 2, 3 terminals 11, 15 J JPEG 8, 49-53 JPEG thumbnail 50 L LAMP indicator 10, 65-68 Left screen 37 LIGHT button 9 M MPAA 8, 45-46 MSO 7, 8 MUTE button 9, 34 N NTSC 8 Number keys 9, 33 O OK button 9 P Password 8, 45,...Remote Control 9, 24 POWER button / POWER indicator (Unit 10, 24, 65 R R-TUNE button 9, 32 RECALL button 9, 33 Remote Control Sensor 10 Reset All Memory Functions 7 RGB cable 20 Right screen 37 S SAP button 9, 35 SD Card 49-53 Sleep Timer 35, 44 Sound mute 34 Stereo System...
... E EAS 7, 8 H HDMI 8, 22, 32, 38, 43 HDMI input terminals 11, 22 HDTV 8 I Input 1, 2, 3 terminals 11, 15 J JPEG 8, 49-53 JPEG thumbnail 50 L LAMP indicator 10, 65-68 Left screen 37 LIGHT button 9 M MPAA 8, 45-46 MSO 7, 8 MUTE button 9, 34 N NTSC 8 Number keys 9, 33 O OK button 9 P Password 8, 45,...Remote Control 9, 24 POWER button / POWER indicator (Unit 10, 24, 65 R R-TUNE button 9, 32 RECALL button 9, 33 Remote Control Sensor 10 Reset All Memory Functions 7 RGB cable 20 Right screen 37 S SAP button 9, 35 SD Card 49-53 Sleep Timer 35, 44 Sound mute 34 Stereo System...


