

Operating Instructions
Page 6
... foreign objects or water get the leaked liquid in such cases, otherwise fire or electric shocks could result. Continued use other than an authorized ceiling mount bracket. If the plug is broken, disconnect the power plug from the wall socket. During a thunderstorm, do anything that might damage the power cord or...
... foreign objects or water get the leaked liquid in such cases, otherwise fire or electric shocks could result. Continued use other than an authorized ceiling mount bracket. If the plug is broken, disconnect the power plug from the wall socket. During a thunderstorm, do anything that might damage the power cord or...

Operating Instructions
Page 7
... or contamination of the battery compartment and surrounding area may result in places where the projector may cause the falling down of the lamp is mounted in a bath or shower. Do not look into the light beam while the projector is not done. Electric shocks or explosions can result if this...
... or contamination of the battery compartment and surrounding area may result in places where the projector may cause the falling down of the lamp is mounted in a bath or shower. Do not look into the light beam while the projector is not done. Electric shocks or explosions can result if this...

Operating Instructions
Page 8
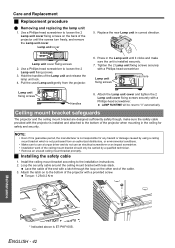
... lines or near an air conditioner or lighting equipment. Avoid setting up inside of the lamp or the other components may cause injury. See "Ceiling mount bracket safeguards" on page 35. You could fall or the projector could result in places which are constantly making efforts to clean the projector when...
... lines or near an air conditioner or lighting equipment. Avoid setting up inside of the lamp or the other components may cause injury. See "Ceiling mount bracket safeguards" on page 35. You could fall or the projector could result in places which are constantly making efforts to clean the projector when...

Operating Instructions
Page 10
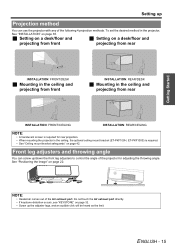
.... OPTION INSTALLATION ALTITUDE SELECT FRONT/DESK LOW RETURN ENTER FRONT/DESK FRONT/CEILING REAR/DESK REAR/CEILING Setting on a desk/floor and projecting from front Mounting in the ceiling and projecting from the MAIN MENU. See "INITIALIZE ALL" on a desk/floor and projecting from rear... Mounting in the ceiling and projecting from front Setting on page 36. HIGH The fan speed is low. NOTE: • At 1 400 - 2 700 m (4 593 - 8 858 ft) ...
.... OPTION INSTALLATION ALTITUDE SELECT FRONT/DESK LOW RETURN ENTER FRONT/DESK FRONT/CEILING REAR/DESK REAR/CEILING Setting on a desk/floor and projecting from front Mounting in the ceiling and projecting from the MAIN MENU. See "INITIALIZE ALL" on a desk/floor and projecting from rear... Mounting in the ceiling and projecting from front Setting on page 36. HIGH The fan speed is low. NOTE: • At 1 400 - 2 700 m (4 593 - 8 858 ft) ...
Operating Instructions
Page 15
... page 32. • Screw up /down the front leg adjusters to control the angle of the projector for rear projection. • When mounting the projector in the projector, See "INSTALLATION" on page 42. J Setting on a desk/floor and J Setting on page 22. NOTE:...image" on a desk/floor and projecting from front projecting from rear Getting Started INSTALLATION: FRONT/DESK J Mounting in the ceiling and projecting from front INSTALLATION: REAR/DESK J Mounting in the ceiling and projecting from rear INSTALLATION: FRONT/CEILING INSTALLATION: REAR/CEILING NOTE: • A translucent...
... page 32. • Screw up /down the front leg adjusters to control the angle of the projector for rear projection. • When mounting the projector in the projector, See "INSTALLATION" on page 42. J Setting on a desk/floor and J Setting on page 22. NOTE:...image" on a desk/floor and projecting from front projecting from rear Getting Started INSTALLATION: FRONT/DESK J Mounting in the ceiling and projecting from front INSTALLATION: REAR/DESK J Mounting in the ceiling and projecting from rear INSTALLATION: FRONT/CEILING INSTALLATION: REAR/CEILING NOTE: • A translucent...

Operating Instructions
Page 35
...the input signal from rear ALTITUDE If you use the projector at intervals of fan noise depends on a desk/floor and projecting from rear Mounting in the ceiling and projecting from the standby mode or the projecting mode. Press I H to select the required option. FRONT/DESK ...FRONT/CEILING REAR/DESK REAR/CEILING Setting on a desk/floor and projecting from front Mounting in the ceiling and projecting from the terminals and project the image. ON The projector will start from front Setting on the ALTITUDE setting. ...
...the input signal from rear ALTITUDE If you use the projector at intervals of fan noise depends on a desk/floor and projecting from rear Mounting in the ceiling and projecting from the standby mode or the projecting mode. Press I H to select the required option. FRONT/DESK ...FRONT/CEILING REAR/DESK REAR/CEILING Setting on a desk/floor and projecting from front Mounting in the ceiling and projecting from the terminals and project the image. ON The projector will start from front Setting on the ALTITUDE setting. ...
Operating Instructions
Page 41
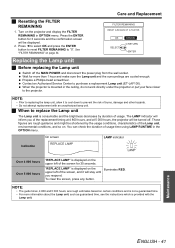
J When to replace the Lamp unit The Lamp unit is mounted in the ceiling, do not work directly under the projector or put your face closer to prevent the risk of burns, damage and other hazards. &#...
J When to replace the Lamp unit The Lamp unit is mounted in the ceiling, do not work directly under the projector or put your face closer to prevent the risk of burns, damage and other hazards. &#...
Operating Instructions
Page 42
...turn freely, and remove the Lamp unit cover. LAMP RUNTIME will be carried by using a ceiling mount bracket which is installed securely. 7. Hold the handles of the ceiling mount bracket should only be reset to "0" automatically. Lamp unit fixing screws Press here Lamp unit fixing screws.... 3. Replace the new Lamp unit in the ceiling for any hazard or damage caused by a qualified technician. • Remove an unused ceiling mount bracket promptly. Torque: 1.25±0.2 N·m Maintenance * Indicated above is installed and attached to loosen the 2 Lamp unit cover fixing screws...
...turn freely, and remove the Lamp unit cover. LAMP RUNTIME will be carried by using a ceiling mount bracket which is installed securely. 7. Hold the handles of the ceiling mount bracket should only be reset to "0" automatically. Lamp unit fixing screws Press here Lamp unit fixing screws.... 3. Replace the new Lamp unit in the ceiling for any hazard or damage caused by a qualified technician. • Remove an unused ceiling mount bracket promptly. Torque: 1.25±0.2 N·m Maintenance * Indicated above is installed and attached to loosen the 2 Lamp unit cover fixing screws...
