
Operating Instructions
Page 3
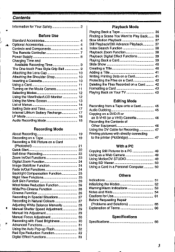
... Optional Accessories Controls and Components The Remote Controller Power Supply Charging Time and Available Recording Time The One-touch Free Style Grip Belt Attaching the Lens Cap Attaching the Shoulder Strap Inserting a Cassette Using a Card Turning on the Movie Camera Selecting Modes Using the Viewfinder/LCD Monitor Using the Menu Screen...
... Optional Accessories Controls and Components The Remote Controller Power Supply Charging Time and Available Recording Time The One-touch Free Style Grip Belt Attaching the Lens Cap Attaching the Shoulder Strap Inserting a Cassette Using a Card Turning on the Movie Camera Selecting Modes Using the Viewfinder/LCD Monitor Using the Menu Screen...
Operating Instructions
Page 4
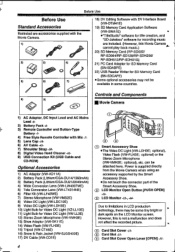
... with the Movie Camera. 1) 4 t,ti e, A,. •. -il 2) 3) 4) l' g 5) 8) 7) +MN , 18) DV Editing Software with Mic -75) Lens Cap 406) AV Cable -4.37) Shoulder Strap 408) Digital Video Head Cleaner -639) USB Connection Kit (USB Cable and CD-ROM) Optional Accessories 1) AC Adaptor... (VW-AD11A) 2) Battery Pack (LIthlum/CGA-DU14/1360mAh) 3) Battery Pack (Lithium/CGA-DU21/2040mAh) 4) Wide Conversion Lens (VW-LW4307ME) 5) Tele Conversion Lens (VW-LT4314NE) 6) Filter Kit (VW-LF43WE) 7) Stereo Microphone (VW-VMS2E) 8) Video DC Light (VW-LDC10E) 9) Video DC Light...
... with the Movie Camera. 1) 4 t,ti e, A,. •. -il 2) 3) 4) l' g 5) 8) 7) +MN , 18) DV Editing Software with Mic -75) Lens Cap 406) AV Cable -4.37) Shoulder Strap 408) Digital Video Head Cleaner -639) USB Connection Kit (USB Cable and CD-ROM) Optional Accessories 1) AC Adaptor... (VW-AD11A) 2) Battery Pack (LIthlum/CGA-DU14/1360mAh) 3) Battery Pack (Lithium/CGA-DU21/2040mAh) 4) Wide Conversion Lens (VW-LW4307ME) 5) Tele Conversion Lens (VW-LT4314NE) 6) Filter Kit (VW-LF43WE) 7) Stereo Microphone (VW-VMS2E) 8) Video DC Light (VW-LDC10E) 9) Video DC Light...
Operating Instructions
Page 5
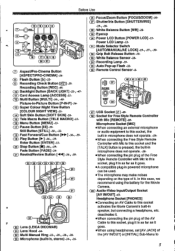
....] -36-, -39(n Play Button [Ill -36-, -39- Fade Button [FADE] -24(21) Rewind/Review Button [ill] -36-, -39- 0000000 item ) L' '35 32 (22 ) Lens (LEICA DICOMAR) (23) Lens Hood -64(n Multi Manual Ring -23-, -29-, -30-, -30( ) Microphone (built-In, stereo) -24-, -26. (26) Focus/Zoom Button [FOCUS/ZOOM] -30- In this...
....] -36-, -39(n Play Button [Ill -36-, -39- Fade Button [FADE] -24(21) Rewind/Review Button [ill] -36-, -39- 0000000 item ) L' '35 32 (22 ) Lens (LEICA DICOMAR) (23) Lens Hood -64(n Multi Manual Ring -23-, -29-, -30-, -30( ) Microphone (built-In, stereo) -24-, -26. (26) Focus/Zoom Button [FOCUS/ZOOM] -30- In this...

Operating Instructions
Page 10
... the Grip Belt. (It is not possible when using as to avoid dropping the Movie Camera. 1 Pull the end of the Shoulder Strap through the Lens Cap Cord. 6 Inserting a Cassette 1 Slide the [OPEN/EJECT] Lever ( ,Ti) toward the front and pull down to open the Cassette Compartment Cover. Attaching the ... Shoulder Strap before going out of doors to record so as a hand strap.) •When you are not recording, be sure to cover the Lens with the Lens Cap for protection. 2 Detach the end of the Grip Belt. @r 3 Slide Q to the other Shoulder Strap Holder in the same way. • 0 Attaching ...
... the Grip Belt. (It is not possible when using as to avoid dropping the Movie Camera. 1 Pull the end of the Shoulder Strap through the Lens Cap Cord. 6 Inserting a Cassette 1 Slide the [OPEN/EJECT] Lever ( ,Ti) toward the front and pull down to open the Cassette Compartment Cover. Attaching the ... Shoulder Strap before going out of doors to record so as a hand strap.) •When you are not recording, be sure to cover the Lens with the Lens Cap for protection. 2 Detach the end of the Grip Belt. @r 3 Slide Q to the other Shoulder Strap Holder in the same way. • 0 Attaching ...

Operating Instructions
Page 11
... up . 46 O 9 48 0 111111101111 11 Please turn on the Power 1 Set the [OFF/ON] Switch a6 to Turn on the Movie Camera after removing the Lens Cap. Using a Card • A Card can be used to malfunction. III (it) 0 ACCESS While the Movie Camera is turned on with Its cut corner on... the [PUSH] mark 0. 0 'A, 4 Close the Cassette Compartment Cover. 3 Close the Card Slot Cover a) securely. 2 Insert a Cassette. Before Use 2 While holding the Memory Card with the Lens Cap on , never attempt to the [REC] arrow direction). • For other notes concerning this item, see -54-.
... up . 46 O 9 48 0 111111101111 11 Please turn on the Power 1 Set the [OFF/ON] Switch a6 to Turn on the Movie Camera after removing the Lens Cap. Using a Card • A Card can be used to malfunction. III (it) 0 ACCESS While the Movie Camera is turned on with Its cut corner on... the [PUSH] mark 0. 0 'A, 4 Close the Cassette Compartment Cover. 3 Close the Card Slot Cover a) securely. 2 Insert a Cassette. Before Use 2 While holding the Memory Card with the Lens Cap on , never attempt to the [REC] arrow direction). • For other notes concerning this item, see -54-.

Operating Instructions
Page 19
... and the recording to Card Recording Mode [0]. II Recording Lamp The Recording Lamp (1_4) lights up if the [REC LAMP] on the power, remove the Lens Cap. L 0 •The [CHK] Indication is turned on a card by pressing the [PHOTO SHOT] Button. To Check the Recording By pressing the [E]] Button (p) briefly in...-. 19 When recording with the [AUTO/MANUAUAE LOCK] Switch (31) set to [AUTO], the Movie Camera automatically adjusts the focus and white balance. If the Lens Cap Is still attached when the power is displayed.
... and the recording to Card Recording Mode [0]. II Recording Lamp The Recording Lamp (1_4) lights up if the [REC LAMP] on the power, remove the Lens Cap. L 0 •The [CHK] Indication is turned on a card by pressing the [PHOTO SHOT] Button. To Check the Recording By pressing the [E]] Button (p) briefly in...-. 19 When recording with the [AUTO/MANUAUAE LOCK] Switch (31) set to [AUTO], the Movie Camera automatically adjusts the focus and white balance. If the Lens Cap Is still attached when the power is displayed.

Operating Instructions
Page 20
... the [STILL] Button (17) is opened, the V ewfinder Is disabled automatically. IN Recording Yourself By opening the LCD Monitor and rotating it frontward (to the lens side), you to locate the end of the recording on the Cassette quickly. 1 Set [TAPE RECORDING MENU] or [TAPE PLAYBACK MENU] » [INITIAL] » [BLANK...
... the [STILL] Button (17) is opened, the V ewfinder Is disabled automatically. IN Recording Yourself By opening the LCD Monitor and rotating it frontward (to the lens side), you to locate the end of the recording on the Cassette quickly. 1 Set [TAPE RECORDING MENU] or [TAPE PLAYBACK MENU] » [INITIAL] » [BLANK...
Operating Instructions
Page 23
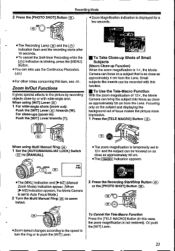
...the Movie Camera Is set to push the [W/T] Lever. Recording Mode 2 Press the [PHOTO SHOT] Button C). For close as approximately 50 cm from the Lens. cpt II • Zoom Magnification Indication is displayed for a few seconds. •*1 5XW (2 *The Recording Lamp (sit) and the [0] Indication flash ... -ups (zoom In): Push the [W/T] Lever towards [W]. MNL AUTO. Or push the [WIT] Lever. 23 Focusing only on as approximately 4 cm from the Lens. cio II When using [WIT] Lever Est ) 1 For wide-angle shots (zoom out): Push the [W/T] Lever (at ) towards [T]. - Zoom In/Out...
...the Movie Camera Is set to push the [W/T] Lever. Recording Mode 2 Press the [PHOTO SHOT] Button C). For close as approximately 50 cm from the Lens. cpt II • Zoom Magnification Indication is displayed for a few seconds. •*1 5XW (2 *The Recording Lamp (sit) and the [0] Indication flash ... -ups (zoom In): Push the [W/T] Lever towards [W]. MNL AUTO. Or push the [WIT] Lever. 23 Focusing only on as approximately 4 cm from the Lens. cio II When using [WIT] Lever Est ) 1 For wide-angle shots (zoom out): Push the [W/T] Lever (at ) towards [T]. - Zoom In/Out...

Operating Instructions
Page 25
... 3 Release the [FADE] Button (jT) about 3 seconds after starting recording. •The image reappears gradually. Fade Out Fade Out causes images and sounds to the lens side). 0 Pt 0 ni LIGHT •The screen becomes white and the Viewfinder turns on. 25 Backlight Compensation Function This prevents the subject from being recorded...
... 3 Release the [FADE] Button (jT) about 3 seconds after starting recording. •The image reappears gradually. Fade Out Fade Out causes images and sounds to the lens side). 0 Pt 0 ni LIGHT •The screen becomes white and the Viewfinder turns on. 25 Backlight Compensation Function This prevents the subject from being recorded...

Operating Instructions
Page 27
... Cinema Mode Set [TAPE RECORDING MENU] » [RECORDING] » [CINEMA] » [OFF). When the Movie Camera is turned on with the Lens Cap on the Movie Camera after removing the Lens Cap. 1 Set the [AUTO/MANUALJAE LOCK] Switch 31 to [MANUAL]. Recording in a glaring surrounding, such as sports scenes. 2) [ ] Portrait Mode SILL...
... Cinema Mode Set [TAPE RECORDING MENU] » [RECORDING] » [CINEMA] » [OFF). When the Movie Camera is turned on with the Lens Cap on the Movie Camera after removing the Lens Cap. 1 Set the [AUTO/MANUALJAE LOCK] Switch 31 to [MANUAL]. Recording in a glaring surrounding, such as sports scenes. 2) [ ] Portrait Mode SILL...

Operating Instructions
Page 28
... the [AUTO/MANUALJAE LOCK] Switch to [AUTO]. About White Balance Sensor The White Balance Sensor Ca) determines the nature of light that comes through the Lens and White Balance Sensor, thereby judging the recording condition, and selects the closest hue setting. Or, set the [AUTO/MANUAUAE LOCK] Switch to [AUTO]. se...
... the [AUTO/MANUALJAE LOCK] Switch to [AUTO]. About White Balance Sensor The White Balance Sensor Ca) determines the nature of light that comes through the Lens and White Balance Sensor, thereby judging the recording condition, and selects the closest hue setting. Or, set the [AUTO/MANUAUAE LOCK] Switch to [AUTO]. se...

Operating Instructions
Page 40
... can be played back like a Slide Show. 1 Set the Mode Dial (D to use for the image you want to use for several seconds. Set the Lens to the image you want to Picture Playback Mode. J Playback Mode 2 Press the [MULTI] Button (D. •The [SLIDER] Indication is shown on the entire screen...
... can be played back like a Slide Show. 1 Set the Mode Dial (D to use for the image you want to use for several seconds. Set the Lens to the image you want to Picture Playback Mode. J Playback Mode 2 Press the [MULTI] Button (D. •The [SLIDER] Indication is shown on the entire screen...

Operating Instructions
Page 49
Using MotionDV STUDIO Using the MotionDV STUDIO software allows you to capture video recorded on a tape or Images viewed through the lens of visual effects can be added and titles can be changed in PC connection mode by operating Mode Dial. • For more details on the ...
Using MotionDV STUDIO Using the MotionDV STUDIO software allows you to capture video recorded on a tape or Images viewed through the lens of visual effects can be added and titles can be changed in PC connection mode by operating Mode Dial. • For more details on the ...
Operating Instructions
Page 53
... problem. CAN NOT OPERATE 53 IIIDEW (DEW DETECT/EJECT TAPE): CAN NOT USE USB Condensation has occurred. -62- when you are recording pictures on the Lens Cap to You are attempting to connect the USB which is not compatible with this Movie Cable while the DV Cable Is connected. This Card...
... problem. CAN NOT OPERATE 53 IIIDEW (DEW DETECT/EJECT TAPE): CAN NOT USE USB Condensation has occurred. -62- when you are recording pictures on the Lens Cap to You are attempting to connect the USB which is not compatible with this Movie Cable while the DV Cable Is connected. This Card...

Operating Instructions
Page 56
... Mode cannot be used , It is recommended that you tum the image Stabilizer off. •Within the digital zoom range, or when recording with a conversion lens attached, the Image Stabilizer Function may not work effectively. ▪ Backlight Compensation Function •When setting the Iris manually, the Backlight Compensation Function does not...
... Mode cannot be used , It is recommended that you tum the image Stabilizer off. •Within the digital zoom range, or when recording with a conversion lens attached, the Image Stabilizer Function may not work effectively. ▪ Backlight Compensation Function •When setting the Iris manually, the Backlight Compensation Function does not...

Operating Instructions
Page 58
... detecting the ambient brightness. (If it determines that you check through the headphones before recording to 4 metres. optional) or Wide Conversion Lens (VW-LW4307ME; In this case, either adjust the iris manually or use the Night View Functions. Microphone Sensitivity Level •When this... case, adjust the focus manually. •Tele Conversion Lens (VW-LT4314NE; Picture will remain valid so long as the general reference for [GAIN] or set [MODE] to [AUTO] or [MNL ...
... detecting the ambient brightness. (If it determines that you check through the headphones before recording to 4 metres. optional) or Wide Conversion Lens (VW-LW4307ME; In this case, either adjust the iris manually or use the Night View Functions. Microphone Sensitivity Level •When this... case, adjust the focus manually. •Tele Conversion Lens (VW-LT4314NE; Picture will remain valid so long as the general reference for [GAIN] or set [MODE] to [AUTO] or [MNL ...
Operating Instructions
Page 61
... of the 5 To protect the Lens, attach the supplied Image. Viewfinder or the LCD Monitor. (-8., 424 • Black streaks may be disturbed.) •When using AV Cable and DV Cable (optional) at the 4 edges of Other Equipment stop operating the unit and consult the Panasonic Customer Care Centre on 132600. ...display transmitters or high-voltage cables. recording mode as IEEE1394), you can be detach the Battery or AC Adaptor and then able to [OFF]. Lens Cap. these effects are not output from other business use your Movie Camera on a rainy or snowy day or on the [AV IN/OUT]...
... of the 5 To protect the Lens, attach the supplied Image. Viewfinder or the LCD Monitor. (-8., 424 • Black streaks may be disturbed.) •When using AV Cable and DV Cable (optional) at the 4 edges of Other Equipment stop operating the unit and consult the Panasonic Customer Care Centre on 132600. ...display transmitters or high-voltage cables. recording mode as IEEE1394), you can be detach the Battery or AC Adaptor and then able to [OFF]. Lens Cap. these effects are not output from other business use your Movie Camera on a rainy or snowy day or on the [AV IN/OUT]...

Operating Instructions
Page 62
...adhering on the Movie Camera for about 2 to the Tape Recording/Playback Mode and then check if the Condensation Indication disappears. When the lens temperature becomes close to the ambient temperature. Keep the AC Adaptor 1 metre or more time before the Condensation Indication Is displayed. &#...charging starts automatically. Leave it may not be frozen. Watch for about 1 hour. After use the Tape Recording/ Playback Mode. When the Lens is inserted. • It takes about 20 seconds to take more away from radio. •When using the AC Adaptor, It may generate...
...adhering on the Movie Camera for about 2 to the Tape Recording/Playback Mode and then check if the Condensation Indication disappears. When the lens temperature becomes close to the ambient temperature. Keep the AC Adaptor 1 metre or more time before the Condensation Indication Is displayed. &#...charging starts automatically. Leave it may not be frozen. Watch for about 1 hour. After use the Tape Recording/ Playback Mode. When the Lens is inserted. • It takes about 20 seconds to take more away from radio. •When using the AC Adaptor, It may generate...

Operating Instructions
Page 64
...effective pixels with a mere 0.01% of the pixels Inactive or always lit. The result is left for 1 year or longer without removing the Lens Hood. •Donot attach other components. If the Cassette is stronger than usual at first. Develop a habit of approximately 123,000 pixels. Magnetic...the recorded picture. To store the Battery for the attachment. • When you completely use , be used for a long period of the Lens Hood without winding or rewinding, temperature and humidity changes may be damaged. • After use up the charged capacity. This can result in a...
...effective pixels with a mere 0.01% of the pixels Inactive or always lit. The result is left for 1 year or longer without removing the Lens Hood. •Donot attach other components. If the Cassette is stronger than usual at first. Develop a habit of approximately 123,000 pixels. Magnetic...the recorded picture. To store the Battery for the attachment. • When you completely use , be used for a long period of the Lens Hood without winding or rewinding, temperature and humidity changes may be damaged. • After use up the charged capacity. This can result in a...

Operating Instructions
Page 65
...back even when the [H Button is pressed. • Is the Mode Dial set to Playback Mode? If it with the filter and conversion lens attached together to the Movie Camera, 4 corners of less than 15 seconds are some cases, the Remaining Tape Time Indication may show remaining tape... a fully charged Battery. (-8-) • Has condensation occurred? In cold places, the operating time of your accessories. • Be sure to keep the Lens Hood attached to the Movie Camera so as to operate. (-18-) Indications 1: The Time Code becomes inaccurate. • The Time Code Indication counter may ...
...back even when the [H Button is pressed. • Is the Mode Dial set to Playback Mode? If it with the filter and conversion lens attached together to the Movie Camera, 4 corners of less than 15 seconds are some cases, the Remaining Tape Time Indication may show remaining tape... a fully charged Battery. (-8-) • Has condensation occurred? In cold places, the operating time of your accessories. • Be sure to keep the Lens Hood attached to the Movie Camera so as to operate. (-18-) Indications 1: The Time Code becomes inaccurate. • The Time Code Indication counter may ...


