
Operating Instructions
Page 26
... A [Settings] A Specify the path to the OCR program file (.exe) in the [Multi-Function Viewer] window after scanning. 6 After you finish scanning, press MStopN to reset the Scanning mode setting you want to Multi-Function Viewer, the scanned image will be You can be displayed in the [OCR Path] field. A MSetN...
... A [Settings] A Specify the path to the OCR program file (.exe) in the [Multi-Function Viewer] window after scanning. 6 After you finish scanning, press MStopN to reset the Scanning mode setting you want to Multi-Function Viewer, the scanned image will be You can be displayed in the [OCR Path] field. A MSetN...
Operating Instructions
Page 28
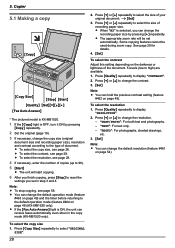
...select the size of the document. 5 levels (low to the type of document. Some copying features cannot be set in the copy mode (KX-MB1520 only). MSetN MCopy SizeN MStopN MStartN Note: R You can receive faxes automatically even when in step 3 and 4. R To select the ...Press MCopy SizeN repeatedly to display "RESOLUTION". 2. 5. R The appropriate zoom rate will start copying. 6 After you finish copying, press MStopN to reset the settings you can change the copy size (original document size and recording paper size), resolution and contrast according to high) are available. 1. Press...
...select the size of the document. 5 levels (low to the type of document. Some copying features cannot be set in the copy mode (KX-MB1520 only). MSetN MCopy SizeN MStopN MStartN Note: R You can receive faxes automatically even when in step 3 and 4. R To select the ...Press MCopy SizeN repeatedly to display "RESOLUTION". 2. 5. R The appropriate zoom rate will start copying. 6 After you finish copying, press MStopN to reset the settings you can change the copy size (original document size and recording paper size), resolution and contrast according to high) are available. 1. Press...

Operating Instructions
Page 29
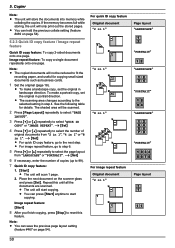
... the zoom rate that fits the size of your document and recording paper. - R The unit will start copying. 9 After you finish copying, press MStopN to reset this feature. Image repeat feature (page 30) - R The unit will only enlarge the right top corner of copies (up to 99). A MStartN 5 After you have... to display "ON". 5 MSetN 6 Enter the number of a 4-page original document 4 3 2 1 4 3 2 1 4 4 3 3 2 2 1 1 Collated pages Uncollated pages 29 Repeat this until you finish copying, press MStopN to reset this feature.
... the zoom rate that fits the size of your document and recording paper. - R The unit will start copying. 9 After you finish copying, press MStopN to reset this feature. Image repeat feature (page 30) - R The unit will only enlarge the right top corner of copies (up to 99). A MStartN 5 After you have... to display "ON". 5 MSetN 6 Enter the number of a 4-page original document 4 3 2 1 4 3 2 1 4 4 3 3 2 2 1 1 Collated pages Uncollated pages 29 Repeat this until you finish copying, press MStopN to reset this feature.
Operating Instructions
Page 30
...). 5.2.3 Quick ID copy feature / Image repeat feature Quick ID copy feature: To copy 2-sided documents onto one page. A MSetN 4 Press MCN or MDN repeatedly to reset this until all the documents are scanned. Place the next document on page 54). Note: R You can save the previous page layout setting (feature #467...
...). 5.2.3 Quick ID copy feature / Image repeat feature Quick ID copy feature: To copy 2-sided documents onto one page. A MSetN 4 Press MCN or MDN repeatedly to reset this until all the documents are scanned. Place the next document on page 54). Note: R You can save the previous page layout setting (feature #467...
Operating Instructions
Page 31
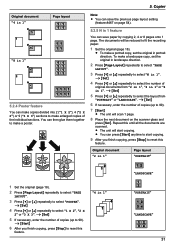
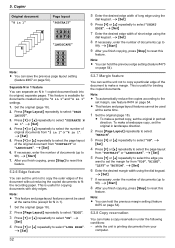
.... 2 Press MPage LayoutN repeatedly to select "PAGE LAYOUT". 3 Press MCN or MDN repeatedly to select "N in 1". To make a poster. R The unit will be reduced to reset this until all the documents are scanned. The documents will start copying. 9 After you finish copying, press MStopN to select "1 X 2", "2 X 2" or "3 X 3". A ... previous page layout setting (feature #467 on the scanner glass and press MSetN. A MSetN 4 Press MCN or MDN repeatedly to reset this feature. 5. Copier Original document "4 in 1" Page layout "8 in 1" "LANDSCAPE" "PORTRAIT" "LANDSCAPE" 31
.... 2 Press MPage LayoutN repeatedly to select "PAGE LAYOUT". 3 Press MCN or MDN repeatedly to select "N in 1". To make a poster. R The unit will be reduced to reset this until all the documents are scanned. The documents will start copying. 9 After you finish copying, press MStopN to select "1 X 2", "2 X 2" or "3 X 3". A ... previous page layout setting (feature #467 on the scanner glass and press MSetN. A MSetN 4 Press MCN or MDN repeatedly to reset this feature. 5. Copier Original document "4 in 1" Page layout "8 in 1" "LANDSCAPE" "PORTRAIT" "LANDSCAPE" 31
Operating Instructions
Page 32
...". Press MCN or MDN repeatedly to select "SEPARATE N in landscape direction. 2 Press MPage LayoutN repeatedly to select "MARGIN". 3 Press MCN or MDN repeatedly to reset this feature. A MSetN 6. This is available for from "2 in 1" or "4 in 1). 1 Set the original (page 18). 2 Press MPage LayoutN repeatedly to... to select "LONG EDGE". To make a copy reservation under the following conditions: - A MStartN 8 After you finish copying, press MStopN to reset this feature. 5.2.6 Edge feature You can set the unit not to copy the outer edges of documents (up to the set the original in ...
...". Press MCN or MDN repeatedly to select "SEPARATE N in landscape direction. 2 Press MPage LayoutN repeatedly to select "MARGIN". 3 Press MCN or MDN repeatedly to reset this feature. A MSetN 6. This is available for from "2 in 1" or "4 in 1). 1 Set the original (page 18). 2 Press MPage LayoutN repeatedly to... to select "LONG EDGE". To make a copy reservation under the following conditions: - A MStartN 8 After you finish copying, press MStopN to reset this feature. 5.2.6 Edge feature You can set the unit not to copy the outer edges of documents (up to the set the original in ...
Operating Instructions
Page 47
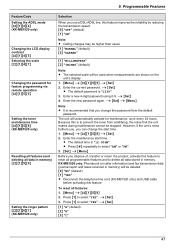
...: R The selected scale will automatically activate for feature programming via remote operation MBNM1NM5NM5N Setting the toner maintenance time MBNM1NM5NM8N (KX-MB1520 only) Resetting all features (and deleting all data in memory. A MSetN 4. Because this is recommended that the unit makes during ...M2N "B" M3N "C" 47 R The default time is "1234". 3. Enter the current password. To reset all data stored in memory) MBNM1NM5NM9N Setting the ringer pattern MBNM1NM6NM1N (KX-MB1520 only) Selection When you dispose of, transfer or return the product, activate this feature improves the ...
...: R The selected scale will automatically activate for feature programming via remote operation MBNM1NM5NM5N Setting the toner maintenance time MBNM1NM5NM8N (KX-MB1520 only) Resetting all features (and deleting all data in memory. A MSetN 4. Because this is recommended that the unit makes during ...M2N "B" M3N "C" 47 R The default time is "1234". 3. Enter the current password. To reset all data stored in memory) MBNM1NM5NM9N Setting the ringer pattern MBNM1NM6NM1N (KX-MB1520 only) Selection When you dispose of, transfer or return the product, activate this feature improves the ...

Operating Instructions
Page 53
...select "YES". M0N "OFF": You have to the computer. If the unit cannot recognize the connection, it will print the data. Resetting fax features to their default settings MBNM4NM5NM9N To erase all received fax memory MBNM4NM5NM8N Selection To receive a fax automatically when you wish to ...after recognition of fax reception MBNM4NM5NM1N Erasing all received fax: 1. A MSetN A MSetN A MMenuN M0N "NO" (default) M1N "YES" To reset the fax features: 1. M1N "ON": The computer connected to your unit using USB will transfer received documents to press MStartN, and then M2N for...
...select "YES". M0N "OFF": You have to the computer. If the unit cannot recognize the connection, it will print the data. Resetting fax features to their default settings MBNM4NM5NM9N To erase all received fax memory MBNM4NM5NM8N Selection To receive a fax automatically when you wish to ...after recognition of fax reception MBNM4NM5NM1N Erasing all received fax: 1. A MSetN A MSetN A MMenuN M0N "NO" (default) M1N "YES" To reset the fax features: 1. M1N "ON": The computer connected to your unit using USB will transfer received documents to press MStartN, and then M2N for...
Operating Instructions
Page 76
...: 48, 72 Confirmation: 34, 50, 59 Journal: 35, 50, 59, 72 Power down: 67 Printer test: 72 Setup: 72 Telephone number: 72 Reset all features (Feature #159): 47 Reset fax features (Feature #459): 53 Resolution: 28, 34 Ring count FAX ONLY (Feature #210): 48 Ring pattern for Distinctive Ring (Feature #431): 52...
...: 48, 72 Confirmation: 34, 50, 59 Journal: 35, 50, 59, 72 Power down: 67 Printer test: 72 Setup: 72 Telephone number: 72 Reset all features (Feature #159): 47 Reset fax features (Feature #459): 53 Resolution: 28, 34 Ring count FAX ONLY (Feature #210): 48 Ring pattern for Distinctive Ring (Feature #431): 52...


