Scanner
Page 1
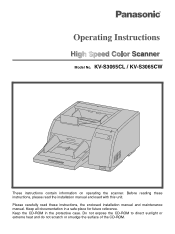
Keep the CD-ROM in a safe place for future reference. Keep all documentation in the protective case. Model No. KV-S3065CL / KV-S3065CW These instructions contain information on operating the scanner. Please carefully read these instructions, please read the installation manual enclosed with this unit. Do not expose the CD-ROM to direct sunlight or extreme heat and do not scratch or smudge the surface of the CD-ROM. Before reading these instructions, the enclosed installation manual and maintenance manual.
Keep the CD-ROM in a safe place for future reference. Keep all documentation in the protective case. Model No. KV-S3065CL / KV-S3065CW These instructions contain information on operating the scanner. Please carefully read these instructions, please read the installation manual enclosed with this unit. Do not expose the CD-ROM to direct sunlight or extreme heat and do not scratch or smudge the surface of the CD-ROM. Before reading these instructions, the enclosed installation manual and maintenance manual.

Scanner
Page 2
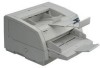
Thank you for purchasing a Panasonic "High Speed Color Scanner." ≥ Panasonic supports your original document. ∫ System requirements When using the scanner with a reliable and easy to work . A large size color image may not be scanned in the United States and other SCSI devices connected by ...are as follows. As an ENERGY STAR® Partner, Panasonic has determined that this product meets the ENERGY STAR guidelines for the purpose of private use document scanner. ≥ Panasonic has developed Panasonic Image Enhancement Technology to improve the quality of your scanned ...
Thank you for purchasing a Panasonic "High Speed Color Scanner." ≥ Panasonic supports your original document. ∫ System requirements When using the scanner with a reliable and easy to work . A large size color image may not be scanned in the United States and other SCSI devices connected by ...are as follows. As an ENERGY STAR® Partner, Panasonic has determined that this product meets the ENERGY STAR guidelines for the purpose of private use document scanner. ≥ Panasonic has developed Panasonic Image Enhancement Technology to improve the quality of your scanned ...
Scanner
Page 3
... ≥ Removing paper jams from the exit path 21 Cleaning the Unit 22 ≥ Outside of the scanner 22 ≥ Inside the scanner 22 ≥ Roller cleaning paper 22 ≥ Cleaning the rollers 23 ≥ Cleaning the sensors, reflectors, double feed detectors and image sensor covers 25 Replacing ...
... ≥ Removing paper jams from the exit path 21 Cleaning the Unit 22 ≥ Outside of the scanner 22 ≥ Inside the scanner 22 ≥ Roller cleaning paper 22 ≥ Cleaning the rollers 23 ≥ Cleaning the sensors, reflectors, double feed detectors and image sensor covers 25 Replacing ...
Scanner
Page 7
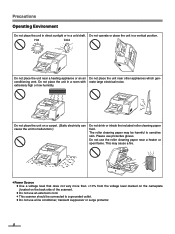
... damage. Do not place any liquids near the unit. -Accidental spillage of the unit: Prior to scanning, remove all staples and paper clips from pages. scanner.
... damage. Do not place any liquids near the unit. -Accidental spillage of the unit: Prior to scanning, remove all staples and paper clips from pages. scanner.
Scanner
Page 8
... place the unit in direct sunlight or in a room with erate large electrical noise. Do not place the unit on the back side of the scanner). ≥ Do not use a line conditioner, transient suppressor or surge protector. 8 The roller cleaning paper may cause a fire. ≥Power Source &#... on a carpet. (Static electricity can cause the unit to a grounded outlet. ≥ Do not use an extension cord. ≥ This scanner should be harmful to sensitive skin. This may be connected to malfunction.) Do not drink or inhale the included roller cleaning paper fluid. Do not...
... place the unit in direct sunlight or in a room with erate large electrical noise. Do not place the unit on the back side of the scanner). ≥ Do not use a line conditioner, transient suppressor or surge protector. 8 The roller cleaning paper may cause a fire. ≥Power Source &#... on a carpet. (Static electricity can cause the unit to a grounded outlet. ≥ Do not use an extension cord. ≥ This scanner should be harmful to sensitive skin. This may be connected to malfunction.) Do not drink or inhale the included roller cleaning paper fluid. Do not...

Scanner
Page 10
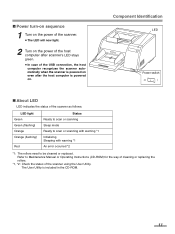
.... An imprinter unit installed here is called a post-imprinter. Fan exhaust vent USB connector Used to connect the scanner unit to red, and light steadily or flash. SCSI connector Used to connect the scanner unit to the host computer. 10 Exit tray Exit document guide Power indicator When the power is for...
.... An imprinter unit installed here is called a post-imprinter. Fan exhaust vent USB connector Used to connect the scanner unit to red, and light steadily or flash. SCSI connector Used to connect the scanner unit to the host computer. 10 Exit tray Exit document guide Power indicator When the power is for...
Scanner
Page 11
... powered on. ∫ Power turn-on sequence 1 Turn on the power of the scanner. ≥ The LED will now light. 2 Turn on the power of the host computer after scanner's LED stays green. ≥ In case of the scanner using the User Utility. Component Identification LED Power switch ∫ About LED LED indicates...Operating Instructions (CD-ROM) for the way of cleaning or replacing the rollers. *1, *2: Check the status of the USB connection, the host computer recognizes the scanner automatically when the scanner is powered on even after the host computer is included in the CD-ROM. 11
... powered on. ∫ Power turn-on sequence 1 Turn on the power of the scanner. ≥ The LED will now light. 2 Turn on the power of the host computer after scanner's LED stays green. ≥ In case of the scanner using the User Utility. Component Identification LED Power switch ∫ About LED LED indicates...Operating Instructions (CD-ROM) for the way of cleaning or replacing the rollers. *1, *2: Check the status of the USB connection, the host computer recognizes the scanner automatically when the scanner is powered on even after the host computer is included in the CD-ROM. 11

Scanner
Page 12
The scanner is provided with a DIP switch for USB connection) When connecting the scanner to a SCSI chain using a SCSI cable, perform the SCSI ID setting correctly. DIP switch SCSI ID Setting ID No. 0 1 2 3 4 5 6 7 #2 OFF OFF OFF OFF ON ON ON ON Switch #1 OFF OFF ON ON OFF OFF ON ON #0 OFF ON OFF ON OFF ON OFF ON Remarks Default setting 12 setting. Component Identification ∫ About the SCSI setting (Not required for the SCSI ID No.
The scanner is provided with a DIP switch for USB connection) When connecting the scanner to a SCSI chain using a SCSI cable, perform the SCSI ID setting correctly. DIP switch SCSI ID Setting ID No. 0 1 2 3 4 5 6 7 #2 OFF OFF OFF OFF ON ON ON ON Switch #1 OFF OFF ON ON OFF OFF ON ON #0 OFF ON OFF ON OFF ON OFF ON Remarks Default setting 12 setting. Component Identification ∫ About the SCSI setting (Not required for the SCSI ID No.
Scanner
Page 17
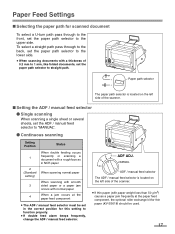
MANUAL ADF / manual feed selector The ADF / manual feed selector is located on the left side of the scanner. ∫ Setting the ADF / manual feed selector ¥ Single scanning When scanning a single sheet or several sheets, set the ADF / manual feed selector to "MANUAL". ... 1 frequently or scanning a document with a rough face as in the correct position for thin paper (KV-SS018) should be used. 17 Paper path selector The paper path selector is located on the left side of the scanner. ≥ If thin paper (with paper weight less than 50 g/m2) causes a paper jam frequently...
MANUAL ADF / manual feed selector The ADF / manual feed selector is located on the left side of the scanner. ∫ Setting the ADF / manual feed selector ¥ Single scanning When scanning a single sheet or several sheets, set the ADF / manual feed selector to "MANUAL". ... 1 frequently or scanning a document with a rough face as in the correct position for thin paper (KV-SS018) should be used. 17 Paper path selector The paper path selector is located on the left side of the scanner. ≥ If thin paper (with paper weight less than 50 g/m2) causes a paper jam frequently...
Scanner
Page 19
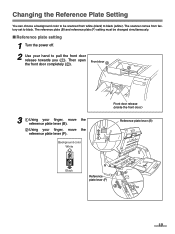
...must be scanned from factory set to black. The scanner comes from white (black) to black (white). Then open the front door completely (2). Front door 2 2 1 3 1 Using your finger, move the reference plate lever (F). 1 Background color White Front door release (Inside the front door.) ...Reference plate lever (B) Black Reference plate lever (F) 2 19 Changing the Reference Plate Setting You can choose a background color to be changed simultaneously. ∫ Reference plate setting 1 Turn the power off. 2 Use your finger, move the reference plate lever...
...must be scanned from factory set to black. The scanner comes from white (black) to black (white). Then open the front door completely (2). Front door 2 2 1 3 1 Using your finger, move the reference plate lever (F). 1 Background color White Front door release (Inside the front door.) ...Reference plate lever (B) Black Reference plate lever (F) 2 19 Changing the Reference Plate Setting You can choose a background color to be changed simultaneously. ∫ Reference plate setting 1 Turn the power off. 2 Use your finger, move the reference plate lever...
Scanner
Page 21
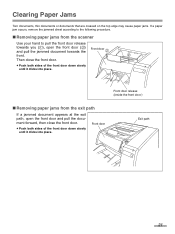
Front door 2 2 1 Front door release (Inside the front door.) ∫ Removing paper jams from the scanner Use your hand to the following procedure. ∫ Removing paper jams from the exit path If a jammed document appears at the exit path, open the ...
Front door 2 2 1 Front door release (Inside the front door.) ∫ Removing paper jams from the scanner Use your hand to the following procedure. ∫ Removing paper jams from the exit path If a jammed document appears at the exit path, open the ...
Scanner
Page 22
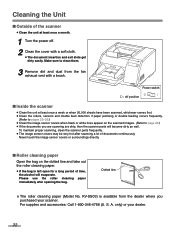
... accessories: Call 1-800-346-4768 (U. A. Power switch ± : off position ∫ Inside the scanner ≥ Clean the unit at least once a month. 1 Turn the power off. 2 Clean the cover with a brush. S. KV-SS03) is left open for a long period of time, the alcohol will become dirty as well. Cleaning... the Unit ∫ Outside of the scanner ≥ Clean the unit at least once a week or when 20,000 sheets have...
... accessories: Call 1-800-346-4768 (U. A. Power switch ± : off position ∫ Inside the scanner ≥ Clean the unit at least once a month. 1 Turn the power off. 2 Clean the cover with a brush. S. KV-SS03) is left open for a long period of time, the alcohol will become dirty as well. Cleaning... the Unit ∫ Outside of the scanner ≥ Clean the unit at least once a week or when 20,000 sheets have...

Scanner
Page 24
...after scanning a lot of documents. If cleaned in the back of the unit. Left side view ≥ Wipe in the left side of the scanner. Conveyor rollers Warning: When the tip of the pointer is located on the diagram to the right. ≥ Perform the retard roller cleaning only... in the direction of the arrows. Cleaning the Unit 3 Use the roller cleaning paper (KV-SS03) to remove the dirt from the surfaces of all the way around from rotating. Paper feed roller Image sensor covers Drive rollers A Separation ...
...after scanning a lot of documents. If cleaned in the back of the unit. Left side view ≥ Wipe in the left side of the scanner. Conveyor rollers Warning: When the tip of the pointer is located on the diagram to the right. ≥ Perform the retard roller cleaning only... in the direction of the arrows. Cleaning the Unit 3 Use the roller cleaning paper (KV-SS03) to remove the dirt from the surfaces of all the way around from rotating. Paper feed roller Image sensor covers Drive rollers A Separation ...
Scanner
Page 27
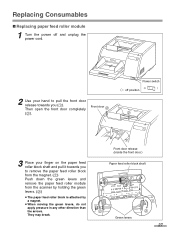
... hand to remove the paper feed roller block from the magnet. (1) Push down the green levers and remove the paper feed roller module from the scanner by holding the green levers. (2) ≥ The paper feed roller block is attached by a magnet. ≥ When moving the green levers, do not apply pressure...
... hand to remove the paper feed roller block from the magnet. (1) Push down the green levers and remove the paper feed roller module from the scanner by holding the green levers. (2) ≥ The paper feed roller block is attached by a magnet. ≥ When moving the green levers, do not apply pressure...

Scanner
Page 28
Caution: Do not close the front door when the paper feed roller block is located in the scanner. (1) Then push up on the left side and the bearings into the guide grooves of the side chassis in the conveyor.) 28 Bearing Side chassis ...Green levers Paper feed roller block Green levers Replacing Consumables 4 Open the optional "Roller Exchange Kit (KV-SS017)", and take out the new paper feed roller module. 5 Install the new paper feed roller module with the bearings and guide grooves, and then...
Caution: Do not close the front door when the paper feed roller block is located in the scanner. (1) Then push up on the left side and the bearings into the guide grooves of the side chassis in the conveyor.) 28 Bearing Side chassis ...Green levers Paper feed roller block Green levers Replacing Consumables 4 Open the optional "Roller Exchange Kit (KV-SS017)", and take out the new paper feed roller module. 5 Install the new paper feed roller module with the bearings and guide grooves, and then...

Scanner
Page 32
...with the shading adjustment Before proceeding, be carried out by means of the User Utility using the special shading paper which is provided with this scanner. ¥ When shading adjustment is required Proceed with the shading adjustment. 32 Shading Adjustment ¥ What is the purpose of the scanning ... that form on the main menu, and operate as shading adjustment. Clean the parts again, and then proceed with the compensation when the colors in the extreme, or when the image quality fails to thoroughly clean the image sensor cover (F). If the shading adjustment is known as the...
...with the shading adjustment Before proceeding, be carried out by means of the User Utility using the special shading paper which is provided with this scanner. ¥ When shading adjustment is required Proceed with the shading adjustment. 32 Shading Adjustment ¥ What is the purpose of the scanning ... that form on the main menu, and operate as shading adjustment. Clean the parts again, and then proceed with the compensation when the colors in the extreme, or when the image quality fails to thoroughly clean the image sensor cover (F). If the shading adjustment is known as the...
Scanner
Page 33
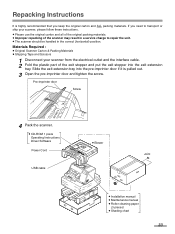
...Maintenance manual ≥ Roller cleaning paper (3 pieces) ≥ Shading chart 33 Materials Required : ≥ Original Scanner Carton & Packing Materials ≥ Shipping Tape and Scissors 1 Disconnect your scanner, please follow these instructions. ≥ Please use the original carton and all of the original packing materials. ≥...; Improper repacking of the scanner may result in the correct (horizontal) position. Repacking Instructions It is pulled out. 3 Open the pre-imprinter door ...
...Maintenance manual ≥ Roller cleaning paper (3 pieces) ≥ Shading chart 33 Materials Required : ≥ Original Scanner Carton & Packing Materials ≥ Shipping Tape and Scissors 1 Disconnect your scanner, please follow these instructions. ≥ Please use the original carton and all of the original packing materials. ≥...; Improper repacking of the scanner may result in the correct (horizontal) position. Repacking Instructions It is pulled out. 3 Open the pre-imprinter door ...

Scanner
Page 34
... (Weight) Power requirement Power consumption Maximum (Scanning) Minimum (Standby) Sleep mode KV-S3065CL KV-S3065CW Duplex scanning Front side : CIS (Contact Type Color Image Sensor) Back side : CIS (Contact Type Color Image Sensor) 227 mm (8.9 in.) 302 mm (11.9 in the scanner. Binary mode, Grayscale mode (8 bit), 64-step gradation (dither) mode, ...) Sub-scanning direction : 100~600 dpi (1 dpi step) (Same as main scanning direction) The optical resolution is recommended. 34 Specifications Item Scanner Unit Model No. Refer to PIE Reference Manual for thin paper is 600 dpi.
... (Weight) Power requirement Power consumption Maximum (Scanning) Minimum (Standby) Sleep mode KV-S3065CL KV-S3065CW Duplex scanning Front side : CIS (Contact Type Color Image Sensor) Back side : CIS (Contact Type Color Image Sensor) 227 mm (8.9 in.) 302 mm (11.9 in the scanner. Binary mode, Grayscale mode (8 bit), 64-step gradation (dither) mode, ...) Sub-scanning direction : 100~600 dpi (1 dpi step) (Same as main scanning direction) The optical resolution is recommended. 34 Specifications Item Scanner Unit Model No. Refer to PIE Reference Manual for thin paper is 600 dpi.
Scanner
Page 36
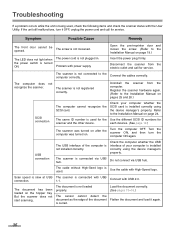
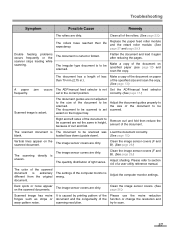
... the edge of the document is connected via USB hub. The power cord is not loosened. Connect the cables correctly. Register the scanner hardware again. (Refer to the Installation Manual on the hopper tray. Do not connect via USB hub. The document has been loaded... connection. Scan speed is used . USB connection The USB interface of your computer whether the SCSI card is not loaded properly. The scanner is not installed correctly. If the unit still malfunctions, turn the computer ON again. Open the pre-imprinter door and loosen the screw...
... the edge of the document is connected via USB hub. The power cord is not loosened. Connect the cables correctly. Register the scanner hardware again. (Refer to the Installation Manual on the hopper tray. Do not connect via USB hub. The document has been loaded... connection. Scan speed is used . USB connection The USB interface of your computer whether the SCSI card is not loaded properly. The scanner is not installed correctly. If the unit still malfunctions, turn the computer ON again. Open the pre-imprinter door and loosen the screw...
Scanner
Page 37
...Replace the paper feed roller module and the retard roller module. (See page 27 and page 29.) Double feeding problems occurs frequently or the scanner stops loading while scanning. Make a copy of the document on the scanned document. of the function or change the resolution and wavy pattern...density is The document to be scanned. The image sensor covers are dirty. The quantity distribution of the scanned document is wrong. The color of light varies. The scanned document is uneven. Please refer to be scanned was Load the document correctly. Dark spots or noise appear...
...Replace the paper feed roller module and the retard roller module. (See page 27 and page 29.) Double feeding problems occurs frequently or the scanner stops loading while scanning. Make a copy of the document on the scanned document. of the function or change the resolution and wavy pattern...density is The document to be scanned. The image sensor covers are dirty. The quantity distribution of the scanned document is wrong. The color of light varies. The scanned document is uneven. Please refer to be scanned was Load the document correctly. Dark spots or noise appear...


