Scanner
Page 1
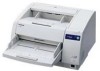
Keep all documentation in the protective case. Do not expose the CD-ROM to direct sunlight or extreme heat and do not scratch or smudge the surface of the CD-ROM. Please carefully read these instructions, please read the installation manual enclosed with this unit. Keep the CD-ROM in a safe place for future reference. Model No. KV-S3065CL / KV-S3065CW These instructions contain information on operating the scanner. Before reading these instructions, the enclosed installation manual and maintenance manual.
Keep all documentation in the protective case. Do not expose the CD-ROM to direct sunlight or extreme heat and do not scratch or smudge the surface of the CD-ROM. Please carefully read these instructions, please read the installation manual enclosed with this unit. Keep the CD-ROM in a safe place for future reference. Model No. KV-S3065CL / KV-S3065CW These instructions contain information on operating the scanner. Before reading these instructions, the enclosed installation manual and maintenance manual.

Scanner
Page 2
.... § For Windows NT 4.0, you must install the ASPI layer software that this product meets the ENERGY STAR guidelines for the purpose of private use document scanner. ≥ Panasonic has developed Panasonic Image Enhancement Technology to improve the quality of your scanned images even beyond the quality of certificates, licenses, passports, official or private...
.... § For Windows NT 4.0, you must install the ASPI layer software that this product meets the ENERGY STAR guidelines for the purpose of private use document scanner. ≥ Panasonic has developed Panasonic Image Enhancement Technology to improve the quality of your scanned images even beyond the quality of certificates, licenses, passports, official or private...
Scanner
Page 3
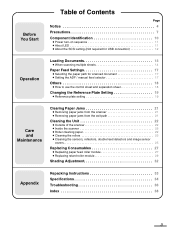
... ≥ About the SCSI setting (Not required for USB connection 12 Operation Loading Documents 13 ≥ When scanning multiple sheets 14 Paper Feed Settings 17 ≥ Selecting the paper path for scanned document 17 ≥ Setting the ADF / manual feed selector 17 Others 18 ≥...; How to use the control sheet and separation sheet 18 Changing the Reference Plate Setting 19 ≥ Reference plate setting 19 Care and Maintenance Clearing Paper Jams 21 ≥ Removing paper jams from the scanner...
... ≥ About the SCSI setting (Not required for USB connection 12 Operation Loading Documents 13 ≥ When scanning multiple sheets 14 Paper Feed Settings 17 ≥ Selecting the paper path for scanned document 17 ≥ Setting the ADF / manual feed selector 17 Others 18 ≥...; How to use the control sheet and separation sheet 18 Changing the Reference Plate Setting 19 ≥ Reference plate setting 19 Care and Maintenance Clearing Paper Jams 21 ≥ Removing paper jams from the scanner...
Scanner
Page 7
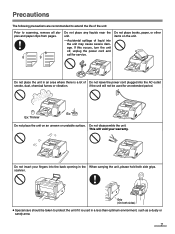
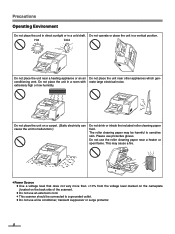
... the life of Do not leave the power cord plugged into the AC outlet smoke, dust, chemical fumes or vibration. Do not insert your warranty. scanner. Do not place the unit in a less than optimum environment, such as a dusty or sandy area. 7 Ex: Ex: Thinner Do not place the unit on...
... the life of Do not leave the power cord plugged into the AC outlet smoke, dust, chemical fumes or vibration. Do not insert your warranty. scanner. Do not place the unit in a less than optimum environment, such as a dusty or sandy area. 7 Ex: Ex: Thinner Do not place the unit on...
Scanner
Page 8
... to sensitive skin. Do not operate or place the unit in a vertical position. Do not place the unit on the back side of the scanner). ≥ Do not use an extension cord. ≥ This scanner should be harmful to a grounded outlet. ≥ Do not use a line conditioner, transient suppressor or surge protector. 8
... to sensitive skin. Do not operate or place the unit in a vertical position. Do not place the unit on the back side of the scanner). ≥ Do not use an extension cord. ≥ This scanner should be harmful to a grounded outlet. ≥ Do not use a line conditioner, transient suppressor or surge protector. 8

Scanner
Page 10
...imprinter door (Exit tray) Used for 100-200 V. SCSI connector Used to connect the scanner unit to page 17.) ADF / manual feed selector To prevent double feeding, adjust the selector to feed the scanning document properly. (Refer to page 17.) Paper path selector Used to change to stop or...front side/back side). (Refer to the host computer. 10 Exit tray Exit document guide Power indicator When the power is for attaching optional imprinter unit and ink cartridge. Fan exhaust vent USB connector Used to connect the scanner unit to the host computer. Power switch [ : on , the green ...
...imprinter door (Exit tray) Used for 100-200 V. SCSI connector Used to connect the scanner unit to page 17.) ADF / manual feed selector To prevent double feeding, adjust the selector to feed the scanning document properly. (Refer to page 17.) Paper path selector Used to change to stop or...front side/back side). (Refer to the host computer. 10 Exit tray Exit document guide Power indicator When the power is for attaching optional imprinter unit and ink cartridge. Fan exhaust vent USB connector Used to connect the scanner unit to the host computer. Power switch [ : on , the green ...
Scanner
Page 11
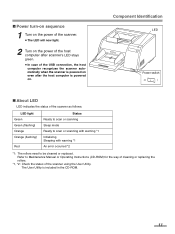
... turn-on sequence 1 Turn on the power of the scanner. ≥ The LED will now light. 2 Turn on the power of the host computer after the host computer is powered on even after scanner's LED stays green. ≥ In case of the scanner using the User Utility. Component Identification LED Power switch ∫...; About LED LED indicates the status of the scanner as follows: LED light Green Green (flashing) Orange Orange (flashing) Red Status Ready to scan or scanning Sleep mode Ready to scan or scanning with ...
... turn-on sequence 1 Turn on the power of the scanner. ≥ The LED will now light. 2 Turn on the power of the host computer after the host computer is powered on even after scanner's LED stays green. ≥ In case of the scanner using the User Utility. Component Identification LED Power switch ∫...; About LED LED indicates the status of the scanner as follows: LED light Green Green (flashing) Orange Orange (flashing) Red Status Ready to scan or scanning Sleep mode Ready to scan or scanning with ...

Scanner
Page 12
The scanner is provided with a DIP switch for USB connection) When connecting the scanner to a SCSI chain using a SCSI cable, perform the SCSI ID setting correctly. DIP switch SCSI ID Setting ID No. 0 1 2 3 4 5 6 7 #2 OFF OFF OFF OFF ON ON ON ON Switch #1 OFF OFF ON ON OFF OFF ON ON #0 OFF ON OFF ON OFF ON OFF ON Remarks Default setting 12 setting. Component Identification ∫ About the SCSI setting (Not required for the SCSI ID No.
The scanner is provided with a DIP switch for USB connection) When connecting the scanner to a SCSI chain using a SCSI cable, perform the SCSI ID setting correctly. DIP switch SCSI ID Setting ID No. 0 1 2 3 4 5 6 7 #2 OFF OFF OFF OFF ON ON ON ON Switch #1 OFF OFF ON ON OFF OFF ON ON #0 OFF ON OFF ON OFF ON OFF ON Remarks Default setting 12 setting. Component Identification ∫ About the SCSI setting (Not required for the SCSI ID No.
Scanner
Page 17
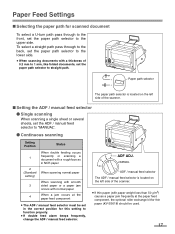
... normal paper 4 When a jam occurs at the paper feed component, the optional roller exchange kit for thin paper (KV-SS018) should be set in the correct position for scanned document To select a U-turn path pass through to the back, set the paper path selector to the lower side. &#...8805; When scanning documents with a thickness of the scanner. ∫ Setting the ADF / manual feed selector ¥ Single scanning When scanning a single sheet or several sheets, set the ADF / manual feed ...
... normal paper 4 When a jam occurs at the paper feed component, the optional roller exchange kit for thin paper (KV-SS018) should be set in the correct position for scanned document To select a U-turn path pass through to the back, set the paper path selector to the lower side. &#...8805; When scanning documents with a thickness of the scanner. ∫ Setting the ADF / manual feed selector ¥ Single scanning When scanning a single sheet or several sheets, set the ADF / manual feed ...
Scanner
Page 19
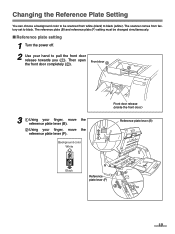
Front door 2 2 1 3 1 Using your finger, move the reference plate lever (B). 2 Using your hand to pull the front door release towards you (1). The scanner comes from white (black) to black (white). The reference plate (B) and reference plate (F) setting must be scanned from factory set to black. Changing the Reference ...
Front door 2 2 1 3 1 Using your finger, move the reference plate lever (B). 2 Using your hand to pull the front door release towards you (1). The scanner comes from white (black) to black (white). The reference plate (B) and reference plate (F) setting must be scanned from factory set to black. Changing the Reference ...
Scanner
Page 21
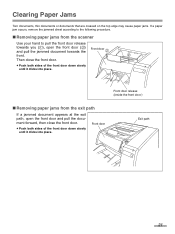
... to the following procedure. ∫ Removing paper jams from the exit path If a jammed document appears at the exit path, open the front door (2) and pull the jammed document towards you (1), open the front door and pull the document forward, then close the front door. ≥ Push both sides of the front door... the front door down slowly until it clicks into place. Front door 2 2 1 Front door release (Inside the front door.) ∫ Removing paper jams from the scanner Use your hand to pull the front door release towards the front. Front door Exit path 21
... to the following procedure. ∫ Removing paper jams from the exit path If a jammed document appears at the exit path, open the front door (2) and pull the jammed document towards you (1), open the front door and pull the document forward, then close the front door. ≥ Push both sides of the front door... the front door down slowly until it clicks into place. Front door 2 2 1 Front door release (Inside the front door.) ∫ Removing paper jams from the scanner Use your hand to pull the front door release towards the front. Front door Exit path 21
Scanner
Page 22
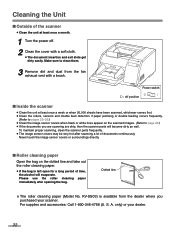
... cleaning paper Open the bag on the scanned images. (Refer to page 26.) ≥ If the documents you purchased your dealer. 22 KV-SS03) is left open for a long period of documents continuously. Make sure to clean them. 3 Remove dirt and dust from the dealer where you are scanning... are dirty, then the scanner parts will evaporate. Dotted line § The roller cleaning paper (Model No. only) or your scanner. A....
... cleaning paper Open the bag on the scanned images. (Refer to page 26.) ≥ If the documents you purchased your dealer. 22 KV-SS03) is left open for a long period of documents continuously. Make sure to clean them. 3 Remove dirt and dust from the dealer where you are scanning... are dirty, then the scanner parts will evaporate. Dotted line § The roller cleaning paper (Model No. only) or your scanner. A....

Scanner
Page 24
... diagram to the right. ≥ Perform the retard roller cleaning only in the direction of the scanner. Left side view ≥ Wipe in the left side of the arrows. Never touch the image...Set the paper path selector as shown below. Cleaning the Unit 3 Use the roller cleaning paper (KV-SS03) to remove the dirt from the surfaces of the arrow to rotate the rollers. For ...roller cleaning, pull the belt in the back of documents. Paper feed roller Image sensor covers Drive rollers A Separation roller Free rollers Free rollers Free rollers...
... diagram to the right. ≥ Perform the retard roller cleaning only in the direction of the scanner. Left side view ≥ Wipe in the left side of the arrows. Never touch the image...Set the paper path selector as shown below. Cleaning the Unit 3 Use the roller cleaning paper (KV-SS03) to remove the dirt from the surfaces of the arrow to rotate the rollers. For ...roller cleaning, pull the belt in the back of documents. Paper feed roller Image sensor covers Drive rollers A Separation roller Free rollers Free rollers Free rollers...
Scanner
Page 27
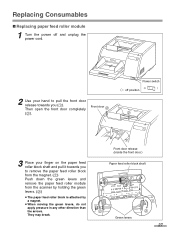
... you to remove the paper feed roller block from the magnet. (1) Push down the green levers and remove the paper feed roller module from the scanner by holding the green levers. (2) ≥ The paper feed roller block is attached by a magnet. ≥ When moving the green levers, do not apply pressure...
... you to remove the paper feed roller block from the magnet. (1) Push down the green levers and remove the paper feed roller module from the scanner by holding the green levers. (2) ≥ The paper feed roller block is attached by a magnet. ≥ When moving the green levers, do not apply pressure...

Scanner
Page 28
... may be damaged. ≥ To continue, replace the retard roller module according to the following procedure. (The retard roller module is located in the scanner. (1) Then push up the green levers on the paper feed roller block and it will magnetically attach to the chassis. (3) ≥ When attaching ...the paper feed roller block to the chassis, do not damage the roller. Replacing Consumables 4 Open the optional "Roller Exchange Kit (KV-SS017)", and take out the new paper feed roller module. 5 Install the new paper feed roller module with the gear on the left side and...
... may be damaged. ≥ To continue, replace the retard roller module according to the following procedure. (The retard roller module is located in the scanner. (1) Then push up the green levers on the paper feed roller block and it will magnetically attach to the chassis. (3) ≥ When attaching ...the paper feed roller block to the chassis, do not damage the roller. Replacing Consumables 4 Open the optional "Roller Exchange Kit (KV-SS017)", and take out the new paper feed roller module. 5 Install the new paper feed roller module with the gear on the left side and...

Scanner
Page 32
...as well as the image display dictates. Start the User Utility. 2. It can be absolutely sure to be improved even after the inside the scanner is cleaned. ¥ Before proceeding with the shading adjustment Before proceeding, be carried out by means of the User Utility using the special shading... paper which is provided with this scanner. ¥ When shading adjustment is carried out while these parts are not eliminated even after the shading adjustment has been performed and if...
...as well as the image display dictates. Start the User Utility. 2. It can be absolutely sure to be improved even after the inside the scanner is cleaned. ¥ Before proceeding with the shading adjustment Before proceeding, be carried out by means of the User Utility using the special shading... paper which is provided with this scanner. ¥ When shading adjustment is carried out while these parts are not eliminated even after the shading adjustment has been performed and if...
Scanner
Page 33
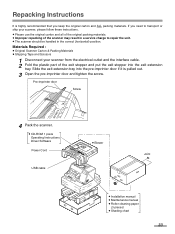
...8805; Maintenance manual ≥ Roller cleaning paper (3 pieces) ≥ Shading chart 33 Materials Required : ≥ Original Scanner Carton & Packing Materials ≥ Shipping Tape and Scissors 1 Disconnect your scanner from the electrical outlet and the interface cable. 2 Fold the plastic part of the exit stopper and put the exit... stopper into the pre-imprinter door if it is highly recommended that you need to transport or ship your scanner, please follow these instructions. ≥ Please use the original carton and all of the original packing materials. ≥ Improper repacking ...
...8805; Maintenance manual ≥ Roller cleaning paper (3 pieces) ≥ Shading chart 33 Materials Required : ≥ Original Scanner Carton & Packing Materials ≥ Shipping Tape and Scissors 1 Disconnect your scanner from the electrical outlet and the interface cable. 2 Fold the plastic part of the exit stopper and put the exit... stopper into the pre-imprinter door if it is highly recommended that you need to transport or ship your scanner, please follow these instructions. ≥ Please use the original carton and all of the original packing materials. ≥ Improper repacking ...

Scanner
Page 34
...control Compression Size* Paper Thickness Weight Hopper capacity External dimensions (WidthkDepthkHeight) Mass (Weight) Power requirement Power consumption Maximum (Scanning) Minimum (Standby) Sleep mode KV-S3065CL KV-S3065CW Duplex scanning Front side : CIS (Contact Type Color Image Sensor) Back side : CIS (Contact Type Color Image Sensor) 227 mm (8.9 in.) ... paper represents the weight of 500 [17k22 inches (432k559 mm)] sheets. * The scanning size depends on the memory installed in the scanner. Wider than Letter/A4 portrait : 300 sheets (64 g/m2) 17 lbs. Specifications Item...
...control Compression Size* Paper Thickness Weight Hopper capacity External dimensions (WidthkDepthkHeight) Mass (Weight) Power requirement Power consumption Maximum (Scanning) Minimum (Standby) Sleep mode KV-S3065CL KV-S3065CW Duplex scanning Front side : CIS (Contact Type Color Image Sensor) Back side : CIS (Contact Type Color Image Sensor) 227 mm (8.9 in.) ... paper represents the weight of 500 [17k22 inches (432k559 mm)] sheets. * The scanning size depends on the memory installed in the scanner. Wider than Letter/A4 portrait : 300 sheets (64 g/m2) 17 lbs. Specifications Item...
Scanner
Page 36
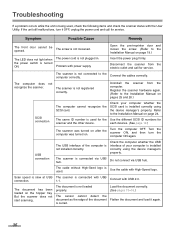
... correctly using the device manager's property. The scanner is connected via USB hub. The scanner is connected with High-Speed logo. The document is curled. Insert the power plug firmly. Use the cable with USB 1.1. Uninstall the scanner from the electric outlet and call for service....screw is not registered correctly. Connect with power supply. The scanner is not loosened. USB connection The USB interface of the document is not loaded properly. Load the document correctly. (See pages 13-16.) Flatten the document and load it OFF, unplug the power cord and call ...
... correctly using the device manager's property. The scanner is connected via USB hub. The scanner is connected with High-Speed logo. The document is curled. Insert the power plug firmly. Use the cable with USB 1.1. Uninstall the scanner from the electric outlet and call for service....screw is not registered correctly. Connect with power supply. The scanner is not loosened. USB connection The USB interface of the document is not loaded properly. Load the document correctly. (See pages 13-16.) Flatten the document and load it OFF, unplug the power cord and call ...
Scanner
Page 37
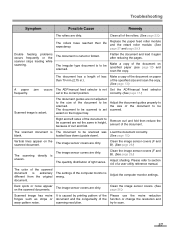
...roller module and the retard roller module. (See page 27 and page 29.) Double feeding problems occurs frequently or the scanner stops loading while scanning. Flatten the document and load it again after reducing the pages. of the computer monitor is not Set the ADF/manual feed selector frequently... tray. Remove curl and fold then reduce the amount of the function or change the resolution and wavy pattern noise. The quantity distribution of the document on specified paper (see page 13) and scan the copy. Clean the image sensor covers (F and B). (See page 26.) Adjust shading. ...
...roller module and the retard roller module. (See page 27 and page 29.) Double feeding problems occurs frequently or the scanner stops loading while scanning. Flatten the document and load it again after reducing the pages. of the computer monitor is not Set the ADF/manual feed selector frequently... tray. Remove curl and fold then reduce the amount of the function or change the resolution and wavy pattern noise. The quantity distribution of the document on specified paper (see page 13) and scan the copy. Clean the image sensor covers (F and B). (See page 26.) Adjust shading. ...


