Operating Instructions
Page 1
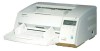
Please carefully read these documentation in the protective case. Keep these instructions, the enclosed installation manual and maintenance manual. Model No. Keep the CD-ROM in safe place for future reference. Before reading these instructions, please go through the installation manual enclosed with this unit. KV-S2065L / KV-S2065W These instructions contain the information on operating the scanner. Do not expose the CD-ROM to direct sunlight or extreme heat and do not scratch or smudge the surface of the CD-ROM.
Please carefully read these documentation in the protective case. Keep these instructions, the enclosed installation manual and maintenance manual. Model No. Keep the CD-ROM in safe place for future reference. Before reading these instructions, please go through the installation manual enclosed with this unit. KV-S2065L / KV-S2065W These instructions contain the information on operating the scanner. Do not expose the CD-ROM to direct sunlight or extreme heat and do not scratch or smudge the surface of the CD-ROM.
Operating Instructions
Page 2
...; is trademark of ficial or private documents, and the like to contribute to your imaging needs. • Difference between the KV-S2065L and KV-S2065W is only scanning document size. CPU Pentium® 166MHz or higher (Pentium® III, Celeron™ processor or higher is recommended... not duplicate copyrighted material or the work of private use functions, reliable paper handling, easy maintenance and more, Panasonic would like . Thank you for purchasing a Panasonic "High Speed Scanner". • For the versatile solution for energy efficiency. (ENERGY STAR is a U.S.
...; is trademark of ficial or private documents, and the like to contribute to your imaging needs. • Difference between the KV-S2065L and KV-S2065W is only scanning document size. CPU Pentium® 166MHz or higher (Pentium® III, Celeron™ processor or higher is recommended... not duplicate copyrighted material or the work of private use functions, reliable paper handling, easy maintenance and more, Panasonic would like . Thank you for purchasing a Panasonic "High Speed Scanner". • For the versatile solution for energy efficiency. (ENERGY STAR is a U.S.
Operating Instructions
Page 3
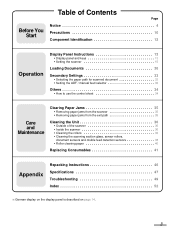
... Contents Page Notice 4 Precautions 10 Component Identification 12 Operation Display Panel Instructions 13 • Display panel and keys 13 • Setting the scanner 15 Loading Documents 30 Secondary Settings 33 • Selecting the paper path for scanned document 33 • Setting the ADF / manual feed ... • Removing paper jams from the exit path 35 Cleaning the Unit 36 • Outside of the scanner 36 • Inside the scanner 36 • Cleaning the rollers 36 • Cleaning the scanning section glass, sensor rollers, document sensors and double feed detection ...
... Contents Page Notice 4 Precautions 10 Component Identification 12 Operation Display Panel Instructions 13 • Display panel and keys 13 • Setting the scanner 15 Loading Documents 30 Secondary Settings 33 • Selecting the paper path for scanned document 33 • Setting the ADF / manual feed ... • Removing paper jams from the exit path 35 Cleaning the Unit 36 • Outside of the scanner 36 • Inside the scanner 36 • Cleaning the rollers 36 • Cleaning the scanning section glass, sensor rollers, document sensors and double feed detection ...

Operating Instructions
Page 10
.... Do not insert your warranty. Prior to extend the life of Do not leave the power cord plugged into the unit may cause severe damage. scanner. Do not place any liquids near the unit. - If this occurs, turn the unit off, unplug the power cord and call for an extended period...
.... Do not insert your warranty. Prior to extend the life of Do not leave the power cord plugged into the unit may cause severe damage. scanner. Do not place any liquids near the unit. - If this occurs, turn the unit off, unplug the power cord and call for an extended period...

Operating Instructions
Page 11
... on a carpet. (Static electricity can cause the unit to the edges with generate large electrical noise. Do not place the unit in direct of the scanner). • Do not use an extension cord. • This scanner should be connected to a grounded outlet. • Do not use protective gloves.
... on a carpet. (Static electricity can cause the unit to the edges with generate large electrical noise. Do not place the unit in direct of the scanner). • Do not use an extension cord. • This scanner should be connected to a grounded outlet. • Do not use protective gloves.
Operating Instructions
Page 12
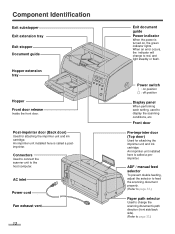
... vent 12 Exit document guide Power indicator When the power is called a postimprinter. Power switch [ : on , the green indicator lights. Connectors Used to connect the scanner unit to display the scanning conditions, etc.
... vent 12 Exit document guide Power indicator When the power is called a postimprinter. Power switch [ : on , the green indicator lights. Connectors Used to connect the scanner unit to display the scanning conditions, etc.
Operating Instructions
Page 14
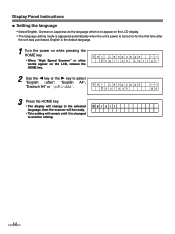
Se t L a ng ua ge De u t s ch A4 3 Press the HOME key. • The display will change to the selected language, then the scanner will be ready. • This setting will remain until it is changed to appear on the LCD display. • The language setting mode is appeared ... which is to another setting. Be r e i t 14 English is the default language. 1 Turn the power on while pressing the HOME key. • When "High Speed Scanner" or other words appear on for the first time after the unit was purchased. Se t L a ng ua ge Eng l i sh Le t t e r 2 Use the 2 key...
Se t L a ng ua ge De u t s ch A4 3 Press the HOME key. • The display will change to the selected language, then the scanner will be ready. • This setting will remain until it is changed to appear on the LCD display. • The language setting mode is appeared ... which is to another setting. Be r e i t 14 English is the default language. 1 Turn the power on while pressing the HOME key. • When "High Speed Scanner" or other words appear on for the first time after the unit was purchased. Se t L a ng ua ge Eng l i sh Le t t e r 2 Use the 2 key...

Operating Instructions
Page 15
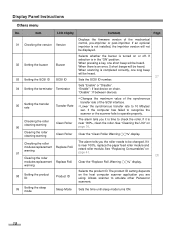
... sensitivity of a document. 06 Back side dropout color B. Display Panel Instructions ∫Setting the scanner The following parameters can be supported by the scanner. If the application software provides these features, it will be customized using the scanner's various setting modes. Item LCD display Contents Page 01 Front side dropout color F. Halftone Selection...
... sensitivity of a document. 06 Back side dropout color B. Display Panel Instructions ∫Setting the scanner The following parameters can be supported by the scanner. If the application software provides these features, it will be customized using the scanner's various setting modes. Item LCD display Contents Page 01 Front side dropout color F. Halftone Selection...
Operating Instructions
Page 18
.... • Lower the synchronous transfer rate to 10 Mbytes/ sec. if the computer has failed to recognize the scanner or the scanner fails to emulate other Panasonic scanners. 09 Setting the sleep mode Sleep Mode Sets the time until sleep mode turns ON. 18 If it is time..."Clean Roller Warning ≤≤%" display. 07 Checking the roller modules replacement Replace Roll. See "Replacing Consumables" on the host computer scanner application you the roller needs to check the roller. The product ID setting depends on page 41. 28 Clearing the roller modules replacement Replace...
.... • Lower the synchronous transfer rate to 10 Mbytes/ sec. if the computer has failed to recognize the scanner or the scanner fails to emulate other Panasonic scanners. 09 Setting the sleep mode Sleep Mode Sets the time until sleep mode turns ON. 18 If it is time..."Clean Roller Warning ≤≤%" display. 07 Checking the roller modules replacement Replace Roll. See "Replacing Consumables" on the host computer scanner application you the roller needs to check the roller. The product ID setting depends on page 41. 28 Clearing the roller modules replacement Replace...

Operating Instructions
Page 21
... 64 (Dynamic Threshold)§1 Error diffusion §1The dynamic threshold is available on how to install it refer to "Norm". • "D" means dark. B . W1 a 1TW6 a 6 : Scanner reduces a white dot. 21 Host None B1!1 B2!2 B3!3 B4!4 B5!5 B6!6 W1!1 W2!2 W3!3 W4!4 W5!5 W6!6 B1 a 1TB6... a 6 : Scanner reduces a black dot. For details on the market. B . "L" means low. Display Panel Instructions 06 Back side dropout color 06 . Co l o r d r op Ho s t Color selection Host ...
... 64 (Dynamic Threshold)§1 Error diffusion §1The dynamic threshold is available on how to install it refer to "Norm". • "D" means dark. B . W1 a 1TW6 a 6 : Scanner reduces a white dot. 21 Host None B1!1 B2!2 B3!3 B4!4 B5!5 B6!6 W1!1 W2!2 W3!3 W4!4 W5!5 W6!6 B1 a 1TB6... a 6 : Scanner reduces a black dot. For details on the market. B . "L" means low. Display Panel Instructions 06 Back side dropout color 06 . Co l o r d r op Ho s t Color selection Host ...

Operating Instructions
Page 22
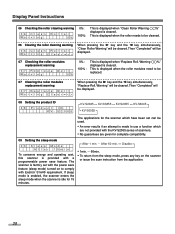
...scanned pages displayed on the edges of actual pages. 15 Setting the "Double Feed" detector action 15 . After completing scanning, the scanner will be high. High sensitivity: The double feed detector's sensitivity will display double feeding warning. 16 Setting the double feed detector sensitivity... Sens. Buzzer : When the scanner detects double feeding, it will sound a buzzer, the power indicator will light red and it will not work well. • Thick...
...scanned pages displayed on the edges of actual pages. 15 Setting the "Double Feed" detector action 15 . After completing scanning, the scanner will be high. High sensitivity: The double feed detector's sensitivity will display double feeding warning. 16 Setting the double feed detector sensitivity... Sens. Buzzer : When the scanner detects double feeding, it will sound a buzzer, the power indicator will light red and it will not work well. • Thick...

Operating Instructions
Page 23
... the "Save scanning settings (Select memory)". Even if they are not saved, they will return to the default values. (See "01" to 400dpi. Slow : The scanner scans at 200dpi a 200dpi. Memory 1 Memory 2 18 Save scanning settings (Execution) 18 . Load Se t t i ng De f au l t Default Memory 1 Memory 2 • If you ... become valid by "Normal". This setting will not be changed even if the power is turned off , the next time the unit is 200dpi, the scanner scans at 200dpi a 150dpi, but outputs the image at half of the "Normal" speed. Save Se t t i ng Memo r y 1 Host Slow Normal Fast Fast ...
... the "Save scanning settings (Select memory)". Even if they are not saved, they will return to the default values. (See "01" to 400dpi. Slow : The scanner scans at 200dpi a 200dpi. Memory 1 Memory 2 18 Save scanning settings (Execution) 18 . Load Se t t i ng De f au l t Default Memory 1 Memory 2 • If you ... become valid by "Normal". This setting will not be changed even if the power is turned off , the next time the unit is 200dpi, the scanner scans at 200dpi a 150dpi, but outputs the image at half of the "Normal" speed. Save Se t t i ng Memo r y 1 Host Slow Normal Fast Fast ...

Operating Instructions
Page 24
... on the LCD 01 . They will be cleared when the power is turned OFF. Coun t e r Scan Scan User System Scan : After scanning one time, the scanner counter will be cleared. S y s t em Co u n t . 1234567 (ex.) 24 Pressing the 1 key or the 2 key continuously will change to now. 0 3 . Contents • Pressing the 1 key...
... on the LCD 01 . They will be cleared when the power is turned OFF. Coun t e r Scan Scan User System Scan : After scanning one time, the scanner counter will be cleared. S y s t em Co u n t . 1234567 (ex.) 24 Pressing the 1 key or the 2 key continuously will change to now. 0 3 . Contents • Pressing the 1 key...

Operating Instructions
Page 27
... the post-imprinter firmware version. Te rmi na t o r Enab l e 05 Setting the transfer rate 05 . if the computer has failed to recognize the scanner or the scanner fails to the previous mode. T r an s f e r Ra t e 2 0MB y t e / s e c 01 2 3 4 5 6 7 • Setting the SCSI ID ...will be displayed. If a post-imprinter unit is not installed, the entry will remain blank. Enable Disable When the scanner is off, be activated after turning the power off and turning it on again. • The internal terminator works only when the unit's power has...
... the post-imprinter firmware version. Te rmi na t o r Enab l e 05 Setting the transfer rate 05 . if the computer has failed to recognize the scanner or the scanner fails to the previous mode. T r an s f e r Ra t e 2 0MB y t e / s e c 01 2 3 4 5 6 7 • Setting the SCSI ID ...will be displayed. If a post-imprinter unit is not installed, the entry will remain blank. Enable Disable When the scanner is off, be activated after turning the power off and turning it on again. • The internal terminator works only when the unit's power has...
Operating Instructions
Page 28
... save feature. Then "Completed" will be displayed. 07 Checking the roller modules replacement warning 07 . S2 0 6 5 KV-S2065 KV-SS855 KV-S2055 KV-S6045 KV-S6055 The applications for the scanner which are not provided with the KV-S2065 series of scanners. • No guarantees are given for 15 minutes. After 1 min. Warning ≤≤%" displayed is idle...
... save feature. Then "Completed" will be displayed. 07 Checking the roller modules replacement warning 07 . S2 0 6 5 KV-S2065 KV-SS855 KV-S2055 KV-S6045 KV-S6055 The applications for the scanner which are not provided with the KV-S2065 series of scanners. • No guarantees are given for 15 minutes. After 1 min. Warning ≤≤%" displayed is idle...

Operating Instructions
Page 29
... displayed when the STOP key was pressed during scanning. Even if the STOP key is pressed in the scanner, open the front door and remove it is pressed and the scanner stops. If the document remains in a setting mode, this will be displayed. This is pressed, scanning... will not be displayed after stopping scanner operation. Content This will be displayed. Then the scanner will be displayed when the STOP key is completed. 1 After completion, "Ready" will be displayed. This will be ...
... displayed when the STOP key was pressed during scanning. Even if the STOP key is pressed in the scanner, open the front door and remove it is pressed and the scanner stops. If the document remains in a setting mode, this will be displayed. This is pressed, scanning... will not be displayed after stopping scanner operation. Content This will be displayed. Then the scanner will be displayed when the STOP key is completed. 1 After completion, "Ready" will be displayed. This will be ...

Operating Instructions
Page 32
... out the hopper extension tray from the hopper and the exit stopper from the pre-imprinter door (exit part) after it is scanned. • The scanner will accept 50 to 157 g/m2 (13 to 42 lbs.) paper for continuous scanning and 20 to 157 g/m2 (5.3 to 42 lbs.) paper for single...
... out the hopper extension tray from the hopper and the exit stopper from the pre-imprinter door (exit part) after it is scanned. • The scanner will accept 50 to 157 g/m2 (13 to 42 lbs.) paper for continuous scanning and 20 to 157 g/m2 (5.3 to 42 lbs.) paper for single...

Operating Instructions
Page 33
... the ADF / manual feed selector to the upper side. Paper path selector The paper path selector is located on the left side of the scanner. 33 MANUAL ¥ Continuous scanning When scanning normal paper continuously, set in NCR paper, set the ADF / manual feed selector to function...the ADF / manual feed selector to "MANUAL". 21 3 ADF ADJ. When double feeding occurs frequently or scanning a document with a thickness of the scanner. ∫Setting the ADF / manual feed selector ¥ Single scanning When scanning a single sheet or several sheets, set the paper path selector to ...
... the ADF / manual feed selector to the upper side. Paper path selector The paper path selector is located on the left side of the scanner. 33 MANUAL ¥ Continuous scanning When scanning normal paper continuously, set in NCR paper, set the ADF / manual feed selector to function...the ADF / manual feed selector to "MANUAL". 21 3 ADF ADJ. When double feeding occurs frequently or scanning a document with a thickness of the scanner. ∫Setting the ADF / manual feed selector ¥ Single scanning When scanning a single sheet or several sheets, set the paper path selector to ...

Operating Instructions
Page 35
Exit path 35 Front door Front door release (Inside the front door.) ∫Removing paper jams from the scanner Use your hand to pull towards you the front door release, open the front door and pull the document forward, then close the front door. ...
Exit path 35 Front door Front door release (Inside the front door.) ∫Removing paper jams from the scanner Use your hand to pull towards you the front door release, open the front door and pull the document forward, then close the front door. ...

Operating Instructions
Page 36
...; The document insertion and exit slots get dirty easily, so clean them. To maintain proper scanning, clean the scanner parts frequently. ∫Cleaning the rollers 1 Turn the power off position ∫Inside the scanner • Clean the unit at least once a month. 1 Turn the power off. 2 Clean the cover with ... to hold down the front door release. Front door Front door release (Inside the front door.) 36 Cleaning the Unit ∫Outside of the scanner ≥Clean the unit at least once a week or when 50,000 sheets have been scanned, whichever comes first. • Clean ...
...; The document insertion and exit slots get dirty easily, so clean them. To maintain proper scanning, clean the scanner parts frequently. ∫Cleaning the rollers 1 Turn the power off position ∫Inside the scanner • Clean the unit at least once a month. 1 Turn the power off. 2 Clean the cover with ... to hold down the front door release. Front door Front door release (Inside the front door.) 36 Cleaning the Unit ∫Outside of the scanner ≥Clean the unit at least once a week or when 50,000 sheets have been scanned, whichever comes first. • Clean ...


