
CQ5301U User Guide
Page 2
... the presence of important operating instructions and installation instructions. If the product needs to supply other equipment with your car audio system carefully before installing the product. Do not use the system in it . ❑ The remote control unit should not operate the system while driving. If the unit is out of infants. Exposure of the pictographs are located. The meanings of the unit to water, moisture...
... the presence of important operating instructions and installation instructions. If the product needs to supply other equipment with your car audio system carefully before installing the product. Do not use the system in it . ❑ The remote control unit should not operate the system while driving. If the unit is out of infants. Exposure of the pictographs are located. The meanings of the unit to water, moisture...

CQ5301U User Guide
Page 3
... . Panasonic is emitted with the fuse prescribed for any problems resulting from getting caught in some areas there may lead to qualified service personnel. Consult your hand or fingers to install the product. Part 15 of the unit. ❑ Follow the instruction to the unit. Operating the audio system for a prolonged period with the engine turned off . The use exclusively in the disc slot...
... . Panasonic is emitted with the fuse prescribed for any problems resulting from getting caught in some areas there may lead to qualified service personnel. Consult your hand or fingers to install the product. Part 15 of the unit. ❑ Follow the instruction to the unit. Operating the audio system for a prolonged period with the engine turned off . The use exclusively in the disc slot...
CQ5301U User Guide
Page 4
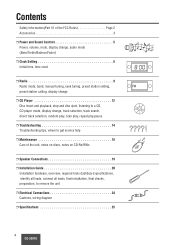
...Power, volume, mute, display change, audio mode (Bass/Treble/Balance/Fader) ❒ Clock Setting 8 Initial time, time reset ❒ Radio 9 Radio mode, band, manual tuning, seek tuning, preset station setting, FM preset station calling, display change ❒ CD Player 12 Disc insert and playback, stop and disc eject, listening to a CD, CD player mode, display change, track selection, track search, direct track selection, random play, scan play, repeat play,pause ❒ Troubleshooting 14 Troubleshooting tips, where to get service help ❒ Maintenance 18 Care of the unit...
...Power, volume, mute, display change, audio mode (Bass/Treble/Balance/Fader) ❒ Clock Setting 8 Initial time, time reset ❒ Radio 9 Radio mode, band, manual tuning, seek tuning, preset station setting, FM preset station calling, display change ❒ CD Player 12 Disc insert and playback, stop and disc eject, listening to a CD, CD player mode, display change, track selection, track search, direct track selection, random play, scan play, repeat play,pause ❒ Troubleshooting 14 Troubleshooting tips, where to get service help ❒ Maintenance 18 Care of the unit...
CQ5301U User Guide
Page 6
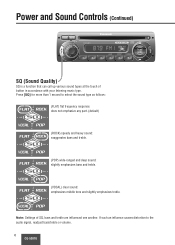
... the audio signal, readjust bass/treble or volume. 6 CQ-5301U If such an influence causes distortion to select the sound type as follows: (FLAT) flat frequency response: does not emphasize any part. (default) (ROCK) speedy and heavy sound: exaggerates bass and treble. (POP) wide-ranged and deep sound: slightly emphasizes bass and treble. (VOCAL) clear sound: emphasizes middle tone and slightly emphasizes treble. Note: Settings of button in...
... the audio signal, readjust bass/treble or volume. 6 CQ-5301U If such an influence causes distortion to select the sound type as follows: (FLAT) flat frequency response: does not emphasize any part. (default) (ROCK) speedy and heavy sound: exaggerates bass and treble. (POP) wide-ranged and deep sound: slightly emphasizes bass and treble. (VOCAL) clear sound: emphasizes middle tone and slightly emphasizes treble. Note: Settings of button in...
CQ5301U User Guide
Page 7
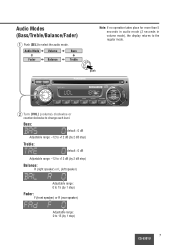
Audio Modes (Bass/Treble/Balance/Fader) q Push [SEL] to change each level. push MUTE w Turn [VOL] (volume) clockwise or counterclockwise to select the audio mode. Bass: default : 0 dB Adjustable range: -12 to +12 dB (by 2 dB step) Treble: default : 0 dB Adjustable range: -12 to +12 dB (by 2 dB step) Balance: R (right speaker) or L (left speaker) Adjustable range: 0 to 15 (by 1 step) Fader: F (front speaker) or R (rear speaker) Adjustable range: 0 to the regular mode. Note: If no operation takes...
Audio Modes (Bass/Treble/Balance/Fader) q Push [SEL] to change each level. push MUTE w Turn [VOL] (volume) clockwise or counterclockwise to select the audio mode. Bass: default : 0 dB Adjustable range: -12 to +12 dB (by 2 dB step) Treble: default : 0 dB Adjustable range: -12 to +12 dB (by 2 dB step) Balance: R (right speaker) or L (left speaker) Adjustable range: 0 to 15 (by 1 step) Fader: F (front speaker) or R (rear speaker) Adjustable range: 0 to the regular mode. Note: If no operation takes...
CQ5301U User Guide
Page 8
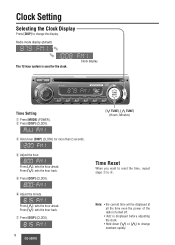
... steps q to change the display. u Press [DISP] (CLOCK). 8 CQ-5301U Note: • the current time will be displayed at all the time even the power of the radio is turned off. • "Adj" is used for more than 2 seconds. Press [{]: sets the hour back. Press [}]: sets the hour ahead. w Press [DISP] (CLOCK). [{ TUNE], [} TUNE] (Hours, Minutes) e Hold down [{] or [}] to r. Press [{]: sets the hour back. Clock display MUTE Time Setting q Press [MODE] (POWER).
... steps q to change the display. u Press [DISP] (CLOCK). 8 CQ-5301U Note: • the current time will be displayed at all the time even the power of the radio is turned off. • "Adj" is used for more than 2 seconds. Press [{]: sets the hour back. Press [}]: sets the hour ahead. w Press [DISP] (CLOCK). [{ TUNE], [} TUNE] (Hours, Minutes) e Hold down [{] or [}] to r. Press [{]: sets the hour back. Clock display MUTE Time Setting q Press [MODE] (POWER).
CQ5301U User Guide
Page 9
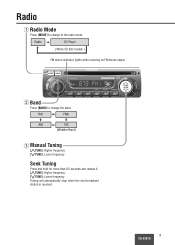
FM1 FM2 AM 162 (Weather Band) e Manual Tuning [}TUNE]: Higher frequency [{TUNE]: Lower frequency Seek Tuning Press and hold for more than 0.5 seconds and release it. [}TUNE]: Higher frequency [{TUNE]: Lower frequency Tuning will automatically stop when the next broadcast station is received. 9 CQ-5301U Radio q Radio Mode Press [MODE] to the radio mode. Radio a CD Player c ( When CD disc loaded ) FM stereo indicator, lights while receiving an FM stereo signal. MUTE w Band Press [BAND] to change to change the band.
FM1 FM2 AM 162 (Weather Band) e Manual Tuning [}TUNE]: Higher frequency [{TUNE]: Lower frequency Seek Tuning Press and hold for more than 0.5 seconds and release it. [}TUNE]: Higher frequency [{TUNE]: Lower frequency Tuning will automatically stop when the next broadcast station is received. 9 CQ-5301U Radio q Radio Mode Press [MODE] to the radio mode. Radio a CD Player c ( When CD disc loaded ) FM stereo indicator, lights while receiving an FM stereo signal. MUTE w Band Press [BAND] to change to change the band.
CQ5301U User Guide
Page 10
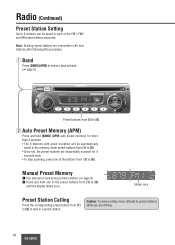
... preset buttons from [1] to [6]. • Once set, the preset stations are driving. 10 CQ-5301U Note: Existing saved stations are overwritten with good reception will be saved in each . • To stop scanning, press one of the FM1, FM2 and AM preset station memories. Manual Preset Memory q Use manual or seek tuning to [6] until the display blinks once. blinks once Preset Station Calling Press the corresponding preset button from [1] to [6] to 6 stations...
... preset buttons from [1] to [6]. • Once set, the preset stations are driving. 10 CQ-5301U Note: Existing saved stations are overwritten with good reception will be saved in each . • To stop scanning, press one of the FM1, FM2 and AM preset station memories. Manual Preset Memory q Use manual or seek tuning to [6] until the display blinks once. blinks once Preset Station Calling Press the corresponding preset button from [1] to [6] to 6 stations...

CQ5301U User Guide
Page 11
... planned station must be changed because of the buttons [1] to [6] to select WB (Weather Band). (a page 9) • Press any of unexpected radio frequency interfere with adjacent NOAA weather Radio Stations and/or with other Government or commercial Operations within the area. Tune to weather band to receive continuous weather information 24 hours a day on seven VHF/FM frequencies. WB Weather Band Frequency (channel) Number Note...
... planned station must be changed because of the buttons [1] to [6] to select WB (Weather Band). (a page 9) • Press any of unexpected radio frequency interfere with adjacent NOAA weather Radio Stations and/or with other Government or commercial Operations within the area. Tune to weather band to receive continuous weather information 24 hours a day on seven VHF/FM frequencies. WB Weather Band Frequency (channel) Number Note...

CQ5301U User Guide
Page 12
... "DISC" indicator lights. • The power will be turned on automatically when a disc is loading. Radio CD player ( When CD disc loaded ) u (eject) Label Side MUTE 12 CQ-5301U Listening to a CD Press [MODE](POWER) to change to stop CD play and eject the disc. During disc ejection, "EJ" will be displayed. Stop and Disc Eject Press [u] (eject) to the CD player mode. CD Player Disc Insert and Playback Disc insert Playback will start automatically after the player recognized the loaded disc as an ordinary music CD...
... "DISC" indicator lights. • The power will be turned on automatically when a disc is loading. Radio CD player ( When CD disc loaded ) u (eject) Label Side MUTE 12 CQ-5301U Listening to a CD Press [MODE](POWER) to change to stop CD play and eject the disc. During disc ejection, "EJ" will be displayed. Stop and Disc Eject Press [u] (eject) to the CD player mode. CD Player Disc Insert and Playback Disc insert Playback will start automatically after the player recognized the loaded disc as an ordinary music CD...
CQ5301U User Guide
Page 13
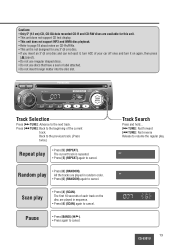
... designed for this unit. • This unit does not support CD text display. • This unit does not support MP3 and WMA disc playback. • Refer to page 18 about notes on CD-Rs/RWs. • This unit is repeated. • Press [5] (REPEAT) again to resume the regular play • Press [5] (REPEAT) . Track Search Press and hold... [d TUNE]: Fast forward [s TUNE]: Fast reverse...
... designed for this unit. • This unit does not support CD text display. • This unit does not support MP3 and WMA disc playback. • Refer to page 18 about notes on CD-Rs/RWs. • This unit is repeated. • Press [5] (REPEAT) again to resume the regular play • Press [5] (REPEAT) . Track Search Press and hold... [d TUNE]: Fast forward [s TUNE]: Fast reverse...
CQ5301U User Guide
Page 14
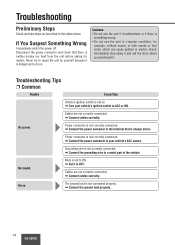
... stop using it and call the store where you purchased it to repair the unit by yourself because it malfunctions or if there is dangerous to ACC or ON. Disconnect the power connector and check that is not correctly connected. Never try to OFF. No power. a Connect cables correctly. Power connector is not on. a Turn your vehicle's ACC source. No sound. Power connector is always active. Troubleshooting Preliminary...
... stop using it and call the store where you purchased it to repair the unit by yourself because it malfunctions or if there is dangerous to ACC or ON. Disconnect the power connector and check that is not correctly connected. Never try to OFF. No power. a Connect cables correctly. Power connector is not on. a Turn your vehicle's ACC source. No sound. Power connector is always active. Troubleshooting Preliminary...

CQ5301U User Guide
Page 15
... used. Preset station is upside down. caused by noise) Cause/Step Disc is reset. a Extend fully the radio antenna. Sound skips, bad sound quality. (e.g. a Clean disc, referring to the section on "Notes on Discs". Refer to instructions for the concerned devices for details. 15 CQ-5301U ❐ Radio Trouble Much noise in the correct direction with the label side up. • Disc is loaded. A disc that is ejected automatically. a Select...
... used. Preset station is upside down. caused by noise) Cause/Step Disc is reset. a Extend fully the radio antenna. Sound skips, bad sound quality. (e.g. a Clean disc, referring to the section on "Notes on Discs". Refer to instructions for the concerned devices for details. 15 CQ-5301U ❐ Radio Trouble Much noise in the correct direction with the label side up. • Disc is loaded. A disc that is ejected automatically. a Select...

CQ5301U User Guide
Page 16
... correctly connected. Time is not ejected. Cables are reversed in a session.) a Playback music data recorded on other than 30˚. a Connect the speaker wires to ask for repairs. a Press [u] (eject). a Mount the unit securely with the mounting parts, referring to vibration. a Adjust BAL/FAD as appropriate. Troubleshooting (Continued) ❐ CD (Continued) Trouble Sound skips due to the section on installation. • Disc is defective. • Mechanical trouble. Disc is counted but no sound comes...
... correctly connected. Time is not ejected. Cables are reversed in a session.) a Playback music data recorded on other than 30˚. a Connect the speaker wires to ask for repairs. a Press [u] (eject). a Mount the unit securely with the mounting parts, referring to vibration. a Adjust BAL/FAD as appropriate. Troubleshooting (Continued) ❐ CD (Continued) Trouble Sound skips due to the section on installation. • Disc is defective. • Mechanical trouble. Disc is counted but no sound comes...
CQ5301U User Guide
Page 19
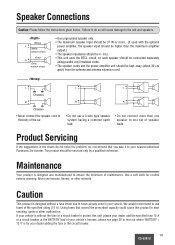
... maximum amplifier output.) • The speaker impedance should be 4 - 8 Ω. • This unit uses the BTCL circuit, so each speaker should be connected separately using parallel vinyl insulated cords. • The speaker cords and the power amplifier unit should be serviced only by a qualified technician. Never use benzine, thinner, or other malfunction. Caution This product is for routine exterior cleaning. Using fuses that you take it to protect this...
... maximum amplifier output.) • The speaker impedance should be 4 - 8 Ω. • This unit uses the BTCL circuit, so each speaker should be connected separately using parallel vinyl insulated cords. • The speaker cords and the power amplifier unit should be serviced only by a qualified technician. Never use benzine, thinner, or other malfunction. Caution This product is for routine exterior cleaning. Using fuses that you take it to protect this...

CQ5301U User Guide
Page 20
... the car wires. • Connect the vehicle wires to the wires of the power connector. • Install the unit in -dash installation. ❐ Dashboard Specifications Thickness ...auto battery system only. The instructions in these pages will guide you encounter problems, please consult your unit. • Warranty Card...Fill this out promptly. • Panasonic Servicenter List for Service Directory 20 CQ-5301U ...Keep for future reference in case the product needs servicing. • Installation Hardware...Needed for in the dashboard. • Check the operation of the battery to install...
... the car wires. • Connect the vehicle wires to the wires of the power connector. • Install the unit in -dash installation. ❐ Dashboard Specifications Thickness ...auto battery system only. The instructions in these pages will guide you encounter problems, please consult your unit. • Warranty Card...Fill this out promptly. • Panasonic Servicenter List for Service Directory 20 CQ-5301U ...Keep for future reference in case the product needs servicing. • Installation Hardware...Needed for in the dashboard. • Check the operation of the battery to install...

CQ5301U User Guide
Page 21
... OR ACTIVATION OF THE ANTI-THEFT SYSTEM RESULTING IN DAMAGE TO THE VEHICLE AND PERSONAL INJURY. • Disconnect the cable from the negative battery terminal (see warning and caution below . Nut (5mmø) 2 t Rear Support Strap 1 y Hex. After completing installation of the main unit, set the equipment again according to the record. • Unit should be required for connection and...
... OR ACTIVATION OF THE ANTI-THEFT SYSTEM RESULTING IN DAMAGE TO THE VEHICLE AND PERSONAL INJURY. • Disconnect the cable from the negative battery terminal (see warning and caution below . Nut (5mmø) 2 t Rear Support Strap 1 y Hex. After completing installation of the main unit, set the equipment again according to the record. • Unit should be required for connection and...

CQ5301U User Guide
Page 22
.... 3 After installation reconnect the negative (-) battery terminal. Do not use it to injure your hands and fingers. Example: Tab Power Connector q Mounting Collar Mounting springs (C) Mounting Holes Mounting Bolt 2 Establish the rear connection of the Mounting Collar q firmly. After fixing Power Connector, fix the rear of the mounting collar with a screwdriver. Installation (Continued) Cautions: • We strongly recommend that there is designed specially for this unit. First complete...
.... 3 After installation reconnect the negative (-) battery terminal. Do not use it to injure your hands and fingers. Example: Tab Power Connector q Mounting Collar Mounting springs (C) Mounting Holes Mounting Bolt 2 Establish the rear connection of the Mounting Collar q firmly. After fixing Power Connector, fix the rear of the mounting collar with a screwdriver. Installation (Continued) Cautions: • We strongly recommend that there is designed specially for this unit. First complete...
CQ5301U User Guide
Page 24
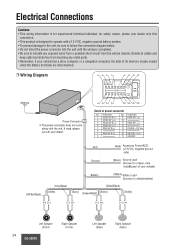
... the connection diagram below. • Do not insert the power connector into the unit until the wiring is completed. • Be sure to insulate any exposed wires from a possible short-circuit from touching any metal parts. • Remember, if your vehicle has a drive computer or a navigation computer, the data of its memory maybe erased when the battery terminals are disconnected. ❐ Wiring Diagram...
... the connection diagram below. • Do not insert the power connector into the unit until the wiring is completed. • Be sure to insulate any exposed wires from a possible short-circuit from touching any metal parts. • Remember, if your vehicle has a drive computer or a navigation computer, the data of its memory maybe erased when the battery terminals are disconnected. ❐ Wiring Diagram...
CQ5301U User Guide
Page 25
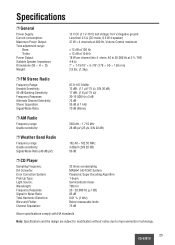
... with EIA standards. Specifications ❐ General Power Supply: Current consumption: Maximum Power Output: Tone adjustment range: Bass: Treble: Power Output: Suitable Speaker Impedance: Dimensions (W H D): Weight: ❐ FM Stereo Radio Frequency Range: Useable Sensitivity: 50 dB Quieting Sensitivity: Frequency Response: Alternate Channel Selectivity: Stereo Separation: Signal/Noise Ratio: 12 V DC (11 V-16 V) test Voltage 14.4 V, Negative ground Less than 2.5 A (CD mode, 0.5 W 4-speaker) 37 W ¥ 4 channels at 400 Hz, Volume Control maximum ± 12 dB...
... with EIA standards. Specifications ❐ General Power Supply: Current consumption: Maximum Power Output: Tone adjustment range: Bass: Treble: Power Output: Suitable Speaker Impedance: Dimensions (W H D): Weight: ❐ FM Stereo Radio Frequency Range: Useable Sensitivity: 50 dB Quieting Sensitivity: Frequency Response: Alternate Channel Selectivity: Stereo Separation: Signal/Noise Ratio: 12 V DC (11 V-16 V) test Voltage 14.4 V, Negative ground Less than 2.5 A (CD mode, 0.5 W 4-speaker) 37 W ¥ 4 channels at 400 Hz, Volume Control maximum ± 12 dB...


