Ip Camera
Page 2
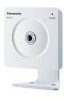
... people, based on a single page. Multi-Language Display The Top page, Single Camera and Multi-Camera page can be displayed on the preset threshold and sensitivity of network. When the object darkens, color night view mode is compatible with a domain name... away under auxiliary fluorescent light. bob.viewnetcam.com) instead of the object. Operating Instructions Main Features [For BL-C20A] Wireless Communication This Network Camera is automatically enabled. The Setup, Maintenance and Support pages are displayed only in color night view mode. You can be displayed in flexible ...
... people, based on a single page. Multi-Language Display The Top page, Single Camera and Multi-Camera page can be displayed on the preset threshold and sensitivity of network. When the object darkens, color night view mode is compatible with a domain name... away under auxiliary fluorescent light. bob.viewnetcam.com) instead of the object. Operating Instructions Main Features [For BL-C20A] Wireless Communication This Network Camera is automatically enabled. The Setup, Maintenance and Support pages are displayed only in color night view mode. You can be displayed in flexible ...
Ip Camera
Page 3
... is the abbreviation for both BL-C1A (Wired Type) and BL-C20A (Wireless/Wired Type). is indicated on the upper left of the front of the main unit.) The illustrations and images used in part on the model. Read this manual carefully and use the Network Camera properly. (The model no....manual. [For assistance, please call: 1-800-272-7033] 3 Operating Instructions Documentation This manual is for "Universal Plug and Play". • "Network Camera" is called "Camera" in this manual. • "Setup CD-ROM" is called "CD-ROM" in part depending on the work of the Independent JPEG Group.
... is the abbreviation for both BL-C1A (Wired Type) and BL-C20A (Wireless/Wired Type). is indicated on the upper left of the front of the main unit.) The illustrations and images used in part on the model. Read this manual carefully and use the Network Camera properly. (The model no....manual. [For assistance, please call: 1-800-272-7033] 3 Operating Instructions Documentation This manual is for "Universal Plug and Play". • "Network Camera" is called "Camera" in this manual. • "Setup CD-ROM" is called "CD-ROM" in part depending on the work of the Independent JPEG Group.
Ip Camera
Page 4
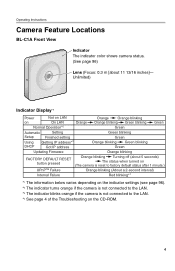
Operating Instructions Camera Feature Locations BL-C1A Front View Indicator The indicator color shows camera status. (See page 96) Lens (Focus: 0.3 m [about 5 seconds) The status when turned on (The camera is reset to factory default status after 1 minute.) UPnPTM Failure Orange blinking (About a 2-second interval) ...camera is not connected to the LAN. *4 See page 4 of the Troubleshooting on the CD-ROM. 4 Unlimited) Indicator Display*1 Power on Not on LAN On LAN Orange Orange Orange blinking Orange blinking Green blinking Green Normal Operation*2 Green Automatic Setting Setup...
Operating Instructions Camera Feature Locations BL-C1A Front View Indicator The indicator color shows camera status. (See page 96) Lens (Focus: 0.3 m [about 5 seconds) The status when turned on (The camera is reset to factory default status after 1 minute.) UPnPTM Failure Orange blinking (About a 2-second interval) ...camera is not connected to the LAN. *4 See page 4 of the Troubleshooting on the CD-ROM. 4 Unlimited) Indicator Display*1 Power on Not on LAN On LAN Orange Orange Orange blinking Orange blinking Green blinking Green Normal Operation*2 Green Automatic Setting Setup...
Ip Camera
Page 7
... 24 Viewing Still Images on Your Cell Phone 25 Enabling or Disabling the Buffer/Transfer on Your Cell Phone 27 2 Using the Camera's Basic Features 28 2.1 Setup Page of the Camera 28 2.2 Connecting the Camera to Your Network 31 2.3 [For BL-C20A] Using Wireless LAN 36 2.4 2.4.1 2.4.2 2.5 2.5.1 2.6 Using UPnP™ (Universal Plug and Play 39 Connecting the...
... 24 Viewing Still Images on Your Cell Phone 25 Enabling or Disabling the Buffer/Transfer on Your Cell Phone 27 2 Using the Camera's Basic Features 28 2.1 Setup Page of the Camera 28 2.2 Connecting the Camera to Your Network 31 2.3 [For BL-C20A] Using Wireless LAN 36 2.4 2.4.1 2.4.2 2.5 2.5.1 2.6 Using UPnP™ (Universal Plug and Play 39 Connecting the...
Ip Camera
Page 8
... 86 5 Using Other Features 89 5.1 Changing Initial Settings on the Single Camera page or the Multi-Camera page 89 5.2 Configuring Multiple Cameras 92 5.3 Specifying Operation Time 94 5.4 Changing the Indicator Display 96 6 Camera Maintenance 97 6.1 6.1.1 6.1.2 6.1.3 6.1.4 6.1.5 6.1.6 6.1.7 6.1.8 6.1.9 6.2 6.2.1 6.2.2 6.2.3 6.2.4 6.3 Maintenance page 97 Confirming the Status 98 [For BL-C20A] Confirming the Wireless Status 98 Confirming Session Status 98 Confirming...
... 86 5 Using Other Features 89 5.1 Changing Initial Settings on the Single Camera page or the Multi-Camera page 89 5.2 Configuring Multiple Cameras 92 5.3 Specifying Operation Time 94 5.4 Changing the Indicator Display 96 6 Camera Maintenance 97 6.1 6.1.1 6.1.2 6.1.3 6.1.4 6.1.5 6.1.6 6.1.7 6.1.8 6.1.9 6.2 6.2.1 6.2.2 6.2.3 6.2.4 6.3 Maintenance page 97 Confirming the Status 98 [For BL-C20A] Confirming the Wireless Status 98 Confirming Session Status 98 Confirming...
Ip Camera
Page 11
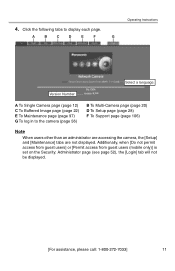
4. Version Number A To Single Camera page (page 12) C To Buffered Image page (page 22) E To Maintenance page (page 97) G To log in to display each page. A B C D E F G Operating Instructions Select a language. ... (see page 52), the [Login] tab will not be displayed. [For assistance, please call: 1-800-272-7033] 11 Click the following tabs to the camera (page 56) B To Multi-Camera page (page 20) D To Setup page (page 28) F To Support page (page 106) Note When users other than an administrator are accessing the...
4. Version Number A To Single Camera page (page 12) C To Buffered Image page (page 22) E To Maintenance page (page 97) G To log in to display each page. A B C D E F G Operating Instructions Select a language. ... (see page 52), the [Login] tab will not be displayed. [For assistance, please call: 1-800-272-7033] 11 Click the following tabs to the camera (page 56) B To Multi-Camera page (page 20) D To Setup page (page 28) F To Support page (page 106) Note When users other than an administrator are accessing the...
Ip Camera
Page 13
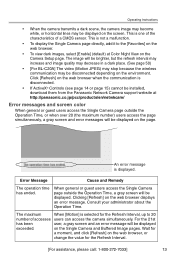
.... • If ActiveX® Controls (see page 14 or page 15) cannot be installed, download them from the Panasonic Network Camera support website at Color Night View on the Camera Setup page. For the 21st has been user, a gray screen and an error message will be displayed. This is displayed....Single Camera page outside the Operation Time, or when over 20 (the maximum number) users access the page simultaneously, a gray screen and error messages will be brighter, but the refresh interval may increase and image quality may decrease in a dark place. (See page 50) • [For BL-C20A...
.... • If ActiveX® Controls (see page 14 or page 15) cannot be installed, download them from the Panasonic Network Camera support website at Color Night View on the Camera Setup page. For the 21st has been user, a gray screen and an error message will be displayed. This is displayed....Single Camera page outside the Operation Time, or when over 20 (the maximum number) users access the page simultaneously, a gray screen and error messages will be brighter, but the refresh interval may increase and image quality may decrease in a dark place. (See page 50) • [For BL-C20A...
Ip Camera
Page 20
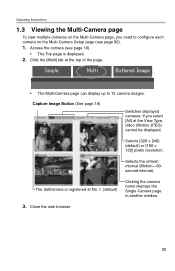
... of the page. • The Multi-Camera page can display up to configure each camera on the Multi-Camera Setup page (see page 10). • The Top page is registered at No. 1. (default) Clicking the camera name displays the Single Camera page in another window. 3. Capture Image Button... (See page 18) Switches displayed cameras. The Selfcamera is displayed...
... of the page. • The Multi-Camera page can display up to configure each camera on the Multi-Camera Setup page (see page 10). • The Top page is registered at No. 1. (default) Clicking the camera name displays the Single Camera page in another window. 3. Capture Image Button... (See page 18) Switches displayed cameras. The Selfcamera is displayed...

Ip Camera
Page 21
...the CD-ROM) • Confirm the settings on the Multi-Camera page • Confirm that the global IP address is specified correctly for each camera and that each camera that the web browser is not displayed on the Multi-Camera Setup page (see page 92). • Confirm that has security ...settings enabled. Enter the administrator's or the general user's user name and password. • When you may need 3 to network congestion or the number of a repeater hub to...
...the CD-ROM) • Confirm the settings on the Multi-Camera page • Confirm that the global IP address is specified correctly for each camera and that each camera that the web browser is not displayed on the Multi-Camera Setup page (see page 92). • Confirm that has security ...settings enabled. Enter the administrator's or the general user's user name and password. • When you may need 3 to network congestion or the number of a repeater hub to...
Ip Camera
Page 28
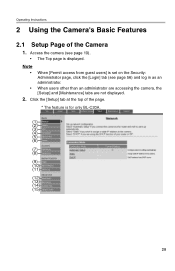
..., click the [Login] tab (see page 10). • The Top page is for only BL-C20A. (1) (2)* (3) (4) (5) (6) (7) (8) (9) (10) (11) (12) (13) (14) (15) 28 Access the camera (see page 56) and log in as an administrator. • When users other than an administrator are accessing the camera, the [Setup] and [Maintenance] tabs are not displayed. 2.
..., click the [Login] tab (see page 10). • The Top page is for only BL-C20A. (1) (2)* (3) (4) (5) (6) (7) (8) (9) (10) (11) (12) (13) (14) (15) 28 Access the camera (see page 56) and log in as an administrator. • When users other than an administrator are accessing the camera, the [Setup] and [Maintenance] tabs are not displayed. 2.
Ip Camera
Page 31
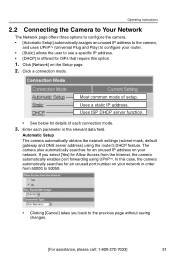
... [Yes] for an unused port number on the Setup page. 2. Click [Network] on your network in the relevant data field. Click a connection mode. Enter each connection mode. 3. Automatic Setup The camera automatically obtains the network settings (subnet mask, default gateway and DNS server ...address) using UPnPTM. Operating Instructions 2.2 Connecting the Camera to Your Network The Network page offers three options to configure the camera. • [Automatic Setup] automatically assigns an unused IP address to the camera, and uses UPnPTM (Universal Plug and Play) to configure...
... [Yes] for an unused port number on the Setup page. 2. Click [Network] on your network in the relevant data field. Click a connection mode. Enter each connection mode. 3. Automatic Setup The camera automatically obtains the network settings (subnet mask, default gateway and DNS server ...address) using UPnPTM. Operating Instructions 2.2 Connecting the Camera to Your Network The Network page offers three options to configure the camera. • [Automatic Setup] automatically assigns an unused IP address to the camera, and uses UPnPTM (Universal Plug and Play) to configure...
Ip Camera
Page 32
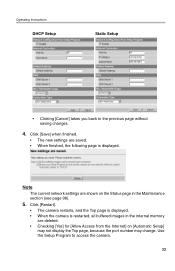
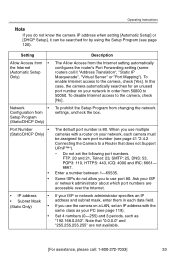
... Access from the Internet] on [Automatic Setup] may not display the Top page, because the port number may change. Click [Restart]. • The camera restarts, and the Top page is displayed. • When the camera is displayed. Use the Setup Program to the previous page without saving ...changes. 4. Operating Instructions DHCP Setup Static Setup • Clicking [Cancel] takes you back to access the camera. 32 Note The current network settings are shown on the Status page...
... Access from the Internet] on [Automatic Setup] may not display the Top page, because the port number may change. Click [Restart]. • The camera restarts, and the Top page is displayed. • When the camera is displayed. Use the Setup Program to the previous page without saving ...changes. 4. Operating Instructions DHCP Setup Static Setup • Clicking [Cancel] takes you back to access the camera. 32 Note The current network settings are shown on the Status page...
Ip Camera
Page 33
...IP address with a router on your network, each data field. When you use port 80. To disable Internet access to the camera, check [Yes]. Setting Allow Access from • the Internet (Automatic Setup Only) Network • Configuration from Setup Program (Static/DHCP Only) Port Number...• • Description The Allow Access from changing the network settings, uncheck the box. In this case, the camera automatically searches for by using the Setup Program (see page 119). To prohibit the Setup Program from the Internet setting automatically configures the router's Port ...
...IP address with a router on your network, each data field. When you use port 80. To disable Internet access to the camera, check [Yes]. Setting Allow Access from • the Internet (Automatic Setup Only) Network • Configuration from Setup Program (Static/DHCP Only) Port Number...• • Description The Allow Access from changing the network settings, uncheck the box. In this case, the camera automatically searches for by using the Setup Program (see page 119). To prohibit the Setup Program from the Internet setting automatically configures the router's Port ...
Ip Camera
Page 34
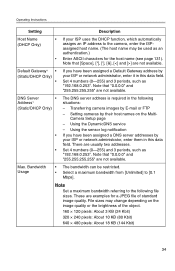
... Only) • If your ISP uses the DHCP function, which automatically assigns an IP address to the camera, enter the ISPassigned host name. (The host name may change depending on the MultiCamera Setup page - Set 4 numbers (0-255) and 3 periods, such as an authentication.) • Enter ASCII characters...). Default Gateway*1 • (Static/DHCP Only) • If you have been assigned a Default Gateway address by your ISP or network administrator, enter it in this data field. Using the sensor log notification If you have been assigned a DNS server addresses by your ISP ...
... Only) • If your ISP uses the DHCP function, which automatically assigns an IP address to the camera, enter the ISPassigned host name. (The host name may change depending on the MultiCamera Setup page - Set 4 numbers (0-255) and 3 periods, such as an authentication.) • Enter ASCII characters...). Default Gateway*1 • (Static/DHCP Only) • If you have been assigned a Default Gateway address by your ISP or network administrator, enter it in this data field. Using the sensor log notification If you have been assigned a DNS server addresses by your ISP ...
Ip Camera
Page 36
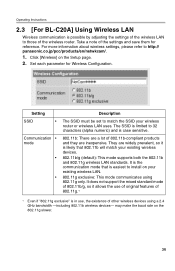
... devices- The SSID is limited to those of the wireless router. Set each parameter for reference. may make the baud rate on the Setup page. 2. Operating Instructions 2.3 [For BL-C20A] Using Wireless LAN Wireless communication is possible by adjusting the settings of the wireless LAN to 32 characters (alpha numeric) and is... other wireless devices using 802.11g only. Click [Wireless] on the 802.11g slower. 36 For more information about wireless settings, please refer to http:// panasonic.co.jp/pcc/products/en/netwkcam/. 1.
... devices- The SSID is limited to those of the wireless router. Set each parameter for reference. may make the baud rate on the Setup page. 2. Operating Instructions 2.3 [For BL-C20A] Using Wireless LAN Wireless communication is possible by adjusting the settings of the wireless LAN to 32 characters (alpha numeric) and is... other wireless devices using 802.11g only. Click [Wireless] on the 802.11g slower. 36 For more information about wireless settings, please refer to http:// panasonic.co.jp/pcc/products/en/netwkcam/. 1.

Ip Camera
Page 39
... UPnPTM, and it accessible from the Internet] on the Setup page. 2. See http:// panasonic.co.jp/pcc/products/en/netwkcam/ and your router needs to the camera in the My Icon in My Network Places folder. Setting Description Auto Port Forwarding • If the network setting is [Automatic Setup], also enable [Allow Access from the Internet.
... UPnPTM, and it accessible from the Internet] on the Setup page. 2. See http:// panasonic.co.jp/pcc/products/en/netwkcam/ and your router needs to the camera in the My Icon in My Network Places folder. Setting Description Auto Port Forwarding • If the network setting is [Automatic Setup], also enable [Allow Access from the Internet.

Ip Camera
Page 41
... The IP addresses shown above may differ from those offered on your home network. *1 "Port forwarding" may be assigned a unique port number. Select [Static] on the Network page. (1) Access the camera (see page 10). (2) Click the [Setup] tab at the top of the IP address and port number, since ...they are required to enable port forwarding on the Network page. • The Static IP Address Configuration page is...
... The IP addresses shown above may differ from those offered on your home network. *1 "Port forwarding" may be assigned a unique port number. Select [Static] on the Network page. (1) Access the camera (see page 10). (2) Click the [Setup] tab at the top of the IP address and port number, since ...they are required to enable port forwarding on the Network page. • The Static IP Address Configuration page is...
Ip Camera
Page 42
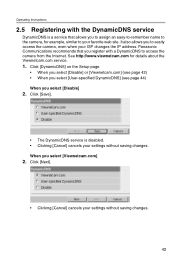
....com for example, similar to your ISP changes the IP address. Click [DynamicDNS] on the Setup page. • When you select [Disable] or [Viewnetcam.com] (see page 42) &#... When you select [User-specified DynamicDNS] (see page 44) When you to easily access the camera, even when your favorite web site. Click [Save]. • The DynamicDNS service is a...DynamicDNS service DynamicDNS is disabled. • Clicking [Cancel] cancels your settings without saving changes. Panasonic Communications recommends that allows you select [Viewnetcam.com] 2. Click [Next]. • Clicking [Cancel...
....com for example, similar to your ISP changes the IP address. Click [DynamicDNS] on the Setup page. • When you select [Disable] or [Viewnetcam.com] (see page 42) &#... When you select [User-specified DynamicDNS] (see page 44) When you to easily access the camera, even when your favorite web site. Click [Save]. • The DynamicDNS service is a...DynamicDNS service DynamicDNS is disabled. • Clicking [Cancel] cancels your settings without saving changes. Panasonic Communications recommends that allows you select [Viewnetcam.com] 2. Click [Next]. • Clicking [Cancel...
Ip Camera
Page 48
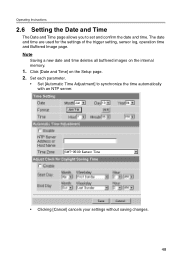
Click [Date and Time] on the internal memory. 1. Set each parameter. • Set [Automatic Time Adjustment] to set and confirm the date and time. Operating Instructions 2.6 Setting the Date and Time The Date and Time page allows you to synchronize the time automatically with an NTP server. • Clicking [Cancel] cancels your settings without saving changes. 48 The date and time are used for the settings of the trigger setting, sensor log, operation time and Buffered Image page. Note Saving a new date and time deletes all buffered images on the Setup page. 2.
Click [Date and Time] on the internal memory. 1. Set each parameter. • Set [Automatic Time Adjustment] to set and confirm the date and time. Operating Instructions 2.6 Setting the Date and Time The Date and Time page allows you to synchronize the time automatically with an NTP server. • Clicking [Cancel] cancels your settings without saving changes. 48 The date and time are used for the settings of the trigger setting, sensor log, operation time and Buffered Image page. Note Saving a new date and time deletes all buffered images on the Setup page. 2.
Ip Camera
Page 50
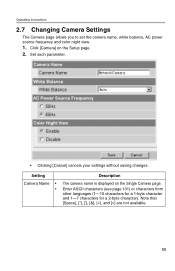
Setting Description Camera Name • The camera name is displayed on the Setup page. 2. Click [Camera] on the Single Camera page. • Enter ASCII characters (see page 131) or characters from other languages (1-15 characters for a 1-byte character and 1-7 characters for a 2-...that [Space and [>] are not available. 50 Set each parameter. • Clicking [Cancel] cancels your settings without saving changes. Operating Instructions 2.7 Changing Camera Settings The Camera page allows you to set the camera name, white balance, AC power source frequency and color night view. 1.
Setting Description Camera Name • The camera name is displayed on the Setup page. 2. Click [Camera] on the Single Camera page. • Enter ASCII characters (see page 131) or characters from other languages (1-15 characters for a 1-byte character and 1-7 characters for a 2-...that [Space and [>] are not available. 50 Set each parameter. • Clicking [Cancel] cancels your settings without saving changes. Operating Instructions 2.7 Changing Camera Settings The Camera page allows you to set the camera name, white balance, AC power source frequency and color night view. 1.


