
Operating Instructions
Page 55
Saving the Date and Time page. - Turning off the camera. - Click [Delete Buffered Images]. 2.7 Deleting Buffered Images Note • • When restarting the camera (see Page 123), buffered images for all triggers are deleted. The following operations also delete buffered images for all triggers. - Operating Instructions 55 Restarting, updating firmware or resetting the camera to factory default. 4.
Saving the Date and Time page. - Turning off the camera. - Click [Delete Buffered Images]. 2.7 Deleting Buffered Images Note • • When restarting the camera (see Page 123), buffered images for all triggers are deleted. The following operations also delete buffered images for all triggers. - Operating Instructions 55 Restarting, updating firmware or resetting the camera to factory default. 4.
Operating Instructions
Page 126
...are restored as they were saved, therefore the camera's IP address may change . When the settings are loaded, the settings are not changed when you reset the camera to factory default, the camera can also use the Setup Program to reset the camera and set the user name and password again.... the settings later. Click [Browse...]. Note • • • • • • The configuration file saves the camera's network settings. If you load the saved configuration file and restart the camera. You can load its settings from a Configuration File If you have updated the...
...are restored as they were saved, therefore the camera's IP address may change . When the settings are loaded, the settings are not changed when you reset the camera to factory default, the camera can also use the Setup Program to reset the camera and set the user name and password again.... the settings later. Click [Browse...]. Note • • • • • • The configuration file saves the camera's network settings. If you load the saved configuration file and restart the camera. You can load its settings from a Configuration File If you have updated the...

Operating Instructions
Page 127
...When the lens finishes panning and tilting, it is being reset. On the left side of the camera's default settings. Reconfigure the camera by referring to turn off for a list of the screen under [Maintenance], click [Reset To Factory Default]. 3. Change ... Do not turn off the camera. Operating Instructions 127 All camera settings (including the user name, password, IP address, subnet mask etc.) The network connection mode changes to their factory default settings. 1. 8.9 Resetting the Camera 8.9 Resetting the Camera You can reset all of the camera's settings to [Automatic Setup...
...When the lens finishes panning and tilting, it is being reset. On the left side of the camera's default settings. Reconfigure the camera by referring to turn off for a list of the screen under [Maintenance], click [Reset To Factory Default]. 3. Change ... Do not turn off the camera. Operating Instructions 127 All camera settings (including the user name, password, IP address, subnet mask etc.) The network connection mode changes to their factory default settings. 1. 8.9 Resetting the Camera 8.9 Resetting the Camera You can reset all of the camera's settings to [Automatic Setup...

Operating Instructions
Page 128
The camera must be turned on in order to their factory default settings by pressing the FACTORY DEFAULT RESET button for about one second with a pointed object. 8.9 Resetting the Camera Resetting the camera using the FACTORY DEFAULT RESET button You can also reset all of the camera's settings to reset it. FACTORY DEFAULT RESET 128 Operating Instructions
The camera must be turned on in order to their factory default settings by pressing the FACTORY DEFAULT RESET button for about one second with a pointed object. 8.9 Resetting the Camera Resetting the camera using the FACTORY DEFAULT RESET button You can also reset all of the camera's settings to reset it. FACTORY DEFAULT RESET 128 Operating Instructions
Operating Instructions
Page 143
...144). Restore the settings saved in IPv6 mode, the Setup Program can find all cameras on the network and display their factory default settings. 4. If you can be performed by MAC Address], then enter the camera's MAC address. (The MAC address is connected in a configuration file on your..., etc.) as desired (max. 15 characters). • See Page 147 for Cameras]. 3. See Page 82 for details about each camera individually with your ISP or network administrator for more than 20 minutes have been reset to your PC. • The Setup Program starts. a. Specify an IP address...
...144). Restore the settings saved in IPv6 mode, the Setup Program can find all cameras on the network and display their factory default settings. 4. If you can be performed by MAC Address], then enter the camera's MAC address. (The MAC address is connected in a configuration file on your..., etc.) as desired (max. 15 characters). • See Page 147 for Cameras]. 3. See Page 82 for details about each camera individually with your ISP or network administrator for more than 20 minutes have been reset to your PC. • The Setup Program starts. a. Specify an IP address...
Installation Guide
Page 2
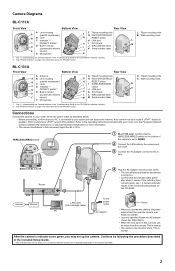
... to the Panasonic Network Camera website (http://panasonic.co.jp/pcc/products/en/netwkcam/) for more information. • The camera illustrations in this document depict the BL-C131A. Camera Diagrams BL-C111A Front View Bottom View Rear View A Lens housing A (pan/tilt mechanism) B B Lens C Indicator*1/ C PRIVACY button*2 D D Built-in sensor (pyroelectric infrared E sensor) E Microphone F Tripod mounting hole F G FACTORY DEFAULT G RESET button H LAN...
... to the Panasonic Network Camera website (http://panasonic.co.jp/pcc/products/en/netwkcam/) for more information. • The camera illustrations in this document depict the BL-C131A. Camera Diagrams BL-C111A Front View Bottom View Rear View A Lens housing A (pan/tilt mechanism) B B Lens C Indicator*1/ C PRIVACY button*2 D D Built-in sensor (pyroelectric infrared E sensor) E Microphone F Tripod mounting hole F G FACTORY DEFAULT G RESET button H LAN...


