Operating Instructions
Page 1
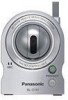
BL-C111A BL-C131A Operating Instructions Network Camera BL-C111A (Wired Type) Model BL-C131A (Wireless/Wired Type) Please read this document before using the product, and save this document for customers in the USA or Puerto Rico Panasonic Network Camera Website: http://www.panasonic.com/netcam for future reference.
BL-C111A BL-C131A Operating Instructions Network Camera BL-C111A (Wired Type) Model BL-C131A (Wireless/Wired Type) Please read this document before using the product, and save this document for customers in the USA or Puerto Rico Panasonic Network Camera Website: http://www.panasonic.com/netcam for future reference.
Operating Instructions
Page 4
.... 4 Operating Instructions Abbreviations • UPnP is the abbreviation for both the BL-C111A (Wired Type) and BL-C131A (Wireless/Wired Type). Other Information About this documentation • This manual is written for "Universal Plug and Play". • The Network Camera is referred to as "the camera" in this document. • The Setup CD-ROM is referred to...
.... 4 Operating Instructions Abbreviations • UPnP is the abbreviation for both the BL-C111A (Wired Type) and BL-C131A (Wireless/Wired Type). Other Information About this documentation • This manual is written for "Universal Plug and Play". • The Network Camera is referred to as "the camera" in this document. • The Setup CD-ROM is referred to...

Operating Instructions
Page 5
... Viewnetcam.com 75 Configuring the Camera to Use a Third-party Dynamic DNS Service 78 Confirming Internet Access 80 5 Changing Camera Settings 81 5.1 5.1.1 5.1.2 5.2 5.2.1 5.2.2 5.3 Network Settings ...81 Network (IPv4) Settings 82 Proxy Server Settings ...87 Using the Camera in Wireless Mode (BL-C131A Only 88 Configuring the Camera for Wireless Connection (BL-C131A Only 89 Restarting the Camera in Wireless Mode (BL-C131A Only 93 UPnP™ Settings...
... Viewnetcam.com 75 Configuring the Camera to Use a Third-party Dynamic DNS Service 78 Confirming Internet Access 80 5 Changing Camera Settings 81 5.1 5.1.1 5.1.2 5.2 5.2.1 5.2.2 5.3 Network Settings ...81 Network (IPv4) Settings 82 Proxy Server Settings ...87 Using the Camera in Wireless Mode (BL-C131A Only 88 Configuring the Camera for Wireless Connection (BL-C131A Only 89 Restarting the Camera in Wireless Mode (BL-C131A Only 93 UPnP™ Settings...

Operating Instructions
Page 10
... video images, or use the digital zoom feature (see Page 118) has been turned on network conditions, PC performance, the number of people accessing the camera, and the type of the camera's optical sensor, and is not displayed immediately or correctly, click your web browser's refresh button... to use the [Refresh Rate] selector to select to view still images. - If you are accessing the camera. click to return to the 1.4 Wireless Connection Issues (BL-C131A Only) in wireless mode, refer to normal mode) H. Set the [Video Display Time] for general users (see Page 104) and ...
... video images, or use the digital zoom feature (see Page 118) has been turned on network conditions, PC performance, the number of people accessing the camera, and the type of the camera's optical sensor, and is not displayed immediately or correctly, click your web browser's refresh button... to use the [Refresh Rate] selector to select to view still images. - If you are accessing the camera. click to return to the 1.4 Wireless Connection Issues (BL-C131A Only) in wireless mode, refer to normal mode) H. Set the [Video Display Time] for general users (see Page 104) and ...
Operating Instructions
Page 82
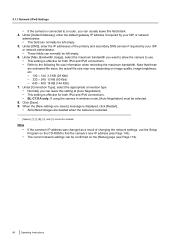
... address was changed as described in this setting at [Auto Negotiation]. • BL-C131A only: If using the camera in wireless mode, [Auto Negotiation] must be confirmed on the CD-ROM to specify your network settings (if necessary), after which the camera obtains an IP address automatically from the DHCP feature of your broadband router or...
... address was changed as described in this setting at [Auto Negotiation]. • BL-C131A only: If using the camera in wireless mode, [Auto Negotiation] must be confirmed on the CD-ROM to specify your network settings (if necessary), after which the camera obtains an IP address automatically from the DHCP feature of your broadband router or...
Operating Instructions
Page 84
...Under [Max. Click [Save]. 10. Note • • To access the camera again, use . • This setting is effective for both IPv4 and IPv6 connections. • BL-C131A only: If using the camera in this setting at [Auto Negotiation]. • This setting is effective for both IPv4...primary and secondary DNS servers provided by your ISP or network administrator. 7. Enter the appropriate subnet mask. • Confirm the subnet mask assigned to your router's address is 192.168.0.1, you assigned to the camera in wireless mode, [Auto Negotiation] must be confirmed on image ...
...Under [Max. Click [Save]. 10. Note • • To access the camera again, use . • This setting is effective for both IPv4 and IPv6 connections. • BL-C131A only: If using the camera in this setting at [Auto Negotiation]. • This setting is effective for both IPv4...primary and secondary DNS servers provided by your ISP or network administrator. 7. Enter the appropriate subnet mask. • Confirm the subnet mask assigned to your router's address is 192.168.0.1, you assigned to the camera in wireless mode, [Auto Negotiation] must be confirmed on image ...
Operating Instructions
Page 86
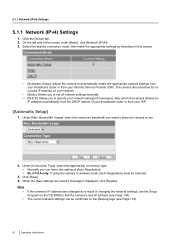
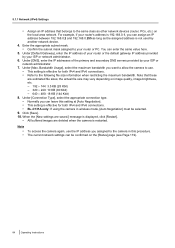
...]. • This setting is effective for both IPv4 and IPv6 connections. • BL-C131A only: If using the camera in wireless mode, [Auto Negotiation] must be selected. 8. The current network settings can normally be left empty. 6. Click [Save]. 9. 5.1.1 Network (IPv4) Settings • If the camera is connected to a router, you can normally be left empty. 5. Under [DNS...
...]. • This setting is effective for both IPv4 and IPv6 connections. • BL-C131A only: If using the camera in wireless mode, [Auto Negotiation] must be selected. 8. The current network settings can normally be left empty. 6. Click [Save]. 9. 5.1.1 Network (IPv4) Settings • If the camera is connected to a router, you can normally be left empty. 5. Under [DNS...
Operating Instructions
Page 91
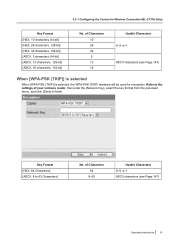
...(BL-C131A Only) Key Format [HEX, 10 characters, 64-bit] [HEX, 26 characters, 128-bit] [HEX, 32 characters, 152-bit] [ASCII, 5 characters, 64-bit] [ASCII, 13 characters, 128-bit] [ASCII, 16 characters, 152-bit] No. of your wireless router, then enter the [Network ...Key], select the key format from the pull-down menu, and click [Save] to finish. Key Format [HEX, 64 Characters] [ASCII, 8 to the settings of Characters 10 26 32 5 13 16 Usable Characters 0-9, a-f ASCII characters (see Page 147) Operating Instructions 91 5.2.1 Configuring the Camera...
...(BL-C131A Only) Key Format [HEX, 10 characters, 64-bit] [HEX, 26 characters, 128-bit] [HEX, 32 characters, 152-bit] [ASCII, 5 characters, 64-bit] [ASCII, 13 characters, 128-bit] [ASCII, 16 characters, 152-bit] No. of your wireless router, then enter the [Network ...Key], select the key format from the pull-down menu, and click [Save] to finish. Key Format [HEX, 64 Characters] [ASCII, 8 to the settings of Characters 10 26 32 5 13 16 Usable Characters 0-9, a-f ASCII characters (see Page 147) Operating Instructions 91 5.2.1 Configuring the Camera...
Operating Instructions
Page 92
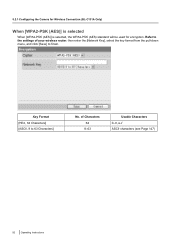
5.2.1 Configuring the Camera for Wireless Connection (BL-C131A Only) When [WPA2-PSK (AES)] is selected When [WPA2-PSK (AES)] is selected, the WPA2-PSK (AES) standard will be used for encryption. of your wireless router, then enter the [Network Key], select the key format from the pull-down menu, and click [Save] to finish. Key Format [HEX, 64 Characters] [ASCII, 8 to the settings of Characters 64 8-63 Usable Characters 0-9, a-f ASCII characters (see Page 147) 92 Operating Instructions Refer to 63 Characters] No.
5.2.1 Configuring the Camera for Wireless Connection (BL-C131A Only) When [WPA2-PSK (AES)] is selected When [WPA2-PSK (AES)] is selected, the WPA2-PSK (AES) standard will be used for encryption. of your wireless router, then enter the [Network Key], select the key format from the pull-down menu, and click [Save] to finish. Key Format [HEX, 64 Characters] [ASCII, 8 to the settings of Characters 64 8-63 Usable Characters 0-9, a-f ASCII characters (see Page 147) 92 Operating Instructions Refer to 63 Characters] No.
Operating Instructions
Page 120
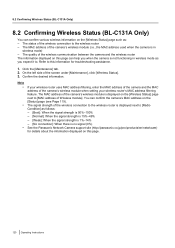
... the screen under [Maintenance], click [Wireless Status]. 3. The MAC address of the camera's wireless module (i.e., the MAC address used when the camera is no signal (0%) See the Panasonic Network Camera support site (http://panasonic.co.jp/pcc/products/en/netwkcam) for troubleshooting assistance. 1. On the left side of the camera's wireless module when setting your wireless router's MAC address filtering feature...
... the screen under [Maintenance], click [Wireless Status]. 3. The MAC address of the camera's wireless module (i.e., the MAC address used when the camera is no signal (0%) See the Panasonic Network Camera support site (http://panasonic.co.jp/pcc/products/en/netwkcam) for troubleshooting assistance. 1. On the left side of the camera's wireless module when setting your wireless router's MAC address filtering feature...
Operating Instructions
Page 129
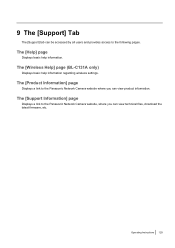
The [Help] page Displays basic help information regarding wireless settings. The [Product Information] page Displays a link to the following pages. Operating Instructions 129 9 The [Support] Tab The [Support] tab can view product information. The [Wireless Help] page (BL-C131A only) Displays basic help information. The [Support Information] page Displays a link to the Panasonic Network Camera website, where you can be accessed by all users and provides access to the Panasonic Network Camera website where you can view technical files, download the latest firmware, etc.
The [Help] page Displays basic help information regarding wireless settings. The [Product Information] page Displays a link to the following pages. Operating Instructions 129 9 The [Support] Tab The [Support] tab can view product information. The [Wireless Help] page (BL-C131A only) Displays basic help information. The [Support Information] page Displays a link to the Panasonic Network Camera website, where you can be accessed by all users and provides access to the Panasonic Network Camera website where you can view technical files, download the latest firmware, etc.
Operating Instructions
Page 133
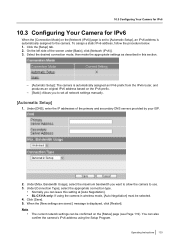
... and secondary DNS servers provided by your ISP. 2. Select the desired connection mode, then make the appropriate settings as described in wireless mode, [Auto Negotiation] must be confirmed on the [Status] page (see Page 119). Click [Save]. 5. You can leave this section. ...Max. Bandwidth Usage], select the maximum bandwidth you can also confirm the camera's IPv6 address using the camera in this setting at [Auto Negotiation]. • BL-C131A only: If using the Setup Program. Note • The current network settings can be selected. 4. Under [DNS], enter the IP addresses...
... and secondary DNS servers provided by your ISP. 2. Select the desired connection mode, then make the appropriate settings as described in wireless mode, [Auto Negotiation] must be confirmed on the [Status] page (see Page 119). Click [Save]. 5. You can leave this section. ...Max. Bandwidth Usage], select the maximum bandwidth you can also confirm the camera's IPv6 address using the camera in this setting at [Auto Negotiation]. • BL-C131A only: If using the Setup Program. Note • The current network settings can be selected. 4. Under [DNS], enter the IP addresses...

Operating Instructions
Page 134
...Connection Type], select the appropriate connection type. • Normally you want to allow access from the Internet using the camera in wireless mode, [Auto Negotiation] must be assigned to the camera. • The default port number is 80, however, note that these are available for IPv6 [Static] 1. ... of the primary and secondary DNS servers provided by your ISP or network administrator for both IPv4 and IPv6 connections. • BL-C131A only: If using port 80. Note that some ISPs do not allow the camera to use. • This setting is displayed, click [Restart]. ...
...Connection Type], select the appropriate connection type. • Normally you want to allow access from the Internet using the camera in wireless mode, [Auto Negotiation] must be assigned to the camera. • The default port number is 80, however, note that these are available for IPv6 [Static] 1. ... of the primary and secondary DNS servers provided by your ISP or network administrator for both IPv4 and IPv6 connections. • BL-C131A only: If using port 80. Note that some ISPs do not allow the camera to use. • This setting is displayed, click [Restart]. ...
Operating Instructions
Page 154
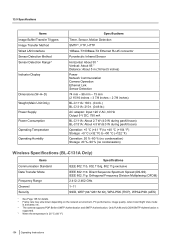
... 5 inches) Power Network Communication Camera Operation Ethernet Link Sensor Detection 74 mm ´ 98 mm ´ 73 mm (2 15/16 inches ´ 3 7/8 inches ´ 2 7/8 inches) BL-C111A: 180 (0.4 lb.) BL-C131A: 210 (0.46 lb.) AC adaptor: Input 120 V AC, 60 Hz Output 9 V DC, 750 mA BL-C111A: About 2.7 W (4.0 W during pan/tilt scan) BL-C131A: About 4.5 W (6.0 W during pan/tilt scan) Operation...
... 5 inches) Power Network Communication Camera Operation Ethernet Link Sensor Detection 74 mm ´ 98 mm ´ 73 mm (2 15/16 inches ´ 3 7/8 inches ´ 2 7/8 inches) BL-C111A: 180 (0.4 lb.) BL-C131A: 210 (0.46 lb.) AC adaptor: Input 120 V AC, 60 Hz Output 9 V DC, 750 mA BL-C111A: About 2.7 W (4.0 W during pan/tilt scan) BL-C131A: About 4.5 W (6.0 W during pan/tilt scan) Operation...
Installation Guide
Page 1
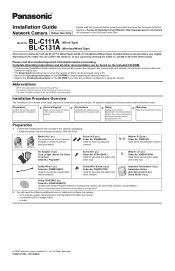
... explains how to physically connect the camera to the power supply and network, as the camera's documentation.* *See the included Important Information for both the BL-C111A (Wired Type) and BL-C131A (Wireless/Wired Type). PQME10080Z Used to install and configure the camera. - Important Information (1 pc.) ... save this document for "Universal Plug and Play". • The Network Camera is referred to the wall. Panasonic Network Camera Website: http://www.panasonic.com/netcam for customers in the camera's packaging. • Additional pieces can be ordered by checking the ...
... explains how to physically connect the camera to the power supply and network, as the camera's documentation.* *See the included Important Information for both the BL-C111A (Wired Type) and BL-C131A (Wireless/Wired Type). PQME10080Z Used to install and configure the camera. - Important Information (1 pc.) ... save this document for "Universal Plug and Play". • The Network Camera is referred to the wall. Panasonic Network Camera Website: http://www.panasonic.com/netcam for customers in the camera's packaging. • Additional pieces can be ordered by checking the ...
Installation Guide
Page 2
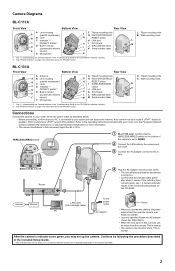
... O Connections Connect the camera to your router and to the Panasonic Network Camera website (http://panasonic.co.jp/pcc/products/en/netwkcam/) for more information. • The camera illustrations in this document depict the BL-C131A. If the indicator does not light green, see 1.2 Camera Indicator Issues in the ...BL-C131A Router 4 Plug the AC adaptor into the power outlet. • The lens will pan and tilt when the camera is normal. After the camera's indicator turns green, you operate the camera, the power outlet should be heard from the camera. Also confirm that the WIRELESS...
... O Connections Connect the camera to your router and to the Panasonic Network Camera website (http://panasonic.co.jp/pcc/products/en/netwkcam/) for more information. • The camera illustrations in this document depict the BL-C131A. If the indicator does not light green, see 1.2 Camera Indicator Issues in the ...BL-C131A Router 4 Plug the AC adaptor into the power outlet. • The lens will pan and tilt when the camera is normal. After the camera's indicator turns green, you operate the camera, the power outlet should be heard from the camera. Also confirm that the WIRELESS...


