Installation Guide
Page 1
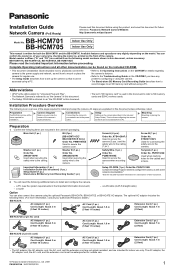
...camera. Main Unit (1 pc.) Bit (1pc.) [BB-HCM701CE/ BB-HCM705CE Only] Order No. XTB4+20AFJ Used to secure the camera (3 pcs.) and the safety wire to SD memory cards and SDHC memory cards. BB-HCM701 BB-HCM705 Indoor Use Only Indoor Use Only This manual is an overview of your authorized Panasonic dealer.) BB... optional AC adaptor includes the following is written for installation. Installation Guide Network Camera (PoE Ready) Please read the included Important Information before using the camera. • The Stand-alone SD Memory Card Recording Guide describes how to...
...camera. Main Unit (1 pc.) Bit (1pc.) [BB-HCM701CE/ BB-HCM705CE Only] Order No. XTB4+20AFJ Used to secure the camera (3 pcs.) and the safety wire to SD memory cards and SDHC memory cards. BB-HCM701 BB-HCM705 Indoor Use Only Indoor Use Only This manual is an overview of your authorized Panasonic dealer.) BB... optional AC adaptor includes the following is written for installation. Installation Guide Network Camera (PoE Ready) Please read the included Important Information before using the camera. • The Stand-alone SD Memory Card Recording Guide describes how to...
Installation Guide
Page 2
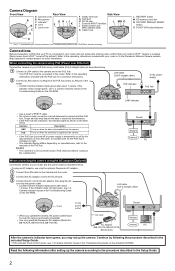
...BB-HCA7A, BB-HCA7CE, BB-HCA7E) Modem Internet PC After the camera's indicator turns green, you operate the camera, the power outlet should be near the camera and easily accessible. • Use only specified Panasonic AC adaptor (Model No. When connecting the camera using PoE (Power over Ethernet) Connect the camera to your PoE... after setting up the camera. PoE Turns on manufacturers, refer to the Panasonic Network Camera website (http://panasonic.net/pcc/ipcam/) for indicator meaning. If the indicator does not light green, see 1.2 Camera Indicator Issues in the ...
...BB-HCA7A, BB-HCA7CE, BB-HCA7E) Modem Internet PC After the camera's indicator turns green, you operate the camera, the power outlet should be near the camera and easily accessible. • Use only specified Panasonic AC adaptor (Model No. When connecting the camera using PoE (Power over Ethernet) Connect the camera to your PoE... after setting up the camera. PoE Turns on manufacturers, refer to the Panasonic Network Camera website (http://panasonic.net/pcc/ipcam/) for indicator meaning. If the indicator does not light green, see 1.2 Camera Indicator Issues in the ...

Installation Guide
Page 3
... INPUT interface may get stuck into a soft material. Mounting the Camera Wiring without making a hole for mounting. Open the screw covers, loosen the screws, and remove the camera cover. (For BB-HCM701CE/BB-HCM705CE: When loosening the screws, use it. In some areas...AC adaptor, LAN, etc.). 4. External INPUT interface Circuit Diagram Example Camera Door Sensor (Alarm) 1 2 Terminal Description 1 External sensor input. Secure the camera to the ceiling or wall using supplemental lighting for indoor use only and should be triggered by local or state ordinances. ...
... INPUT interface may get stuck into a soft material. Mounting the Camera Wiring without making a hole for mounting. Open the screw covers, loosen the screws, and remove the camera cover. (For BB-HCM701CE/BB-HCM705CE: When loosening the screws, use it. In some areas...AC adaptor, LAN, etc.). 4. External INPUT interface Circuit Diagram Example Camera Door Sensor (Alarm) 1 2 Terminal Description 1 External sensor input. Secure the camera to the ceiling or wall using supplemental lighting for indoor use only and should be triggered by local or state ordinances. ...

Installation Guide
Page 4
...of the ceiling or wall, such as needed, depending on a concrete or mortar ceiling 1. Mark the points where you want to install the camera. Pass and connect all necessary cables (AC adaptor, LAN, etc.). N Ceiling N Wall Hole for cables in the ceiling for use your fingers...screw into a secure, 25 mm (1 inch) thick area of the camera may become detached, it would not fall . Attach the camera cover, tighten the screws, and close the screw covers. (Recommended torque 0.6 N·m {6.1 kgf·cm}) (For BB-HCM701CE/BB-HCM705CE: When tightening the screws, use a drill for cables in ...
...of the ceiling or wall, such as needed, depending on a concrete or mortar ceiling 1. Mark the points where you want to install the camera. Pass and connect all necessary cables (AC adaptor, LAN, etc.). N Ceiling N Wall Hole for cables in the ceiling for use your fingers...screw into a secure, 25 mm (1 inch) thick area of the camera may become detached, it would not fall . Attach the camera cover, tighten the screws, and close the screw covers. (Recommended torque 0.6 N·m {6.1 kgf·cm}) (For BB-HCM701CE/BB-HCM705CE: When tightening the screws, use a drill for cables in ...


