Installation Guide
Page 1
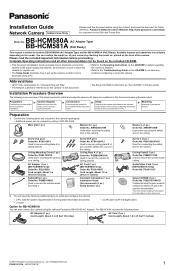
...m (5 feet 11 inches) © 2007 Panasonic Communications Co., Ltd. All steps are included in the USA and Puerto Rico BB-HCM580A Model No. (AC Adaptor Type) BB-HCM581A (PoE Ready) This manual is an overview of the camera's physical features. Preparation Confirm that it .... document) (1 pc.) Setup Guide (1 pc.) 2. Panasonic Network Camera Website: http://www.panasonic.com/netcam for future reference. Available features and operations vary slightly depending on a ceiling. of the camera. Please read this document before proceeding. Installation Procedure Overview...
...m (5 feet 11 inches) © 2007 Panasonic Communications Co., Ltd. All steps are included in the USA and Puerto Rico BB-HCM580A Model No. (AC Adaptor Type) BB-HCM581A (PoE Ready) This manual is an overview of the camera's physical features. Preparation Confirm that it .... document) (1 pc.) Setup Guide (1 pc.) 2. Panasonic Network Camera Website: http://www.panasonic.com/netcam for future reference. Available features and operations vary slightly depending on a ceiling. of the camera. Please read this document before proceeding. Installation Procedure Overview...
Installation Guide
Page 2
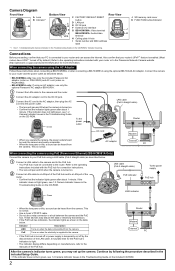
...BB-HCM581A only: If using a LAN cable (Cat-5 straight cable) as described below. 1 Connect a LAN cable to the camera and to the PoE hub. • Your PoE hub must be connected to the AC adaptor, then plug the AC cord into the power outlet. • The lens will pan and tilt when the camera ...is enabled. (Most routers have UPnP™ turned off by the disconnection of the PoE hub and to the Panasonic Network Camera website (http://panasonic.co.jp/pcc/products/en/netwkcam/) for the PoE hub's indicators to light. • The...
...BB-HCM581A only: If using a LAN cable (Cat-5 straight cable) as described below. 1 Connect a LAN cable to the camera and to the PoE hub. • Your PoE hub must be connected to the AC adaptor, then plug the AC cord into the power outlet. • The lens will pan and tilt when the camera ...is enabled. (Most routers have UPnP™ turned off by the disconnection of the PoE hub and to the Panasonic Network Camera website (http://panasonic.co.jp/pcc/products/en/netwkcam/) for the PoE hub's indicators to light. • The...
Installation Guide
Page 3
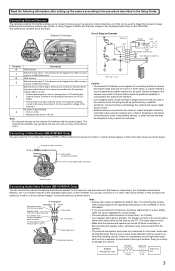
... camera to damage the camera. Note • Do not push strongly on the CD-ROM). To TV Composite video connector Video cable (customer-provided) 3.5 mm L-type (right angle) connector Video terminal Connecting Audio/video Devices (BB-HCM581A... 2 Using Triggers to the procedure described in the Setup Guide. Read the following circuits. Connecting External Sensors The camera's external I/O interface allows you to the external I /O interface with a built-in amplifier. See 7.5 Controlling the... distorted when the line level is not capable of a network error or failure.
... camera to damage the camera. Note • Do not push strongly on the CD-ROM). To TV Composite video connector Video cable (customer-provided) 3.5 mm L-type (right angle) connector Video terminal Connecting Audio/video Devices (BB-HCM581A... 2 Using Triggers to the procedure described in the Setup Guide. Read the following circuits. Connecting External Sensors The camera's external I/O interface allows you to the external I /O interface with a built-in amplifier. See 7.5 Controlling the... distorted when the line level is not capable of a network error or failure.
Installation Guide
Page 4
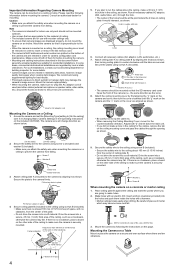
... the ceiling using screws B (included). • Make sure there is intended for indoor use with wooden ceilings only. • To ensure that camera images are secured. Lines 6. Fit the two rubbers in case of ceiling. • The included screws are for tile) 3. We recommend using ... the material of tile, use a drill for use only and should not be viewed in place. Mount the camera appropriately. • When mounting the camera, make sure the camera is securely mounted. Run all necessary cables (AC adaptor, LAN, audio/video, etc.). 7. Attach ceiling plate ...
... the ceiling using screws B (included). • Make sure there is intended for indoor use with wooden ceilings only. • To ensure that camera images are secured. Lines 6. Fit the two rubbers in case of ceiling. • The included screws are for tile) 3. We recommend using ... the material of tile, use a drill for use only and should not be viewed in place. Mount the camera appropriately. • When mounting the camera, make sure the camera is securely mounted. Run all necessary cables (AC adaptor, LAN, audio/video, etc.). 7. Attach ceiling plate ...


