
Pro-line Network Cam
Page 2
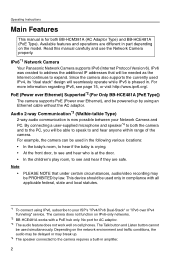
..., audio/video recording may break up by law. The camera does not function on IPv6-only networks. *2 BB-HCE481A works with all applicable federal, state and local statutes. *1 To connect using an Ethernet cable without the AC adaptor. No port for both the camera and to both BB-HCM381A (AC Adaptor Type) and BB-HCE481A (PoE Type). PoE (Power over Ethernet) Supported*2 (For Only BB-HCE481A [PoE Type]) The camera supports PoE (Power over IPv4 Tunneling" service. By connecting a user-supplied microphone...
..., audio/video recording may break up by law. The camera does not function on IPv6-only networks. *2 BB-HCE481A works with all applicable federal, state and local statutes. *1 To connect using an Ethernet cable without the AC adaptor. No port for both the camera and to both BB-HCM381A (AC Adaptor Type) and BB-HCE481A (PoE Type). PoE (Power over Ethernet) Supported*2 (For Only BB-HCE481A [PoE Type]) The camera supports PoE (Power over IPv4 Tunneling" service. By connecting a user-supplied microphone...

Pro-line Network Cam
Page 3
... that position. Output Control ........ Remote Pan/Tilt/Zoom/Focus The following control features are available to monitor the camera in mounting on your PC. Click to view a wide range of the camera. If you to Center ........ Network Camera has a 42x magnifying capacity: a 21x optical zoom and a 2x digital zoom. Preset Position ........ When you select a preset position, the camera moves to 1 GB SD memory card, you can register 20 preset positions. Video Output Network Camera has an analog composite output terminal. If you enable alarm...
... that position. Output Control ........ Remote Pan/Tilt/Zoom/Focus The following control features are available to monitor the camera in mounting on your PC. Click to view a wide range of the camera. If you to Center ........ Network Camera has a 42x magnifying capacity: a 21x optical zoom and a 2x digital zoom. Preset Position ........ When you select a preset position, the camera moves to 1 GB SD memory card, you can register 20 preset positions. Video Output Network Camera has an analog composite output terminal. If you enable alarm...

Pro-line Network Cam
Page 5
... Operation Bar 23 Zooming In and Out 26 Automatic and Manual Focusing 28 Setting Home Position/Alarm Position/Preset Position 30 Listening to Camera Audio and Talking through the Camera .......34 1.7 Viewing the Multi-Camera page 36 1.8 1.8.1 1.9 1.9.1 Viewing the Buffered Image page 38 Deleting Buffered Images 40 Viewing Still Images on Your Cell Phone 41 Enabling or Disabling the Buffer/Transfer on your Cell Phone 44 2 Using the Camera's Basic Features 45 2.1 Setup Page of the Camera 45 2.2 Connecting...
... Operation Bar 23 Zooming In and Out 26 Automatic and Manual Focusing 28 Setting Home Position/Alarm Position/Preset Position 30 Listening to Camera Audio and Talking through the Camera .......34 1.7 Viewing the Multi-Camera page 36 1.8 1.8.1 1.9 1.9.1 Viewing the Buffered Image page 38 Deleting Buffered Images 40 Viewing Still Images on Your Cell Phone 41 Enabling or Disabling the Buffer/Transfer on your Cell Phone 44 2 Using the Camera's Basic Features 45 2.1 Setup Page of the Camera 45 2.2 Connecting...
Pro-line Network Cam
Page 7
...Camera 157 Updating the Camera Firmware 158 Creating the Configuration File 160 Loading Settings from a Configuration File 161 Resetting the Camera to Factory Default 162 Support page 163 The Help page 163 Product Information 163 Support Information 163 External I/O 164 7 Other Information 166 7.1 FACTORY DEFAULT RESET Button 166 7.2 Default Setting List 167 7.3 Cleaning 178 7.4 Setting an IP Address on Your PC 179 7.5 Using Setup Program 180 7.6 7.6.1 7.6.2 7.6.3 7.7 Setting Your PC 186 Setting Proxy Server Settings on a Web Browser 186 Setting UPnP™ to Display...
...Camera 157 Updating the Camera Firmware 158 Creating the Configuration File 160 Loading Settings from a Configuration File 161 Resetting the Camera to Factory Default 162 Support page 163 The Help page 163 Product Information 163 Support Information 163 External I/O 164 7 Other Information 166 7.1 FACTORY DEFAULT RESET Button 166 7.2 Default Setting List 167 7.3 Cleaning 178 7.4 Setting an IP Address on Your PC 179 7.5 Using Setup Program 180 7.6 7.6.1 7.6.2 7.6.3 7.7 Setting Your PC 186 Setting Proxy Server Settings on a Web Browser 186 Setting UPnP™ to Display...
Pro-line Network Cam
Page 8
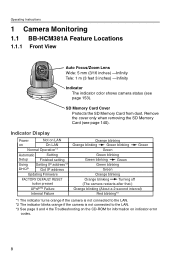
Indicator Display Power on Not on LAN On LAN Normal Operation*1 Automatic Setting Setup Finished setting Using DHCP Getting IP address*2 Got IP address Updating Firmware FACTORY DEFAULT RESET button pressed UPnPTM Failure Internal Failure Orange blinking Orange blinking Green blinking Green Green Green blinking Green blinking Green Green blinking Green Orange blinking Orange blinking Turning off (The camera restarts after that.) Orange blinking (About a 2-second interval) Red blinking*3 *1 The indicator turns orange if the camera is not connected to the...
Indicator Display Power on Not on LAN On LAN Normal Operation*1 Automatic Setting Setup Finished setting Using DHCP Getting IP address*2 Got IP address Updating Firmware FACTORY DEFAULT RESET button pressed UPnPTM Failure Internal Failure Orange blinking Orange blinking Green blinking Green Green Green blinking Green blinking Green Green blinking Green Orange blinking Orange blinking Turning off (The camera restarts after that.) Orange blinking (About a 2-second interval) Red blinking*3 *1 The indicator turns orange if the camera is not connected to the...

Pro-line Network Cam
Page 9
Operating Instructions External I/O (See page 164) DC IN jack Connects the camera to your LAN. 1.1.2 Rear View Ethernet (LAN) port Connects the camera to the AC adaptor. Hook for ceiling mounting (See Installation Guide). MAC Address and Serial Number are indicated on the label. 9 Audio/Video terminal (See Getting Started) 1.1.3 Bottom View FACTORY DEFAULT RESET button Resets settings to secure the AC adaptor cord. Hole for Ceiling Plate A Used for AC Adaptor Cord Used to default (see page 166).
Operating Instructions External I/O (See page 164) DC IN jack Connects the camera to your LAN. 1.1.2 Rear View Ethernet (LAN) port Connects the camera to the AC adaptor. Hook for ceiling mounting (See Installation Guide). MAC Address and Serial Number are indicated on the label. 9 Audio/Video terminal (See Getting Started) 1.1.3 Bottom View FACTORY DEFAULT RESET button Resets settings to secure the AC adaptor cord. Hole for Ceiling Plate A Used for AC Adaptor Cord Used to default (see page 166).
Pro-line Network Cam
Page 10
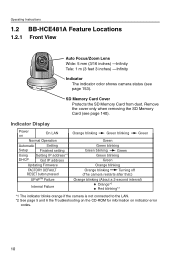
... address Updating Firmware FACTORY DEFAULT RESET button pressed UPnPTM Failure Internal Failure Orange blinking Green blinking Green Green Green blinking Green blinking Green Green blinking Green Orange blinking Orange blinking Turning off (The camera restarts after that.) Orange blinking (About a 2-second interval) Orange*2 Red blinking*2 *1 The indicator blinks orange if the camera is not connected to the LAN. *2 See page 5 and 6 the Troubleshooting on the CD-ROM for information on indicator error codes. 10 Operating Instructions 1.2 BB-HCE481A...
... address Updating Firmware FACTORY DEFAULT RESET button pressed UPnPTM Failure Internal Failure Orange blinking Green blinking Green Green Green blinking Green blinking Green Green blinking Green Orange blinking Orange blinking Turning off (The camera restarts after that.) Orange blinking (About a 2-second interval) Orange*2 Red blinking*2 *1 The indicator blinks orange if the camera is not connected to the LAN. *2 See page 5 and 6 the Troubleshooting on the CD-ROM for information on indicator error codes. 10 Operating Instructions 1.2 BB-HCE481A...

Pro-line Network Cam
Page 11
MAC Address and Serial Number are indicated on the label. 11 Hole for Ceiling Plate A Used for ceiling mounting. (See Installation Guide) Operating Instructions External I/O (See page 164) PoE IN port Connects the camera to default (see page 166). 1.2.2 Rear View Audio/Video terminal (See Getting Started) 1.2.3 Bottom View FACTORY DEFAULT RESET button Resets settings to your PoE hub.
MAC Address and Serial Number are indicated on the label. 11 Hole for Ceiling Plate A Used for ceiling mounting. (See Installation Guide) Operating Instructions External I/O (See page 164) PoE IN port Connects the camera to default (see page 166). 1.2.2 Rear View Audio/Video terminal (See Getting Started) 1.2.3 Bottom View FACTORY DEFAULT RESET button Resets settings to your PoE hub.
Pro-line Network Cam
Page 15
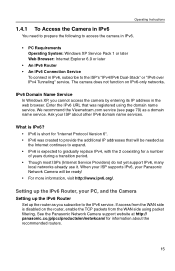
... support IPv6, many local networks already use it. Operating Instructions 1.4.1 To Access the Camera in IPv6 You need to prepare the following to access the camera in IPv6. • PC Requirements Operating System: Windows XP Service Pack 1 or later Web Browser: Internet Explorer 6.0 or later • An IPv6 Router • An IPv6 Connection Service To connect in the web browser. Ask your PC, and the Camera Setting up the IPv6 Router Set up the router as a domain name service. Setting...
... support IPv6, many local networks already use it. Operating Instructions 1.4.1 To Access the Camera in IPv6 You need to prepare the following to access the camera in IPv6. • PC Requirements Operating System: Windows XP Service Pack 1 or later Web Browser: Internet Explorer 6.0 or later • An IPv6 Router • An IPv6 Connection Service To connect in the web browser. Ask your PC, and the Camera Setting up the IPv6 Router Set up the router as a domain name service. Setting...

Pro-line Network Cam
Page 17
... Image Button (See page 22) Operation Bar (See page 23) Audio Control Bar (Talk Button, Listen Button and Adjustment Bar) (See page 34) Click to Center (See page 21) Click the URL in case of the page. • When the Security Warning window is displayed, click [Yes] (see page 19). • See page 20 for the Security Warning window when using IPsec or enabling Motion Detection will be changed...
... Image Button (See page 22) Operation Bar (See page 23) Audio Control Bar (Talk Button, Listen Button and Adjustment Bar) (See page 34) Click to Center (See page 21) Click the URL in case of the page. • When the Security Warning window is displayed, click [Yes] (see page 19). • See page 20 for the Security Warning window when using IPsec or enabling Motion Detection will be changed...

Pro-line Network Cam
Page 19
... "Download signed ActiveX Controls". (2) Check "Enable" in as an administrator to install ActiveX Controls and enable video viewing. Contacting your network administrator. - This may prevent motion video from the Panasonic Network Camera support website at http://panasonic.co.jp/pcc/products/en/netwkcam/. In this situation we recommend: - Using regularly refreshed images rather than video. 19 Operating Instructions Security Warning window When trying to access the proxy server (see the video using Windows 2000 or Windows XP, log in "Run ActiveX Controls and plug...
... "Download signed ActiveX Controls". (2) Check "Enable" in as an administrator to install ActiveX Controls and enable video viewing. Contacting your network administrator. - This may prevent motion video from the Panasonic Network Camera support website at http://panasonic.co.jp/pcc/products/en/netwkcam/. In this situation we recommend: - Using regularly refreshed images rather than video. 19 Operating Instructions Security Warning window When trying to access the proxy server (see the video using Windows 2000 or Windows XP, log in "Run ActiveX Controls and plug...

Pro-line Network Cam
Page 31
...If "Success!" Operating Instructions Registering a Preset Position 20 camera positions can register preset positions. Pan and tilt the camera to [Cancel]. Pan/Tilt Zoom Focus Preset Position Preset number Setting a name Preset Name Preset (1) Name UpperLeft Save Back The button turns blue. Click [Program]. • [Program] switches to a desired position. 3. Select a preset button (1-8) or a preset position (1-20) from dropdown list, and enter the preset name. is displayed, the position has been registered successfully. The preset number and preset name are displayed. Note...
...If "Success!" Operating Instructions Registering a Preset Position 20 camera positions can register preset positions. Pan and tilt the camera to [Cancel]. Pan/Tilt Zoom Focus Preset Position Preset number Setting a name Preset Name Preset (1) Name UpperLeft Save Back The button turns blue. Click [Program]. • [Program] switches to a desired position. 3. Select a preset button (1-8) or a preset position (1-20) from dropdown list, and enter the preset name. is displayed, the position has been registered successfully. The preset number and preset name are displayed. Note...

Pro-line Network Cam
Page 43
... Alarm Log and Buffer/Transfer. 43 Operating Instructions (10) Goes to the control page. (11) Displays the number of new logs. (12) Displays the date and time, the kind of compatibility with Panasonic Network Cameras. http:// IP address(or URL):Port Number/MobileH for XHTML. (or .viewnetcam.com:50000/MobileX) • When pan, tilt, or zoom reaches the end, the keypad number and character disappear. Note • Audio feature does not work...
... Alarm Log and Buffer/Transfer. 43 Operating Instructions (10) Goes to the control page. (11) Displays the number of new logs. (12) Displays the date and time, the kind of compatibility with Panasonic Network Cameras. http:// IP address(or URL):Port Number/MobileH for XHTML. (or .viewnetcam.com:50000/MobileX) • When pan, tilt, or zoom reaches the end, the keypad number and character disappear. Note • Audio feature does not work...
Pro-line Network Cam
Page 46
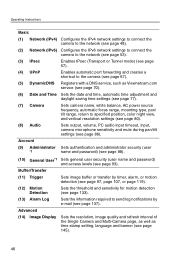
... Date and Time Sets the date and time, automatic time adjustment and daylight saving time settings (see page 77). (7) Camera Sets camera name, white balance, AC power source frequency, automatic focus range, mounting type, pan/ tilt range, return to specified position, color night view, and vertical resolution settings (see page 80). (8) Audio Sets output, volume, PC audio input timeout, input, camera microphone sensitivity and mute during pan/tilt settings (see page 86). Account (9) Administrator Sets authentication and administrator security (user *1 name and password) (see page...
... Date and Time Sets the date and time, automatic time adjustment and daylight saving time settings (see page 77). (7) Camera Sets camera name, white balance, AC power source frequency, automatic focus range, mounting type, pan/ tilt range, return to specified position, color night view, and vertical resolution settings (see page 80). (8) Audio Sets output, volume, PC audio input timeout, input, camera microphone sensitivity and mute during pan/tilt settings (see page 86). Account (9) Administrator Sets authentication and administrator security (user *1 name and password) (see page...
Pro-line Network Cam
Page 68
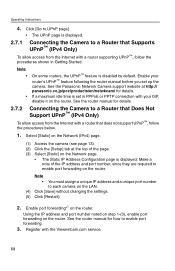
... Internet with a router supporting UPnP™, follow the procedures below. 1. If a maximum idle time is displayed. Make a note of the page. (3) Select [Static] on the Network page. • The Static IP Address Configuration page is set up the camera. See the router manual for details. Enable port forwarding*1 on the router. Register with your ISP, disable it on the LAN. (4) Click [Save] without changing the settings. (5) Click [Restart]. 2. Using...
... Internet with a router supporting UPnP™, follow the procedures below. 1. If a maximum idle time is displayed. Make a note of the page. (3) Select [Static] on the Network page. • The Static IP Address Configuration page is set up the camera. See the router manual for details. Enable port forwarding*1 on the router. Register with your ISP, disable it on the LAN. (4) Click [Save] without changing the settings. (5) Click [Restart]. 2. Using...
Pro-line Network Cam
Page 73
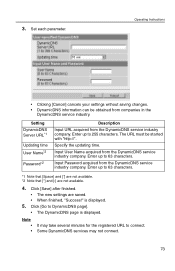
... updating time. Input Password acquired from companies in the DynamicDNS service industry. Note • • It may not connect. 73 Operating Instructions • Clicking [Cancel] cancels your settings without saving changes. • DynamicDNS information can be started with "http://". The URL must be obtained from the DynamicDNS service industry company. is displayed. 3. Enter up to 63 characters. Click [Go to connect. Setting DynamicDNS Server URL*1 Updating time User Name*2 Password...
... updating time. Input Password acquired from companies in the DynamicDNS service industry. Note • • It may not connect. 73 Operating Instructions • Clicking [Cancel] cancels your settings without saving changes. • DynamicDNS information can be started with "http://". The URL must be obtained from the DynamicDNS service industry company. is displayed. 3. Enter up to 63 characters. Click [Go to connect. Setting DynamicDNS Server URL*1 Updating time User Name*2 Password...
Pro-line Network Cam
Page 101
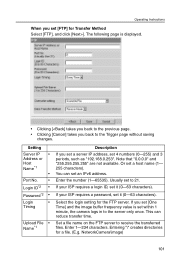
Operating Instructions When you set [FTP] for Transfer Method Select [FTP], and click [Next>]. The following page is displayed. • Clicking [
Operating Instructions When you set [FTP] for Transfer Method Select [FTP], and click [Next>]. The following page is displayed. • Clicking [
Pro-line Network Cam
Page 112
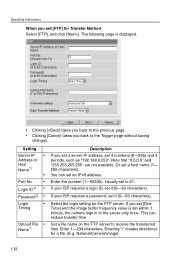
Operating Instructions When you set [FTP] for Transfer Method Select [FTP], and click [Next>]. The following page is displayed. • Clicking [
Operating Instructions When you set [FTP] for Transfer Method Select [FTP], and click [Next>]. The following page is displayed. • Clicking [
Pro-line Network Cam
Page 124
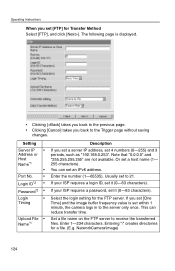
The following page is displayed. • Clicking [ Operating Instructions When you set [FTP] for Transfer Method Select [FTP], and click [Next>].
The following page is displayed. • Clicking [ Operating Instructions When you set [FTP] for Transfer Method Select [FTP], and click [Next>].
Pro-line Network Cam
Page 158
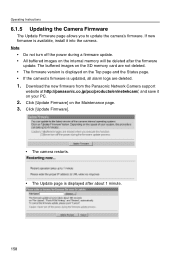
... page. 3. Click [Update Firmware] on your PC. 2. Download the new firmware from the Panasonic Network Camera support website at http://panasonic.co.jp/pcc/products/en/netwkcam/, and save it into the camera. The buffered images on the SD memory card are deleted. 1. Operating Instructions 6.1.5 Updating the Camera Firmware The Update Firmware page allows you to update the camera's firmware. Note • Do not turn off the power during a firmware update. • All buffered images on the...
... page. 3. Click [Update Firmware] on your PC. 2. Download the new firmware from the Panasonic Network Camera support website at http://panasonic.co.jp/pcc/products/en/netwkcam/, and save it into the camera. The buffered images on the SD memory card are deleted. 1. Operating Instructions 6.1.5 Updating the Camera Firmware The Update Firmware page allows you to update the camera's firmware. Note • Do not turn off the power during a firmware update. • All buffered images on the...


