

Owner Manual
Page 1
Contents Introduction 2 Connection 17 Turning On & First Time Setup .....40 Basic Operations 56 Using the Listening Modes ........69 Advanced Setup 79 Zone 2 102 Controlling Other Components ...108 Others 121 En Please retain this manual will enable you for future reference. AV Receiver TX-SR707 Instruction Manual Thank you to obtain optimum performance and listening enjoyment from your new AV Receiver. Please read this manual thoroughly before making connections and plugging in this manual for purchasing an Onkyo AV Receiver. Following the instructions in the unit.
Contents Introduction 2 Connection 17 Turning On & First Time Setup .....40 Basic Operations 56 Using the Listening Modes ........69 Advanced Setup 79 Zone 2 102 Controlling Other Components ...108 Others 121 En Please retain this manual will enable you for future reference. AV Receiver TX-SR707 Instruction Manual Thank you to obtain optimum performance and listening enjoyment from your new AV Receiver. Please read this manual thoroughly before making connections and plugging in this manual for purchasing an Onkyo AV Receiver. Following the instructions in the unit.

Owner Manual
Page 5
...Input Signal Formats 98 Using the Audio Settings 99 Zone 2 Zone 2 102 Multiroom Capability 102 Connecting Zone 2 103 Setting the Powered Zone 2 104 Using Zone 2 105 Using the Remote Controller in Zone 2 and Multiroom Control Kits 107 Controlling Other ...Components Controlling Other Components 108 Preprogrammed Remote Control Codes 108 Looking up for Remote Control Code 108 Entering Remote Control Codes 110 Remote Control Codes for Onkyo...
...Input Signal Formats 98 Using the Audio Settings 99 Zone 2 Zone 2 102 Multiroom Capability 102 Connecting Zone 2 103 Setting the Powered Zone 2 104 Using Zone 2 105 Using the Remote Controller in Zone 2 and Multiroom Control Kits 107 Controlling Other ...Components Controlling Other Components 108 Preprogrammed Remote Control Codes 108 Looking up for Remote Control Code 108 Entering Remote Control Codes 110 Remote Control Codes for Onkyo...
Owner Manual
Page 6
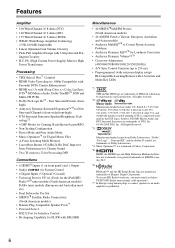
... Pre Out • SIRIUS*8 Satellite Radio Connectivity (North American models) • Banana Plug-Compatible Speaker Posts*7 • Powered Zone 2 • RS232 Port for Interface Control • Bi-Amping Capability for Loudness Correction • Audyssey Dynamic Volume™*9 •...Inc. Music Optimizer™ is a registered trademark & the DTS logos, Symbol, DTS-HD Master Audio and DTS Surround Sensation are trademarks of Onkyo Corporation. *5. and worldwide patents issued & pending. Features Amplifier • 100 Watts/Channel @ 8 ohms (FTC) • 160 Watts/Channel...
... Pre Out • SIRIUS*8 Satellite Radio Connectivity (North American models) • Banana Plug-Compatible Speaker Posts*7 • Powered Zone 2 • RS232 Port for Interface Control • Bi-Amping Capability for Loudness Correction • Audyssey Dynamic Volume™*9 •...Inc. Music Optimizer™ is a registered trademark & the DTS logos, Symbol, DTS-HD Master Audio and DTS Surround Sensation are trademarks of Onkyo Corporation. *5. and worldwide patents issued & pending. Features Amplifier • 100 Watts/Channel @ 8 ohms (FTC) • 160 Watts/Channel...

Owner Manual
Page 8
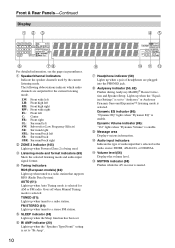
... the currently selected input source. P DISPLAY button (57) This button is used to turn on the output of Zone 2. C STANDBY indicator (40) This indicator lights up when Zone 2 is used for RDS (Radio Data System). I TONE button (57) Used to adjust the tone (bass ... Z The actual front panel has various logos printed on it flashes while a signal is in areas where RDS broadcasts are not shown here for clarity. D ZONE 2 indicator (105) This indicator lights up when the AV receiver is being received from the remote controller. F Remote control sensor (13) This sensor receives ...
... the currently selected input source. P DISPLAY button (57) This button is used to turn on the output of Zone 2. C STANDBY indicator (40) This indicator lights up when Zone 2 is used for RDS (Radio Data System). I TONE button (57) Used to adjust the tone (bass ... Z The actual front panel has various logos printed on it flashes while a signal is in areas where RDS broadcasts are not shown here for clarity. D ZONE 2 indicator (105) This indicator lights up when the AV receiver is being received from the remote controller. F Remote control sensor (13) This sensor receives ...
Owner Manual
Page 10
... FR: Front right SL: Surround left SW: Subwoofer (Low Frequency Effects) SR: Surround right SBL: Surround back left SB: Surround back SBR: Surround back right C ZONE 2 indicator (105) Lights up when the "Equalizer Settings" is selected for the current listening mode. Lights up when Powered... Zone 2 is enable. M MUTING indicator (58) Flashes while the AV receiver is selected. Front & Rear Panels-Continued Display BCD EF G HI For detailed information, see the ...
... FR: Front right SL: Surround left SW: Subwoofer (Low Frequency Effects) SR: Surround right SBL: Surround back left SB: Surround back SBR: Surround back right C ZONE 2 indicator (105) Lights up when the "Equalizer Settings" is selected for the current listening mode. Lights up when Powered... Zone 2 is enable. M MUTING indicator (58) Flashes while the AV receiver is selected. Front & Rear Panels-Continued Display BCD EF G HI For detailed information, see the ...
Owner Manual
Page 12
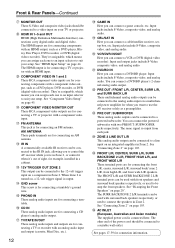
... L/R, CENTER, SURR L/R, and SURR BACK L/R These multichannel analog audio outputs can be connected to a line input on an integrated amplifier in Zone 2. X PRE OUT: SUBWOOFER These analog audio outputs can be connected to suit your TV or projector. The same signal is for connecting a...This screw is output. Input jacks include S-Video, composite video, and analog audio. See "Bi-amping the Front Speakers" on page 44. Y ZONE 2 LINE OUT L/R This analog audio output can be connected to a video input on , a 12-volt trigger signal is for connecting components with ...
... L/R, CENTER, SURR L/R, and SURR BACK L/R These multichannel analog audio outputs can be connected to a line input on an integrated amplifier in Zone 2. X PRE OUT: SUBWOOFER These analog audio outputs can be connected to suit your TV or projector. The same signal is for connecting a...This screw is output. Input jacks include S-Video, composite video, and analog audio. See "Bi-amping the Front Speakers" on page 44. Y ZONE 2 LINE OUT L/R This analog audio output can be connected to a video input on , a 12-volt trigger signal is for connecting components with ...
Owner Manual
Page 17
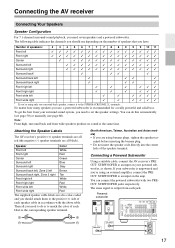
...them to the positive (+) side of speakers that you 're using an external amplifier, connect the PRE OUT: SUBWOOFER to the SURR BACK/ZONE 2 L terminals. To get the best from each speaker cable in accordance with two PREOUT: SUBWOOFER jacks respectively. Note: Front high, surround...same time. Speaker Color Front left White Front right Red Center Green Surround left Blue Surround right Gray Surround back left, Zone 2 left Brown Surround back right, Zone 2 right Tan Front high left White Front high right Red Front wide left ✓ ✓ ✓✓✓...
...them to the positive (+) side of speakers that you 're using an external amplifier, connect the PRE OUT: SUBWOOFER to the SURR BACK/ZONE 2 L terminals. To get the best from each speaker cable in accordance with two PREOUT: SUBWOOFER jacks respectively. Note: Front high, surround...same time. Speaker Color Front left White Front right Red Center Green Surround left Blue Surround right Gray Surround back left, Zone 2 left Brown Surround back right, Zone 2 right Tan Front high left White Front high right Red Front wide left ✓ ✓ ✓✓✓...

Owner Manual
Page 18
... than 6 ohms, be sure to set the minimum speaker impedance to short the positive and negative wires. Do not connect them to the SURR BACK/ZONE 2 L/R, FRONT WIDE L/R, or FRONT HIGH L/R terminals. • Be careful not to "4ohms" (see page 47). Dipole speakers output the same sound in protection circuit may...
... than 6 ohms, be sure to set the minimum speaker impedance to short the positive and negative wires. Do not connect them to the SURR BACK/ZONE 2 L/R, FRONT WIDE L/R, or FRONT HIGH L/R terminals. • Be careful not to "4ohms" (see page 47). Dipole speakers output the same sound in protection circuit may...

Owner Manual
Page 19
... connected to each pair of the speaker cables, and twist the bare wires tightly, as shown. 2 Unscrew the terminal. 1/2" to 5/8" (12 to the SURR BACK/ZONE 2 L terminals.
... connected to each pair of the speaker cables, and twist the bare wires tightly, as shown. 2 Unscrew the terminal. 1/2" to 5/8" (12 to the SURR BACK/ZONE 2 L terminals.

Owner Manual
Page 20
...support bi-amping. Tweeter (high) Tweeter (high) Woofer (low) Right speaker Woofer (low) Left speaker 20 And the SURR BACK/ZONE 2 L/R terminal posts connect to the front speakers' tweeter terminals. • Once you've completed the bi-amping connections shown below ... And connect the AV receiver's FRONT L negative (-) terminal to the left speaker's negative (-) Woofer (low) terminal. 4 Connect the AV receiver's SURR BACK/ZONE 2 L positive (+) terminal to the left speaker's negative (-) Tweeter (high) terminal. Bi-amping Speaker Hookup 1 Connect the AV receiver's FRONT R positive (+) ...
...support bi-amping. Tweeter (high) Tweeter (high) Woofer (low) Right speaker Woofer (low) Left speaker 20 And the SURR BACK/ZONE 2 L/R terminal posts connect to the front speakers' tweeter terminals. • Once you've completed the bi-amping connections shown below ... And connect the AV receiver's FRONT L negative (-) terminal to the left speaker's negative (-) Woofer (low) terminal. 4 Connect the AV receiver's SURR BACK/ZONE 2 L positive (+) terminal to the left speaker's negative (-) Tweeter (high) terminal. Bi-amping Speaker Hookup 1 Connect the AV receiver's FRONT R positive (+) ...

Owner Manual
Page 28
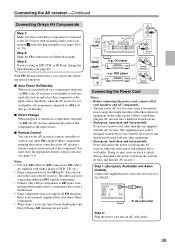
... then make the connection. Step 1: Video Connection Choose a video connection that matches your TV or listen in Zone 2. • To enjoy Dolby Digital and DTS, use connection b or c . (To record or listen in Zone 2 as well, use its tuner to listen to assign the digital audio input (see pages 30 and 32...
... then make the connection. Step 1: Video Connection Choose a video connection that matches your TV or listen in Zone 2. • To enjoy Dolby Digital and DTS, use connection b or c . (To record or listen in Zone 2 as well, use its tuner to listen to assign the digital audio input (see pages 30 and 32...

Owner Manual
Page 29
... connection. • With connection a , you can listen to and record audio from your DVD player or listen in Zone 2. • To enjoy Dolby Digital and DTS, use connection b or c . (To record or listen in Zone 2 as well, use a and b , or a and c .) • If your DVD player has main left and right outputs...
... connection. • With connection a , you can listen to and record audio from your DVD player or listen in Zone 2. • To enjoy Dolby Digital and DTS, use connection b or c . (To record or listen in Zone 2 as well, use a and b , or a and c .) • If your DVD player has main left and right outputs...

Owner Manual
Page 30
... OUT VCR or DVD recorder When you use connection c , you can listen to the VCR or DVD recorder in Zone 2. • To enjoy Dolby Digital and DTS, use connection b or c . (To listen in Zone 2 as well, use your VCR's tuner to listen to assign the component video input (see page 46). With...
... OUT VCR or DVD recorder When you use connection c , you can listen to the VCR or DVD recorder in Zone 2. • To enjoy Dolby Digital and DTS, use connection b or c . (To listen in Zone 2 as well, use your VCR's tuner to listen to assign the component video input (see page 46). With...

Owner Manual
Page 32
... Hint! With this hookup, you can listen to and record audio from the video source or listen in Zone 2. • To enjoy Dolby Digital and DTS, use connection b or c . (To record or listen in Zone 2 as well, use connection c , you use a and b , or a and c .) Connection A B C a b c AV receiver COMPONENT VIDEO IN 2 (CBL/SAT...
... Hint! With this hookup, you can listen to and record audio from the video source or listen in Zone 2. • To enjoy Dolby Digital and DTS, use connection b or c . (To record or listen in Zone 2 as well, use connection c , you use a and b , or a and c .) Connection A B C a b c AV receiver COMPONENT VIDEO IN 2 (CBL/SAT...

Owner Manual
Page 33
... connection. • With connection a , you can listen to and record audio from your game console or listen in Zone 2. • To enjoy Dolby Digital and DTS, use connection b . (To record or listen in Zone 2 as well, use a and b .) Connection A B C a b AV receiver COMPONENT VIDEO IN 2 (CBL/SAT) GAME IN S GAME IN V GAME IN...
... connection. • With connection a , you can listen to and record audio from your game console or listen in Zone 2. • To enjoy Dolby Digital and DTS, use connection b . (To record or listen in Zone 2 as well, use a and b .) Connection A B C a b AV receiver COMPONENT VIDEO IN 2 (CBL/SAT) GAME IN S GAME IN V GAME IN...

Owner Manual
Page 35
... connect that matches your turntable has a ground wire, connect it . • If your CD player or listen in Zone 2. • To connect the CD player digitally, use connection b or c . (To record or listen in Zone 2 as well, use a and b , or a and c .) Connection a b c AV receiver CD IN L/R DIGITAL COAXIAL IN 2 (VCR/DVR) DIGITAL...
... connect that matches your turntable has a ground wire, connect it . • If your CD player or listen in Zone 2. • To connect the CD player digitally, use connection b or c . (To record or listen in Zone 2 as well, use a and b , or a and c .) Connection a b c AV receiver CD IN L/R DIGITAL COAXIAL IN 2 (VCR/DVR) DIGITAL...

Owner Manual
Page 36
... b COAXIAL IN 3 (CBL/SAT) c OPTICAL IN 1 (GAME) IN a L R TV/TAPE a L R TV/TAPE When you use connection b or c , you can play and record or listen in Zone 2. • To connect the recorder digitally for playback, use connections a and b , or a and c . Connecting the AV receiver-Continued Connecting a Cassette, CDR, MiniDisc, or DAT Recorder...
... b COAXIAL IN 3 (CBL/SAT) c OPTICAL IN 1 (GAME) IN a L R TV/TAPE a L R TV/TAPE When you use connection b or c , you can play and record or listen in Zone 2. • To connect the recorder digitally for playback, use connections a and b , or a and c . Connecting the AV receiver-Continued Connecting a Cassette, CDR, MiniDisc, or DAT Recorder...
Owner Manual
Page 39
..., Australian and Asian models) Never disconnect the power cord from the wall outlet first, and then the AV receiver. V cables are supplied with Onkyo players (DVD, CD, etc.). • Some components have two V jacks. You can use a power cord other than the one to the... Australian and Asian models) Connect the supplied power cord to control your other V-capable Onkyo components, pointing the remote controller at the AV receiver's remote control sensor instead of your other Onkyo components. • While Zone 2 is started on a component connected via V will automatically turn on , the ...
..., Australian and Asian models) Never disconnect the power cord from the wall outlet first, and then the AV receiver. V cables are supplied with Onkyo players (DVD, CD, etc.). • Some components have two V jacks. You can use a power cord other than the one to the... Australian and Asian models) Connect the supplied power cord to control your other V-capable Onkyo components, pointing the remote controller at the AV receiver's remote control sensor instead of your other Onkyo components. • While Zone 2 is started on a component connected via V will automatically turn on , the ...

Owner Manual
Page 47
... to select "Speakers Type(Front)", and then use the Left and Right [F]/[S] buttons to the FRONT L/R and SURR BACK/ZONE 2 L/R terminal posts for bi-amped operation. Powered Zone 2 See "Setting the Powered Zone 2" on page 20. First Time Setup-Continued Speaker Settings If you change the "Speakers Type(Front)" setting. Speaker Setup", and...
... to select "Speakers Type(Front)", and then use the Left and Right [F]/[S] buttons to the FRONT L/R and SURR BACK/ZONE 2 L/R terminal posts for bi-amped operation. Powered Zone 2 See "Setting the Powered Zone 2" on page 20. First Time Setup-Continued Speaker Settings If you change the "Speakers Type(Front)" setting. Speaker Setup", and...
Owner Manual
Page 51
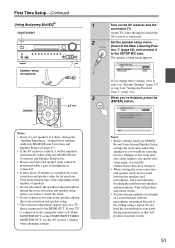
... of listening area at ear height. On the TV, select the input to step 5 on "Speaker Settings" (page 47) or step 4 on "Setting the Powered Zone 2" (page 104). MultEQ: Auto Setup Speakers Type(Front) Powered Zone2 Normal Not Act If you 've finished, press the [ENTER] button. When you change the...
... of listening area at ear height. On the TV, select the input to step 5 on "Speaker Settings" (page 47) or step 4 on "Setting the Powered Zone 2" (page 104). MultEQ: Auto Setup Speakers Type(Front) Powered Zone2 Normal Not Act If you 've finished, press the [ENTER] button. When you change the...


