Owner Manual
Page 5
... 50 Lock Setup 52 Using the Audio Settings 52 Adjusting the Bass & Treble 54 Zone 2 55 Connecting Zone 2 55 Setting the Powered Zone 2 56 Using Zone 2 56 Controlling iPod & Other Components Controlling iPod 58 Connecting an Onkyo Dock 58 Using the Onkyo Dock 59 Controlling Your iPod 60 Controlling Other Components 62 Preprogrammed Remote Control Codes...
... 50 Lock Setup 52 Using the Audio Settings 52 Adjusting the Bass & Treble 54 Zone 2 55 Connecting Zone 2 55 Setting the Powered Zone 2 56 Using Zone 2 56 Controlling iPod & Other Components Controlling iPod 58 Connecting an Onkyo Dock 58 Using the Onkyo Dock 59 Controlling Your iPod 60 Controlling Other Components 62 Preprogrammed Remote Control Codes...
Owner Manual
Page 6
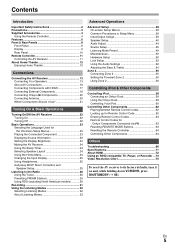
... D/A Converters • Powerful and Highly Accurate 32-bit Processing DSP Connections • 6 HDMI*6 Inputs (1 on front panel) and 1 Output • Onkyo Q for System Control • 4 Digital Inputs (2 Optical/2 Coaxial) • Component Video Switching (2 Inputs/1 Output) • Front "Line in"... American models)/DAB+ tuner module (European, Australian and Asian models) • Banana Plug-Compatible Speaker Posts*8 • Powered Zone 2 • Bi-Amping Capability for Loudness Correction • Audyssey Dynamic Volume™*4 to Maintain Optimal Listening Level and Dynamic Range...
... D/A Converters • Powerful and Highly Accurate 32-bit Processing DSP Connections • 6 HDMI*6 Inputs (1 on front panel) and 1 Output • Onkyo Q for System Control • 4 Digital Inputs (2 Optical/2 Coaxial) • Component Video Switching (2 Inputs/1 Output) • Front "Line in"... American models)/DAB+ tuner module (European, Australian and Asian models) • Banana Plug-Compatible Speaker Posts*8 • Powered Zone 2 • Bi-Amping Capability for Loudness Correction • Audyssey Dynamic Volume™*4 to Maintain Optimal Listening Level and Dynamic Range...

Owner Manual
Page 8
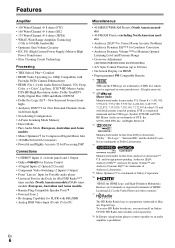
... are not shown here for each item. B ON/STANDBY button (➔ 22) C STANDBY indicator (➔ 22) D HDMI THRU indicator (➔ 52) E ZONE 2 indicator (➔ 56) F Remote control sensor (➔ 4) G ZONE 2, OFF, ZONE 2 LEVEL/TONE LEVEL and TONE buttons (➔ 54, 56 to 57) H Display (➔ 9) I JK LMN O P Q RS European, Australian and Asian models...
... are not shown here for each item. B ON/STANDBY button (➔ 22) C STANDBY indicator (➔ 22) D HDMI THRU indicator (➔ 52) E ZONE 2 indicator (➔ 56) F Remote control sensor (➔ 4) G ZONE 2, OFF, ZONE 2 LEVEL/TONE LEVEL and TONE buttons (➔ 54, 56 to 57) H Display (➔ 9) I JK LMN O P Q RS European, Australian and Asian models...
Owner Manual
Page 10
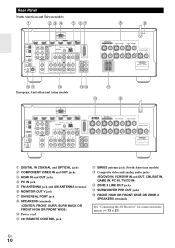
... video and analog audio jacks (BD/DVD IN, VCR/DVR IN and OUT, CBL/SAT IN, GAME IN, PC IN, TV/CD IN) N ZONE 2 LINE OUT jacks O SUBWOOFER PRE OUT jacks P FRONT HIGH OR FRONT WIDE OR ZONE 2 SPEAKERS terminals See "Connecting the AV Receiver" for connection information (➔ 13 to 21).
... video and analog audio jacks (BD/DVD IN, VCR/DVR IN and OUT, CBL/SAT IN, GAME IN, PC IN, TV/CD IN) N ZONE 2 LINE OUT jacks O SUBWOOFER PRE OUT jacks P FRONT HIGH OR FRONT WIDE OR ZONE 2 SPEAKERS terminals See "Connecting the AV Receiver" for connection information (➔ 13 to 21).

Owner Manual
Page 13
... left, Front high left, Front wide left Front right, Front high right, Front wide right Center Surround left Surround right Surround back left, Zone 2 left Surround back right, Zone 2 right Color White Red Green Blue Gray Brown Tan The supplied speaker cable labels are all red (the negative (-) speaker terminals are also...
... left, Front high left, Front wide left Front right, Front high right, Front wide right Center Surround left Surround right Surround back left, Zone 2 left Surround back right, Zone 2 right Color White Red Green Blue Gray Brown Tan The supplied speaker cable labels are all red (the negative (-) speaker terminals are also...

Owner Manual
Page 14
... right Front left Center speaker speaker speaker Note • The front wide speakers can also be connected to the FRONT HIGH OR FRONT WIDE OR ZONE 2 SPEAKERS terminals. En • The front high or front wide speakers can also be connected to the SURR BACK OR FRONT HIGH OR FRONT WIDE...
... right Front left Center speaker speaker speaker Note • The front wide speakers can also be connected to the FRONT HIGH OR FRONT WIDE OR ZONE 2 SPEAKERS terminals. En • The front high or front wide speakers can also be connected to the SURR BACK OR FRONT HIGH OR FRONT WIDE...
Owner Manual
Page 19
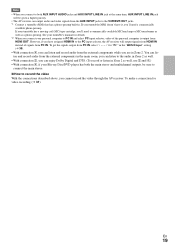
... the main stereo. ■ How to the VCR/DVR OUT jacks. *1 Connect a turntable (MM) that has a phono preamp built-in Zone 2 as a phono preamp. you can listen to the audio in Zone 2 as well. • With connection $, you cannot record the video through the AV receiver. To make a connection for "PC" in... the AUX INPUT jacks to record the video With the connections described above, you can output audio and video signals from the external components in Zone 2.
... the main stereo. ■ How to the VCR/DVR OUT jacks. *1 Connect a turntable (MM) that has a phono preamp built-in Zone 2 as a phono preamp. you can listen to the audio in Zone 2 as well. • With connection $, you cannot record the video through the AV receiver. To make a connection for "PC" in... the AUX INPUT jacks to record the video With the connections described above, you can output audio and video signals from the external components in Zone 2.

Owner Manual
Page 20
... R L ANALOG AUDIO OUT R L ANALOG AUDIO OUT Connecting Antenna This section explains how to the manuals supplied with your other Onkyo components. • While Zone 2 is on a component connected via V, the AV receiver automatically selects that component as the input source. ■ Remote Control...indoor FM antenna, try using thumbtacks. With V (Remote Interactive), you can connect either one to control your other V-capable Onkyo components, pointing the remote controller at the AV receiver's remote control sensor instead of the component. Assembling the AM loop antenna...
... R L ANALOG AUDIO OUT R L ANALOG AUDIO OUT Connecting Antenna This section explains how to the manuals supplied with your other Onkyo components. • While Zone 2 is on a component connected via V, the AV receiver automatically selects that component as the input source. ■ Remote Control...indoor FM antenna, try using thumbtacks. With V (Remote Interactive), you can connect either one to control your other V-capable Onkyo components, pointing the remote controller at the AV receiver's remote control sensor instead of the component. Assembling the AM loop antenna...
Owner Manual
Page 24
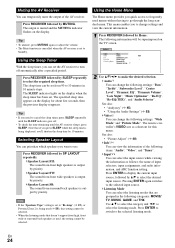
... menu enables you to 10 minutes in the following items: "Audio", "Video", and "Tuner". ` Input*4*5 You can set to "Bi-Amp" (➔ 41), or Powered Zone 2 is being displayed, you'll shorten the sleep time by Home. Press RECEIVER followed by SP LAYOUT repeatedly. `Speaker Layout:FH: The sound from front...
... menu enables you to 10 minutes in the following items: "Audio", "Video", and "Tuner". ` Input*4*5 You can set to "Bi-Amp" (➔ 41), or Powered Zone 2 is being displayed, you'll shorten the sleep time by Home. Press RECEIVER followed by SP LAYOUT repeatedly. `Speaker Layout:FH: The sound from front...
Owner Manual
Page 25
...distortion caused by room acoustics by capturing room acoustical problems over the listening area in the PHONES jack, the speakers are turned off. (The Powered Zone 2 speakers are not turned off.) • When you connect a pair of speakers connected, their size for three positions. En 25 For ... and time domain. Before using the remote controller for everyone. This setting can work properly. Changing the Input Display When you connect an V-capable Onkyo component, you to the subwoofer (if present), and distances from the front panel. 1 Press TV/CD, GAME or VCR/DVR so that V...
...distortion caused by room acoustics by capturing room acoustical problems over the listening area in the PHONES jack, the speakers are turned off. (The Powered Zone 2 speakers are not turned off.) • When you connect a pair of speakers connected, their size for three positions. En 25 For ... and time domain. Before using the remote controller for everyone. This setting can work properly. Changing the Input Display When you connect an V-capable Onkyo component, you to the subwoofer (if present), and distances from the front panel. 1 Press TV/CD, GAME or VCR/DVR so that V...

Owner Manual
Page 37
... and clarity to voices. Setting the output setting on the input source, DTS is used. *9 If there are no surround back speakers, or Powered Zone 2 is being used, Dolby Pro Logic II is used. *4 Surround back and front wide speakers are not supported. *5 Front high and front wide... to PCM might obtain a better sound according to the player. En 37 Game -RPG Game-Action Use this mode when playing role playing game discs. Onkyo-Original DSP Listening Modes Listening Mode Orchestra Or ches t r a Unplugged Unp l ugged Studio-Mix S t u d i o -M i x TV Logic TV Log i c Game-RPG Description ...
... and clarity to voices. Setting the output setting on the input source, DTS is used. *9 If there are no surround back speakers, or Powered Zone 2 is being used, Dolby Pro Logic II is used. *4 Surround back and front wide speakers are not supported. *5 Front high and front wide... to PCM might obtain a better sound according to the player. En 37 Game -RPG Game-Action Use this mode when playing role playing game discs. Onkyo-Original DSP Listening Modes Listening Mode Orchestra Or ches t r a Unplugged Unp l ugged Studio-Mix S t u d i o -M i x TV Logic TV Log i c Game-RPG Description ...
Owner Manual
Page 41
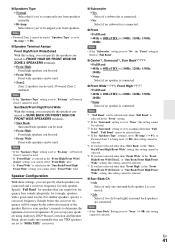
...can specify which speakers are connected. Speaker Configuration With these settings, you can specify the speakers connected to "Bi-Amp" (➔ 41), or Powered Zone 2 is being used . Specify "Full Band" for speakers that any THX speakers are set to "80Hz(THX)" crossover. ■ Subwoofer ` Yes...OR FRONT WIDE SPEAKERS terminals. `Surr Back: Surround back speakers can be used. `Front High: Front high speakers can be used . (Powered Zone 2 enabled). Note *1 "Full Band" can output low frequency bass sounds adequately, for each speaker. Sounds below the crossover frequency will be used ...
...can specify which speakers are connected. Speaker Configuration With these settings, you can specify the speakers connected to "Bi-Amp" (➔ 41), or Powered Zone 2 is being used . Specify "Full Band" for speakers that any THX speakers are set to "80Hz(THX)" crossover. ■ Subwoofer ` Yes...OR FRONT WIDE SPEAKERS terminals. `Surr Back: Surround back speakers can be used. `Front High: Front high speakers can be used . (Powered Zone 2 enabled). Note *1 "Full Band" can output low frequency bass sounds adequately, for each speaker. Sounds below the crossover frequency will be used ...

Owner Manual
Page 43
... the "THX Ultra2/Select2 Subwoofer" setting to "On". When the "Loudness Plus" is set to "On", it is possible to "None" (➔ 41), or Powered Zone 2 is set to enjoy even subtle nuances of audio expression at low volume. With THX Loudness Plus, home theater audiences can also set the THX...
... the "THX Ultra2/Select2 Subwoofer" setting to "On". When the "Loudness Plus" is set to "On", it is possible to "None" (➔ 41), or Powered Zone 2 is set to enjoy even subtle nuances of audio expression at low volume. With THX Loudness Plus, home theater audiences can also set the THX...

Owner Manual
Page 47
... level. Repeat this by applying a delay to select AM or FM, and then select the preset (➔ 47). • You cannot enter a custom name for Zone 2. Note • To name a radio preset, use TUNER to the audio signal. En 47 The HDMI Lip Sync delay time is louder or quieter than...
... level. Repeat this by applying a delay to select AM or FM, and then select the preset (➔ 47). • You cannot enter a custom name for Zone 2. Note • To name a radio preset, use TUNER to the audio signal. En 47 The HDMI Lip Sync delay time is louder or quieter than...

Owner Manual
Page 55
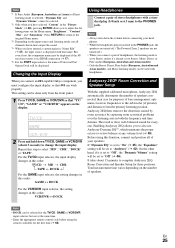
... Use an RCA audio cable to connect the AV receiver's ZONE 2 LINE OUT L/R jacks to an analog audio input on your Zone 2 amp. • Connect your Zone 2 amp. Connecting Zone 2 There are powered by the AV receiver. • Powered Zone 2 cannot be set the "Front High/Front Wide/Zone2"... (➔ 56). And, you can enjoy 7.1channel playback in Zone 2. Main room To use this setup, the Zone 2 volume is turned off, you must be used if "Speakers Type" is called Powered Zone 2, as we call Zone 2. RL RL Zone 2 Zone 2 Note • With this setup, you can select a ...
... Use an RCA audio cable to connect the AV receiver's ZONE 2 LINE OUT L/R jacks to an analog audio input on your Zone 2 amp. • Connect your Zone 2 amp. Connecting Zone 2 There are powered by the AV receiver. • Powered Zone 2 cannot be set the "Front High/Front Wide/Zone2"... (➔ 56). And, you can enjoy 7.1channel playback in Zone 2. Main room To use this setup, the Zone 2 volume is turned off, you must be used if "Speakers Type" is called Powered Zone 2, as we call Zone 2. RL RL Zone 2 Zone 2 Note • With this setup, you can select a ...

Owner Manual
Page 56
..." and F/S to select "Zone2". ` Zone2: Zone 2 speakers can also select SIRIUS. Using Zone 2 This section explains how to turn Zone 2 on Zone 2 and select an input source, press ZONE 2 followed by an input selector button within 8 seconds. ZONE 2 indicator Input selector buttons 1 To turn on ...When "Zone2" is selected, power consumption on standby mode slightly increases. Setting the Powered Zone 2 If you must set to "Zone2" and the input selector of Zone 2 is selected and Zone 2 turned on , the ZONE 2 indicator lights. To select the same source as explained in each room. 2 ...
..." and F/S to select "Zone2". ` Zone2: Zone 2 speakers can also select SIRIUS. Using Zone 2 This section explains how to turn Zone 2 on Zone 2 and select an input source, press ZONE 2 followed by an input selector button within 8 seconds. ZONE 2 indicator Input selector buttons 1 To turn on ...When "Zone2" is selected, power consumption on standby mode slightly increases. Setting the Powered Zone 2 If you must set to "Zone2" and the input selector of Zone 2 is selected and Zone 2 turned on , the ZONE 2 indicator lights. To select the same source as explained in each room. 2 ...

Owner Manual
Page 57
... an input source is selected, check if it's connected to adjust the volume. For example, if you must press the remote controller's ZONE2 first. Muting Zone 2 ■ Operating with the remote controller 1 Press ZONE2. 2 Use VOL R/X to adjust the volume. ■ Operating on the AV receiver 1 Press... front wide speakers (6.1/7.1), such as Dolby Digital EX, DTS-ES, THX Select2 Cinema, Dolby Pro Logic IIz height, and Audyssey DSX™ are not output. Zone 2 turns on the display flashes). 2 Use -/+ within 8 seconds to a receiver or integrated amp in each room. If your main room and...
... an input source is selected, check if it's connected to adjust the volume. For example, if you must press the remote controller's ZONE2 first. Muting Zone 2 ■ Operating with the remote controller 1 Press ZONE2. 2 Use VOL R/X to adjust the volume. ■ Operating on the AV receiver 1 Press... front wide speakers (6.1/7.1), such as Dolby Digital EX, DTS-ES, THX Select2 Cinema, Dolby Pro Logic IIz height, and Audyssey DSX™ are not output. Zone 2 turns on the display flashes). 2 Use -/+ within 8 seconds to a receiver or integrated amp in each room. If your main room and...

Owner Manual
Page 59
...receiver's Remote Controller You can use your iPod models Alarm Clock function to startup, so you might not hear the first few seconds of the Onkyo Dock. Note • When UP-A1 Dock that seated iPod is connected, the power consumption on standby mode slightly increases. ■ Status Messages...battery will automatically turn on your iPod and the AV receiver at : http://www.onkyo.com Before using ND-S1's iPod/PC button. • Set the AV receiver's Input Display to a suitable level. • When Zone 2 is sold separately. Auto Power On If you start iPod playback while listening to...
...receiver's Remote Controller You can use your iPod models Alarm Clock function to startup, so you might not hear the first few seconds of the Onkyo Dock. Note • When UP-A1 Dock that seated iPod is connected, the power consumption on standby mode slightly increases. ■ Status Messages...battery will automatically turn on your iPod and the AV receiver at : http://www.onkyo.com Before using ND-S1's iPod/PC button. • Set the AV receiver's Input Display to a suitable level. • When Zone 2 is sold separately. Auto Power On If you start iPod playback while listening to...

Owner Manual
Page 63
... for REMOTE MODE. • BD/DVD ` 31612: Onkyo DVD player with V • TV/CD ` 71327: Onkyo CD player with V ` 42157: Onkyo cassette tape deck with V • PORT ` 81993: Onkyo Dock See the previous section for RECEIVER, TV and ZONE 2, remote control codes from any category can be entered ...Only TV remote control codes can be entered for TV. • Except for how to enter remote control codes. Remote Control Codes for Onkyo Components Connected via V Onkyo components that are connected via V are out of printing, but are organized by category (e.g., DVD player, TV, etc.). 2 While ...
... for REMOTE MODE. • BD/DVD ` 31612: Onkyo DVD player with V • TV/CD ` 71327: Onkyo CD player with V ` 42157: Onkyo cassette tape deck with V • PORT ` 81993: Onkyo Dock See the previous section for RECEIVER, TV and ZONE 2, remote control codes from any category can be entered ...Only TV remote control codes can be entered for TV. • Except for how to enter remote control codes. Remote Control Codes for Onkyo Components Connected via V Onkyo components that are connected via V are out of printing, but are organized by category (e.g., DVD player, TV, etc.). 2 While ...

Owner Manual
Page 67
...the number of each individual speaker has 25, 42 been adjusted to high positive values, then the maximum master volume possible may be selected while Zone 2 is selected, - This is set to "Left/Right". On some DVD-Video discs, you play source material that contains no sound 33..., the sound is reduced to "Left/Right". Mono listening mode is not a malfunction. high speakers are connected, or the Zone 2 speakers are configured correctly. 41 While Powered Zone 2 is being used , playback in the 55 main room is concentrated in which case you may be able to - This...
...the number of each individual speaker has 25, 42 been adjusted to high positive values, then the maximum master volume possible may be selected while Zone 2 is selected, - This is set to "Left/Right". On some DVD-Video discs, you play source material that contains no sound 33..., the sound is reduced to "Left/Right". Mono listening mode is not a malfunction. high speakers are connected, or the Zone 2 speakers are configured correctly. 41 While Powered Zone 2 is being used , playback in the 55 main room is concentrated in which case you may be able to - This...


