Owner Manual
Page 1
AV Receiver TX-NR807 HT-RC180 Instruction Manual Thank you to obtain optimum performance and listening enjoyment from your new AV Receiver. Following the instructions in the unit. Please retain this manual will enable you for future reference. Please read this manual thoroughly before making connections and plugging in this manual for purchasing an Onkyo AV Receiver.... Contents Introduction 2 Connection 18 Turning On & First Time Setup .....42 Basic Operations 60 Using the Listening Modes ........74 Advanced Setup 84 NET 107 Multi Zone 115 Controlling ...
AV Receiver TX-NR807 HT-RC180 Instruction Manual Thank you to obtain optimum performance and listening enjoyment from your new AV Receiver. Following the instructions in the unit. Please retain this manual will enable you for future reference. Please read this manual thoroughly before making connections and plugging in this manual for purchasing an Onkyo AV Receiver.... Contents Introduction 2 Connection 18 Turning On & First Time Setup .....42 Basic Operations 60 Using the Listening Modes ........74 Advanced Setup 84 NET 107 Multi Zone 115 Controlling ...

Owner Manual
Page 2
...including amplifiers) that may touch dangerous voltage points or short-out parts that there is used, use this unit. 17. Adjust only those controls that are provided for your outlet, consult an electrician for service. 16. Do not install near water. 6. The rear edge of the ... apparatus near any kind into the apparatus, the apparatus has been exposed to its normal operation, E. tors, heat registers, stoves, or other controls may result in damage and will often require extensive work by the operating instructions as a bookcase or rack, ensure that could result in any...
...including amplifiers) that may touch dangerous voltage points or short-out parts that there is used, use this unit. 17. Adjust only those controls that are provided for your outlet, consult an electrician for service. 16. Do not install near water. 6. The rear edge of the ... apparatus near any kind into the apparatus, the apparatus has been exposed to its normal operation, E. tors, heat registers, stoves, or other controls may result in damage and will often require extensive work by the operating instructions as a bookcase or rack, ensure that could result in any...
Owner Manual
Page 4
...Use this adapter if your AC outlet does not match with the plug on the AV receiver's power cord (adapter varies from country to country.) Speaker cable labels * Power-plug...terminal which is marked with an appropriate fuse. For European Models Declaration of Conformity We, ONKYO EUROPE ELECTRONICS GmbH LIEGNITZERSTRASSE 6, 82194 GROEBENZELL, GERMANY declare in own responsibility, that indicated on...coloured in accordance with the following accessories: Remote controller & two batteries (AA/R6) (Note for China: The battery for the remote controller is not supplied for this unit.) Speaker ...
...Use this adapter if your AC outlet does not match with the plug on the AV receiver's power cord (adapter varies from country to country.) Speaker cable labels * Power-plug...terminal which is marked with an appropriate fuse. For European Models Declaration of Conformity We, ONKYO EUROPE ELECTRONICS GmbH LIEGNITZERSTRASSE 6, 82194 GROEBENZELL, GERMANY declare in own responsibility, that indicated on...coloured in accordance with the following accessories: Remote controller & two batteries (AA/R6) (Note for China: The battery for the remote controller is not supplied for this unit.) Speaker ...
Owner Manual
Page 5
... AV Receiver 107 Listening to Internet Radio 108 Playing Music Files on a Server 109 Network Settings 113 Multi Zone Multi Zone 115 Multiroom Capability 115 Connecting Zone 2 116 Connecting Zone 3 117 Setting the Powered Zone 2/3 118 Setting the Multi Zone 119 Using Zone 2/3 120 Using the Remote Controller in Zone 2/3 and Multiroom Control Kits (TX-NR807 122 Controlling...
... AV Receiver 107 Listening to Internet Radio 108 Playing Music Files on a Server 109 Network Settings 113 Multi Zone Multi Zone 115 Multiroom Capability 115 Connecting Zone 2 116 Connecting Zone 3 117 Setting the Powered Zone 2/3 118 Setting the Multi Zone 119 Using Zone 2/3 120 Using the Remote Controller in Zone 2/3 and Multiroom Control Kits (TX-NR807 122 Controlling...
Owner Manual
Page 6
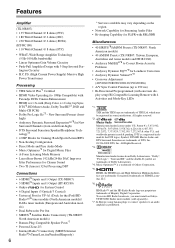
...logo are proprietary trademarks of HDMI Licensing, LLC. *6. To receive HD Radio broadcasts, you must install an Onkyo UP-HT1 HD Radio tuner module (sold separately). *7. ... DSP Connections • 6 HDMI*5 Inputs and 1 Output (TX-NR807) • 5 HDMI*5 Inputs and 1 Output (HT-RC180) • Onkyo for System Control • 6 Digital Inputs (3 Optical/3 Coaxial) • ...Network Capability for Streaming Audio Files • Bi-Amping Capability for FL/FR with SBL/SBR Miscellaneous • 40 SIRIUS*8/AM/FM Presets (TX-NR807: North American models) • 40 AM/FM Presets (TX-NR807...
...logo are proprietary trademarks of HDMI Licensing, LLC. *6. To receive HD Radio broadcasts, you must install an Onkyo UP-HT1 HD Radio tuner module (sold separately). *7. ... DSP Connections • 6 HDMI*5 Inputs and 1 Output (TX-NR807) • 5 HDMI*5 Inputs and 1 Output (HT-RC180) • Onkyo for System Control • 6 Digital Inputs (3 Optical/3 Coaxial) • ...Network Capability for Streaming Audio Files • Bi-Amping Capability for FL/FR with SBL/SBR Miscellaneous • 40 SIRIUS*8/AM/FM Presets (TX-NR807: North American models) • 40 AM/FM Presets (TX-NR807...
Owner Manual
Page 8
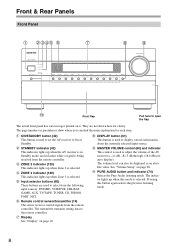
... Audio listening mode. C STANDBY indicator (42) This indicator lights up when Zone 2 is being received from the remote controller. D ZONE 2 indicator (120) This indicator lights up when the AV receiver is in parentheses show where you can also be displayed as an absolute value. H Display See ..."Display" on page 98. J MASTER VOLUME control (60) and indicator This control is selected. Pressing this mode is used to -2 dB,...
... Audio listening mode. C STANDBY indicator (42) This indicator lights up when Zone 2 is being received from the remote controller. D ZONE 2 indicator (120) This indicator lights up when the AV receiver is in parentheses show where you can also be displayed as an absolute value. H Display See ..."Display" on page 98. J MASTER VOLUME control (60) and indicator This control is selected. Pressing this mode is used to -2 dB,...
Owner Manual
Page 11
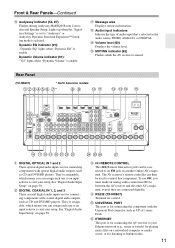
... setup. Rear Panel (TX-NR807) * North American models B C DEFG H* IJ KL M NO P Q R ST U VW X Y Z[ " B DIGITAL OPTICAL IN 1 and 2 These optical digital audio inputs are connected digitally. F UNIVERSAL PORT This port is for connecting the AV receiver to your Ethernet network (e.g., router or switch) for listening to suit your setup. The AV receiver's remote controller can assign each one...
... setup. Rear Panel (TX-NR807) * North American models B C DEFG H* IJ KL M NO P Q R ST U VW X Y Z[ " B DIGITAL OPTICAL IN 1 and 2 These optical digital audio inputs are connected digitally. F UNIVERSAL PORT This port is for connecting the AV receiver to your Ethernet network (e.g., router or switch) for listening to suit your setup. The AV receiver's remote controller can assign each one...
Owner Manual
Page 12
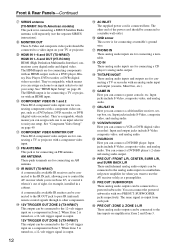
... connecting an FM antenna. The HDMI output is output. 12V TRIGGER OUT ZONE 3 (TX-NR807) This output can be connected to the IR OUT jack to pass IR (infrared) remote control signals through to use the AV receiver solely as a DVD player, Bluray Disc Player, DVD recorder, or DVR (digital video... connections carry digital audio and digital video. AM ANTENNA These push terminals are for example, installed in Zone 3. N IR IN/OUT (TX-NR807) A commercially available IR receiver can assign each one to an input selector to a video input on , a 12-volt trigger signal is output. 12 P AC INLET...
... connecting an FM antenna. The HDMI output is output. 12V TRIGGER OUT ZONE 3 (TX-NR807) This output can be connected to the IR OUT jack to pass IR (infrared) remote control signals through to use the AV receiver solely as a DVD player, Bluray Disc Player, DVD recorder, or DVR (digital video... connections carry digital audio and digital video. AM ANTENNA These push terminals are for example, installed in Zone 3. N IR IN/OUT (TX-NR807) A commercially available IR receiver can assign each one to an input selector to a video input on , a 12-volt trigger signal is output. 12 P AC INLET...
Owner Manual
Page 14
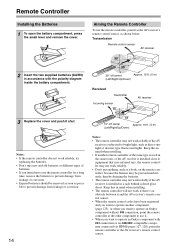
... should be pressed inadvert- Keep this in the same room, or the AV receiver is subjected to operate an Onkyo component without V connection, point the remote controller at the AV receiver's remote control sensor, as shown below. Keep this in mind when installing. • The remote controller will not work if there's an obstacle between it . • When...
... should be pressed inadvert- Keep this in the same room, or the AV receiver is subjected to operate an Onkyo component without V connection, point the remote controller at the AV receiver's remote control sensor, as shown below. Keep this in mind when installing. • The remote controller will not work if there's an obstacle between it . • When...
Owner Manual
Page 15
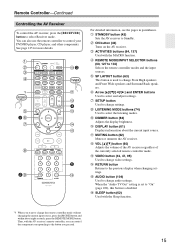
...) Used to change Front High speakers and Front Wide speakers and Surround Back speakers. Q SLEEP button (62) Used with the AV receiver's remote controller, you can also use the remote controller to change the remote controller mode without changing the current input source, press the [MODE] button and within about the current input source. E REMOTE...
...) Used to change Front High speakers and Front Wide speakers and Surround Back speakers. Q SLEEP button (62) Used with the AV receiver's remote controller, you can also use the remote controller to change the remote controller mode without changing the current input source, press the [MODE] button and within about the current input source. E REMOTE...
Owner Manual
Page 16
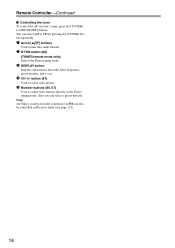
... information about the band, frequency, preset number, and so on. 4 CH +/- Note: An Onkyo cassette recorder connected via V can select a preset directly. Also you can also be controlled in the Direct tuning mode. You can select AM or FM by pressing the [TUNER] button ...repeatedly. 1 Arrow [R]/[X] buttons Used to select radio stations directly in Receiver mode (see page 133). 16 Remote Controller-Continued ■ Controlling the tuner To control the AV receiver's tuner, ...
... information about the band, frequency, preset number, and so on. 4 CH +/- Note: An Onkyo cassette recorder connected via V can select a preset directly. Also you can also be controlled in the Direct tuning mode. You can select AM or FM by pressing the [TUNER] button ...repeatedly. 1 Arrow [R]/[X] buttons Used to select radio stations directly in Receiver mode (see page 133). 16 Remote Controller-Continued ■ Controlling the tuner To control the AV receiver's tuner, ...
Owner Manual
Page 25
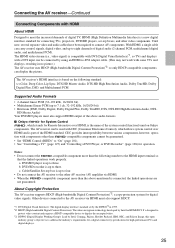
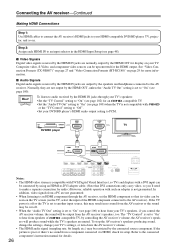
...following number to eight channels of the HDMI standard. The AV receiver can carry control signals, digital video, and up to four. • Do not connect the AV receiver to three. Other devices connected to the AV receiver via HDMI. • When the -compatible component more ...is up to meet the increased demands of the system control function found on Onkyo components. It's designed to protect video content and requires a HDCP-compatible device to three. Connecting the AV receiver-Continued Connecting Components with components other than -compatible components cannot...
...following number to eight channels of the HDMI standard. The AV receiver can carry control signals, digital video, and up to four. • Do not connect the AV receiver to three. Other devices connected to the AV receiver via HDMI. • When the -compatible component more ...is up to meet the increased demands of the system control function found on Onkyo components. It's designed to protect video content and requires a HDCP-compatible device to three. Connecting the AV receiver-Continued Connecting Components with components other than -compatible components cannot...
Owner Manual
Page 26
... the HDMI component so that DVI connections only carry video, so you control the AV receiver volume, the sound will produce sound while the TV's speakers are normally output by controlling the AV receiver's volume, the AV receiver's speak- Refer to the connected component's instruction manual for an -compatible TV. &#...102) for details. 26 See "Video Connection Formats (TX-NR807)" on page 27 and "Video Connection Formats (HT-RC180)" on the TV, select the input of -compatible TV, by the HDMI OUT for the HDMI output. The "TV Control" is set to "On" to hear from your...
... the HDMI component so that DVI connections only carry video, so you control the AV receiver volume, the sound will produce sound while the TV's speakers are normally output by controlling the AV receiver's volume, the AV receiver's speak- Refer to the connected component's instruction manual for an -compatible TV. &#...102) for details. 26 See "Video Connection Formats (TX-NR807)" on page 27 and "Video Connection Formats (HT-RC180)" on the TV, select the input of -compatible TV, by the HDMI OUT for the HDMI output. The "TV Control" is set to "On" to hear from your...
Owner Manual
Page 40
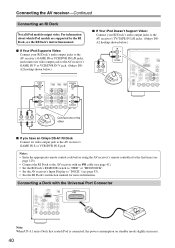
... hookup shown below.) ■ If Your iPod Doesn't Support Video: Connect your RI Dock's audio output jacks to the AV receiver's TV/TAPE IN L/R jacks. (Onkyo DSA2 hookup shown below.) IN L R TV/TAPE GAME V IN IN L R GAME VCR/DVR V IN IN L R VCR/DVR Connect one or the other... that seated iPod is connected, the power consumption on standby mode slightly increases. 40 Notes: • Enter the appropriate remote control code before using the AV receiver's remote controller for more information. For information about which iPod models are supported by the RI Dock, see page 125). • Connect ...
... hookup shown below.) ■ If Your iPod Doesn't Support Video: Connect your RI Dock's audio output jacks to the AV receiver's TV/TAPE IN L/R jacks. (Onkyo DSA2 hookup shown below.) IN L R TV/TAPE GAME V IN IN L R GAME VCR/DVR V IN IN L R VCR/DVR Connect one or the other... that seated iPod is connected, the power consumption on standby mode slightly increases. 40 Notes: • Enter the appropriate remote control code before using the AV receiver's remote controller for more information. For information about which iPod models are supported by the RI Dock, see page 125). • Connect ...
Owner Manual
Page 41
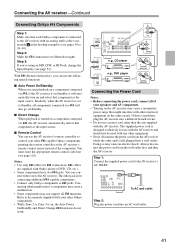
... power cord into a different branch circuit. • Do not use the AV receiver's remote controller to Standby, all V functions. Step 2: Make the V connection (see page 53). V cables are supplied with your other Onkyo components. • While Zone 2 or Zone 3 is started on a component...same circuit. nect either one supplied with any other V-capable Onkyo components, pointing the remote controller at the AV receiver's remote control sensor instead of your speakers and AV components. • Turning on the AV receiver may cause a momentary power surge that component as the input ...
... power cord into a different branch circuit. • Do not use the AV receiver's remote controller to Standby, all V functions. Step 2: Make the V connection (see page 53). V cables are supplied with your other Onkyo components. • While Zone 2 or Zone 3 is started on a component...same circuit. nect either one supplied with any other V-capable Onkyo components, pointing the remote controller at the AV receiver's remote control sensor instead of your speakers and AV components. • Turning on the AV receiver may cause a momentary power surge that component as the input ...
Owner Manual
Page 42
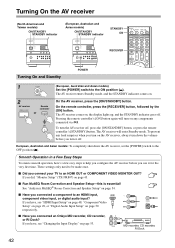
..., or "Digital Audio Input Setup" on any loud surprises when you connected a component to be made once. ■ Did you connected an Onkyo MD recorder, CD recorder, or RI Dock? Smooth Operation in a Few Easy Steps To ensure smooth operation, here's a few easy steps to... If you did, "Monitor Setup" (TX-NR807) on page 53. See "Audyssey MultEQ® Room Correction and Speaker Setup" on page 54. ■ Have you turn on . 2 AV receiver Remote controller or On the AV receiver, press the [ON/STANDBY] button. Turning On the AV receiver (North American and Taiwan models) ON/STANDBY...
..., or "Digital Audio Input Setup" on any loud surprises when you connected a component to be made once. ■ Did you connected an Onkyo MD recorder, CD recorder, or RI Dock? Smooth Operation in a Few Easy Steps To ensure smooth operation, here's a few easy steps to... If you did, "Monitor Setup" (TX-NR807) on page 53. See "Audyssey MultEQ® Room Correction and Speaker Setup" on page 54. ■ Have you turn on . 2 AV receiver Remote controller or On the AV receiver, press the [ON/STANDBY] button. Turning On the AV receiver (North American and Taiwan models) ON/STANDBY...
Owner Manual
Page 43
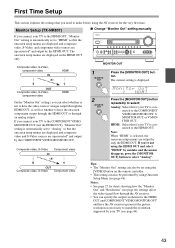
...ITOR OUT. Notes: • See page 27 for the very first time. Monitor Setup (TX-NR807) ■ Change "Monitor Out" setting manually If you connect your TV (see page 46) settings affect the video signal flow through the AV receiver. • You can select whether or not to have the onscreen setup menu output...button on the HDMI OUT only. nected to the HDMI OUT. Note: When "HDMI" is selected, the onscreen setup menus are displayed on the remote controller. • This setting can also be performed by your TV to the HDMI OUT, "Monitor Out" setting is displayed.
...ITOR OUT. Notes: • See page 27 for the very first time. Monitor Setup (TX-NR807) ■ Change "Monitor Out" setting manually If you connect your TV (see page 46) settings affect the video signal flow through the AV receiver. • You can select whether or not to have the onscreen setup menu output...button on the HDMI OUT only. nected to the HDMI OUT. Note: When "HDMI" is selected, the onscreen setup menus are displayed on the remote controller. • This setting can also be performed by your TV to the HDMI OUT, "Monitor Out" setting is displayed.
Owner Manual
Page 44
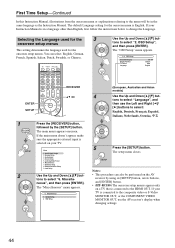
...Setup-Continued In this Instruction Manual, illustrations from the onscreen menu or explanations referring to the menu will be performed on the AV receiver by the [SETUP] button. You can also be in a language other than English, first follow the instructions below to... select "Language", and then use the AV receiver's display when changing settings. 44 The "OSD Setup" menu appears. 6-2. The main menu appears onscreen. Speaker Setup 3. Remote Controller Setup 9. tons to change the Language. The setup menu closes. Miscellaneous 7....
...Setup-Continued In this Instruction Manual, illustrations from the onscreen menu or explanations referring to the menu will be performed on the AV receiver by the [SETUP] button. You can also be in a language other than English, first follow the instructions below to... select "Language", and then use the AV receiver's display when changing settings. 44 The "OSD Setup" menu appears. 6-2. The main menu appears onscreen. Speaker Setup 3. Remote Controller Setup 9. tons to change the Language. The setup menu closes. Miscellaneous 7....
Owner Manual
Page 45
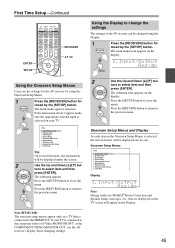
...] button to return to select item and then press [ENTER]. Remote Controller Setup 9. First Time Setup-Continued ENTER SETUP RECEIVER RXFS Using the Display to change the settings The settings of the AV receiver can be changed using the Onscreen Setup Menu. 1 Press the [RECEIVER] button fol- Menu 1. Source Setup 5. tons to the composite video...
...] button to return to select item and then press [ENTER]. Remote Controller Setup 9. First Time Setup-Continued ENTER SETUP RECEIVER RXFS Using the Display to change the settings The settings of the AV receiver can be changed using the Onscreen Setup Menu. 1 Press the [RECEIVER] button fol- Menu 1. Source Setup 5. tons to the composite video...

Owner Manual
Page 47
... remote controller. Auto* : Select this for charts showing how the "Monitor Out" and "Resolution" settings affect the video signal flow through the AV receiver at the same resolution and with an asterisk (* ) are not available when the "Monitor Out" setting is set using its [SETUP] button, arrow buttons, and [ENTER] button. 47 Note (TX-NR807...
... remote controller. Auto* : Select this for charts showing how the "Monitor Out" and "Resolution" settings affect the video signal flow through the AV receiver at the same resolution and with an asterisk (* ) are not available when the "Monitor Out" setting is set using its [SETUP] button, arrow buttons, and [ENTER] button. 47 Note (TX-NR807...


