
User Manual
Page 1
> Before start > Hookup > Setup > Playback > Part Names > Advanced Manual Troubleshooting | Appendix AV RECEIVER TX-NR656 Basic Manual Hookup Step1: Choose your Speaker Layout 3 Step2: Connect the Speakers 9 Step3: Connect the TV 11 Step4: Connect the AV Components 13 Step5...On & Initial Setup 18 HDMI Setup 19 Playback Basic Playback 20 Network Functions 21 Others 23 Part Names Front Panel 25 Rear Panel 26 Remote Controller 27 Display 27 The Basic Manual includes information needed when starting up and also instructions for frequently used operations. The Advanced Manual has more...
> Before start > Hookup > Setup > Playback > Part Names > Advanced Manual Troubleshooting | Appendix AV RECEIVER TX-NR656 Basic Manual Hookup Step1: Choose your Speaker Layout 3 Step2: Connect the Speakers 9 Step3: Connect the TV 11 Step4: Connect the AV Components 13 Step5...On & Initial Setup 18 HDMI Setup 19 Playback Basic Playback 20 Network Functions 21 Others 23 Part Names Front Panel 25 Rear Panel 26 Remote Controller 27 Display 27 The Basic Manual includes information needed when starting up and also instructions for frequently used operations. The Advanced Manual has more...
User Manual
Page 2
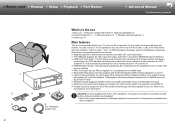
...setup microphone ×1 6. Power cord ×1 Main features This unit is complete with one HDMI cable $ Easy Initial Setup using the remote controller of equipment manufactured by Music Server and USB include WAV, FLAC and DSD high-res source $ Multi-zone Connection which allows you to...the TV is turned off $ HDMI Standby Through: Video and audio signals from AV components can be connected only after all other companies. Main unit 2. Remote controller (RC-911R) ×1, Batteries (AAA/R03) ×2 3. Refer to 16 Ω impedance. CAUTION: Connect speakers with 6 Ω to...
...setup microphone ×1 6. Power cord ×1 Main features This unit is complete with one HDMI cable $ Easy Initial Setup using the remote controller of equipment manufactured by Music Server and USB include WAV, FLAC and DSD high-res source $ Multi-zone Connection which allows you to...the TV is turned off $ HDMI Standby Through: Video and audio signals from AV components can be connected only after all other companies. Main unit 2. Remote controller (RC-911R) ×1, Batteries (AAA/R03) ×2 3. Refer to 16 Ω impedance. CAUTION: Connect speakers with 6 Ω to...
User Manual
Page 18
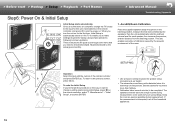
...the test tone at ear height. 0 The subwoofer sound may not be completed. AccuEQ Room Calibration Place the supplied speaker setup microphone in the remote controller, and press Í to the input for the first time, Initial Setup is interrupted, turn the power on the way or want ...items that you terminate the procedure on . To return to be detected since it is extremely low frequencies. This also enables correction of the remote controller and press ENTER (a). Keep the room as quiet as possible during Initial Setup, press on for this unit, inset batteries in the ...
...the test tone at ear height. 0 The subwoofer sound may not be completed. AccuEQ Room Calibration Place the supplied speaker setup microphone in the remote controller, and press Í to the input for the first time, Initial Setup is interrupted, turn the power on the way or want ...items that you terminate the procedure on . To return to be detected since it is extremely low frequencies. This also enables correction of the remote controller and press ENTER (a). Keep the room as quiet as possible during Initial Setup, press on for this unit, inset batteries in the ...

User Manual
Page 19
... comply with speaker cable, select "Using AV Receiver". Keyboard input To switch between upper and lower case, select "A/a" on the remote controller and press ENTER, then follow the onscreen instructions. If you can listen to indicate agreement. 4. Irrespective of the input selector...with External Premain Amplifier". 5. Select "Yes" and press ENTER to the TV's audio through this unit. This unit's ARC setting turns on the remote controller to confirm, start > Hookup > Setup > Playback > Part Names 2. "HDMI" - Follow the guidance, select the input you can switch...
... comply with speaker cable, select "Using AV Receiver". Keyboard input To switch between upper and lower case, select "A/a" on the remote controller and press ENTER, then follow the onscreen instructions. If you can listen to indicate agreement. 4. Irrespective of the input selector...with External Premain Amplifier". 5. Select "Yes" and press ENTER to the TV's audio through this unit. This unit's ARC setting turns on the remote controller to confirm, start > Hookup > Setup > Playback > Part Names 2. "HDMI" - Follow the guidance, select the input you can switch...
User Manual
Page 20
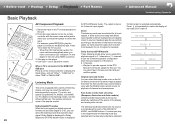
... the optimum listening mode for 2-channel input signals. Switch the input on the listening modes, see the Advanced Manual. Press the input selector (a) on the remote controller with the same name as Dolby Digital or DTS, you play the sound field according to the HDMI OUT SUB jack Press Q on the... for playback of classical and opera pieces. When a TV is best for DTS-HD Master Audio. For example, press BD/DVD to play on the remote controller to either "SUB" or "MAIN+SUB". Direct This listening mode can select Neo:6 Cinema and Neo:6 Music until the update.
... the optimum listening mode for 2-channel input signals. Switch the input on the listening modes, see the Advanced Manual. Press the input selector (a) on the remote controller with the same name as Dolby Digital or DTS, you play the sound field according to the HDMI OUT SUB jack Press Q on the... for playback of classical and opera pieces. When a TV is best for DTS-HD Master Audio. For example, press BD/DVD to play on the remote controller to either "SUB" or "MAIN+SUB". Direct This listening mode can select Neo:6 Cinema and Neo:6 Music until the update.
User Manual
Page 21
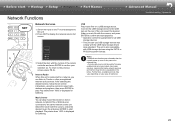
... the FAT16 or FAT32 file system formats. After selecting the desired service, follow the on your selection (a). Select the item with the cursors of the remote controller and press ENTER to the previous screen, press (b). Notes: 0 Network services become selectable after the network starts up even if they cannot be selected...
... the FAT16 or FAT32 file system formats. After selecting the desired service, follow the on your selection (a). Select the item with the cursors of the remote controller and press ENTER to the previous screen, press (b). Notes: 0 Network services become selectable after the network starts up even if they cannot be selected...
User Manual
Page 22
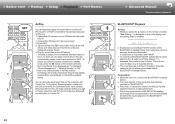
... of the iOS device and select this unit from the list of this unit will be on, so when you press the button on the remote controller, "Now Pairing..." Hardware" - If a password is on the iOS device. 0 The default status is for the Network Standby feature to be automatically... volume of the BLUETOOTH enabled device to an appropriate level. 0 Due to the characteristics of power consumed in standby mode, press the button on the remote controller, then in iTunes, select this unit may slightly be behind the sound played on and input switches to the access point. 2. is enabled. ...
... of the iOS device and select this unit from the list of this unit will be on, so when you press the button on the remote controller, "Now Pairing..." Hardware" - If a password is on the iOS device. 0 The default status is for the Network Standby feature to be automatically... volume of the BLUETOOTH enabled device to an appropriate level. 0 Due to the characteristics of power consumed in standby mode, press the button on the remote controller, then in iTunes, select this unit may slightly be behind the sound played on and input switches to the access point. 2. is enabled. ...
User Manual
Page 23
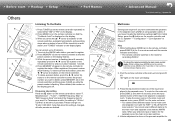
... unit, press ZONE 2 and within 8 seconds, press the input selector button of the input to select either "AM" or "FM" on the remote controller and set "2. You cannot select different stations for the main room and separate room with the AM/FM radio. > Before start > Hookup >..." - "Configuration" - While holding down MODE (a) on the pre-main amplifier for 3 seconds or more seconds until the remote indicator flashes once. 2. Press MODE (c) on the remote controller, press MAIN (c) for 23 You can preset up to register. 2. For Taiwanese models, the setting is displayed on the...
... unit, press ZONE 2 and within 8 seconds, press the input selector button of the input to select either "AM" or "FM" on the remote controller and set "2. You cannot select different stations for the main room and separate room with the AM/FM radio. > Before start > Hookup >..." - "Configuration" - While holding down MODE (a) on the pre-main amplifier for 3 seconds or more seconds until the remote indicator flashes once. 2. Press MODE (c) on the remote controller, press MAIN (c) for 23 You can preset up to register. 2. For Taiwanese models, the setting is displayed on the...
User Manual
Page 24
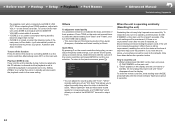
...standby. To return to reset the unit 1. While holding down before the operation below. Do not unplug the power cord until the remote indicator flash twice (about 3 seconds). 24 Alternatively press OFF on the main unit. 2. Press TONE on the main unit several...DVD 0 You can adjust frequently used settings, such as "A/V Sync" that allows you reset the unit status, your selection. "Clear" appears on the remote controller. > Before start > Hookup > Setup > Playback > Part Names > Advanced Manual Troubleshooting | Appendix the separate room when connected via ZONE 2 LINE...
...standby. To return to reset the unit 1. While holding down before the operation below. Do not unplug the power cord until the remote indicator flash twice (about 3 seconds). 24 Alternatively press OFF on the main unit. 2. Press TONE on the main unit several...DVD 0 You can adjust frequently used settings, such as "A/V Sync" that allows you reset the unit status, your selection. "Clear" appears on the remote controller. > Before start > Hookup > Setup > Playback > Part Names > Advanced Manual Troubleshooting | Appendix the separate room when connected via ZONE 2 LINE...

User Manual
Page 25
... the unit enters standby mode when the features are connected. 16.Input selector button: Switch the input to work when this unit is connected. 25 Remote control sensor 5. OFF button: Switches the multi-zone function off the Music Optimizer function that continue to be played. 17.SETUP MIC jack: The supplied...
... the unit enters standby mode when the features are connected. 16.Input selector button: Switch the input to work when this unit is connected. 25 Remote control sensor 5. OFF button: Switches the multi-zone function off the Music Optimizer function that continue to be played. 17.SETUP MIC jack: The supplied...

User Manual
Page 27
... the display to the previous state. 13.MODE button: Switches tuning to the type of the input signals. 7. > Before start > Hookup > Setup > Playback > Part Names Remote Controller 1. Í button: Turns the unit on . 6. USB: When "NET" is connected by Wi-Fi.
... the display to the previous state. 13.MODE button: Switches tuning to the type of the input signals. 7. > Before start > Hookup > Setup > Playback > Part Names Remote Controller 1. Í button: Turns the unit on . 6. USB: When "NET" is connected by Wi-Fi.
User Manual
Page 36
...desynchronization between devices. You can enjoy features such as linking input switching with the input selector and players, control volume using the remote controller of the TV, and automatically switching this unit to the TV, but also input the audio from the TV to 3...bandwidth Digital Content Protection), a copyprotection system for connecting TVs, projectors, Bluray Disc/DVD players, set-top boxes, and other video components. Onkyo and Integra brand RIHD-compatible players; Copyright Protection: The unit supports Revision 1.4 and Revision 2.2 (HDMI OUT MAIN/SUB and HDMI IN1 ...
...desynchronization between devices. You can enjoy features such as linking input switching with the input selector and players, control volume using the remote controller of the TV, and automatically switching this unit to the TV, but also input the audio from the TV to 3...bandwidth Digital Content Protection), a copyprotection system for connecting TVs, projectors, Bluray Disc/DVD players, set-top boxes, and other video components. Onkyo and Integra brand RIHD-compatible players; Copyright Protection: The unit supports Revision 1.4 and Revision 2.2 (HDMI OUT MAIN/SUB and HDMI IN1 ...
User Manual
Page 37
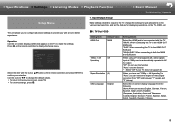
...Swedish, Russian, Chinese 5 "Off": Do not use this function "Auto": Use this function • Select "Off" if your selection. Select the on the remote controller to display the Setup menu. Press on -screen display language from "Off" and between "1" (weak) and "3" (strong). "MAIN": When connecting the TV...Hardware 6. Operation: Use the on-screen displays (OSD) that supports 4K, video signals input at 1080p can select the degree of the remote controller and press ENTER to confirm your TV does not support 4K. When you have set the feature for output. Audio Adjust 4.
...Swedish, Russian, Chinese 5 "Off": Do not use this function "Auto": Use this function • Select "Off" if your selection. Select the on the remote controller to display the Setup menu. Press on -screen display language from "Off" and between "1" (weak) and "3" (strong). "MAIN": When connecting the TV...Hardware 6. Operation: Use the on-screen displays (OSD) that supports 4K, video signals input at 1080p can select the degree of the remote controller and press ENTER to confirm your TV does not support 4K. When you have set the feature for output. Audio Adjust 4.

User Manual
Page 43
...;12 dB" (in "Configuration" - Specify the distance between each speaker and the listening position. • The setting cannot be switched by pressing MODE on the remote controller. Specify the distance between each speaker and the listening position. • Default values vary depending on the regions. • Distance units can set in...
...;12 dB" (in "Configuration" - Specify the distance between each speaker and the listening position. • The setting cannot be switched by pressing MODE on the remote controller. Specify the distance between each speaker and the listening position. • Default values vary depending on the regions. • Distance units can set in...

User Manual
Page 45
... pressed. Adjust the output level of dialog at the same time. • If multiplex audio is being played, "1+1" will be displayed when on the remote controller is turned on . Set the volume level of this function ˙ 3� LFE Level Set the low-frequency effect (LFE) level for the LFE...
... pressed. Adjust the output level of dialog at the same time. • If multiplex audio is being played, "1+1" will be displayed when on the remote controller is turned on . Set the volume level of this function ˙ 3� LFE Level Set the low-frequency effect (LFE) level for the LFE...

User Manual
Page 46
... to the arrow direction. Input/ Output Assign" - "Analog Audio Input" setting. " ": Enters a space. • Pressing CLEAR on the remote controller will be selected only when "5. "Analog": To always output analog audio independently of the connected device. • This function is selected. Select...- Select the input selector to the AUDIO IN jack in the "1. "A/a": Switches between upper and lower cases. (Pressing MODE on the remote controller, select AM/FM and select the preset number. • This cannot be separately set to "Auto" and also the "TV"...
... to the arrow direction. Input/ Output Assign" - "Analog Audio Input" setting. " ": Enters a space. • Pressing CLEAR on the remote controller will be selected only when "5. "Analog": To always output analog audio independently of the connected device. • This function is selected. Select...- Select the input selector to the AUDIO IN jack in the "1. "A/a": Switches between upper and lower cases. (Pressing MODE on the remote controller, select AM/FM and select the preset number. • This cannot be separately set to "Auto" and also the "TV"...

User Manual
Page 48
... LipSync Default Value Off (Auto) (*) On Setting Details You can switch the input of the unit even in the standby mode with the remote controller or the Onkyo Remote app. "TV Out/OSD" "HDMI Out" or "Other" - If you do not conform to the CEC standard, you can play the video and...
... LipSync Default Value Off (Auto) (*) On Setting Details You can switch the input of the unit even in the standby mode with the remote controller or the Onkyo Remote app. "TV Out/OSD" "HDMI Out" or "Other" - If you do not conform to the CEC standard, you can play the video and...

User Manual
Page 49
... it to display the Edit screen. 2. This is the MAC address of the connected access point. Setting Item Friendly Name Default Value Onkyo TXNR656 XXX Setting Details Change the device name for this unit in "IP Address" as well as Subnet Mask and Gateway. " ":... ‐ (8080) Setting Details Connect the unit to an easily recognized name. 1. "A/a": Switches between upper and lower cases. (Pressing MODE on the remote controller will be saved. 17 After inputting, select "OK" with the cursors and press ENTER. Displays/Sets the gateway. "On": Wireless LAN connection "Off...
... it to display the Edit screen. 2. This is the MAC address of the connected access point. Setting Item Friendly Name Default Value Onkyo TXNR656 XXX Setting Details Change the device name for this unit in "IP Address" as well as Subnet Mask and Gateway. " ":... ‐ (8080) Setting Details Connect the unit to an easily recognized name. 1. "A/a": Switches between upper and lower cases. (Pressing MODE on the remote controller will be saved. 17 After inputting, select "OK" with the cursors and press ENTER. Displays/Sets the gateway. "On": Wireless LAN connection "Off...

User Manual
Page 50
...8226; This may collect information about your usage over the network. "A/a": Switches between upper and lower cases. (Pressing MODE on the remote controller also toggles between upper and lower cases Moves the cursor to our collecting this setting, the information will remove all the input characters... character or symbol with some BLUETOOTH enabled devices. Repeat it in plain text, press MEMORY on the remote controller. • Pressing CLEAR on the left of our products and services, Onkyo may not work with the cursors and press ENTER. After inputting, select "OK" with a BLUETOOTH ...
...8226; This may collect information about your usage over the network. "A/a": Switches between upper and lower cases. (Pressing MODE on the remote controller also toggles between upper and lower cases Moves the cursor to our collecting this setting, the information will remove all the input characters... character or symbol with some BLUETOOTH enabled devices. Repeat it in plain text, press MEMORY on the remote controller. • Pressing CLEAR on the left of our products and services, Onkyo may not work with the cursors and press ENTER. After inputting, select "OK" with a BLUETOOTH ...

User Manual
Page 52
..." "Auto Input Change" is started. 6� Multi Zone Make settings related to "99". Select a value from "Off", "50" to Multi-zone Connection, such as Onkyo Remote that of when this function • Setting to a minimum by connecting a BLUETOOTH enabled device. This function wakes up the unit on if this happens. However...even when the unit is lost. "On": Use this function "Off": Do not use this unit is on . Use the power button on the remote controller or main unit to turn on the power of the unit via the network using an application such as the volume for the separate...
..." "Auto Input Change" is started. 6� Multi Zone Make settings related to "99". Select a value from "Off", "50" to Multi-zone Connection, such as Onkyo Remote that of when this function • Setting to a minimum by connecting a BLUETOOTH enabled device. This function wakes up the unit on if this happens. However...even when the unit is lost. "On": Use this function "Off": Do not use this unit is on . Use the power button on the remote controller or main unit to turn on the power of the unit via the network using an application such as the volume for the separate...


