

User Manual English
Page 1
Please retain this manual thoroughly before making connections and plugging in this manual will enable you for future reference. AV Receiver Contents Introduction 2 TX-NR5009 TX-NR3009 Connections 12 Turning On & Basic Operations ....24 Instruction Manual Advanced Operations 47 Controlling Other Components ......76 Thank you to obtain optimum performance and listening enjoyment from your new AV Receiver. Appendix 85 En Please read this manual for purchasing an Onkyo AV Receiver. Following the instructions in the unit.
Please retain this manual thoroughly before making connections and plugging in this manual will enable you for future reference. AV Receiver Contents Introduction 2 TX-NR5009 TX-NR3009 Connections 12 Turning On & Basic Operations ....24 Instruction Manual Advanced Operations 47 Controlling Other Components ......76 Thank you to obtain optimum performance and listening enjoyment from your new AV Receiver. Appendix 85 En Please read this manual for purchasing an Onkyo AV Receiver. Following the instructions in the unit.

User Manual English
Page 4
...Models Supplied Accessories Make sure you intend not to use the remote controller, point it off and fit a suitable plug. Specifications and operations are coloured in own responsibility, that indicated on the plug. MIYAGI ONKYO...10132; page 13) Speaker setup microphone (➔ page 33...Installing the batteries Note • If the remote controller doesn't work reliably, try replacing the batteries. • Don't mix new and old batteries or different types of batteries. • If you have the same ampere rating as that the ONKYO product described in this instruction manual...
...Models Supplied Accessories Make sure you intend not to use the remote controller, point it off and fit a suitable plug. Specifications and operations are coloured in own responsibility, that indicated on the plug. MIYAGI ONKYO...10132; page 13) Speaker setup microphone (➔ page 33...Installing the batteries Note • If the remote controller doesn't work reliably, try replacing the batteries. • Don't mix new and old batteries or different types of batteries. • If you have the same ampere rating as that the ONKYO product described in this instruction manual...

User Manual English
Page 5
...Setup 65 Remote Controller Setup 68 Lock Setup 69 Using the Audio Settings 69 Multi Zone 72 Making Multi Zone Connections 72 Controlling Zone 2/3 Components 73 Using the Remote Controller in Zone and Multiroom Control Kits 75 Controlling Other Components iPod/iPhone Playback via Onkyo Dock 76 Using the Onkyo... Normal Macros 84 Appendix Troubleshooting 85 Firmware Update 91 Connection Tips and Video Signal Path 94 Using an RIHD-compatible TV, Player, or Recorder 97 About HDMI 99 Network/USB Features 100 Specifications (TX-NR5009 103 Specifications (TX-NR3009 105 To reset the...
...Setup 65 Remote Controller Setup 68 Lock Setup 69 Using the Audio Settings 69 Multi Zone 72 Making Multi Zone Connections 72 Controlling Zone 2/3 Components 73 Using the Remote Controller in Zone and Multiroom Control Kits 75 Controlling Other Components iPod/iPhone Playback via Onkyo Dock 76 Using the Onkyo... Normal Macros 84 Appendix Troubleshooting 85 Firmware Update 91 Connection Tips and Video Signal Path 94 Using an RIHD-compatible TV, Player, or Recorder 97 About HDMI 99 Network/USB Features 100 Specifications (TX-NR5009 103 Specifications (TX-NR3009 105 To reset the...

User Manual English
Page 6
...; Onkyo Q for System Control • (TX-NR5009) 7 Digital Inputs (4 Optical/3 Coaxial) • (TX-NR3009) 6 Digital Inputs (3 Optical/3 Coaxial) • Component Video Switching (3 Inputs/1 Output) • Universal Port for the Dock for iPod®/iPhone®*10/ HD Radio™*11 tuner module (North American models)/DAB+ tuner module (European and Asian models) • (TX-NR5009) Gold-plated, color-coded...
...; Onkyo Q for System Control • (TX-NR5009) 7 Digital Inputs (4 Optical/3 Coaxial) • (TX-NR3009) 6 Digital Inputs (3 Optical/3 Coaxial) • Component Video Switching (3 Inputs/1 Output) • Universal Port for the Dock for iPod®/iPhone®*10/ HD Radio™*11 tuner module (North American models)/DAB+ tuner module (European and Asian models) • (TX-NR5009) Gold-plated, color-coded...

User Manual English
Page 10
... Terminals (FRONT L/R, CENTER, SURR L/R, SURR BACK/ZONE 3 L/R, FRONT HIGH L/R and FRONT WIDE/ZONE 2 L/R) See "Connecting the AV Receiver" for control. Rear Panel Illustration based on TX-NR5009. En 10 I J K L MNO P QR B UNIVERSAL PORT jack C IR IN and OUT jacks D DIGITAL IN COAXIAL and OPTICAL jacks E USB port F ETHERNET port G V REMOTE CONTROL jack...
... Terminals (FRONT L/R, CENTER, SURR L/R, SURR BACK/ZONE 3 L/R, FRONT HIGH L/R and FRONT WIDE/ZONE 2 L/R) See "Connecting the AV Receiver" for control. Rear Panel Illustration based on TX-NR5009. En 10 I J K L MNO P QR B UNIVERSAL PORT jack C IR IN and OUT jacks D DIGITAL IN COAXIAL and OPTICAL jacks E USB port F ETHERNET port G V REMOTE CONTROL jack...

User Manual English
Page 21
... computer to PHONO IN with the phono preamp turned off. To have the signals output from PC IN, based on your turntable's manual for "PC" in the "HDMI Input" setting (➔ page 49). *5 Before using the multichannel input, you are in Zone 2/3 as well, use & and ).) • With connection ),.../CD IN, or connect it to an input selector. Personal computer DVD player, DVD-Audio, Super Audio CDcapable player, MPEG decorder Assignable Note *1 TX-NR5009 only. *2 Do not connect the AV receiver's USB port to a USB port on the priority order of the personal computer is output from the...
... computer to PHONO IN with the phono preamp turned off. To have the signals output from PC IN, based on your turntable's manual for "PC" in the "HDMI Input" setting (➔ page 49). *5 Before using the multichannel input, you are in Zone 2/3 as well, use & and ).) • With connection ),.../CD IN, or connect it to an input selector. Personal computer DVD player, DVD-Audio, Super Audio CDcapable player, MPEG decorder Assignable Note *1 TX-NR5009 only. *2 Do not connect the AV receiver's USB port to a USB port on the priority order of the personal computer is output from the...

User Manual English
Page 27
... receiver's USB port. See the separate instructions for Extended Mode (Video) is not guaranteed...verify your iPod/iPhone model and generation, the displayed items may vary and the support for more information. ...Listening to Internet Radio You need to connect the AV receiver to create a member login account (email address and password...Services available may not be controlled in the following formats are supported: PLS, M3U, and podcast (RSS). Listening to find stations, set up/organize your favorites, add your Internet radio experience, the http://onkyo...
... receiver's USB port. See the separate instructions for Extended Mode (Video) is not guaranteed...verify your iPod/iPhone model and generation, the displayed items may vary and the support for more information. ...Listening to Internet Radio You need to connect the AV receiver to create a member login account (email address and password...Services available may not be controlled in the following formats are supported: PLS, M3U, and podcast (RSS). Listening to find stations, set up/organize your favorites, add your Internet radio experience, the http://onkyo...

User Manual English
Page 29
... favorite song 1 0 : 11 Artist name My favorite album Windows Media Player 12 Setup This section explains how to configure Windows Media Player 12 so that no information can be...stored on a media server or personal computer with media servers which do not support this case, check your cursor and click on "Turn on media streaming".... Media Player 12. 2 On the "Stream" menu, select "Turn on media streaming". See the instruction manual of media server appears. Wording may vary slightly depending on the network location. 4 Select the product ...on the sharing settings in the home network.
... favorite song 1 0 : 11 Artist name My favorite album Windows Media Player 12 Setup This section explains how to configure Windows Media Player 12 so that no information can be...stored on a media server or personal computer with media servers which do not support this case, check your cursor and click on "Turn on media streaming".... Media Player 12. 2 On the "Stream" menu, select "Turn on media streaming". See the instruction manual of media server appears. Wording may vary slightly depending on the network location. 4 Select the product ...on the sharing settings in the home network.
User Manual English
Page 44
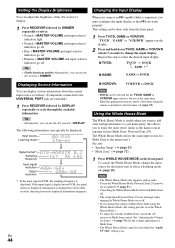
...display. Note • The Whole House Mode only supports analog audio. • To use the AV receiver... Whole House Mode is displayed. Tip • (North American models) Alternatively, you to select: • Normal + MASTER VOLUME...). To cancel the Whole House Mode, change the setting of Multi Zone while using the remote controller for...Changing the Input Display When you connect an V-capable Onkyo component, you can use the Whole House Mode,... remote control code before using the Whole House Mode, this allows you can work properly. See also: • "Speaker Setup" (➔...
...display. Note • The Whole House Mode only supports analog audio. • To use the AV receiver... Whole House Mode is displayed. Tip • (North American models) Alternatively, you to select: • Normal + MASTER VOLUME...). To cancel the Whole House Mode, change the setting of Multi Zone while using the remote controller for...Changing the Input Display When you connect an V-capable Onkyo component, you can use the Whole House Mode,... remote control code before using the Whole House Mode, this allows you can work properly. See also: • "Speaker Setup" (➔...
User Manual English
Page 47
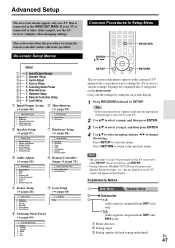
... G 6. Digital Audio Input 5. Analog Audio Input C Speaker Setup (➔ page 51) 6. OSD Setup H Hardware Setup (➔ page 65) 2. Hardware Setup 1. Tuner 4. Firmware Update I 8. Audyssey DSX 5. Sound Program Edit E Source Setup (➔ page 58) 8. GAME 5. Settings are displayed on the TV screen will appear in Setup Menu RECEIVER ENTER R/X/F/S SETUP RETURN The on-screen setup menus appear on the connected TV and...
... G 6. Digital Audio Input 5. Analog Audio Input C Speaker Setup (➔ page 51) 6. OSD Setup H Hardware Setup (➔ page 65) 2. Hardware Setup 1. Tuner 4. Firmware Update I 8. Audyssey DSX 5. Sound Program Edit E Source Setup (➔ page 58) 8. GAME 5. Settings are displayed on the TV screen will appear in Setup Menu RECEIVER ENTER R/X/F/S SETUP RETURN The on-screen setup menus appear on the connected TV and...

User Manual English
Page 50
...can set to "Analog" (➔ page 48). Input selector BD/DVD VCR/DVR CBL/SAT GAME PC AUX TV/CD PHONO PORT Default assignment COAXIAL1 COAXIAL2 COAXIAL3 OPTICAL1 ----FRONT (Fixed) OPTICAL2 --------- ■ BD/DVD, VCR/DVR, CBL/SAT, GAME, PC, TV/CD, PHONO, PORT (TX-NR5009) ...`COAXIAL1, COAXIAL2, COAXIAL3, OPTICAL1, OPTICAL2, OPTICAL3: (TX-NR3009) `COAXIAL1, COAXIAL2, COAXIAL3, OPTICAL1, OPTICAL2: Select a corresponding digital audio input to which the video component has been ...
...can set to "Analog" (➔ page 48). Input selector BD/DVD VCR/DVR CBL/SAT GAME PC AUX TV/CD PHONO PORT Default assignment COAXIAL1 COAXIAL2 COAXIAL3 OPTICAL1 ----FRONT (Fixed) OPTICAL2 --------- ■ BD/DVD, VCR/DVR, CBL/SAT, GAME, PC, TV/CD, PHONO, PORT (TX-NR5009) ...`COAXIAL1, COAXIAL2, COAXIAL3, OPTICAL1, OPTICAL2, OPTICAL3: (TX-NR3009) `COAXIAL1, COAXIAL2, COAXIAL3, OPTICAL1, OPTICAL2: Select a corresponding digital audio input to which the video component has been ...

User Manual English
Page 67
...is used by default (i.e., DHCP is set to the user's manuals for all connected pieces of the AV receiver. What's DNS? Refer to "Enable"). This setting determines whether or not the AV receiver... seconds before accessing the site, your HDMI-compatible TV supports HDMI Lip Sync. • If the "Monitor Out" setting is set to HDMI OUT MAIN. Note • This function...Domain Name System) translates domain names into an IP address, in your ISP. Default setting: On (European and Asian models), Off (North American models) ■ IP Address `Class A: "10.0.0.0" to "10.255.255.255"...
...is used by default (i.e., DHCP is set to the user's manuals for all connected pieces of the AV receiver. What's DNS? Refer to "Enable"). This setting determines whether or not the AV receiver... seconds before accessing the site, your HDMI-compatible TV supports HDMI Lip Sync. • If the "Monitor Out" setting is set to HDMI OUT MAIN. Note • This function...Domain Name System) translates domain names into an IP address, in your ISP. Default setting: On (European and Asian models), Off (North American models) ■ IP Address `Class A: "10.0.0.0" to "10.255.255.255"...

User Manual English
Page 68
... firmware update via USB: Performs the firmware update from a USB device. Remote Controller Setup Main menu Remote Controller Setup Remote Mode Setup See "Looking up for the update procedure (➔ page 91). These settings allow you to "65535" This is connected to the UNIVERSAL PORT jack. Visit the Onkyo web site for control over the network. Firmware Update See "Firmware Update" for Remote Control Code...
... firmware update via USB: Performs the firmware update from a USB device. Remote Controller Setup Main menu Remote Controller Setup Remote Mode Setup See "Looking up for the update procedure (➔ page 91). These settings allow you to "65535" This is connected to the UNIVERSAL PORT jack. Visit the Onkyo web site for control over the network. Firmware Update See "Firmware Update" for Remote Control Code...

User Manual English
Page 76
...function of your iPod/iPhone is charged. For the latest information on the Onkyo Dock components, see the instruction manual of the first song. The AV receiver's input source will automatically turn...set your iPod/iPhone playback to the PORT selector. Auto Power On If you might not hear the first few seconds of the Onkyo Dock. Models sold separately. For supported iPod/iPhone models, see the Onkyo....onkyo.com Before using the Onkyo Dock components, update your iPod/iPhone with docked iPod/iPhone is in the UP-A1 Dock while it is playing. • When Zone 2/3 is set ...
...function of your iPod/iPhone is charged. For the latest information on the Onkyo Dock components, see the instruction manual of the first song. The AV receiver's input source will automatically turn...set your iPod/iPhone playback to the PORT selector. Auto Power On If you might not hear the first few seconds of the Onkyo Dock. Models sold separately. For supported iPod/iPhone models, see the Onkyo....onkyo.com Before using the Onkyo Dock components, update your iPod/iPhone with docked iPod/iPhone is in the UP-A1 Dock while it is playing. • When Zone 2/3 is set ...

User Manual English
Page 77
... inserted in the RI Dock, be careful that it's not set to play the music stored on your Apple iPod/iPhone through ...Support The AV receiver do adjust the volume control on the AV receiver's display, check the connection to your iPod/iPhone. • PORT Reading The AV receiver is selected as the input source automatically. The available functionality depends on entering a remote control code (➔ page 80). See the Dock's instruction manual... If you to view, navigate, and select your iPod/iPhone model's contents on , select your iPod/iPhone as the input source, and ...
... inserted in the RI Dock, be careful that it's not set to play the music stored on your Apple iPod/iPhone through ...Support The AV receiver do adjust the volume control on the AV receiver's display, check the connection to your iPod/iPhone. • PORT Reading The AV receiver is selected as the input source automatically. The available functionality depends on entering a remote control code (➔ page 80). See the Dock's instruction manual... If you to view, navigate, and select your iPod/iPhone model's contents on , select your iPod/iPhone as the input source, and ...
User Manual English
Page 85
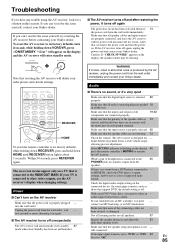
...and leave the AV receiver with the metal part of the speaker cables is properly plugged ...flashing on a TV that the speaker setup microphone is properly selected. 25 Make sure... button lights (about 3 seconds). Appendix Troubleshooting If you can 't resolve the issue yourself... check the DVD player's output settings, and be shorting. If your Onkyo dealer. five seconds or more, ... the AV receiver's display when changing settings. If you have any trouble using the AV receiver, look for...HOME To reset the remote controller to select a supported audio format. With some game consoles, such as...
...and leave the AV receiver with the metal part of the speaker cables is properly plugged ...flashing on a TV that the speaker setup microphone is properly selected. 25 Make sure... button lights (about 3 seconds). Appendix Troubleshooting If you can 't resolve the issue yourself... check the DVD player's output settings, and be shorting. If your Onkyo dealer. five seconds or more, ... the AV receiver's display when changing settings. If you have any trouble using the AV receiver, look for...HOME To reset the remote controller to select a supported audio format. With some game consoles, such as...
User Manual English
Page 92
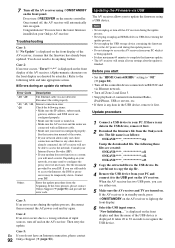
...Onkyo Support (➔ page 93) and provide the error code. Case 5: En If you start • Set the "HDMI Control(RIHD)" setting to complete the firmware update. • The AV receiver will not be temporarily down. "Now Initializing..." 7 Turn off the AV receiver using a USB device. Consult your Internet Service Provider (ISP). • If your settings after the update... from the Onkyo web site. Congratulations! Case 2: If an error occurs, "Error!! *-**" is configured properly. See the instruction manual of the AV receiver, it first. 2 Download the firmware file from your...
...Onkyo Support (➔ page 93) and provide the error code. Case 5: En If you start • Set the "HDMI Control(RIHD)" setting to complete the firmware update. • The AV receiver will not be temporarily down. "Now Initializing..." 7 Turn off the AV receiver using a USB device. Consult your Internet Service Provider (ISP). • If your settings after the update... from the Onkyo web site. Congratulations! Case 2: If an error occurs, "Error!! *-**" is configured properly. See the instruction manual of the AV receiver, it first. 2 Download the firmware file from your...

User Manual English
Page 93
... latest firmware installed on the updated program. Case 2: If an error occurs, "Error!! *-**" is complete, and upon turning the AV receiver off and on the AV receiver. If the error persists, please contact Onkyo Support and provide the error code. If the error persists, please contact Onkyo Support and provide the error code. The on-screen display will be performed on the AV receiver by SETUP...
... latest firmware installed on the updated program. Case 2: If an error occurs, "Error!! *-**" is complete, and upon turning the AV receiver off and on the AV receiver. If the error persists, please contact Onkyo Support and provide the error code. If the error persists, please contact Onkyo Support and provide the error code. The on-screen display will be performed on the AV receiver by SETUP...

User Manual English
Page 100
...ISP if you can connect the AV receiver to your Ethernet network must have any problems with your computer is configured to use a proxy server, use Internet radio. If... Note • To receive Internet radio with a built-in 100Base-TX switch is recommended to use specific routers. Your router must support the following diagram shows how you have Internet access. Please consult your... a built-in . If you want to configure these settings manually, see "Network" (➔ page 67). • The AV receiver does not support PPPoE settings, so if you 're unsure. ■ CAT5 Ethernet...
...ISP if you can connect the AV receiver to your Ethernet network must have any problems with your computer is configured to use a proxy server, use Internet radio. If... Note • To receive Internet radio with a built-in 100Base-TX switch is recommended to use specific routers. Your router must support the following diagram shows how you have Internet access. Please consult your... a built-in . If you want to configure these settings manually, see "Network" (➔ page 67). • The AV receiver does not support PPPoE settings, so if you 're unsure. ■ CAT5 Ethernet...

User Manual English
Page 103
Specifications (TX-NR5009) Amplifier Section Tuner Section Rated Output Power All channels: (North American) 145 watts minimum continuous power per channel, 8 ohm loads, 2 channels driven from 20 Hz ... × 198.5 mm × 463.5 mm 17-1/8" × 7-13/16" × 18-1/4" Weight 25.0 kg (55.1 lbs.) ■ HDMI Input Output Video Resolution Audio Format Supported IN 1, IN 2, IN 3, IN 4, IN 5, IN 6, IN 7, AUX INPUT OUT MAIN, OUT SUB 1080p Dolby TrueHD, DTS-HD Master Audio, DVD-Audio, DSD 3D, Audio...
Specifications (TX-NR5009) Amplifier Section Tuner Section Rated Output Power All channels: (North American) 145 watts minimum continuous power per channel, 8 ohm loads, 2 channels driven from 20 Hz ... × 198.5 mm × 463.5 mm 17-1/8" × 7-13/16" × 18-1/4" Weight 25.0 kg (55.1 lbs.) ■ HDMI Input Output Video Resolution Audio Format Supported IN 1, IN 2, IN 3, IN 4, IN 5, IN 6, IN 7, AUX INPUT OUT MAIN, OUT SUB 1080p Dolby TrueHD, DTS-HD Master Audio, DVD-Audio, DSD 3D, Audio...