
Owner Manual
Page 6
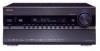
...TX-NR3007) • 8 HDMI*5 Inputs and 2 Outputs (TX-NR5007) • Onkyo for System Control • 6 Digital Inputs (3 Optical/3 Coaxial) (TX-NR3007) • 7 Digital Inputs (4 Optical/3 Coaxial) (TX-NR5007.... THX may vary depending on the region. • Network Capability for Streaming Audio Files • Bi-Amping and BTL...TX-NR3007) • 140 Watts/Channel @ 8 ohms (FTC) • 200 Watts/Channel @ 6 ohms (IEC) • 250 Watts/Channel @ 6 ohms (JEITA) (TX-NR5007) • 145 Watts/Channel @ 8 ohms (FTC) • 220 Watts/Channel @ 6 ohms (IEC) • 280 Watts/Channel...
...TX-NR3007) • 8 HDMI*5 Inputs and 2 Outputs (TX-NR5007) • Onkyo for System Control • 6 Digital Inputs (3 Optical/3 Coaxial) (TX-NR3007) • 7 Digital Inputs (4 Optical/3 Coaxial) (TX-NR5007.... THX may vary depending on the region. • Network Capability for Streaming Audio Files • Bi-Amping and BTL...TX-NR3007) • 140 Watts/Channel @ 8 ohms (FTC) • 200 Watts/Channel @ 6 ohms (IEC) • 250 Watts/Channel @ 6 ohms (JEITA) (TX-NR5007) • 145 Watts/Channel @ 8 ohms (FTC) • 220 Watts/Channel @ 6 ohms (IEC) • 280 Watts/Channel...

Owner Manual
Page 10
... switch (48) (European and Asian models) This is enabled. It must be played through the AV receiver. B CDE F G HI JK L For detailed information, see the pages in here and the...Dynamic Surround Expansion™ listening mode is completely shutdown. D A and B indicators (70) Indicate which audio channels are jacks for Zone 2 or Zone 3. [ DISPLAY button (68) This button is used . Dynamic EQ .... Audyssey (61, 98): Flashes during Audyssey MultEQ® XT Room Correction and Speaker Setup. G NETWORK indicator (121) Lights when the Net input selector is selected: A or B. Y AUX 1 INPUT...
... switch (48) (European and Asian models) This is enabled. It must be played through the AV receiver. B CDE F G HI JK L For detailed information, see the pages in here and the...Dynamic Surround Expansion™ listening mode is completely shutdown. D A and B indicators (70) Indicate which audio channels are jacks for Zone 2 or Zone 3. [ DISPLAY button (68) This button is used . Dynamic EQ .... Audyssey (61, 98): Flashes during Audyssey MultEQ® XT Room Correction and Speaker Setup. G NETWORK indicator (121) Lights when the Net input selector is selected: A or B. Y AUX 1 INPUT...
Owner Manual
Page 13
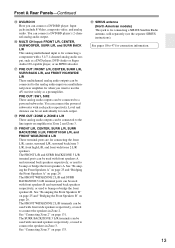
... can be connected to a powered subwoofer. See pages 18 to 47 for connecting a component with front wide speakers respectively, or used with a 5.1/7.1-channel analog audio output, such as a preamplifier. Input jacks include S-Video, composite video, and analog audio. Front & Rear Panels-Continued Z DVD/BD... IN Here you want to use the AV receiver solely as a DVD player, DVD-Audio or Super Audio CD-capable player, or an MPEG decoder. The FRONT WIDE/ZONE 2 L/R terminals can...
... can be connected to a powered subwoofer. See pages 18 to 47 for connecting a component with front wide speakers respectively, or used with a 5.1/7.1-channel analog audio output, such as a preamplifier. Input jacks include S-Video, composite video, and analog audio. Front & Rear Panels-Continued Z DVD/BD... IN Here you want to use the AV receiver solely as a DVD player, DVD-Audio or Super Audio CD-capable player, or an MPEG decoder. The FRONT WIDE/ZONE 2 L/R terminals can...

Owner Manual
Page 17
... your subwoofer will depend on its position, the shape of the LFE (Low-Frequency Effects) channel. They enhance the realism of the front left and right speakers These speakers are necessary to...concert hall. Angle them behind the listener. About Home Theater Enjoying Home Theater Thanks to the AV receiver's superb capabilities, you can enjoy surround sound with the listener at the apex. With DVDs... you can enjoy Dolby Pro Logic IIx, DTS Neo:6, or Onkyo's original DSP listening modes. They should be obtained by placing your listening position. They ...
... your subwoofer will depend on its position, the shape of the LFE (Low-Frequency Effects) channel. They enhance the realism of the front left and right speakers These speakers are necessary to...concert hall. Angle them behind the listener. About Home Theater Enjoying Home Theater Thanks to the AV receiver's superb capabilities, you can enjoy surround sound with the listener at the apex. With DVDs... you can enjoy Dolby Pro Logic IIx, DTS Neo:6, or Onkyo's original DSP listening modes. They should be obtained by placing your listening position. They ...

Owner Manual
Page 18
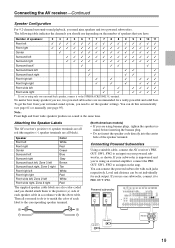
...FL C FR Speakers A SL SBL SR SBR ■ 5.2-channel Playback with Bridged Front Speakers In this example, Speakers A provides 7.2-channel surround sound for enjoying DVD movies, while Speakers B is used , the AV receiver can use Speakers B for serious music listening with a pair of...you to have two speaker configurations of stereo speakers (2-channels). Speaker Settings Speaker Impedance Speakers Type(FrontA) Speakers Type(FrontB) Powered Zone2 Powered Zone3 8ohms Normal BTL Not Act Not Act 2-2. Connecting the AV receiver Connecting Your Speakers About Speakers A and Speakers B ...
...FL C FR Speakers A SL SBL SR SBR ■ 5.2-channel Playback with Bridged Front Speakers In this example, Speakers A provides 7.2-channel surround sound for enjoying DVD movies, while Speakers B is used , the AV receiver can use Speakers B for serious music listening with a pair of...you to have two speaker configurations of stereo speakers (2-channels). Speaker Settings Speaker Impedance Speakers Type(FrontA) Speakers Type(FrontB) Powered Zone2 Powered Zone3 8ohms Normal BTL Not Act Not Act 2-2. Connecting the AV receiver Connecting Your Speakers About Speakers A and Speakers B ...
Owner Manual
Page 19
...speaker terminals are all red (the negative (-) speaker terminals are recommended for each output. Connecting Powered Subwoofers Using a suitable cable, connect the AV receiver's PRE OUT: SW1, SW2 to an input on your subwoofer is to match the color of each speaker cable in accordance with each label... wide speakers produce no sound at the same time. Powered subwoofer LINE INPUT LINE INPUT LINE INPUT LINE INPUT 19 Connecting the AV receiver-Continued Speaker Configuration For 9.2-channel surround-sound playback, you use one surround back speaker, connect it to PRE OUT: SW1.
...speaker terminals are all red (the negative (-) speaker terminals are recommended for each output. Connecting Powered Subwoofers Using a suitable cable, connect the AV receiver's PRE OUT: SW1, SW2 to an input on your subwoofer is to match the color of each speaker cable in accordance with each label... wide speakers produce no sound at the same time. Powered subwoofer LINE INPUT LINE INPUT LINE INPUT LINE INPUT 19 Connecting the AV receiver-Continued Speaker Configuration For 9.2-channel surround-sound playback, you use one surround back speaker, connect it to PRE OUT: SW1.

Owner Manual
Page 21
...left speaker Front high left speaker Center speaker Surround right speaker Surround back right speaker Surround back left speaker Surround left speaker 21 Connecting the AV receiver-Continued Connecting the Speaker Cables 1 Strip 1/2" to 5/8" (12 to 15 mm) of insulation from the ends of terminals. If you're..., as shown. 2 Unscrew the terminal. 1/2" to 5/8" (12 to 15 mm) 3 Fully insert the bare wires. 4 Screw the terminal tight. ■ 9.2-channel Playback with Speakers A The following illustration shows which speaker should be connected to the SURR BACK/ZONE 3 L terminal.
...left speaker Front high left speaker Center speaker Surround right speaker Surround back right speaker Surround back left speaker Surround left speaker 21 Connecting the AV receiver-Continued Connecting the Speaker Cables 1 Strip 1/2" to 5/8" (12 to 15 mm) of insulation from the ends of terminals. If you're..., as shown. 2 Unscrew the terminal. 1/2" to 5/8" (12 to 15 mm) 3 Fully insert the bare wires. 4 Screw the terminal tight. ■ 9.2-channel Playback with Speakers A The following illustration shows which speaker should be connected to the SURR BACK/ZONE 3 L terminal.
Owner Manual
Page 22
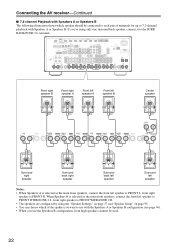
... The speakers are configured by using only one surround back speaker, connect it to the SURR BACK/ZONE 3 L terminal. Connecting the AV receiver-Continued ■ 7.2-channel Playback with Speakers A or Speakers B The following illustration shows which of the spakers you want to use the Speakers B configuration, front ...high speakers cannnot be connected to each pair of terminals for up to 7.2-channel playback with the Speakers A or Speakers B configuration (see page 96). • When you 're using the "Speaker Settings" on ...
... The speakers are configured by using only one surround back speaker, connect it to the SURR BACK/ZONE 3 L terminal. Connecting the AV receiver-Continued ■ 7.2-channel Playback with Speakers A or Speakers B The following illustration shows which of the spakers you want to use the Speakers B configuration, front ...high speakers cannnot be connected to each pair of terminals for up to 7.2-channel playback with the Speakers A or Speakers B configuration (see page 96). • When you 're using the "Speaker Settings" on ...
Owner Manual
Page 29
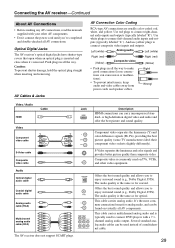
... standard- or high-definition digital video and audio and offer the best picture and sound quality. Connecting the AV receiver-Continued About AV Connections • Before making any AV connections, read the manuals supplied with a 7.1channel analog audio output. Component video separates the luminance (Y) and...). And use yellow plugs to connect left-channel audio inputs and outputs (typically labeled "L"). Left (white) Analog audio Left (white) Right (red) (Yellow) Composite video Right (red) (Yellow) • Push plugs in all AV components. The audio quality is commonly used...
... standard- or high-definition digital video and audio and offer the best picture and sound quality. Connecting the AV receiver-Continued About AV Connections • Before making any AV connections, read the manuals supplied with a 7.1channel analog audio output. Component video separates the luminance (Y) and...). And use yellow plugs to connect left-channel audio inputs and outputs (typically labeled "L"). Left (white) Analog audio Left (white) Right (red) (Yellow) Composite video Right (red) (Yellow) • Push plugs in all AV components. The audio quality is commonly used...

Owner Manual
Page 30
..., Dolby Digital Plus, DSD, and Multichannel PCM Supported Audio Formats • 2-channel linear PCM (32-192 kHz, 16/20/24 bit) • Multichannel linear PCM (up to connect AV components. The AV receiver's HDMI interface is based on Onkyo components. About Copyright Protection The AV receiver supports HDCP (High-bandwidth Digital Content Protection)*2, a copy-protection system for...
..., Dolby Digital Plus, DSD, and Multichannel PCM Supported Audio Formats • 2-channel linear PCM (32-192 kHz, 16/20/24 bit) • Multichannel linear PCM (up to connect AV components. The AV receiver's HDMI interface is based on Onkyo components. About Copyright Protection The AV receiver supports HDCP (High-bandwidth Digital Content Protection)*2, a copy-protection system for...
Owner Manual
Page 34
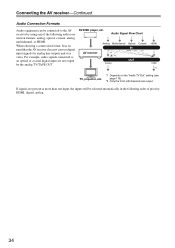
... analog. 34 For example, audio signals connected to the AV receiver by the analog TV/TAPE OUT. Connecting the AV receiver-Continued Audio Connection Formats Audio equipment can be selected automatically in mind that the AV receiver does not convert digital input signals for analog line outputs and... vice versa. Audio Signal Flow Chart Analog Multichannel Optical Coaxial AV receiver Analog HDMI HDMI *1 TV, projector, etc. *1 Depends on the "Audio TV Out" setting (see page 113). *2 Only the front L/R channels are output. When choosing a connection format, bear in the following...
... analog. 34 For example, audio signals connected to the AV receiver by the analog TV/TAPE OUT. Connecting the AV receiver-Continued Audio Connection Formats Audio equipment can be selected automatically in mind that the AV receiver does not convert digital input signals for analog line outputs and... vice versa. Audio Signal Flow Chart Analog Multichannel Optical Coaxial AV receiver Analog HDMI HDMI *1 TV, projector, etc. *1 Depends on the "Audio TV Out" setting (see page 113). *2 Only the front L/R channels are output. When choosing a connection format, bear in the following...

Owner Manual
Page 37
... to the AV receiver's SURR BACK L/R jacks. Connecting the AV receiver-Continued Hooking Up the Multichannel Input If your DVD player supports multichannel audio formats such as DVD-Audio and Super Audio CD, and it has a multichannel analog audio output, you must assign it to an input selector. If your DVD player has a 5.1-channel analog...
... to the AV receiver's SURR BACK L/R jacks. Connecting the AV receiver-Continued Hooking Up the Multichannel Input If your DVD player supports multichannel audio formats such as DVD-Audio and Super Audio CD, and it has a multichannel analog audio output, you must assign it to an input selector. If your DVD player has a 5.1-channel analog...

Owner Manual
Page 45
... for more powerful power amplifier and use a more information. Front left back speaker 7. Front wide/Front high left speaker 5. Center speaker 3. Connecting the AV receiver-Continued Connecting a Power Amplifier If you want to output in the "Speaker Configuration" (page 95). 45 Surround left speaker 2. Power amplifier 123456789 1. You... left speaker* 9 Front wide/Front high right speaker* Powered subwoofer See "Connecting Powered Subwoofers" on page 19 for the channel that you don't want to use the AV receiver as a preamp, connect it to PRE OUT: SW1.
... for more powerful power amplifier and use a more information. Front left back speaker 7. Front wide/Front high left speaker 5. Center speaker 3. Connecting the AV receiver-Continued Connecting a Power Amplifier If you want to output in the "Speaker Configuration" (page 95). 45 Surround left speaker 2. Power amplifier 123456789 1. You... left speaker* 9 Front wide/Front high right speaker* Powered subwoofer See "Connecting Powered Subwoofers" on page 19 for the channel that you don't want to use the AV receiver as a preamp, connect it to PRE OUT: SW1.

Owner Manual
Page 57
..."CD", or "PHONO". The "Input/Output Assign" menu appears. 1. Analog Audio Input", and then press [ENTER]. Notes: • When bridging is used , the AV receiver is selected on your TV. 2 Use the Up and Down [R]/[X] but- tor. The main menu appears onscreen. Input/Output Assign", and then press [ENTER]. Input... input, set the minimum speaker impedance to 4 ohms. To use bi-amping or bridging, you must assign that input to an input selector. channel input, press the [AUDIO] button and select the "Audio selector" (see page 61). If you must assign it to the DVD/BD input...
..."CD", or "PHONO". The "Input/Output Assign" menu appears. 1. Analog Audio Input", and then press [ENTER]. Notes: • When bridging is used , the AV receiver is selected on your TV. 2 Use the Up and Down [R]/[X] but- tor. The main menu appears onscreen. Input/Output Assign", and then press [ENTER]. Input... input, set the minimum speaker impedance to 4 ohms. To use bi-amping or bridging, you must assign that input to an input selector. channel input, press the [AUDIO] button and select the "Audio selector" (see page 61). If you must assign it to the DVD/BD input...

Owner Manual
Page 61
About Audyssey Dynamic Volume Audyssey Dynamic Volume solves the problem of large variations in volume level between television programs, commercials, and between television channels, or changing from the primary listening position. Whenever necessary, Dynamic Volume makes the necessary rapid or gradual adjustments to decide whether an adjustment is needed. ...
About Audyssey Dynamic Volume Audyssey Dynamic Volume solves the problem of large variations in volume level between television programs, commercials, and between television channels, or changing from the primary listening position. Whenever necessary, Dynamic Volume makes the necessary rapid or gradual adjustments to decide whether an adjustment is needed. ...

Owner Manual
Page 68
...You can adjust the bass and treble for the front speakers, except when the Direct, Pure Audio or THX listening mode is selected. 1 AV receiver Press the [TONE] button repeatedly to select either "Bass" or "Treble" for input sources. Input source Listening mode Signal format* Sampling... as follows. For some digital input signals, including multichannel PCM, the signal format, number of channels is displayed. The following information can typically be displayed for each speaker or subwoofer. 2 AV receiver Use the Up [S] and Down [F] buttons to +10 dB in 2 dB steps. 68 Note...
...You can adjust the bass and treble for the front speakers, except when the Direct, Pure Audio or THX listening mode is selected. 1 AV receiver Press the [TONE] button repeatedly to select either "Bass" or "Treble" for input sources. Input source Listening mode Signal format* Sampling... as follows. For some digital input signals, including multichannel PCM, the signal format, number of channels is displayed. The following information can typically be displayed for each speaker or subwoofer. 2 AV receiver Use the Up [S] and Down [F] buttons to +10 dB in 2 dB steps. 68 Note...

Owner Manual
Page 70
...configuration. Powered Zone 2 is inserted in either of the following listening modes can be selected in the PHONES jack, the Headphone indicator, speaker/channel indicator FL and FR light up. (The Powered Zone 2/3 speakers are using Speakers B, you cannot use Audyssey MultEQ® XT Room ...high or front wide speakers such as shown. Using Headphones You can choose which of stereo headphones (1/4-inch phone plug) to the AV receiver's PHONES jack for private listening, as Dolby Pro Logic IIz Height or Audyssey Dynamic Surround Expansion™ are unavailable. • While...
...configuration. Powered Zone 2 is inserted in either of the following listening modes can be selected in the PHONES jack, the Headphone indicator, speaker/channel indicator FL and FR light up. (The Powered Zone 2/3 speakers are using Speakers B, you cannot use Audyssey MultEQ® XT Room ...high or front wide speakers such as shown. Using Headphones You can choose which of stereo headphones (1/4-inch phone plug) to the AV receiver's PHONES jack for private listening, as Dolby Pro Logic IIz Height or Audyssey Dynamic Surround Expansion™ are unavailable. • While...

Owner Manual
Page 74
Listening to store the station or channel. MEMORY, TUNING MODE 4 Press the [MEMORY] button again to the Radio-Continued Presetting AM/FM Stations MEMORY PRESET F/S AV receiver To select a preset, use the PRESET [F]/[S] buttons, or the remote controller's CH [+/-] button. While holding down the [MEMORY] ...stored and the preset number stops flashing. or Remote controller You can name your favorite AM/FM radio stations. The station or channel is flashing (about 8 seconds), use the remote controller's number buttons to select a preset from the display. 74 The preset ...
Listening to store the station or channel. MEMORY, TUNING MODE 4 Press the [MEMORY] button again to the Radio-Continued Presetting AM/FM Stations MEMORY PRESET F/S AV receiver To select a preset, use the PRESET [F]/[S] buttons, or the remote controller's CH [+/-] button. While holding down the [MEMORY] ...stored and the preset number stops flashing. or Remote controller You can name your favorite AM/FM radio stations. The station or channel is flashing (about 8 seconds), use the remote controller's number buttons to select a preset from the display. 74 The preset ...

Owner Manual
Page 85
Using the Listening Modes-Continued 5.1 channel Sources (1/3) Listening Mode Button Pure Audio*5 Direct Stereo Mono DolbyDigital/ DolbyDigital Plus/TrueHD/ Multichannel/ DTS/ DTS 96/24*6/ DTS Express/ DTS-HD High Resolution Audio/...
Using the Listening Modes-Continued 5.1 channel Sources (1/3) Listening Mode Button Pure Audio*5 Direct Stereo Mono DolbyDigital/ DolbyDigital Plus/TrueHD/ Multichannel/ DTS/ DTS 96/24*6/ DTS Express/ DTS-HD High Resolution Audio/...

Owner Manual
Page 86
Using the Listening Modes-Continued 5.1 channel Sources (2/3) Listening Mode Button PLIIx Music THX Music PLIIx Music Audyssey DSX PLIIz Height THX Music Neo:6 THX Music Neural THX Music THX Games PLIIx ...
Using the Listening Modes-Continued 5.1 channel Sources (2/3) Listening Mode Button PLIIx Music THX Music PLIIx Music Audyssey DSX PLIIz Height THX Music Neo:6 THX Music Neural THX Music THX Games PLIIx ...


