
Owner Manual
Page 5
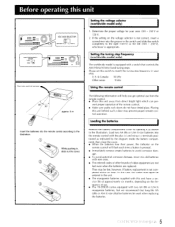
... in your area: 220 - 230 V or 120 V. 2. If the setting on the remote control will help you get optimal use . • The TX-DS838 comes equipped with this unit behind such a door may be used when replacing the batteries. 5 age. • To avoid potential corrosion damage, never mix ...controls the AM (9 kHz/10 kHz) band tuning steps. Loading the batteries Remove the battery compartment cover by opening it as indicated by the diagram inside the battery compartment, then close the cover. • When the batteries lose their power, the indicator on the voltage selector is not...
... in your area: 220 - 230 V or 120 V. 2. If the setting on the remote control will help you get optimal use . • The TX-DS838 comes equipped with this unit behind such a door may be used when replacing the batteries. 5 age. • To avoid potential corrosion damage, never mix ...controls the AM (9 kHz/10 kHz) band tuning steps. Loading the batteries Remove the battery compartment cover by opening it as indicated by the diagram inside the battery compartment, then close the cover. • When the batteries lose their power, the indicator on the voltage selector is not...
Owner Manual
Page 20
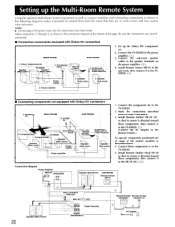
... : 4. Speaker Sub room) 2. Emitter (c) MAIN ROOM 5. Onkyo components (a) Speaker (Main room) TX-DS838 Speaker (Main room) 4. Set up the Multi-Room Remote System Using the optional Multi-Room System equipment as well as a power amplifier and connecting components as shown in the following diagrams makes it to the TX-DS838. (,4)) (Connect the AC adaptor to the...
... : 4. Speaker Sub room) 2. Emitter (c) MAIN ROOM 5. Onkyo components (a) Speaker (Main room) TX-DS838 Speaker (Main room) 4. Set up the Multi-Room Remote System Using the optional Multi-Room System equipment as well as a power amplifier and connecting components as shown in the following diagrams makes it to the TX-DS838. (,4)) (Connect the AC adaptor to the...
Owner Manual
Page 21
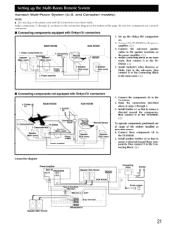
... • Do not plug in the main room, then connect it to the TX-DS838. 5. Onkyo components (a) Speaker (Main room) TX-DS838 Speaker (Main room) \ 4. Power amplifier Remote control _5. Connect the TX-DS838 to the speaker terminals on the power amplifier. (E2_;) 4. Install Xantech's J-... 1. Ctr IU lacUldUldl I II I(JU I - Speaker \ Sub room) 1. Connect these components, then connect it to the Connecting Block. (C6)) Connection diagram Power Amplifier Main o IN SPEAKERS o -3 Speaker (Sub Room) 0 0 Remote Sensor 0 SUB ROOM 0 0 00 Speaker (Main Room) MULTI SOURCE NI...
... • Do not plug in the main room, then connect it to the TX-DS838. 5. Onkyo components (a) Speaker (Main room) TX-DS838 Speaker (Main room) \ 4. Power amplifier Remote control _5. Connect the TX-DS838 to the speaker terminals on the power amplifier. (E2_;) 4. Install Xantech's J-... 1. Ctr IU lacUldUldl I II I(JU I - Speaker \ Sub room) 1. Connect these components, then connect it to the Connecting Block. (C6)) Connection diagram Power Amplifier Main o IN SPEAKERS o -3 Speaker (Sub Room) 0 0 Remote Sensor 0 SUB ROOM 0 0 00 Speaker (Main Room) MULTI SOURCE NI...

Owner Manual
Page 42
... press of parameters which can be sure the System Setup parameters have been set once, it . 3. to turn off , press the button again to the diagram on the remote control to select a setting. cursor button on page 46 for 5 seconds. If the parameters have been set them again. Refer to display...
... press of parameters which can be sure the System Setup parameters have been set once, it . 3. to turn off , press the button again to the diagram on the remote control to select a setting. cursor button on page 46 for 5 seconds. If the parameters have been set them again. Refer to display...


