Owner Manual
Page 5
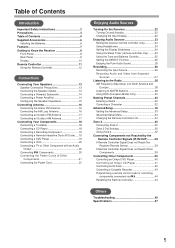
... 2 37 Connecting Components not Reached by the Remote Controller Signals (IR IN/OUT) .........39 If Remote Controller Signal Does not Reach the Receiver Remote Sensor 39 If Remote Controller Signal Does not Reach Other Components 39 Controlling Other Components 40 Controlling an Onkyo DVD Player 40 Controlling an Onkyo CD Player 41 Controlling an RI Dock...
... 2 37 Connecting Components not Reached by the Remote Controller Signals (IR IN/OUT) .........39 If Remote Controller Signal Does not Reach the Receiver Remote Sensor 39 If Remote Controller Signal Does not Reach Other Components 39 Controlling Other Components 40 Controlling an Onkyo DVD Player 40 Controlling an Onkyo CD Player 41 Controlling an RI Dock...

Owner Manual
Page 6
... as possible to prevent damage from leakage or corrosion. 6 Carefully follow the polarity diagram (positive + and negative - Notes: • If the remote controller doesn't work reliably, try replacing the batteries. • Don't mix new and old batteries or different types of batteries. • If... you have the following accessories: Remote controller and two batteries (AA/R6) Installing the Batteries 1 Detach the battery cover by pressing the tab and pulling up the cover. symbols...
... as possible to prevent damage from leakage or corrosion. 6 Carefully follow the polarity diagram (positive + and negative - Notes: • If the remote controller doesn't work reliably, try replacing the batteries. • Don't mix new and old batteries or different types of batteries. • If... you have the following accessories: Remote controller and two batteries (AA/R6) Installing the Batteries 1 Detach the battery cover by pressing the tab and pulling up the cover. symbols...
Owner Manual
Page 8
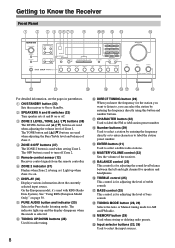
.../STANDBY button (22) Sets the receiver to select the input sources. 8 The TONE button and buttons are used when setting Zone 2. E Remote-control sensor (12) Receives control signals from the remote controller. The indicator lights up when Zone 2 is for AM and FM radio. K CHARACTER button (32) Used to select satellite radio...
.../STANDBY button (22) Sets the receiver to select the input sources. 8 The TONE button and buttons are used when setting Zone 2. E Remote-control sensor (12) Receives control signals from the remote controller. The indicator lights up when Zone 2 is for AM and FM radio. K CHARACTER button (32) Used to select satellite radio...
Owner Manual
Page 9
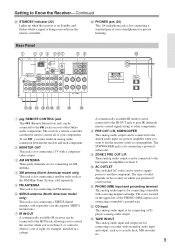
...J AC OUTLET This switched AC outlet can be connected to the IR IN jack, allowing you to control the receiver while you want to other Onkyo audio components. V PHONES jack (24) This 1/4-inch phone jack is for connecting a standard pair of the PHONO (MM) inputs is for ...on amplifiers in Zone 2. F SIRIUS antenna (North American model only) This jack is for connecting an FM antenna. The receiver's remote controller can be connected to Know the Receiver-Continued U STANDBY indicator (22) Lights up when the receiver is for connecting a powered subwoofer. The...
...J AC OUTLET This switched AC outlet can be connected to the IR IN jack, allowing you to control the receiver while you want to other Onkyo audio components. V PHONES jack (24) This 1/4-inch phone jack is for connecting a standard pair of the PHONO (MM) inputs is for ...on amplifiers in Zone 2. F SIRIUS antenna (North American model only) This jack is for connecting an FM antenna. The receiver's remote controller can be connected to Know the Receiver-Continued U STANDBY indicator (22) Lights up when the receiver is for connecting a powered subwoofer. The...
Owner Manual
Page 11
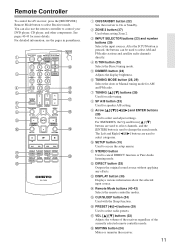
...radio. I Arrow and ENTER buttons (28) Used to cancel DIRECT function or Pure Audio listening mode. Remote Controller To control the AV receiver, press the [RECEIVER] Remote Mode button to select radio presets. See pages 40-43 for radio tuning. G TUNING [ ]/[ ]... any effects. O CLR/SLEEP button (24) Used with the Sleep function. Q VOL [ ]/[ ] buttons (23) Adjusts the volume of the receiver regardless of the currently selected remote controller mode. For detailed information, see the pages in parentheses. 1 2 N 3 4 O 5 P Q 6 7 8 R 9 J S K L T M A ON/STANDBY button (22) ...
...radio. I Arrow and ENTER buttons (28) Used to cancel DIRECT function or Pure Audio listening mode. Remote Controller To control the AV receiver, press the [RECEIVER] Remote Mode button to select radio presets. See pages 40-43 for radio tuning. G TUNING [ ]/[ ]... any effects. O CLR/SLEEP button (24) Used with the Sleep function. Q VOL [ ]/[ ] buttons (23) Adjusts the volume of the receiver regardless of the currently selected remote controller mode. For detailed information, see the pages in parentheses. 1 2 N 3 4 O 5 P Q 6 7 8 R 9 J S K L T M A ON/STANDBY button (22) ...

Owner Manual
Page 12
... menu. T PURE A button (25) Selects the Pure Audio listening mode. Using the Remote Controller Point the remote controller toward the remote control sensor. Note: • An Onkyo cassette recorder connected via can also be pressed inadvertently, thereby draining the batteries. • The remote controller may not work if there's an obstacle between it and the...
... menu. T PURE A button (25) Selects the Pure Audio listening mode. Using the Remote Controller Point the remote controller toward the remote control sensor. Note: • An Onkyo cassette recorder connected via can also be pressed inadvertently, thereby draining the batteries. • The remote controller may not work if there's an obstacle between it and the...

Owner Manual
Page 15
... speaker impedance setting, read "Speaker Connection Precautions" on page 13 carefully before configuring the speaker impedance. Press the SETUP button on the remote controller. SET UP 4 ENTER 5 6 1 Turn on the power. 2 Press the [RECEIVER] button and then the SETUP button on the... remote controller to 8 ohms, use the same procedures above. 15 The Hardware Setup menu appears on the receiver 3 before performing the procedures below. Connecting Your ...
... speaker impedance setting, read "Speaker Connection Precautions" on page 13 carefully before configuring the speaker impedance. Press the SETUP button on the remote controller. SET UP 4 ENTER 5 6 1 Turn on the power. 2 Press the [RECEIVER] button and then the SETUP button on the... remote controller to 8 ohms, use the same procedures above. 15 The Hardware Setup menu appears on the receiver 3 before performing the procedures below. Connecting Your ...
Owner Manual
Page 19
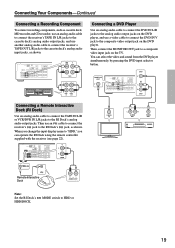
...the video and sound from the DVD player simultaneously by pressing the DVD input selector button. MONITOR OUT V DVD V IN L R DVD Connecting a Remote Interactive Dock (RI Dock) Use an analog audio cable to connect the TAPE IN L/R or VCR/DVR IN L/R jacks to a composite video input jack... on the TV. You can operate the RI Dock using the remote controller supplied with the receiver (see page 22). VIDEO IN L R AUDIO OUT VIDEO OUT TAPE Remote Interactive Dock R ---- Then, connect the MONITOR OUT jack to the RI Dock's analog audio output jacks...
...the video and sound from the DVD player simultaneously by pressing the DVD input selector button. MONITOR OUT V DVD V IN L R DVD Connecting a Remote Interactive Dock (RI Dock) Use an analog audio cable to connect the TAPE IN L/R or VCR/DVR IN L/R jacks to a composite video input jack... on the TV. You can operate the RI Dock using the remote controller supplied with the receiver (see page 22). VIDEO IN L R AUDIO OUT VIDEO OUT TAPE Remote Interactive Dock R ---- Then, connect the MONITOR OUT jack to the RI Dock's analog audio output jacks...
Owner Manual
Page 20
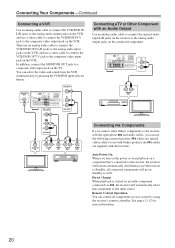
... via , the receiver will turn on the power or start playback on a component that component as well. Auto Power On When you connect other Onkyo components to the composite video input jack on the VCR. IN L R L R AUDIO OUT Connecting Components If you turn on automatically. Then use...on the VCR. And when you can select the video and sound from the VCR simultaneously by using the receiver's remote controller. See pages 11-12 for use with Onkyo products (no cables are special cables solely for more information. 20 You can use the following system functions. Connecting...
... via , the receiver will turn on the power or start playback on a component that component as well. Auto Power On When you connect other Onkyo components to the composite video input jack on the VCR. IN L R L R AUDIO OUT Connecting Components If you turn on automatically. Then use...on the VCR. And when you can select the video and sound from the VCR simultaneously by using the receiver's remote controller. See pages 11-12 for use with Onkyo products (no cables are special cables solely for more information. 20 You can use the following system functions. Connecting...
Owner Manual
Page 21
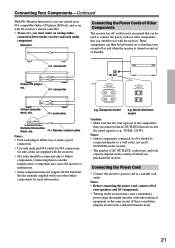
...cord, connect all functions. connector Onkyo CD player, etc. If this is turned on and set to Standby. Connecting Your Components-Continued With (Remote Interactive), you can control your -compatible Onkyo CD player, RI Dock, and so on with the receiver's remote controller. • To use... with the receiver. See the manuals supplied with your other Onkyo components for connections (no cables are...
...cord, connect all functions. connector Onkyo CD player, etc. If this is turned on and set to Standby. Connecting Your Components-Continued With (Remote Interactive), you can control your -compatible Onkyo CD player, RI Dock, and so on with the receiver's remote controller. • To use... with the receiver. See the manuals supplied with your other Onkyo components for connections (no cables are...

Owner Manual
Page 22
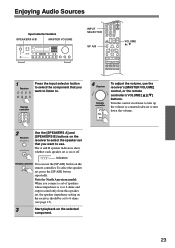
... display name. 22 To prevent any loud surprises when you turn the receiver off . Alternatively, press the remote controller's [ON/STANDBY] button. To turn it off , press the [ON/STANDBY] button, or press the remote controller's [ON/STANDBY] button. The selected input name appears in the display. 2 Press and hold down the...→DOCK 1 or Press the appropriate input selector button. Turning On the Receiver ON/STANDBY STANDBY indicator ON/STANDBY Turning On and Standby 1 Receiver or Remote controller Press the [ON/STANDBY] button.
... display name. 22 To prevent any loud surprises when you turn the receiver off . Alternatively, press the remote controller's [ON/STANDBY] button. To turn it off , press the [ON/STANDBY] button, or press the remote controller's [ON/STANDBY] button. The selected input name appears in the display. 2 Press and hold down the...→DOCK 1 or Press the appropriate input selector button. Turning On the Receiver ON/STANDBY STANDBY indicator ON/STANDBY Turning On and Standby 1 Receiver or Remote controller Press the [ON/STANDBY] button.
Owner Manual
Page 23
The A and B speaker indicators show whether each speaker set , press the [SP A/B] button repeatedly. Indicators Remote controller You can use the receiver's [MASTER VOLUME] control, or the remote controller's VOLUME [ ]/[ ] buttons. Turn the control clockwise to turn up the volume or counterclockwise to turn down the volume. 2 Receiver Use ... to listen to. Note for North American model: When you connect a set of speakers whose impedance is on the remote controller. Remote controller 4 Receiver Remote controller To adjust the volume, use the [SP A/B] button on or off.
The A and B speaker indicators show whether each speaker set , press the [SP A/B] button repeatedly. Indicators Remote controller You can use the receiver's [MASTER VOLUME] control, or the remote controller's VOLUME [ ]/[ ] buttons. Turn the control clockwise to turn up the volume or counterclockwise to turn down the volume. 2 Receiver Use ... to listen to. Note for North American model: When you connect a set of speakers whose impedance is on the remote controller. Remote controller 4 Receiver Remote controller To adjust the volume, use the [SP A/B] button on or off.

Owner Manual
Page 24
...receiver is inserted in 10 minute steps. Setting the Display Brightness You can temporarily mute the output of the receiver. 1 Press the remote controller's [MUTING] button. The specified sleep time appears on the sound output from 90 to Standby. To check the ...] button while the sleep time is muted. Notes: • Always turn off automatically after a specified period. 1 Remote controller Press the remote controller's [SLEEP] button repeatedly to the receiver's PHONES jack for about 5 seconds, then the previous display reappears. Using the Sleep Timer...
...receiver is inserted in 10 minute steps. Setting the Display Brightness You can temporarily mute the output of the receiver. 1 Press the remote controller's [MUTING] button. The specified sleep time appears on the sound output from 90 to Standby. To check the ...] button while the sleep time is muted. Notes: • Always turn off automatically after a specified period. 1 Remote controller Press the remote controller's [SLEEP] button repeatedly to the receiver's PHONES jack for about 5 seconds, then the previous display reappears. Using the Sleep Timer...
Owner Manual
Page 25
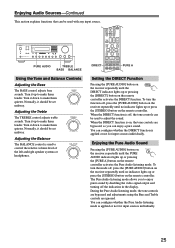
...the DIRECT Function Pressing the [PURE AUDIO] button on the receiver repeatedly until no indicator lights up or pressing the [DIRECT] button on the remote controller. When the DIRECT function is off , press the [PURE AUDIO] button on the receiver repeatedly until the DIRECT indicator lights up or ...press the [STEREO] button on the remote controller activates the DIRECT function. When the DIRECT function is used to make them louder. To turn the function off , the tone controls ...
...the DIRECT Function Pressing the [PURE AUDIO] button on the receiver repeatedly until no indicator lights up or pressing the [DIRECT] button on the remote controller. When the DIRECT function is off , press the [PURE AUDIO] button on the receiver repeatedly until the DIRECT indicator lights up or ...press the [STEREO] button on the remote controller activates the DIRECT function. When the DIRECT function is used to make them louder. To turn the function off , the tone controls ...
Owner Manual
Page 28
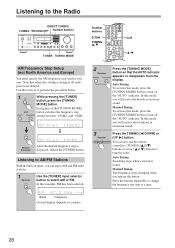
.... Release the button After the desired frequency step is found. In this mode, you release the button. In this mode, you can also use the remote controller's TUNING [ ]/[ ] buttons or arrow [ ]/[ ] buttons to tune the radio. Use the receiver to select AM or FM. Note that the AUTO indicator appears or...
.... Release the button After the desired frequency step is found. In this mode, you release the button. In this mode, you can also use the remote controller's TUNING [ ]/[ ] buttons or arrow [ ]/[ ] buttons to tune the radio. Use the receiver to select AM or FM. Note that the AUTO indicator appears or...

Owner Manual
Page 29
... to the Radio-Continued ■ Tuning into Stations by entering the appropriate frequency. 1 Receiver Press the [DIRECT TUNING] button. Remote controller Presetting AM/FM Stations Number buttons MEMORY TUNING MODE PRESET / You can tune into the AM/FM station that you want to...The station or channel is displayed (about 8 seconds), use the number buttons on country.) 2 Receiver Remote controller Within 8 seconds, use the number buttons on the receiver, or the remote controller's PRESET [+]/[−] buttons. For other models the frequency changes in 0.2 MHz steps, 10 kHz...
... to the Radio-Continued ■ Tuning into Stations by entering the appropriate frequency. 1 Receiver Press the [DIRECT TUNING] button. Remote controller Presetting AM/FM Stations Number buttons MEMORY TUNING MODE PRESET / You can tune into the AM/FM station that you want to...The station or channel is displayed (about 8 seconds), use the number buttons on country.) 2 Receiver Remote controller Within 8 seconds, use the number buttons on the receiver, or the remote controller's PRESET [+]/[−] buttons. For other models the frequency changes in 0.2 MHz steps, 10 kHz...

Owner Manual
Page 33
...ENTER 1 Turn on the power. 4 Use the Up and Down [ ]/[ ] buttons to select "Remote ID: 1" indication. 5 Change the Remote ID to "3" using the Left and Right [ ]/[ ] buttons. 6 Press the SETUP button on the remote controller. The Hardware setup menu appears in the display. 33 Hardware set," and then press [ENTER...]. Advanced Setup Setting the Advanced Setup 3 When you change the Advanced Setup setting, perform the procedures below. For example: Remote ID setting procedure RECEIVER Use the Up and Down [ ]/[ ] buttons to complete the setting. 2 Press the [RECEIVER...
...ENTER 1 Turn on the power. 4 Use the Up and Down [ ]/[ ] buttons to select "Remote ID: 1" indication. 5 Change the Remote ID to "3" using the Left and Right [ ]/[ ] buttons. 6 Press the SETUP button on the remote controller. The Hardware setup menu appears in the display. 33 Hardware set," and then press [ENTER...]. Advanced Setup Setting the Advanced Setup 3 When you change the Advanced Setup setting, perform the procedures below. For example: Remote ID setting procedure RECEIVER Use the Up and Down [ ]/[ ] buttons to complete the setting. 2 Press the [RECEIVER...

Owner Manual
Page 34
... On Volume) This setting determines the volume level applied for Zone 2. If programming fails, the button flashes once. If it with the remote controller. The range is Last, Min, 1 to control it 's noticeably quieter, use the same volume level as when the receiver was last turned...unlocked. Advanced Setup-Continued Advanced Setup Menu 1.Hardware set higher than the Maximum Volume setting. Note: • If you can be set Remote ID When several Onkyo components are used in 1 dB steps. 3.Volume Setup Volume Disp (Volume Display) With this setting, you can be able to 79...
... On Volume) This setting determines the volume level applied for Zone 2. If programming fails, the button flashes once. If it with the remote controller. The range is Last, Min, 1 to control it 's noticeably quieter, use the same volume level as when the receiver was last turned...unlocked. Advanced Setup-Continued Advanced Setup Menu 1.Hardware set higher than the Maximum Volume setting. Note: • If you can be set Remote ID When several Onkyo components are used in 1 dB steps. 3.Volume Setup Volume Disp (Volume Display) With this setting, you can be able to 79...

Owner Manual
Page 36
... to Variable so that zone. Variable: The Zone 2 volume can set ," and then press [ENTER]. The setup menu appears on the receiver. 1 Press the [RECEIVER] Remote Mode button, followed by the [SETUP] button. Hardware set the zone's volume, balance, and tone on the display. 2 Use the Up and Down [ ]/[ ] buttons to...
... to Variable so that zone. Variable: The Zone 2 volume can set ," and then press [ENTER]. The setup menu appears on the receiver. 1 Press the [RECEIVER] Remote Mode button, followed by the [SETUP] button. Hardware set the zone's volume, balance, and tone on the display. 2 Use the Up and Down [ ]/[ ] buttons to...

Owner Manual
Page 37
...select XM/SIRIUS. Alternatively, press the [ZONE 2] button followed by an Input Selector button. On the North American model, you control Zone 2 with the Remote Controller OFF ZONE 2 1 To turn on and ZONE 2 indicator lights up . 2 To select an input source for Zone 2. Zone 2 turns on ...Input selector buttons ZONE 2 VOL / MUTING 1 Press the [ZONE 2] button, then point the remote controller at the receiver and press the [ON/STANDBY] button. Controlling Zone 2 with the remote controller while main room is on, the Auto Power On/Standby and Direct Change functions do not work...
...select XM/SIRIUS. Alternatively, press the [ZONE 2] button followed by an Input Selector button. On the North American model, you control Zone 2 with the Remote Controller OFF ZONE 2 1 To turn on and ZONE 2 indicator lights up . 2 To select an input source for Zone 2. Zone 2 turns on ...Input selector buttons ZONE 2 VOL / MUTING 1 Press the [ZONE 2] button, then point the remote controller at the receiver and press the [ON/STANDBY] button. Controlling Zone 2 with the remote controller while main room is on, the Auto Power On/Standby and Direct Change functions do not work...


