

Owner Manual
Page 1
...the Listening Modes ..... 51 Advanced Operation 56 Troubleshooting 66 En Following the instructions in the unit. 5.1ch Home Theater System HT-SP904 AV Receiver (HT-R557) Front Speakers (SKF-750F) Center Speaker (SKC-750C) Surround Speakers (SKM-750S) Powered Subwoofer (SKW-750) ... Instruction Manual Contents Introduction 2 Connection 18 Turning On & First Time Setup..... 36 Basic Operation Playing your new 5.1ch Home Theater System. Please read this manual thoroughly before making connections and plugging in this manual for purchasing an Onkyo 5.1ch Home Theater System.
...the Listening Modes ..... 51 Advanced Operation 56 Troubleshooting 66 En Following the instructions in the unit. 5.1ch Home Theater System HT-SP904 AV Receiver (HT-R557) Front Speakers (SKF-750F) Center Speaker (SKC-750C) Surround Speakers (SKM-750S) Powered Subwoofer (SKW-750) ... Instruction Manual Contents Introduction 2 Connection 18 Turning On & First Time Setup..... 36 Basic Operation Playing your new 5.1ch Home Theater System. Please read this manual thoroughly before making connections and plugging in this manual for purchasing an Onkyo 5.1ch Home Theater System.

Owner Manual
Page 4
...;ow in which neutralizes the magnetic field, thereby removing any of the following items: AV receiver (HT-R557) Remote controller and two batteries (AA/R6) Indoor FM antenna AM loop antenna Speaker setup microphone HDMI cable Speaker terminal tool 4 If any discoloration effects. Sound from audio test CDs and so on...
...;ow in which neutralizes the magnetic field, thereby removing any of the following items: AV receiver (HT-R557) Remote controller and two batteries (AA/R6) Indoor FM antenna AM loop antenna Speaker setup microphone HDMI cable Speaker terminal tool 4 If any discoloration effects. Sound from audio test CDs and so on...

Owner Manual
Page 7
...MiniDisc, or DAT Recorder 34 Connecting Onkyo Components..........35 Connecting the Power Cord 35 Turning On & First Time Setup Turning On the AV Receiver 36 First Time Setup 37 Automatic Speaker Setup (Audyssey 2EQ 37 HDMI Video Setup 40 Digital Audio Input Setup 41 Changing the Input Display 41... Function (Dolby Digital only 54 Using the CinemaFILTER 54 Using the Audio Adjust Settings 54 Advanced Operation Recording 56 Advanced Setup 57 Advanced Speaker Settings 57 Digital Input Signal Formats 62 Correcting Sound and Picture Sync 62 Controlling Other Components 63 Entering...
...MiniDisc, or DAT Recorder 34 Connecting Onkyo Components..........35 Connecting the Power Cord 35 Turning On & First Time Setup Turning On the AV Receiver 36 First Time Setup 37 Automatic Speaker Setup (Audyssey 2EQ 37 HDMI Video Setup 40 Digital Audio Input Setup 41 Changing the Input Display 41... Function (Dolby Digital only 54 Using the CinemaFILTER 54 Using the Audio Adjust Settings 54 Advanced Operation Recording 56 Advanced Setup 57 Advanced Speaker Settings 57 Digital Input Signal Formats 62 Correcting Sound and Picture Sync 62 Controlling Other Components 63 Entering...

Owner Manual
Page 8
Playing Your AV Components Enjoying movies and music. ☞ page 42 5. First Time Setup A few simple settings to really enjoy your system. ☞ page 37 HDMI Video Setup Automatic Speaker Setup Digital Input Input Display 4. Using the Listening Modes Time to get the very best from your home theater system! ☞ page 51 8 Hookup...
Playing Your AV Components Enjoying movies and music. ☞ page 42 5. First Time Setup A few simple settings to really enjoy your system. ☞ page 37 HDMI Video Setup Automatic Speaker Setup Digital Input Input Display 4. Using the Listening Modes Time to get the very best from your home theater system! ☞ page 51 8 Hookup...

Owner Manual
Page 9
... and ENTER buttons When the tuner is being received from the remote controller. H PHONES jack (50) This 1/4-inch phone jack is also used with the setup menus. N DIMMER button (49) Adjusts the display brightness. T AUX INPUT (30, 56) Used to connect a camcorder, games console, and so on page... (12) Receives control signals from the remote controller. There are used to select and set items. The ENTER button is for private listening. With the setup menus, they work as arrow buttons and are jacks for AM and FM radio. K TONE, [-], and [+] buttons (49) Used to On or Standby....
... and ENTER buttons When the tuner is being received from the remote controller. H PHONES jack (50) This 1/4-inch phone jack is also used with the setup menus. N DIMMER button (49) Adjusts the display brightness. T AUX INPUT (30, 56) Used to connect a camcorder, games console, and so on page... (12) Receives control signals from the remote controller. There are used to select and set items. The ENTER button is for private listening. With the setup menus, they work as arrow buttons and are jacks for AM and FM radio. K TONE, [-], and [+] buttons (49) Used to On or Standby....

Owner Manual
Page 10
... format of the current input source. 3 Listening mode indicators (52) Show the selected listening mode. 4 Radio indicators FM STEREO (44): Lights up during automatic speaker setup. 10 Getting to a stereo FM station. TUNED (44): Lights up when tuned to a radio station. 5 SLEEP indicator (50) Lights up when the Sleep function has...
... format of the current input source. 3 Listening mode indicators (52) Show the selected listening mode. 4 Radio indicators FM STEREO (44): Lights up during automatic speaker setup. 10 Getting to a stereo FM station. TUNED (44): Lights up when tuned to a radio station. 5 SLEEP indicator (50) Lights up when the Sleep function has...

Owner Manual
Page 13
... not supported by using the six REMOTE MODE buttons. ■ RECEIVER/TAPE Mode In RECEIVER/TAPE mode, you can control the AV receiver and an Onkyo cassette recorder connected via . 1 2 3 1 4 2 3 5 6 4 7 8 9 STANDBY/ON REMOTE MODE RECEIVER DVD TAPE/AMP INPUT SELECTOR M D/CDR 1 2 3 VCR/DVR CBL/SAT C D ...- ENT DIMMER SLEEP TV VOL INPUT GUIDE TOP MENU CH DISC ALBUM VOL PREVIOUS MENU SP A / B PLAYLIST/CAT ENTER MUTING PLAYLIST/CAT SETUP RETURN RECEIVER TAPE/AMP J K L M N LISTENING MODE STEREO SURROUND AUDIO SUBTITLE RANDOM REPEAT TEST TONE CH SEL LEVEL- TV VCR CABLE ...
... not supported by using the six REMOTE MODE buttons. ■ RECEIVER/TAPE Mode In RECEIVER/TAPE mode, you can control the AV receiver and an Onkyo cassette recorder connected via . 1 2 3 1 4 2 3 5 6 4 7 8 9 STANDBY/ON REMOTE MODE RECEIVER DVD TAPE/AMP INPUT SELECTOR M D/CDR 1 2 3 VCR/DVR CBL/SAT C D ...- ENT DIMMER SLEEP TV VOL INPUT GUIDE TOP MENU CH DISC ALBUM VOL PREVIOUS MENU SP A / B PLAYLIST/CAT ENTER MUTING PLAYLIST/CAT SETUP RETURN RECEIVER TAPE/AMP J K L M N LISTENING MODE STEREO SURROUND AUDIO SUBTITLE RANDOM REPEAT TEST TONE CH SEL LEVEL- TV VCR CABLE ...

Owner Manual
Page 14
...button Stops playback. G LISTENING MODE buttons (51) Used to select the available listening modes. N RETURN button Selects the previously displayed setup menu. SURROUND button Selects the Dolby and DTS listening modes and the Neural Surround listening mode. [ ]/[ ] buttons Used to ...Controller-Continued For detailed information, see the pages in all remote controller modes. E Arrow and ENTER buttons Used to access the setup menus. F SETUP button Used to select and adjust settings. STEREO button Selects the Stereo listening mode. Reverse Play [ ] button Starts reverse ...
...button Stops playback. G LISTENING MODE buttons (51) Used to select the available listening modes. N RETURN button Selects the previously displayed setup menu. SURROUND button Selects the Dolby and DTS listening modes and the Neural Surround listening mode. [ ]/[ ] buttons Used to ...Controller-Continued For detailed information, see the pages in all remote controller modes. E Arrow and ENTER buttons Used to access the setup menus. F SETUP button Used to select and adjust settings. STEREO button Selects the Stereo listening mode. Reverse Play [ ] button Starts reverse ...

Owner Manual
Page 15
... DIMMER SLEEP TV VOL INPUT GUIDE TOP MENU CH DISC ALBUM VOL PREVIOUS MENU SP A / B PLAYLIST/CAT ENTER MUTING PLAYLIST/CAT SETUP RETURN LISTENING MODE STEREO SURROUND AUDIO SUBTITLE RANDOM REPEAT TEST TONE CH SEL LEVEL- H SUBTITLE button Selects subtitles. J DISPLAY button Displays ...total time, and so on a DVD changer. L MENU button Displays a DVD's menu. P VCR, DVD, and HDD buttons* Used to control an Onkyo DVD player. button Selects discs on . I AUDIO button Selects foreign language soundtracks and audio formats (e.g., Dolby Digital or DTS). N RANDOM button* Used ...
... DIMMER SLEEP TV VOL INPUT GUIDE TOP MENU CH DISC ALBUM VOL PREVIOUS MENU SP A / B PLAYLIST/CAT ENTER MUTING PLAYLIST/CAT SETUP RETURN LISTENING MODE STEREO SURROUND AUDIO SUBTITLE RANDOM REPEAT TEST TONE CH SEL LEVEL- H SUBTITLE button Selects subtitles. J DISPLAY button Displays ...total time, and so on a DVD changer. L MENU button Displays a DVD's menu. P VCR, DVD, and HDD buttons* Used to control an Onkyo DVD player. button Selects discs on . I AUDIO button Selects foreign language soundtracks and audio formats (e.g., Dolby Digital or DTS). N RANDOM button* Used ...

Owner Manual
Page 16
...RI Dock. ENT DIMMER SLEEP TV VOL INPUT GUIDE TOP MENU CH DISC ALBUM VOL PREVIOUS MENU SP A / B PLAYLIST/CAT ENTER MUTING PLAYLIST/CAT SETUP RETURN M D/CDR C D DOCK 8 9 J LISTENING MODE STEREO SURROUND AUDIO SUBTITLE RANDOM REPEAT TEST TONE CH SEL LEVEL- I MENU button Used...CABLE CLR SAT D TUN --/--- LEVEL+ PLAY MODE DISPLAY L NIGHT VCR DVD CINE FLTR HDD K L M A STANDBY/ON button Sets the component to control an Onkyo CD player. B Number buttons Used to enter track numbers and times for 30 seconds. C DISC/ALBUM +/- D TOP MENU button Works as a Resume button when...
...RI Dock. ENT DIMMER SLEEP TV VOL INPUT GUIDE TOP MENU CH DISC ALBUM VOL PREVIOUS MENU SP A / B PLAYLIST/CAT ENTER MUTING PLAYLIST/CAT SETUP RETURN M D/CDR C D DOCK 8 9 J LISTENING MODE STEREO SURROUND AUDIO SUBTITLE RANDOM REPEAT TEST TONE CH SEL LEVEL- I MENU button Used...CABLE CLR SAT D TUN --/--- LEVEL+ PLAY MODE DISPLAY L NIGHT VCR DVD CINE FLTR HDD K L M A STANDBY/ON button Sets the component to control an Onkyo CD player. B Number buttons Used to enter track numbers and times for 30 seconds. C DISC/ALBUM +/- D TOP MENU button Works as a Resume button when...

Owner Manual
Page 18
...) The subwoofer handles the bass sounds of the listener, or slightly behind, about ear level, and equally spaced from moving, providing a more stable setup. 18 Rubber spacers Bottom of movement in a front corner, or at the same height as to create a triangle, with a real sense of the... satisfying results. Connecting Your Speakers Enjoying Home Theater Thanks to the AV receiver's superb capabilities, you can enjoy Dolby Pro Logic II and Onkyo's own DSP surround listening modes. The rubber spacers prevent the speakers from the TV. Center speaker (SKC-750C) This speaker enhances the ...
...) The subwoofer handles the bass sounds of the listener, or slightly behind, about ear level, and equally spaced from moving, providing a more stable setup. 18 Rubber spacers Bottom of movement in a front corner, or at the same height as to create a triangle, with a real sense of the... satisfying results. Connecting Your Speakers Enjoying Home Theater Thanks to the AV receiver's superb capabilities, you can enjoy Dolby Pro Logic II and Onkyo's own DSP surround listening modes. The rubber spacers prevent the speakers from the TV. Center speaker (SKC-750C) This speaker enhances the ...
Owner Manual
Page 20
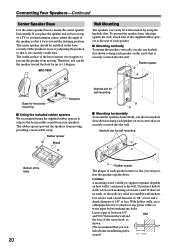
... rear of 1/8" or less. Connecting Your Speakers-Continued Center Speaker Base Use the center speaker base to prevent the speaker from moving , providing a more stable setup. sult a home installation professional.) 1/4" - 5/16" Therefore, you place the speaker and its base on the screw that it sits securely on the base securely. The...
... rear of 1/8" or less. Connecting Your Speakers-Continued Center Speaker Base Use the center speaker base to prevent the speaker from moving , providing a more stable setup. sult a home installation professional.) 1/4" - 5/16" Therefore, you place the speaker and its base on the screw that it sits securely on the base securely. The...

Owner Manual
Page 28
... Components with HDMI If you have an HDMI-compatible player, you can be connected by using an HDMI-to-DVI adapter cable. (Note that its setup. However, if you want to make the connections in addition to an HDMI connection, you'll also need to listen through ), so even if you...
... Components with HDMI If you have an HDMI-compatible player, you can be connected by using an HDMI-to-DVI adapter cable. (Note that its setup. However, if you want to make the connections in addition to an HDMI connection, you'll also need to listen through ), so even if you...

Owner Manual
Page 30
..., Games Console, or Other Device Step 1: Make the video connection A . DIGITAL IN ASSIGNABLE COAX- Step 2: Make the audio connection a . TUNING PRESET MASTER VOLUME SETUP ENTER RETURN TUNING MODE SETUP MIC AUX INPUT VIDEO L AUDIO R a AUX INPUT L AUDIO R AUX INPUT A VIDEO L AUDIO R OUT VIDEO OUT Camcorder, games console, etc. Connection A a AV receiver AUX...
..., Games Console, or Other Device Step 1: Make the video connection A . DIGITAL IN ASSIGNABLE COAX- Step 2: Make the audio connection a . TUNING PRESET MASTER VOLUME SETUP ENTER RETURN TUNING MODE SETUP MIC AUX INPUT VIDEO L AUDIO R a AUX INPUT L AUDIO R AUX INPUT A VIDEO L AUDIO R OUT VIDEO OUT Camcorder, games console, etc. Connection A a AV receiver AUX...

Owner Manual
Page 36
...To turn it for the very first time. OPTICAL ■ Have you connected a component to be made once. ■ Do the automatic speaker setup-this is essential! OUT IN TAPE CD recorder, MD recorder, RI Dock 36 Turning On the AV Receiver STANDBY/ON STANDBY indicator STANDBY/ON STANDBY...when you next turn down the volume before you have, see "Digital Audio Input Setup" on page 41. HDMI If you use it off. See "Automatic Speaker Setup (Audyssey 2EQ)" on page 40. ■ Have you connected an Onkyo MD recorder, CD recorder, or RI Dock? The AV receiver comes on the...
...To turn it for the very first time. OPTICAL ■ Have you connected a component to be made once. ■ Do the automatic speaker setup-this is essential! OUT IN TAPE CD recorder, MD recorder, RI Dock 36 Turning On the AV Receiver STANDBY/ON STANDBY indicator STANDBY/ON STANDBY...when you next turn down the volume before you have, see "Digital Audio Input Setup" on page 41. HDMI If you use it off. See "Automatic Speaker Setup (Audyssey 2EQ)" on page 40. ■ Have you connected an Onkyo MD recorder, CD recorder, or RI Dock? The AV receiver comes on the...

Owner Manual
Page 37
... that you need to make before using this function, connect and position all of the listening area. Automatic Speaker Setup (Audyssey 2EQ) With the supplied speaker setup microphone, the Audyssey 2EQ function can enjoy home theater simultaneously, the Audyssey 2EQ function takes measurements at least 1 ... left side of the supplied speakers. TV TV TV TV TV TV TV TV TV : Listening area : Listening position 37 First Time Setup This section explains the settings that best matches yours and place the microphone accordingly when prompted. The distances between points 1 and 2 and ...
... that you need to make before using this function, connect and position all of the listening area. Automatic Speaker Setup (Audyssey 2EQ) With the supplied speaker setup microphone, the Audyssey 2EQ function can enjoy home theater simultaneously, the Audyssey 2EQ function takes measurements at least 1 ... left side of the supplied speakers. TV TV TV TV TV TV TV TV TV : Listening area : Listening position 37 First Time Setup This section explains the settings that best matches yours and place the microphone accordingly when prompted. The distances between points 1 and 2 and ...

Owner Manual
Page 38
...any extraneous noise is picked up the room as the Audyssey 2EQ function determines which speakers are calculated and saved automatically. 6 When the automatic speaker setup is horizontal. • If there's an obstacle between the micro- A test tone is connected. • It takes about 10 minutes to complete...height of headphones is output by each speaker in this procedure simply by using a tripod or level table. 3 Press [ENTER]. First Time Setup-Continued Using Audyssey 2EQ 1 STANDBY/ON STANDBY TUNING PRESET MASTER VOLUME PHONES MULTI CH DVD VCR/DVR CBL/SAT AUX TAPE TUNER...
...any extraneous noise is picked up the room as the Audyssey 2EQ function determines which speakers are calculated and saved automatically. 6 When the automatic speaker setup is horizontal. • If there's an obstacle between the micro- A test tone is connected. • It takes about 10 minutes to complete...height of headphones is output by each speaker in this procedure simply by using a tripod or level table. 3 Press [ENTER]. First Time Setup-Continued Using Audyssey 2EQ 1 STANDBY/ON STANDBY TUNING PRESET MASTER VOLUME PHONES MULTI CH DVD VCR/DVR CBL/SAT AUX TAPE TUNER...

Owner Manual
Page 39
...very low-frequency sound and its position is set it to its highest crossover frequency, and then try again. First Time Setup-Continued Error Messages While the automatic speaker setup is in progress, one of the speaker-related errors below occurs. • One of the front speakers has not ... In this case, increase the subwoofer's volume, set too high and the sound distorts, it may not be detected by the automatic speaker setup may appear: Ambient noise is too high This message appears if there's too much background noise and the measurements cannot be detected are connected properly...
...very low-frequency sound and its position is set it to its highest crossover frequency, and then try again. First Time Setup-Continued Error Messages While the automatic speaker setup is in progress, one of the speaker-related errors below occurs. • One of the front speakers has not ... In this case, increase the subwoofer's volume, set too high and the sound distorts, it may not be detected by the automatic speaker setup may appear: Ambient noise is too high This message appears if there's too much background noise and the measurements cannot be detected are connected properly...

Owner Manual
Page 40
... ]/[ ] buttons to IN1. For example, if you connect your DVD player to HDMI IN 1, you 're not using the HDMI OUT. 4 SETUP HDMI video Input Press the [SETUP] button. SETUP 2 Use the Up and Down [ ]/[ ] buttons to select "Video Input," and then press [ENTER]. 3 Use the Up and Down [... MODE STEREO SURROUND AUDIO SUBTITLE RANDOM REPEAT TEST TONE CH SEL LEVEL- IN1: Select if the video component is connected to HDMI IN 1. RECEIVER ENTER SETUP STANDBY/ON REMOTE MODE RECEIVER DVD TAPE/AMP INPUT SELECTOR M D/CDR 1 2 3 VCR/DVR CBL/SAT C D DOCK 4 5 6 TV AUX MULTI CH DVD...
... ]/[ ] buttons to IN1. For example, if you connect your DVD player to HDMI IN 1, you 're not using the HDMI OUT. 4 SETUP HDMI video Input Press the [SETUP] button. SETUP 2 Use the Up and Down [ ]/[ ] buttons to select "Video Input," and then press [ENTER]. 3 Use the Up and Down [... MODE STEREO SURROUND AUDIO SUBTITLE RANDOM REPEAT TEST TONE CH SEL LEVEL- IN1: Select if the video component is connected to HDMI IN 1. RECEIVER ENTER SETUP STANDBY/ON REMOTE MODE RECEIVER DVD TAPE/AMP INPUT SELECTOR M D/CDR 1 2 3 VCR/DVR CBL/SAT C D DOCK 4 5 6 TV AUX MULTI CH DVD...

Owner Manual
Page 41
...the same time. Note: Make sure that input to select MD, CDR, or DOCK. Refer to change the setting. OPT 2 - - - - First Time Setup-Continued Digital Audio Input Setup 2, 3 1 STANDBY/ON STANDBY TUNING PRESET MASTER VOLUME PHONES MULTI CH DISPLAY DIGITAL INPUT DVD VCR/DVR CBL/SAT AUX TAPE TUNER...INPUT Press the [DIGITAL INPUT] button repeatedly to the AV receiver digitally (coaxial or optical). Changing the Input Display If you connect an -capable Onkyo MiniDisc recorder, CD recorder, or RI Dock to the TAPE IN/OUT or CBL/SAT IN jacks, for to work properly, you must assign ...
...the same time. Note: Make sure that input to select MD, CDR, or DOCK. Refer to change the setting. OPT 2 - - - - First Time Setup-Continued Digital Audio Input Setup 2, 3 1 STANDBY/ON STANDBY TUNING PRESET MASTER VOLUME PHONES MULTI CH DISPLAY DIGITAL INPUT DVD VCR/DVR CBL/SAT AUX TAPE TUNER...INPUT Press the [DIGITAL INPUT] button repeatedly to the AV receiver digitally (coaxial or optical). Changing the Input Display If you connect an -capable Onkyo MiniDisc recorder, CD recorder, or RI Dock to the TAPE IN/OUT or CBL/SAT IN jacks, for to work properly, you must assign ...


