Owner Manual
Page 4
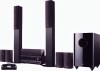
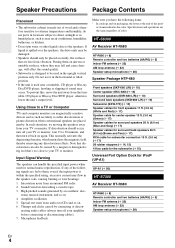
...® (UP-A1) UP-A1 (➔ 56) HT-S7300 AV Receiver HT-R680 HT-R680 (➔ 8) Remote controller and two batteries (AA/R6) (➔ 5) Indoor FM antenna (➔ 22) AM loop antenna (➔ 22) Speaker setup microphone (➔ 28) En 4 Sound from vibration. HT-S6300 AV Receiver HT-R680 HT-R680 (➔ 8) Remote controller and two batteries (AA...
...® (UP-A1) UP-A1 (➔ 56) HT-S7300 AV Receiver HT-R680 HT-R680 (➔ 8) Remote controller and two batteries (AA/R6) (➔ 5) Indoor FM antenna (➔ 22) AM loop antenna (➔ 22) Speaker setup microphone (➔ 28) En 4 Sound from vibration. HT-S6300 AV Receiver HT-R680 HT-R680 (➔ 8) Remote controller and two batteries (AA...
Owner Manual
Page 5
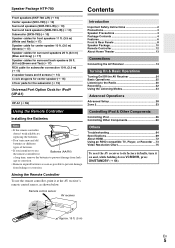
... Turning On/Off the AV Receiver 24 Basic Operations 25 Listening to the Radio 30 Recording 32 Using the Listening Modes 33 Advanced Operations Advanced Setup 38 Zone 2 53 Controlling iPod & Other Components Controlling iPod 56 Controlling Other Components 60 Others Troubleshooting 64 Specifications 69 About HDMI 72 Using an RIHD...
... Turning On/Off the AV Receiver 24 Basic Operations 25 Listening to the Radio 30 Recording 32 Using the Listening Modes 33 Advanced Operations Advanced Setup 38 Zone 2 53 Controlling iPod & Other Components Controlling iPod 56 Controlling Other Components 60 Others Troubleshooting 64 Specifications 69 About HDMI 72 Using an RIHD...

Owner Manual
Page 8
... buttons (MOVIE/TV, MUSIC and GAME) (➔ 33) J DIMMER button (➔ 26) K MEMORY button (➔ 31) L TUNING MODE button (➔ 30) M DISPLAY button (➔ 25) N SETUP button (➔ 38) O TUNING, PRESET (➔ 30 to 31), arrow and ENTER buttons P RETURN button Q MASTER VOLUME control (➔ 25) R MUSIC OPTIMIZER button (➔ 51..., TV/CD and PORT) (➔ 25) U AUX INPUT LINE IN jack (➔ 20) V AUX INPUT VIDEO jack (➔ 20) W AUX INPUT AUDIO jacks (➔ 20) X SETUP MIC jack (➔ 28) En 8 They are not shown here for each item.
... buttons (MOVIE/TV, MUSIC and GAME) (➔ 33) J DIMMER button (➔ 26) K MEMORY button (➔ 31) L TUNING MODE button (➔ 30) M DISPLAY button (➔ 25) N SETUP button (➔ 38) O TUNING, PRESET (➔ 30 to 31), arrow and ENTER buttons P RETURN button Q MASTER VOLUME control (➔ 25) R MUSIC OPTIMIZER button (➔ 51..., TV/CD and PORT) (➔ 25) U AUX INPUT LINE IN jack (➔ 20) V AUX INPUT VIDEO jack (➔ 20) W AUX INPUT AUDIO jacks (➔ 20) X SETUP MIC jack (➔ 28) En 8 They are not shown here for each item.
Owner Manual
Page 12
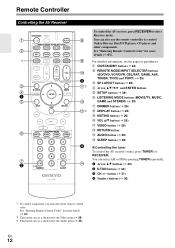
... buttons (BD/DVD, VCR/DVR, CBL/SAT, GAME, AUX, TUNER, TV/CD and PORT) (➔ 25) D SP LAYOUT button (➔ 26) E Arrow R/X/F/S and ENTER buttons F SETUP button (➔ 38) G LISTENING MODE buttons (MOVIE/TV, MUSIC, GAME and STEREO) (➔ 33) H DIMMER button (➔ 26) I J K D L*2 M N*3 E O To control the AV receiver, press RECEIVER...
... buttons (BD/DVD, VCR/DVR, CBL/SAT, GAME, AUX, TUNER, TV/CD and PORT) (➔ 25) D SP LAYOUT button (➔ 26) E Arrow R/X/F/S and ENTER buttons F SETUP button (➔ 38) G LISTENING MODE buttons (MOVIE/TV, MUSIC, GAME and STEREO) (➔ 33) H DIMMER button (➔ 26) I J K D L*2 M N*3 E O To control the AV receiver, press RECEIVER...
Owner Manual
Page 17
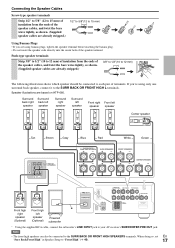
If you are based on HTP-680. When doing so, set En "Surr Back/Front High" in Speaker Setup to the SURR BACK OR FRONT HIGH SPEAKERS terminals. Note • The front high speakers can also be connected to your AV receiver's SUBWOOFER PRE ...
If you are based on HTP-680. When doing so, set En "Surr Back/Front High" in Speaker Setup to the SURR BACK OR FRONT HIGH SPEAKERS terminals. Note • The front high speakers can also be connected to your AV receiver's SUBWOOFER PRE ...
Owner Manual
Page 20
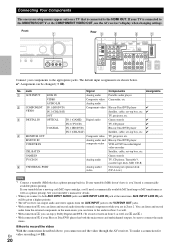
Connecting Your Components The on-screen setup menus appear only on a TV that has a phono preamp built-in. GAME IN Game console TV/CD IN Analog audio TV, CD player, Turntable*1, cassette ...
Connecting Your Components The on-screen setup menus appear only on a TV that has a phono preamp built-in. GAME IN Game console TV/CD IN Analog audio TV, CD player, Turntable*1, cassette ...
Owner Manual
Page 23
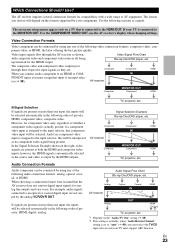
..., projector, etc. *1 Depends on a TV that component video input will be selected automatically in the following order of priority: HDMI, digital, analog. The on-screen setup menus appear only on the "Audio TV Out" setting (➔ 49). *2 This setting is available, when "Audio Return Channel" setting is assigned to the input...
..., projector, etc. *1 Depends on a TV that component video input will be selected automatically in the following order of priority: HDMI, digital, analog. The on-screen setup menus appear only on the "Audio TV Out" setting (➔ 49). *2 This setting is available, when "Audio Return Channel" setting is assigned to the input...
Owner Manual
Page 25
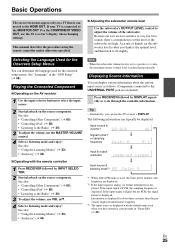
... with the default name even when you think is set the subwoofer level to what you have entered a custom name in the "OSD Setup" (➔ 48). Displaying Source Information You can use the MASTER VOLUME control. 4 Select a listening mode and enjoy! Selecting the Language Used .... 2 Start playback on the source component. If the input signal is PCM, the sampling frequency is displayed. Information is displayed for the onscreen setup menus. Because our ears are less sensitive to very low bass sounds, there's a temptation to adjust the volume of thumb, set to a ...
... with the default name even when you think is set the subwoofer level to what you have entered a custom name in the "OSD Setup" (➔ 48). Displaying Source Information You can use the MASTER VOLUME control. 4 Select a listening mode and enjoy! Selecting the Language Used .... 2 Start playback on the source component. If the input signal is PCM, the sampling frequency is displayed. Information is displayed for the onscreen setup menus. Because our ears are less sensitive to very low bass sounds, there's a temptation to adjust the volume of thumb, set to a ...
Owner Manual
Page 28
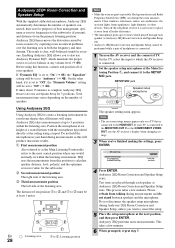
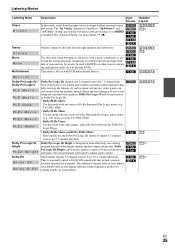
...takes a few minutes. 6 When prompted, repeat step 5. Audyssey 2EQ performs more measurements. Audyssey 2EQ® Room Correction and Speaker Setup With the supplied calibrated microphone, Audyssey 2EQ automatically determines the number of speakers connected, their size for the subwoofer. Audyssey 2EQ then... speaker as possible. Before using a tripod. Total measurement time varies depending on the number of the listening area. SETUP MIC jack Speaker setup microphone Using Audyssey 2EQ Using Audyssey 2EQ to -octave balance at the next position, and then press ENTER. D Third...
...takes a few minutes. 6 When prompted, repeat step 5. Audyssey 2EQ performs more measurements. Audyssey 2EQ® Room Correction and Speaker Setup With the supplied calibrated microphone, Audyssey 2EQ automatically determines the number of speakers connected, their size for the subwoofer. Audyssey 2EQ then... speaker as possible. Before using a tripod. Total measurement time varies depending on the number of the listening area. SETUP MIC jack Speaker setup microphone Using Audyssey 2EQ Using Audyssey 2EQ to -octave balance at the next position, and then press ENTER. D Third...

Owner Manual
Page 29
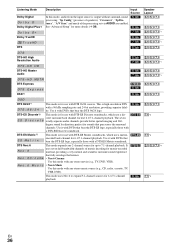
...2EQ Room Correction and Speaker Setup requires you 're using F/S. 8 Disconnect the speaker setup microphone. Retry Cancel Error message En 29 Error Messages While Audyssey 2EQ Room Correction and Speaker Setup is muted, it to the room after 2 or 3 attempts, contact your Onkyo dealer. • Speaker... Detect Error This message appears if a speaker is too high. Note • When Audyssey 2EQ Room Correction and Speaker Setup is complete, the "Equalizer"...
...2EQ Room Correction and Speaker Setup requires you 're using F/S. 8 Disconnect the speaker setup microphone. Retry Cancel Error message En 29 Error Messages While Audyssey 2EQ Room Correction and Speaker Setup is muted, it to the room after 2 or 3 attempts, contact your Onkyo dealer. • Speaker... Detect Error This message appears if a speaker is too high. Note • When Audyssey 2EQ Room Correction and Speaker Setup is complete, the "Equalizer"...

Owner Manual
Page 34
... positioning of sound and a sixth subwoofer channel (called the point-one channel). This is Dolby Digital EX surround sound. See "Speaker Configuration" for the speaker setup (➔ 41). ; 9 $ / Press RECEIVER followed by the listening mode. About Listening Modes The AV receiver's listening modes can produce a discrete or a matrix-encoded sixth channel...
... positioning of sound and a sixth subwoofer channel (called the point-one channel). This is Dolby Digital EX surround sound. See "Speaker Configuration" for the speaker setup (➔ 41). ; 9 $ / Press RECEIVER followed by the listening mode. About Listening Modes The AV receiver's listening modes can produce a discrete or a matrix-encoded sixth channel...
Owner Manual
Page 35
... AUDIO is designed to expand 5.1-channel sources for 7.1-channel playback. % Dolby Pro Logic IIz Height P L z GH e i g h t Dolby Pro Logic IIz Height is disabled. See "Advanced Setup" for more effectively use existing 4 program material when height channel speaker outputs are enabled, but are particularly well-suited to Dolby EX soundtracks that fully...
... AUDIO is designed to expand 5.1-channel sources for 7.1-channel playback. % Dolby Pro Logic IIz Height P L z GH e i g h t Dolby Pro Logic IIz Height is disabled. See "Advanced Setup" for more effectively use existing 4 program material when height channel speaker outputs are enabled, but are particularly well-suited to Dolby EX soundtracks that fully...
Owner Manual
Page 36
... matrix decoding for matrix-encoded material, providing a very natural and seamless surround sound experience that pan across the surround channels. Dolby Digital Plus*5 See "Advanced Setup" for 6.1/7.1-channel playback. Use it with DVDs that bear the DTS-ES logo, especially those with DVDs that bear the DTS 96/24 logo. It...
... matrix decoding for matrix-encoded material, providing a very natural and seamless surround sound experience that pan across the surround channels. Dolby Digital Plus*5 See "Advanced Setup" for 6.1/7.1-channel playback. Use it with DVDs that bear the DTS-ES logo, especially those with DVDs that bear the DTS 96/24 logo. It...
Owner Manual
Page 38
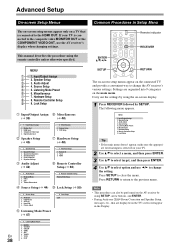
... video MONITOR OUT or the COMPONENT VIDEO OUT, use F/S to the HDMI OUT. Listening Mode Preset G 6. Input/Output Assign 1. OSD Setup H Hardware Setup (➔ 48) 2. Multiplex/Mono 2. Remote Controller Setup Remote Mode Setup J Lock Setup (➔ 50) 4. Audyssey 2. IntelliVolume 3. Lock Setup Lock En 38 5. Listening Mode Preset 1. CBL/SAT 4. TV/CD 8. The following menu appears. Speaker...
... video MONITOR OUT or the COMPONENT VIDEO OUT, use F/S to the HDMI OUT. Listening Mode Preset G 6. Input/Output Assign 1. OSD Setup H Hardware Setup (➔ 48) 2. Multiplex/Mono 2. Remote Controller Setup Remote Mode Setup J Lock Setup (➔ 50) 4. Audyssey 2. IntelliVolume 3. Lock Setup Lock En 38 5. Listening Mode Preset 1. CBL/SAT 4. TV/CD 8. The following menu appears. Speaker...
Owner Manual
Page 39
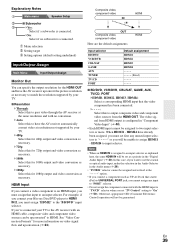
... • When an HDMI IN is connected. Otherwise, appropriate CEC (Consumer Electronics Control) operation will not be upconverted* to HDMI. Explanatory Notes B Main menu Speaker Setup C ■ Subwoofer D ` Yes: Select if a subwoofer is connected. ` No: Select if no conversion. ` Auto: Select this for 1080p output and video conversion as UP-A1...
... • When an HDMI IN is connected. Otherwise, appropriate CEC (Consumer Electronics Control) operation will not be upconverted* to HDMI. Explanatory Notes B Main menu Speaker Setup C ■ Subwoofer D ` Yes: Select if a subwoofer is connected. ` No: Select if no conversion. ` Auto: Select this for 1080p output and video conversion as UP-A1...
Owner Manual
Page 40
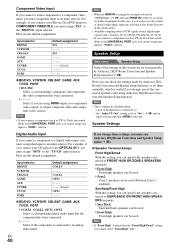
.... Speaker Settings Digital Audio Input If you connect a component to a digital audio input, you must run Audyssey 2EQ Room Correction and Speaker Setup again (➔ 28). ■ Speaker Terminal Assign Front High/Zone2 With this setting, you can specify the speakers connected to FRONT HIGH ... Select a corresponding digital audio input that the video component has been connected Select if you are using Audyssey 2EQ Room Correction and Speaker Setup function. a pair of headphones is connected to an analog audio input. Here you can check the settings made by Audyssey 2EQ®...
.... Speaker Settings Digital Audio Input If you connect a component to a digital audio input, you must run Audyssey 2EQ Room Correction and Speaker Setup again (➔ 28). ■ Speaker Terminal Assign Front High/Zone2 With this setting, you can specify the speakers connected to FRONT HIGH ... Select a corresponding digital audio input that the video component has been connected Select if you are using Audyssey 2EQ Room Correction and Speaker Setup function. a pair of headphones is connected to an analog audio input. Here you can check the settings made by Audyssey 2EQ®...

Owner Manual
Page 41
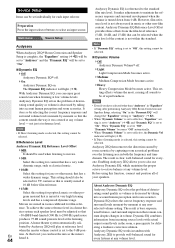
...Band `40Hz to 100Hz, 120Hz, 150Hz, 200Hz ` None: Select if no speaker is NOT set automatically by Audyssey 2EQ Room Correction and Speaker Setup function (➔ 28). With the Double Bass function, you can specify the distance from each speaker to the listening position so that you set to...selected. ■ Surr Back Ch ` 1ch: Select if only one surround back speaker is set automatically by Audyssey 2EQ Room Correction and Speaker Setup function (➔ 28). Refer to your listening position. The LPF only applies to sources that can boost bass output by feeding bass sounds from ...
...Band `40Hz to 100Hz, 120Hz, 150Hz, 200Hz ` None: Select if no speaker is NOT set automatically by Audyssey 2EQ Room Correction and Speaker Setup function (➔ 28). With the Double Bass function, you can specify the distance from each speaker to the listening position so that you set to...selected. ■ Surr Back Ch ` 1ch: Select if only one surround back speaker is set automatically by Audyssey 2EQ Room Correction and Speaker Setup function (➔ 28). Refer to your listening position. The LPF only applies to sources that can boost bass output by feeding bass sounds from ...

Owner Manual
Page 42
...Settings This setting is set automatically by Audyssey 2EQ Room Correction and Speaker Setup function (➔ 28). ■ Equalizer ` Audyssey: This is selected automatically by Audyssey 2EQ® Room Correction and Speaker Setup function (➔ 28). Main menu Audio Adjust With the Audio Adjust ...Speakers that it to only 2-channel stereo sources. Level Calibration Audio Adjust This setting is set automatically by Audyssey 2EQ Room Correction and Speaker Setup function. Here you like. Input Channel ` Main: The main channel is output. ` Sub: The sub channel is output. ` Main...
...Settings This setting is set automatically by Audyssey 2EQ Room Correction and Speaker Setup function (➔ 28). ■ Equalizer ` Audyssey: This is selected automatically by Audyssey 2EQ® Room Correction and Speaker Setup function (➔ 28). Main menu Audio Adjust With the Audio Adjust ...Speakers that it to only 2-channel stereo sources. Level Calibration Audio Adjust This setting is set automatically by Audyssey 2EQ Room Correction and Speaker Setup function. Here you like. Input Channel ` Main: The main channel is output. ` Sub: The sub channel is output. ` Main...
Owner Manual
Page 44
... EQ combines information from incoming source levels with Audyssey 2EQ to provide well-balanced sound for every listener at any volume level. Source Setup Items can be set individually for each speaker level must be adjusted so that -30 dBFS band-limited (500 Hz to 2000 Hz... film reference. ` 15dB: Select this setting for pop/rock music or other than "Audyssey" in "Equalizer" setting after performing Audyssey 2EQ Room Correction and Speaker Setup, selecting "On" in the "Dynamic EQ" will change the "Equalizer" setting to "Audyssey" (➔ 42). • When "Dynamic Volume" is set to...
... EQ combines information from incoming source levels with Audyssey 2EQ to provide well-balanced sound for every listener at any volume level. Source Setup Items can be set individually for each speaker level must be adjusted so that -30 dBFS band-limited (500 Hz to 2000 Hz... film reference. ` 15dB: Select this setting for pop/rock music or other than "Audyssey" in "Equalizer" setting after performing Audyssey 2EQ Room Correction and Speaker Setup, selecting "On" in the "Dynamic EQ" will change the "Equalizer" setting to "Audyssey" (➔ 42). • When "Dynamic Volume" is set to...

Owner Manual
Page 48
..., Deutsch, Français, Español, Italiano, Nederlands, Svenska, ʕ˖ This setting determines the language used for the onscreen setup menus. ■ Remote ID ` 1, 2, or 3 When several Onkyo components are displayed on . To differentiate the AV receiver from "1", to the main volume. The remote indicator flashes twice. En 48 To...
..., Deutsch, Français, Español, Italiano, Nederlands, Svenska, ʕ˖ This setting determines the language used for the onscreen setup menus. ■ Remote ID ` 1, 2, or 3 When several Onkyo components are displayed on . To differentiate the AV receiver from "1", to the main volume. The remote indicator flashes twice. En 48 To...


