
Owner Manual
Page 5
... Dock 35 Connecting a Dock with the Universal Port connector ... 35 Connecting Onkyo V Components 36 Connecting the Power Cord 36 Turning On & First Time Setup Turning On the AV Receiver 37 Turning On and Standby 37 First Time Setup 38 Using the Onscreen Setup Menus 38 Using the Display to change the settings 38 Video Input Setup 39 Digital Input Setup 41 Speaker Settings 42 FM/AM Frequency Step Setup 43 Changing the Input Display 44 Audyssey 2EQ™ Room Correction and Speaker Setup 45 Basic Operations Basic Operations 50 Selecting the Input Source 50 Adjusting the Bass...
... Dock 35 Connecting a Dock with the Universal Port connector ... 35 Connecting Onkyo V Components 36 Connecting the Power Cord 36 Turning On & First Time Setup Turning On the AV Receiver 37 Turning On and Standby 37 First Time Setup 38 Using the Onscreen Setup Menus 38 Using the Display to change the settings 38 Video Input Setup 39 Digital Input Setup 41 Speaker Settings 42 FM/AM Frequency Step Setup 43 Changing the Input Display 44 Audyssey 2EQ™ Room Correction and Speaker Setup 45 Basic Operations Basic Operations 50 Selecting the Input Source 50 Adjusting the Bass...
Owner Manual
Page 6
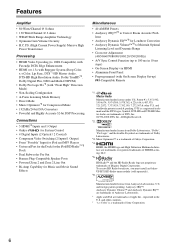
...; 5 HDMI*4 Inputs and 1 Output • Onkyo for System Control • 4 Digital Inputs (2 Optical / 2 Coaxial) • Component Video Switching (2 Inputs/1 Output) • Front "Portable" Input for iPod and MP3 Players • Universal Port for the Dock for the iPod/HD Radio™*5 Dock • Dual Subwoofer Pre Out • Banana Plug-Compatible Speaker Posts • Powered Zone 2 and Zone 2 Line Out • Bi-Amp Capability for Loudness Correction • Audyssey Dynamic Volume™*6 to Maintain Optimal Listening Level and Dynamic Range • Crossover Adjustment...
...; 5 HDMI*4 Inputs and 1 Output • Onkyo for System Control • 4 Digital Inputs (2 Optical / 2 Coaxial) • Component Video Switching (2 Inputs/1 Output) • Front "Portable" Input for iPod and MP3 Players • Universal Port for the Dock for the iPod/HD Radio™*5 Dock • Dual Subwoofer Pre Out • Banana Plug-Compatible Speaker Posts • Powered Zone 2 and Zone 2 Line Out • Bi-Amp Capability for Loudness Correction • Audyssey Dynamic Volume™*6 to Maintain Optimal Listening Level and Dynamic Range • Crossover Adjustment...
Owner Manual
Page 21
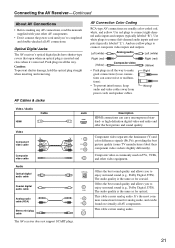
...; Before making any AV connections, read the manuals supplied with your other video equipment. Push plugs in all AV connections. Use white plugs to connect right-channel audio inputs and outputs (typically labeled "R"). Offers the best sound quality and allows you to enjoy surround sound (e.g., Dolby Digital, DTS). Optical Digital Jacks The AV receiver's optical digital jacks have shutter-type covers that open when an optical plug is the same as for optical. Video / Audio HDMI Cable Video Component video cable Composite video cable Audio Optical digital audio cable Y PB...
...; Before making any AV connections, read the manuals supplied with your other video equipment. Push plugs in all AV connections. Use white plugs to connect right-channel audio inputs and outputs (typically labeled "R"). Offers the best sound quality and allows you to enjoy surround sound (e.g., Dolby Digital, DTS). Optical Digital Jacks The AV receiver's optical digital jacks have shutter-type covers that open when an optical plug is the same as for optical. Video / Audio HDMI Cable Video Component video cable Composite video cable Audio Optical digital audio cable Y PB...
Owner Manual
Page 23
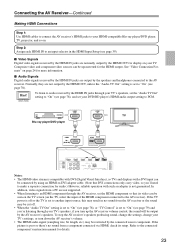
...! To listen to audio received by the connected source component. Composite video and component video sources can be output by the HDMI OUT for details. 23 To stop the AV receiver's speakers producing sound, change the settings, change your TV's settings, or turn up the AV receiver volume control, the sound will be seen on the TV screen (on page 24 for the HDMI output. Connecting the AV Receiver-Continued Making HDMI Connections Step 1: Use HDMI cables to connect the AV receiver's HDMI jacks to your HDMI-compatible Blu-ray player/DVD player, TV, projector...
...! To listen to audio received by the connected source component. Composite video and component video sources can be output by the HDMI OUT for details. 23 To stop the AV receiver's speakers producing sound, change the settings, change your TV's settings, or turn up the AV receiver volume control, the sound will be seen on the TV screen (on page 24 for the HDMI output. Connecting the AV Receiver-Continued Making HDMI Connections Step 1: Use HDMI cables to connect the AV receiver's HDMI jacks to your HDMI-compatible Blu-ray player/DVD player, TV, projector...
Owner Manual
Page 36
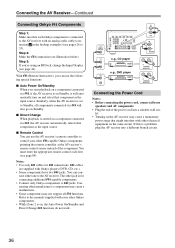
... L R DVD/BD R L ANALOG AUDIO OUT R L ANALOG AUDIO OUT Connecting the Power Cord Notes: • Before connecting the power cord, connect all your other electrical equipment on , the Auto Power On/Standby and Direct Change V functions do not work. If this is on the same circuit. Connecting other manufacturer's components may cause a malfunction. • Some components may cause a momentary power surge that might interfere with Onkyo players (DVD, CD, etc.). • Some components have two V jacks. Step 2: Make...
... L R DVD/BD R L ANALOG AUDIO OUT R L ANALOG AUDIO OUT Connecting the Power Cord Notes: • Before connecting the power cord, connect all your other electrical equipment on , the Auto Power On/Standby and Direct Change V functions do not work. If this is on the same circuit. Connecting other manufacturer's components may cause a malfunction. • Some components may cause a momentary power surge that might interfere with Onkyo players (DVD, CD, etc.). • Some components have two V jacks. Step 2: Make...
Owner Manual
Page 37
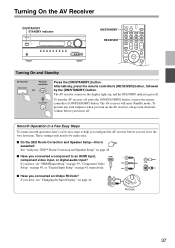
... smooth operation, here's a few easy steps to help you configure the AV receiver before you have , see "HDMI Input Setup" on page 39, "Component Video Setup" on page 40, or "Digital Input Setup" on page 45. ■ Have you connected an Onkyo RI Dock? If you turn it for the very first time. Turning On the AV Receiver ON/STANDBY STANDBY indicator ON/STANDBY RECEIVER Turning On and Standby AV receiver Remote controller or Press the [ON/STANDBY] button...
... smooth operation, here's a few easy steps to help you configure the AV receiver before you have , see "HDMI Input Setup" on page 39, "Component Video Setup" on page 40, or "Digital Input Setup" on page 45. ■ Have you connected an Onkyo RI Dock? If you turn it for the very first time. Turning On the AV Receiver ON/STANDBY STANDBY indicator ON/STANDBY RECEIVER Turning On and Standby AV receiver Remote controller or Press the [ON/STANDBY] button...
Owner Manual
Page 41
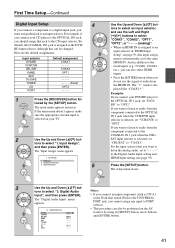
... Digital Input Setup 4 If you connect a component to a digital input jack, you must assign that jack to select "3. Input selector DVD/BD VCR/DVR CBL/SAT GAME AUX TV/TAPE TUNER CD PORT Default assignment COAX1 ----COAX2 OPT1 Fixed) OPT2 ----- 1 Press the [RECEIVER] button fol- If the main menu doesn't appear, make sure the appropriate external input is selected on page 39, this can also be changed. The "* " mark is selected, set to PORT selector. 1-3. The setup menu closes. 3 Use...
... Digital Input Setup 4 If you connect a component to a digital input jack, you must assign that jack to select "3. Input selector DVD/BD VCR/DVR CBL/SAT GAME AUX TV/TAPE TUNER CD PORT Default assignment COAX1 ----COAX2 OPT1 Fixed) OPT2 ----- 1 Press the [RECEIVER] button fol- If the main menu doesn't appear, make sure the appropriate external input is selected on page 39, this can also be changed. The "* " mark is selected, set to PORT selector. 1-3. The setup menu closes. 3 Use...
Owner Manual
Page 55
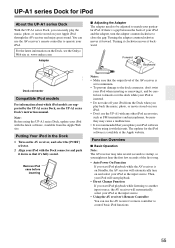
... using the UP-A1 series Dock, update your iPod with the latest software, available from the Dock when you play the music, photo, or movie stored on Standby, the AV receiver will automatically select your iPod as the input source. • Using the AV receiver's Remote Controller You can use the AV receiver's remote controller to operate your iPod as the input source. UP-A1 series Dock for the iPod software is available at : www.onkyo.com Adapter ■ Adjusting the Adapter The adapter needs...
... using the UP-A1 series Dock, update your iPod with the latest software, available from the Dock when you play the music, photo, or movie stored on Standby, the AV receiver will automatically select your iPod as the input source. • Using the AV receiver's Remote Controller You can use the AV receiver's remote controller to operate your iPod as the input source. UP-A1 series Dock for the iPod software is available at : www.onkyo.com Adapter ■ Adjusting the Adapter The adapter needs...

Owner Manual
Page 67
..., make sure the appropriate external input is connected (default). For smaller speakers, specify a crossover frequency. Subwoofer Yes: Select if a subwoofer is selected on page 42. Speaker Configuration With these settings, you change one surround back L speaker is connected. 2ch: Select if two (left and right) surround back speakers are connected (default). 67 The main menu appears onscreen. Specify "Full Band" for speakers that can specify which is useful if you can output low frequency bass sounds adequately, for each speaker...
..., make sure the appropriate external input is connected (default). For smaller speakers, specify a crossover frequency. Subwoofer Yes: Select if a subwoofer is selected on page 42. Speaker Configuration With these settings, you change one surround back L speaker is connected. 2ch: Select if two (left and right) surround back speakers are connected (default). 67 The main menu appears onscreen. Specify "Full Band" for speakers that can specify which is useful if you can output low frequency bass sounds adequately, for each speaker...
Owner Manual
Page 70
... using any surround back speakers, these settings apply to only 2-channel stereo sources. Off: Panorama function off (default). Center Width 0 to select audio channels or languages with Dolby Digital, Dolby Digital Plus and Dolby TrueHD only. Normally, if you're using a center speaker, the center channel sound is output by only the center speaker. (If you're not using the Dolby Pro Logic IIx Music listening mode. Use it to 7 (default: 3) With this setting, you can adjust the width of the sound from the center speaker when using a center speaker, the center channel sound...
... using any surround back speakers, these settings apply to only 2-channel stereo sources. Off: Panorama function off (default). Center Width 0 to select audio channels or languages with Dolby Digital, Dolby Digital Plus and Dolby TrueHD only. Normally, if you're using a center speaker, the center channel sound is output by only the center speaker. (If you're not using the Dolby Pro Logic IIx Music listening mode. Use it to 7 (default: 3) With this setting, you can adjust the width of the sound from the center speaker when using a center speaker, the center channel sound...

Owner Manual
Page 73
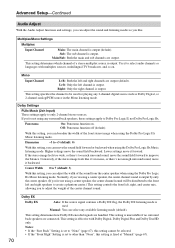
... be adjusted (see page 67). • This setting is not available when the Direct listening mode is output by delaying the audio signals. Advanced Setup-Continued CinemaFILTER With the CinemaFILTER, you can select the priority of the use of SurrBack speakers or FrontHigh speakers. Speaker Levels You can correct this function while the AV receiver is used with music files that the picture and sound are set to Standby. M.Optimizer Off: Music Optimizer off (default...
... be adjusted (see page 67). • This setting is not available when the Direct listening mode is output by delaying the audio signals. Advanced Setup-Continued CinemaFILTER With the CinemaFILTER, you can select the priority of the use of SurrBack speakers or FrontHigh speakers. Speaker Levels You can correct this function while the AV receiver is used with music files that the picture and sound are set to Standby. M.Optimizer Off: Music Optimizer off (default...
Owner Manual
Page 77
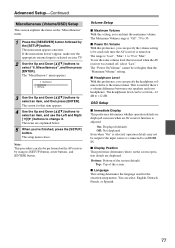
The screen for the onscreen setup menus. To use the Left and Right [F]/[S] buttons to an HDMI IN. ■ Display Position This preference determines where on the screen operation details are displayed. Even when "On" is connected to change it. Volume Setup 2. The range is adjusted. The "Power On Volume" cannot be output if the input source is selected, operation details may not be set from -12 dB to 30. ■ Power On Volume With...
The screen for the onscreen setup menus. To use the Left and Right [F]/[S] buttons to an HDMI IN. ■ Display Position This preference determines where on the screen operation details are displayed. Even when "On" is connected to change it. Volume Setup 2. The range is adjusted. The "Power On Volume" cannot be output if the input source is selected, operation details may not be set from -12 dB to 30. ■ Power On Volume With...
Owner Manual
Page 78
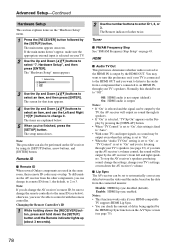
... setup menu closes. Changing the Remote Controller's ID 1 While holding down the [RECEIVER] button, press and hold down the [SETUP] button until the Remote indicator lights up the AV receiver's volume control, the sound will output no sound may overlap. Tuner ■ FM/AM Frequency Step See "FM/AM Frequency Step Setup" on the data from 1, the default, to select an item, and then press [ENTER]. Enable: HDMI lip sync enabled. The screen for that 's connected to...
... setup menu closes. Changing the Remote Controller's ID 1 While holding down the [RECEIVER] button, press and hold down the [SETUP] button until the Remote indicator lights up the AV receiver's volume control, the sound will output no sound may overlap. Tuner ■ FM/AM Frequency Step See "FM/AM Frequency Step Setup" on the data from 1, the default, to select an item, and then press [ENTER]. Enable: HDMI lip sync enabled. The screen for that 's connected to...
Owner Manual
Page 79
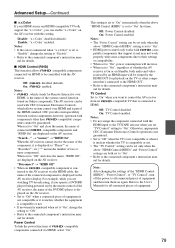
... DVD/BD player is set to "Enable", change the setting to "Off". • Refer to the connected component's instruction man- Note: After changing the settings of the connected component is unnatural when set to "On", change the setting to "Disable". • Refer to the connected component's instruction manual for details. ■ HDMI Control (RIHD) This function allows -compatible components connected via HDMI, select "On". nected to the AV receiver via the HDMI cable, the name of the "HDMI Control (RIHD)", "Power Control", or "TV Control", turn...
... DVD/BD player is set to "Enable", change the setting to "Off". • Refer to the connected component's instruction man- Note: After changing the settings of the connected component is unnatural when set to "On", change the setting to "Disable". • Refer to the connected component's instruction manual for details. ■ HDMI Control (RIHD) This function allows -compatible components connected via HDMI, select "On". nected to the AV receiver via the HDMI cable, the name of the "HDMI Control (RIHD)", "Power Control", or "TV Control", turn...

Owner Manual
Page 80
... can specify the output resolution for the HDMI outputs and have the AV receiver automatically convert video at resolutions not supported by your TV. 2 Use the Up and Down [R]/[X] buttons to pass video through the AV receiver at different resolutions. Lock Setup Lock Unlocked Using the Video Settings You can protect your TV. Through: Select this to select "9. If the main menu doesn't appear, make sure the appropriate external input is selected on your...
... can specify the output resolution for the HDMI outputs and have the AV receiver automatically convert video at resolutions not supported by your TV. 2 Use the Up and Down [R]/[X] buttons to pass video through the AV receiver at different resolutions. Lock Setup Lock Unlocked Using the Video Settings You can protect your TV. Through: Select this to select "9. If the main menu doesn't appear, make sure the appropriate external input is selected on your...

Owner Manual
Page 85
... analog input. • While Powered Zone 2 is on, V functions will not work. • You cannot select different AM or FM radio stations for your Zone 2 speakers are output by adjusting the volume. • When the "Powered Zone 2" setting is selected, power consumption on the remote controller, press the [ZONE 2] button, and then press the [MUTING] button again. 85 Digital input sources are unavailable. • While Zone 2 is being used in each room. Muting Zones Remote controller On the remote controller, press the [ZONE 2] button, and...
... analog input. • While Powered Zone 2 is on, V functions will not work. • You cannot select different AM or FM radio stations for your Zone 2 speakers are output by adjusting the volume. • When the "Powered Zone 2" setting is selected, power consumption on the remote controller, press the [ZONE 2] button, and then press the [MUTING] button again. 85 Digital input sources are unavailable. • While Zone 2 is being used in each room. Muting Zones Remote controller On the remote controller, press the [ZONE 2] button, and...

Owner Manual
Page 89
... or GAME jacks, for V to work properly, you want to reset, press and hold down the [AUDIO] button until the Remote indicator lights up (about 3 seconds). (3 seconds) 2 Within 30 seconds, press the REMOTE MODE button again. trol code. The Remote indicator flashes twice, indicating that the button has been reset. Controlling Other Components-Continued Remote Control Codes for Onkyo Components Connected via V Onkyo components that are connected via V, use the following remote control codes: • [DVD/BD] button 30627: Onkyo DVD player without V (default) • [CD...
... or GAME jacks, for V to work properly, you want to reset, press and hold down the [AUDIO] button until the Remote indicator lights up (about 3 seconds). (3 seconds) 2 Within 30 seconds, press the REMOTE MODE button again. trol code. The Remote indicator flashes twice, indicating that the button has been reset. Controlling Other Components-Continued Remote Control Codes for Onkyo Components Connected via V Onkyo components that are connected via V, use the following remote control codes: • [DVD/BD] button 30627: Onkyo DVD player without V (default) • [CD...

Owner Manual
Page 97
... 50). • Make sure that the speaker setup microphone is not still connected. • The input signal format is off as soon as those that support DVD, the default setting is set the volume to the HDMI OUT. "Clear" will enter Standby mode. If your speakers and input sources. Audio There's no sound • When the T-D (Theater-Dimensional), Stereo or Mono listening mode is connected to maximum. Set it on , set the volume to minimum, disconnect the power cord, and reconnect...
... 50). • Make sure that the speaker setup microphone is not still connected. • The input signal format is off as soon as those that support DVD, the default setting is set the volume to the HDMI OUT. "Clear" will enter Standby mode. If your speakers and input sources. Audio There's no sound • When the T-D (Theater-Dimensional), Stereo or Mono listening mode is connected to maximum. Set it on , set the volume to minimum, disconnect the power cord, and reconnect...

Owner Manual
Page 98
... the HDMI OUT or COMPONENT VIDEO MONITOR OUT (pages 26 and 23). • If the video source is connected to a composite video input, your TV, make sure that each individual speaker has been adjusted to bundle audio cables with a certain signal format • Check the digital audio output setting on may not start immediately. Troubleshooting-Continued The center speaker produces no sound • When the Stereo or Mono listening mode is not a malfunction. Select another listening mode...
... the HDMI OUT or COMPONENT VIDEO MONITOR OUT (pages 26 and 23). • If the video source is connected to a composite video input, your TV, make sure that each individual speaker has been adjusted to bundle audio cables with a certain signal format • Check the digital audio output setting on may not start immediately. Troubleshooting-Continued The center speaker produces no sound • When the Stereo or Mono listening mode is not a malfunction. Select another listening mode...

Owner Manual
Page 99
... station, operating the remote controller may not appear when the input signal from the HDMI IN is output to a device connected to the UNIVERSAL PORT jack on the AV receiver. • Make sure the AV receiver is turned on your amp. • If you 've entered the correct remote control code (page 88). • Make sure to enter the appropriate remote control code first (page 89). • To control an Onkyo component that's not connected via V, point the remote controller...
... station, operating the remote controller may not appear when the input signal from the HDMI IN is output to a device connected to the UNIVERSAL PORT jack on the AV receiver. • Make sure the AV receiver is turned on your amp. • If you 've entered the correct remote control code (page 88). • Make sure to enter the appropriate remote control code first (page 89). • To control an Onkyo component that's not connected via V, point the remote controller...

