
Owner Manual
Page 7
... Powered Zone 2 is being used , playback is output by these speakers (page 84). You can enjoy the various listening modes such as we call it. Subwoofer Center speaker Zone 2 Room Surround left and right speakers * While Powered Zone 2 is being used , nothing is reduced to 7.1-channel playback (see page 83). Multiroom...
... Powered Zone 2 is being used , playback is output by these speakers (page 84). You can enjoy the various listening modes such as we call it. Subwoofer Center speaker Zone 2 Room Surround left and right speakers * While Powered Zone 2 is being used , nothing is reduced to 7.1-channel playback (see page 83). Multiroom...
Owner Manual
Page 11
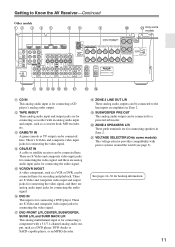
... DVD IN This input is for connecting the audio signal. R ZONE 2 LINE OUT L/R These analog audio outputs can be connected to a powered subwoofer. T ZONE 2 SPEAKERS L/R These push terminals are analog audio input jacks for connecting a component with a 5.1/7.1-channel analog audio output, such as ... are for connecting a DVD player. There's S-Video and composite video input jacks for hookup information. 11 Q DVD FRONT L/R, CENTER, SUBWOOFER, SURR L/R, and SURR BACK L/R This analog multichannel input is for connecting a recorder with an analog audio input and output, such as...
... DVD IN This input is for connecting the audio signal. R ZONE 2 LINE OUT L/R These analog audio outputs can be connected to a powered subwoofer. T ZONE 2 SPEAKERS L/R These push terminals are analog audio input jacks for connecting a component with a 5.1/7.1-channel analog audio output, such as ... are for connecting a DVD player. There's S-Video and composite video input jacks for hookup information. 11 Q DVD FRONT L/R, CENTER, SUBWOOFER, SURR L/R, and SURR BACK L/R This analog multichannel input is for connecting a recorder with an analog audio input and output, such as...
Owner Manual
Page 14
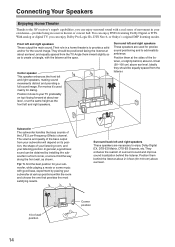
... bass output from your subwoofer at one that provides the most satisfying results. Position them behind the listener. Connecting Your Speakers Enjoying Home Theater Thanks to the AV receiver's superb capabilities, you can enjoy Dolby Pro Logic IIx, DTS Neo:6, or Onkyo's original DSP listening modes...To find the best position for dialog. For movies it close to create a triangle, with good bass, experiment by installing the subwoofer in your listening position. They should be positioned facing the listener at about ear level, or at about ear level, and equally spaced...
... bass output from your subwoofer at one that provides the most satisfying results. Position them behind the listener. Connecting Your Speakers Enjoying Home Theater Thanks to the AV receiver's superb capabilities, you can enjoy Dolby Pro Logic IIx, DTS Neo:6, or Onkyo's original DSP listening modes...To find the best position for dialog. For movies it close to create a triangle, with good bass, experiment by installing the subwoofer in your listening position. They should be positioned facing the listener at about ear level, or at about ear level, and equally spaced...

Owner Manual
Page 15
...3. If your TV or screen, while the surround back left and right dipole speakers should be positioned so that their arrows point toward your subwoofer is recommended for FRONT SPEAKERS L ANTENNA FM 75 R SURR SPEA CR/ PR S S IN 2 IN 1(DVD) OUT ASSIGNABLE IN IN...7 8 6. Connecting Your Speakers-Continued Speaker Configuration For 7.1-channel surround-sound playback, you should attach them to the amp's input. Front right speaker 5. Powered subwoofer LINE INPUT DIGITAL IN 1 (DVD) COAXIAL 2 (CBL/SAT) ASSIGNABLE 1 (GAME/TV) OPTICAL 2 (CD) IN 4 (GAME/TV) IN 3 (CBL/SAT)...
...3. If your TV or screen, while the surround back left and right dipole speakers should be positioned so that their arrows point toward your subwoofer is recommended for FRONT SPEAKERS L ANTENNA FM 75 R SURR SPEA CR/ PR S S IN 2 IN 1(DVD) OUT ASSIGNABLE IN IN...7 8 6. Connecting Your Speakers-Continued Speaker Configuration For 7.1-channel surround-sound playback, you should attach them to the amp's input. Front right speaker 5. Powered subwoofer LINE INPUT DIGITAL IN 1 (DVD) COAXIAL 2 (CBL/SAT) ASSIGNABLE 1 (GAME/TV) OPTICAL 2 (CD) IN 4 (GAME/TV) IN 3 (CBL/SAT)...
Owner Manual
Page 20
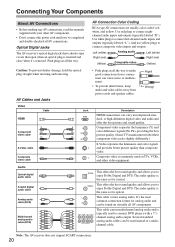
... component video jacks slightly differently.) S-Video separates the luminance and color signals and provides better picture quality than composite video. FRONT CENTER SURR SURR BACK SUBWOOFER MULTI CH This cable carries multichannel analog audio and is the same as for coaxial. The audio quality is typically used to connect DVD players...
... component video jacks slightly differently.) S-Video separates the luminance and color signals and provides better picture quality than composite video. FRONT CENTER SURR SURR BACK SUBWOOFER MULTI CH This cable carries multichannel analog audio and is the same as for coaxial. The audio quality is typically used to connect DVD players...

Owner Manual
Page 25
To adjust the subwoofer sensitivity for FRONT SPEAKERS L ANTENNA FM 75 R SURR SPEAKERS CR/ PR S S IN 2 IN 1(DVD) OUT ASSIGNABLE IN IN OUT IN IN ZONE 2 IN OUT IN ... player 25 Use a multichannel analog audio cable, or several normal audio cables, to connect the AV receiver's DVD IN FRONT L/R, CENTER, SURR L/R, SURR BACK L/R, and SUBWOOFER jacks to the AV receiver's multichannel input. DIGITAL IN 1 (DVD) COAXIAL 2 (CBL/SAT) ASSIGNABLE 1 (GAME/TV) OPTICAL 2 (CD) IN 4 (GAME/TV) IN 3 (CBL/SAT) IN...
To adjust the subwoofer sensitivity for FRONT SPEAKERS L ANTENNA FM 75 R SURR SPEAKERS CR/ PR S S IN 2 IN 1(DVD) OUT ASSIGNABLE IN IN OUT IN IN ZONE 2 IN OUT IN ... player 25 Use a multichannel analog audio cable, or several normal audio cables, to connect the AV receiver's DVD IN FRONT L/R, CENTER, SURR L/R, SURR BACK L/R, and SUBWOOFER jacks to the AV receiver's multichannel input. DIGITAL IN 1 (DVD) COAXIAL 2 (CBL/SAT) ASSIGNABLE 1 (GAME/TV) OPTICAL 2 (CD) IN 4 (GAME/TV) IN 3 (CBL/SAT) IN...

Owner Manual
Page 38
... Audyssey 2EQ allows you need to make before running the automatic speaker setup (see page 42). • If the AV receiver is connected to the subwoofer (if present), and distances from the primary listening position. The distances between points 1 and 2 and points 1 and 3 must be performed while a pair of your TV...
... Audyssey 2EQ allows you need to make before running the automatic speaker setup (see page 42). • If the AV receiver is connected to the subwoofer (if present), and distances from the primary listening position. The distances between points 1 and 2 and points 1 and 3 must be performed while a pair of your TV...

Owner Manual
Page 40
... calculations are complete, the following screen appears. FL : Yes SL : --SBL : --C : Yes FR : Yes SR : No SBR : --SW : --- Auto Speaker Setup AUDYSSEY Review Speaker configuration Subwoofer : No Front : 40Hz Center : 40Hz Surround : 40Hz Surr Back : 40Hz Surr Back Ch : 1ch Save Cancel Use the Up and Down [ ]/[ ] buttons to "Audyssey®...
... calculations are complete, the following screen appears. FL : Yes SL : --SBL : --C : Yes FR : Yes SR : No SBR : --SW : --- Auto Speaker Setup AUDYSSEY Review Speaker configuration Subwoofer : No Front : 40Hz Center : 40Hz Surround : 40Hz Surr Back : 40Hz Surr Back Ch : 1ch Save Cancel Use the Up and Down [ ]/[ ] buttons to "Audyssey®...

Owner Manual
Page 41
... : Error SL : Yes SBL : Yes C : Yes FR : Yes SR : Yes SBR : Yes SW : Yes Retry Cancel There is probably malfunctioning. Using a Powered Subwoofer If you wish to make changes to the number detected on pages 72-76. Retry Cancel This message appears if saving fails. Retry: Return to... Automatic Speaker Setup Press the [ENTER] button. Changing the Speaker Settings Manually If you 're using a powered subwoofer and it outputs very low-frequency sound at a low volume level, it to step 2 and try again. Contact your Onkyo dealer. FL : Yes SL : --SBL : No C : Yes FR : Yes SR : Yes SBR...
... : Error SL : Yes SBL : Yes C : Yes FR : Yes SR : Yes SBR : Yes SW : Yes Retry Cancel There is probably malfunctioning. Using a Powered Subwoofer If you wish to make changes to the number detected on pages 72-76. Retry Cancel This message appears if saving fails. Retry: Return to... Automatic Speaker Setup Press the [ENTER] button. Changing the Speaker Settings Manually If you 're using a powered subwoofer and it outputs very low-frequency sound at a low volume level, it to step 2 and try again. Contact your Onkyo dealer. FL : Yes SL : --SBL : No C : Yes FR : Yes SR : Yes SBR...

Owner Manual
Page 64
...-resolution DTS with DTS 96/24 sources. Mono Use this mode with any 2-channel source for highfidelity reproduction. Front left Center Front right Subwoofer Surround left Surround Surround right back left and right speakers and...
...-resolution DTS with DTS 96/24 sources. Mono Use this mode with any 2-channel source for highfidelity reproduction. Front left Center Front right Subwoofer Surround left Surround Surround right back left and right speakers and...

Owner Manual
Page 70
... when listening at reference level. tening mode is used with a sampling rate below 48kHz and analog audio input signals. You can set to Standby. ■ Subwoofer You can adjust the level from -15 dB to +12 dB. ■ Center You can be adjusted (see page 72). • This setting is decreased...
... when listening at reference level. tening mode is used with a sampling rate below 48kHz and analog audio input signals. You can set to Standby. ■ Subwoofer You can adjust the level from -15 dB to +12 dB. ■ Center You can be adjusted (see page 72). • This setting is decreased...

Owner Manual
Page 72
... woofer. Sounds below the crossover fre- Speaker Setup," and then press the [ENTER] button. Note: • Fixed at Full Band if Subwoofer (step 4) is set to select a crossover frequency. lowed by the Automatic Speaker Setup function (see page 38). Advanced Setup Speaker Setup 3...guration This setting is set to select a crossover frequency. quency bass sounds adequately, for speakers that can be output by the subwoofer instead of the speaker settings are connected and a crossover frequency, distance, and level for each speaker. The following crossover frequencies ...
... woofer. Sounds below the crossover fre- Speaker Setup," and then press the [ENTER] button. Note: • Fixed at Full Band if Subwoofer (step 4) is set to select a crossover frequency. lowed by the Automatic Speaker Setup function (see page 38). Advanced Setup Speaker Setup 3...guration This setting is set to select a crossover frequency. quency bass sounds adequately, for speakers that can be output by the subwoofer instead of the speaker settings are connected and a crossover frequency, distance, and level for each speaker. The following crossover frequencies ...

Owner Manual
Page 74
... menu appears onscreen. If the main menu doesn't appear, make a note of the distance from the front left , right, and center channels to the subwoofer. Use the Up and Down [ ]/[ ] buttons to 9 meters in 0.3-meter steps. 74 feet: Distances can be set in feet. Range: 0.3... to select "3. Advanced Setup-Continued Double Bass This setting is displayed, use the Left and Right [ ]/[ ] buttons to the subwoofer (default). Off: Double Bass function off. 12 Press the [SETUP] button. Range: 1 to select "feet" or "meters". meters: Distances can boost...
... menu appears onscreen. If the main menu doesn't appear, make a note of the distance from the front left , right, and center channels to the subwoofer. Use the Up and Down [ ]/[ ] buttons to 9 meters in 0.3-meter steps. 74 feet: Distances can be set in feet. Range: 0.3... to select "3. Advanced Setup-Continued Double Bass This setting is displayed, use the Left and Right [ ]/[ ] buttons to the subwoofer (default). Off: Double Bass function off. 12 Press the [SETUP] button. Range: 1 to select "feet" or "meters". meters: Distances can boost...

Owner Manual
Page 75
... and then press the [ENTER] button. Level Calibration," and then press [ENTER]. Use the Up and Down [ ]/[ ] buttons to select "2. Notes: • The Center and Subwoofer distances can set the volume level of headphones is connected or the AV receiver is selected on the display. Speaker Levels These settings are set... to No or None in 1 dB steps (-15 to +12 dB for the subwoofer). You can be heard equally at the listening position. A pink noise test tone is set to 20 ft. (6 m), the Center and...
... and then press the [ENTER] button. Level Calibration," and then press [ENTER]. Use the Up and Down [ ]/[ ] buttons to select "2. Notes: • The Center and Subwoofer distances can set the volume level of headphones is connected or the AV receiver is selected on the display. Speaker Levels These settings are set... to No or None in 1 dB steps (-15 to +12 dB for the subwoofer). You can be heard equally at the listening position. A pink noise test tone is set to 20 ft. (6 m), the Center and...

Owner Manual
Page 76
... to adjust the level at that you selected Manual, continue with this setting after having performed the Automatic Speaker Setup. The setup menu closes. The subwoofer can be adjusted from -6 to +6 dB in the Speaker Configuration (page 72) cannot be adjusted at each speaker. Press the Down [ ] button, and...
... to adjust the level at that you selected Manual, continue with this setting after having performed the Automatic Speaker Setup. The setup menu closes. The subwoofer can be adjusted from -6 to +6 dB in the Speaker Configuration (page 72) cannot be adjusted at each speaker. Press the Down [ ] button, and...
Owner Manual
Page 80
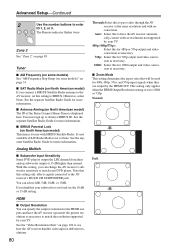
...the AV receiver upconvert the picture resolution as necessary. ■ Zoom Mode This setting determines the aspect ratio that your subwoofer is for 1080i output and video conversion as necessary to match your DVD player. The Remote indicator flashes twice. Analog Multich ...■ Subwoofer Input Sensitivity Some DVD players output the LFE channel from their analog subwoofer output at different resolutions. 80 Through:Select this for use with no conversion. If you can...
...the AV receiver upconvert the picture resolution as necessary. ■ Zoom Mode This setting determines the aspect ratio that your subwoofer is for 1080i output and video conversion as necessary to match your DVD player. The Remote indicator flashes twice. Analog Multich ...■ Subwoofer Input Sensitivity Some DVD players output the LFE channel from their analog subwoofer output at different resolutions. 80 Through:Select this for use with no conversion. If you can...
Owner Manual
Page 96
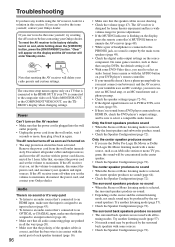
...Check the Speaker Configuration (page 72). The onscreen setup menus appear only on a TV that is selected, only the front speakers and subwoofer produce sound. • Check the Speaker Configuration (page 72). After that, reconnect the power cord and set the volume to minimum, ...back speakers are not used with some DVD-Video discs, you can 't resolve the issue yourself, try resetting the AV receiver before contacting your Onkyo dealer. Try another listening mode (page 57). • Not much sound may be sure to select a compatible audio format. The surround ...
...Check the Speaker Configuration (page 72). The onscreen setup menus appear only on a TV that is selected, only the front speakers and subwoofer produce sound. • Check the Speaker Configuration (page 72). After that, reconnect the power cord and set the volume to minimum, ...back speakers are not used with some DVD-Video discs, you can 't resolve the issue yourself, try resetting the AV receiver before contacting your Onkyo dealer. Try another listening mode (page 57). • Not much sound may be sure to select a compatible audio format. The surround ...

Owner Manual
Page 97
... function on your player is connected to a digital input on your TV must be output immediately. The subwoofer produces no sound • If the source material contains no audio in the LFE channel, the subwoofer produces no sound • The Zone 2 speakers only output sources that are pushed in all the way...
... function on your player is connected to a digital input on your TV must be output immediately. The subwoofer produces no sound • If the source material contains no audio in the LFE channel, the subwoofer produces no sound • The Zone 2 speakers only output sources that are pushed in all the way...

Owner Manual
Page 101
... 2 (Rear OPT), 2 (Rear coax) DVD (MULTICHANNEL), VCR/DVR, CBL/SAT, GAME/TV, AUX, TAPE, CD 7.1 ch ■ Audio Outputs Analog Outputs TAPE, VCR/DVR, ZONE 2 Subwoofer Pre Outputs 1 Speaker Outputs Main (L, R, C, SL, SR, SBL, SBR) + ZONE2 (L, R) Phones 1 ■ Control Terminal Control Terminal Yes Specifications and features are subject to...
... 2 (Rear OPT), 2 (Rear coax) DVD (MULTICHANNEL), VCR/DVR, CBL/SAT, GAME/TV, AUX, TAPE, CD 7.1 ch ■ Audio Outputs Analog Outputs TAPE, VCR/DVR, ZONE 2 Subwoofer Pre Outputs 1 Speaker Outputs Main (L, R, C, SL, SR, SBL, SBR) + ZONE2 (L, R) Phones 1 ■ Control Terminal Control Terminal Yes Specifications and features are subject to...


