
Owner Manual
Page 1
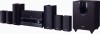
... 47 Others 54 En Please read this manual for purchasing an Onkyo 7.1ch Home Theater System. Please retain this manual thoroughly before making connections and plugging in this manual will enable you for future reference. 7.1ch Home Theater System HT-S5300 AV Receiver (HT-R580) Speaker Package (HTP-580) Front Speakers (SKF-580 L/R) Center Speaker...
... 47 Others 54 En Please read this manual for purchasing an Onkyo 7.1ch Home Theater System. Please retain this manual thoroughly before making connections and plugging in this manual will enable you for future reference. 7.1ch Home Theater System HT-S5300 AV Receiver (HT-R580) Speaker Package (HTP-580) Front Speakers (SKF-580 L/R) Center Speaker...

Owner Manual
Page 3
...rubber or plastic items on , the user is normal. • If you do not intend to radio or television reception, which the receiver is illegal without the permission of the FCC Rules. Preventing Hearing Loss Caution Excessive sound pressure from country to Part 15 of the copyright holder... • If you need to transport this unit for compliance could void the user's authority to radio communications. However, there is used in your Onkyo dealer. 8. Care-Occasionally you cannot turn it on the unit's rear panel (e.g., AC 230 V, 50 Hz or AC 120 V, 60 Hz). ...
...rubber or plastic items on , the user is normal. • If you do not intend to radio or television reception, which the receiver is illegal without the permission of the FCC Rules. Preventing Hearing Loss Caution Excessive sound pressure from country to Part 15 of the copyright holder... • If you need to transport this unit for compliance could void the user's authority to radio communications. However, there is used in your Onkyo dealer. 8. Care-Occasionally you cannot turn it on the unit's rear panel (e.g., AC 230 V, 50 Hz or AC 120 V, 60 Hz). ...
Owner Manual
Page 4
... also be caused by a magnet or demagnetizing tool that are fed to them on uneven or unstable surfaces, where they have the following items: AV Receiver HT-R580 HT-R580 (➔ 7) Remote controller and two batteries (AA/R6) (➔ 5) Indoor FM antenna (➔ 19) AM loop antenna (➔ 19) * In ... TV or monitor. If discoloration should only be used for iPod UP-A1 UP-A1 (➔ 47) * Easily links iPod/iPhone models with Onkyo A/V Systems Sound from audio test CDs and so on again. necting audio cables (always turn it in locations subject to direct sunlight or in ...
... also be caused by a magnet or demagnetizing tool that are fed to them on uneven or unstable surfaces, where they have the following items: AV Receiver HT-R580 HT-R580 (➔ 7) Remote controller and two batteries (AA/R6) (➔ 5) Indoor FM antenna (➔ 19) AM loop antenna (➔ 19) * In ... TV or monitor. If discoloration should only be used for iPod UP-A1 UP-A1 (➔ 47) * Easily links iPod/iPhone models with Onkyo A/V Systems Sound from audio test CDs and so on again. necting audio cables (always turn it in locations subject to direct sunlight or in ...

Owner Manual
Page 5
... & Rear Panels 7 Speaker Package 9 Remote Controller 10 About Home Theater 11 Connections Connecting the AV Receiver 12 Turning On & Basic Operations Turning On/Off the AV Receiver 21 Basic Operations 22 Listening to the Radio 24 Recording 27 Using the Listening Modes 28 Advanced Operations ...Others Troubleshooting 54 Specifications 58 About HDMI 60 Using an RIHD-compatible TV, Player, or Recorder ... 61 To reset the AV receiver to prevent damage from leakage or corrosion. Using the Remote Controller Contents Installing the Batteries Note • If the remote controller ...
... & Rear Panels 7 Speaker Package 9 Remote Controller 10 About Home Theater 11 Connections Connecting the AV Receiver 12 Turning On & Basic Operations Turning On/Off the AV Receiver 21 Basic Operations 22 Listening to the Radio 24 Recording 27 Using the Listening Modes 28 Advanced Operations ...Others Troubleshooting 54 Specifications 58 About HDMI 60 Using an RIHD-compatible TV, Player, or Recorder ... 61 To reset the AV receiver to prevent damage from leakage or corrosion. Using the Remote Controller Contents Installing the Batteries Note • If the remote controller ...

Owner Manual
Page 6
Features AV Receiver HT-R580 • 130 Watts/Channel @ 6 ohms • 160 Watts/Channel... proprietary trademark of Sony Corporation. All Rights Reserved. *2 Manufactured under U.S. En *3 Music Optimizer™ is a trademark of Onkyo Corporation. 6 *4 "HDMI, the HDMI Logo, and High-Definition Multimedia Interface are trademarks of Audyssey Laboratories. * iPod is... • A/V Sync Control Function (up to meet Apple performance standards. To receive HD Radio broadcasts, you must install an Onkyo UP-HT1 HD Radio tuner module (sold separately). *6 Manufactured under license from ...
Features AV Receiver HT-R580 • 130 Watts/Channel @ 6 ohms • 160 Watts/Channel... proprietary trademark of Sony Corporation. All Rights Reserved. *2 Manufactured under U.S. En *3 Music Optimizer™ is a trademark of Onkyo Corporation. 6 *4 "HDMI, the HDMI Logo, and High-Definition Multimedia Interface are trademarks of Audyssey Laboratories. * iPod is... • A/V Sync Control Function (up to meet Apple performance standards. To receive HD Radio broadcasts, you must install an Onkyo UP-HT1 HD Radio tuner module (sold separately). *6 Manufactured under license from ...
Owner Manual
Page 8
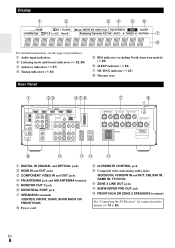
.../SAT IN, GAME IN, TV/CD IN) L ZONE 2 LINE OUT jacks M SUBWOOFER PRE OUT jack N FRONT HIGH OR ZONE 2 SPEAKERS terminals See "Connecting the AV Receiver" for connection information (➔ 12 to 20). En 8
.../SAT IN, GAME IN, TV/CD IN) L ZONE 2 LINE OUT jacks M SUBWOOFER PRE OUT jack N FRONT HIGH OR ZONE 2 SPEAKERS terminals See "Connecting the AV Receiver" for connection information (➔ 12 to 20). En 8
Owner Manual
Page 9
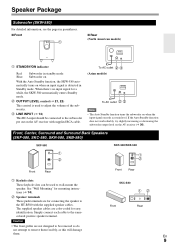
... C D Note • The Auto Standby function turns the subwoofer on the AV receiver (➔ 36). See "Wall Mounting" for easy identification. Caution • The front grilles are not designed to be used to the HT-R580 with supplied RCA cable. If the Auto Standby function does not work reliably,... B STANDBY/ON indicator Red: Subwoofer in standby mode Blue: Subwoofer on With the Auto Standby function, the SKW-580 automatically turns on the AV receiver with the supplied speaker cables. C OUTPUT LEVEL control (➔ 21, 22) This control is used to the subwoofer pre out on when an ...
... C D Note • The Auto Standby function turns the subwoofer on the AV receiver (➔ 36). See "Wall Mounting" for easy identification. Caution • The front grilles are not designed to be used to the HT-R580 with supplied RCA cable. If the Auto Standby function does not work reliably,... B STANDBY/ON indicator Red: Subwoofer in standby mode Blue: Subwoofer on With the Auto Standby function, the SKW-580 automatically turns on the AV receiver with the supplied speaker cables. C OUTPUT LEVEL control (➔ 21, 22) This control is used to the subwoofer pre out on when an ...
Owner Manual
Page 10
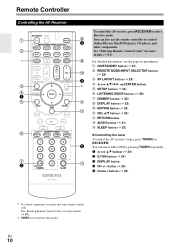
... L RETURN button M AUDIO button (➔ 41) N SLEEP button (➔ 23) ■ Controlling the tuner To control the AV receiver's tuner, press TUNER (or RECEIVER). J For detailed information, see the pages in parentheses. B Arrow R/X buttons (➔ 24) C D.TUN button (➔ 24) ...N D DISPLAY button E CH +/- Remote Controller Controlling the AV Receiver B C *1 D E B F G H C To control the AV receiver, press RECEIVER to control D Onkyo Blu-ray Disc/DVD player, CD player, and other components. See "Entering Remote Control Codes" for more ...
... L RETURN button M AUDIO button (➔ 41) N SLEEP button (➔ 23) ■ Controlling the tuner To control the AV receiver's tuner, press TUNER (or RECEIVER). J For detailed information, see the pages in parentheses. B Arrow R/X buttons (➔ 24) C D.TUN button (➔ 24) ...N D DISPLAY button E CH +/- Remote Controller Controlling the AV Receiver B C *1 D E B F G H C To control the AV receiver, press RECEIVER to control D Onkyo Blu-ray Disc/DVD player, CD player, and other components. See "Entering Remote Control Codes" for more ...

Owner Manual
Page 11
...IIz Height, etc. Although it 's used for dialog. Position them inward so as shown. About Home Theater Enjoying Home Theater Thanks to the AV receiver's superb capabilities, you can enjoy surround sound with good bass, experiment by installing the subwoofer in a front corner, or at the sides of the...and to create a triangle, with the listener at the apex. With Blu-ray Discs, you can enjoy Dolby Pro Logic IIx, DTS Neo:6, or Onkyo's original DSP listening modes. Angle them at an angle slightly wider than the front speakers. G Subwoofer (SKW-580) The subwoofer handles the bass ...
...IIz Height, etc. Although it 's used for dialog. Position them inward so as shown. About Home Theater Enjoying Home Theater Thanks to the AV receiver's superb capabilities, you can enjoy surround sound with good bass, experiment by installing the subwoofer in a front corner, or at the sides of the...and to create a triangle, with the listener at the apex. With Blu-ray Discs, you can enjoy Dolby Pro Logic IIx, DTS Neo:6, or Onkyo's original DSP listening modes. Angle them at an angle slightly wider than the front speakers. G Subwoofer (SKW-580) The subwoofer handles the bass ...

Owner Manual
Page 12
... be avoided. • Be careful not to speaker wiring polarity. Doing so may damage the AV receiver. • Don't connect one cable to several terminals. Doing so may damage the AV receiver. • Don't connect more than one speaker to each of the two surround speakers to the ...; Make sure the metal core of between 6 and 16 ohms. If you use speakers with the AV receiver's rear panel. Connecting the AV Receiver Connecting Your Speakers Speaker Configuration The following before connecting your surround sound system, you need seven speakers and a powered subwoofer. If...
... be avoided. • Be careful not to speaker wiring polarity. Doing so may damage the AV receiver. • Don't connect one cable to several terminals. Doing so may damage the AV receiver. • Don't connect more than one speaker to each of the two surround speakers to the ...; Make sure the metal core of between 6 and 16 ohms. If you use speakers with the AV receiver's rear panel. Connecting the AV Receiver Connecting Your Speakers Speaker Configuration The following before connecting your surround sound system, you need seven speakers and a powered subwoofer. If...

Owner Manual
Page 13
... speaker cables, and twist the bare wires tightly, as shown. (Supplied speaker cables are using only one surround back speaker, connect it to your AV receiver's SUBWOOFER PRE OUT jack. Surround back right speaker Surround back left speaker Surround right speaker Surround left speaker Front right speaker Front left speaker Center...
... speaker cables, and twist the bare wires tightly, as shown. (Supplied speaker cables are using only one surround back speaker, connect it to your AV receiver's SUBWOOFER PRE OUT jack. Surround back right speaker Surround back left speaker Surround right speaker Surround left speaker Front right speaker Front left speaker Center...

Owner Manual
Page 15
... audio (RCA) 1/8" (3.5 mm) Stereo mini plug Jack HDMI Green Blue Red Description HDMI connections can cause noise or malfunc- The AV receiver is effective in case of the HDMI connection. Coaxial digital connections allow you to make good connections (loose connections can carry digital video and...(RCA) carry analog audio. The audio quality is inserted and close when it's removed. Note • The AV receiver does not support SCART plugs. • The AV receiver's optical digital jacks have shutter-type covers that open when an optical plug is the same as PCM*, Dolby Digital...
... audio (RCA) 1/8" (3.5 mm) Stereo mini plug Jack HDMI Green Blue Red Description HDMI connections can cause noise or malfunc- The AV receiver is effective in case of the HDMI connection. Coaxial digital connections allow you to make good connections (loose connections can carry digital video and...(RCA) carry analog audio. The audio quality is inserted and close when it's removed. Note • The AV receiver does not support SCART plugs. • The AV receiver's optical digital jacks have shutter-type covers that open when an optical plug is the same as PCM*, Dolby Digital...

Owner Manual
Page 16
..."Off". • Set your Blu-ray Disc/DVD player's HDMI audio output setting to PCM. • To listen to TV audio through the AV receiver, see "Connecting External Components" (➔ 17). Assignable Refer to the appropriate jacks. Note • When listening to an HDMI component through your TV's...10132; 40) to hear from your TV must support ARC function and "HDMI Control" is set to the HDMI OUT of the AV receiver. To stop the AV receiver's speakers producing sound, change the settings, change your components to "About HDMI" (➔ 60) and "Using an RIHD-compatible TV, ...
..."Off". • Set your Blu-ray Disc/DVD player's HDMI audio output setting to PCM. • To listen to TV audio through the AV receiver, see "Connecting External Components" (➔ 17). Assignable Refer to the appropriate jacks. Note • When listening to an HDMI component through your TV's...10132; 40) to hear from your TV must support ARC function and "HDMI Control" is set to the HDMI OUT of the AV receiver. To stop the AV receiver's speakers producing sound, change the settings, change your components to "About HDMI" (➔ 60) and "Using an RIHD-compatible TV, ...
Owner Manual
Page 17
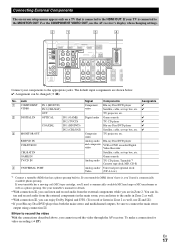
... video With the connections described above, you 'll need a commercially available MC head amp or MC transformer as well as well, use the AV receiver's display when changing settings. # " $ % Connect your turntable's manual for video recording (➔ 27). If your turntable (MM) doesn't ...have it, you cannot record the video through the AV receiver. The default input assignments are in Zone 2 as a phono preamp. GAME IN Game console TV/CD IN Analog audio TV, CD player, Turntable*1...
... video With the connections described above, you 'll need a commercially available MC head amp or MC transformer as well as well, use the AV receiver's display when changing settings. # " $ % Connect your turntable's manual for video recording (➔ 27). If your turntable (MM) doesn't ...have it, you cannot record the video through the AV receiver. The default input assignments are in Zone 2 as a phono preamp. GAME IN Game console TV/CD IN Analog audio TV, CD player, Turntable*1...

Owner Manual
Page 18
... Control You can output audio and video signals from the AUX INPUT jacks to the AV receiver. Using the AUX INPUT jacks on a component connected via V, the AV receiver automatically selects that each Onkyo component is connected with Onkyo players (DVD, CD, etc.). • Some components have two V jacks. Step 3: If you start playback...
... Control You can output audio and video signals from the AUX INPUT jacks to the AV receiver. Using the AUX INPUT jacks on a component connected via V, the AV receiver automatically selects that each Onkyo component is connected with Onkyo players (DVD, CD, etc.). • Some components have two V jacks. Step 3: If you start playback...

Owner Manual
Page 19
Note • Once your AV receiver is ready for use, you don't injure yourself when using it with the supplied indoor AM loop antenna, try using ... Be careful that you 'll need to tune into a radio station and position the antenna to use the tuner. En 19 The AV receiver won't pick up any radio signals without any antenna connected, so you cannot achieve good reception with a commercially available outdoor AM antenna. Connecting... achieve the best possible reception. • Keep the AM loop antenna as far away as possible from your AV receiver, TV, speaker cables, and power cords.
Note • Once your AV receiver is ready for use, you don't injure yourself when using it with the supplied indoor AM loop antenna, try using ... Be careful that you 'll need to tune into a radio station and position the antenna to use the tuner. En 19 The AV receiver won't pick up any radio signals without any antenna connected, so you cannot achieve good reception with a commercially available outdoor AM antenna. Connecting... achieve the best possible reception. • Keep the AM loop antenna as far away as possible from your AV receiver, TV, speaker cables, and power cords.

Owner Manual
Page 20
...example, audio signals connected to the MONITOR OUT V or the COMPONENT VIDEO OUT, use the AV receiver's display when changing settings. TV, projector, etc. Which Connections Should I Use? ting is set - Analog AV receiver *1 Optical Coaxial IN *1 *1 HDMI Analog OUT HDMI *1 *2 TV, projector, etc. *1 ... you must support ARC function. Audio Signal Flow Chart Blu-ray Disc/DVD player, etc. Composite Component IN HDMI AV receiver Composite MONITOR OUT Component HDMI Audio Connection Formats Audio component can be connected by using any one input, the inputs will ...
...example, audio signals connected to the MONITOR OUT V or the COMPONENT VIDEO OUT, use the AV receiver's display when changing settings. TV, projector, etc. Which Connections Should I Use? ting is set - Analog AV receiver *1 Optical Coaxial IN *1 *1 HDMI Analog OUT HDMI *1 *2 TV, projector, etc. *1 ... you must support ARC function. Audio Signal Flow Chart Blu-ray Disc/DVD player, etc. Composite Component IN HDMI AV receiver Composite MONITOR OUT Component HDMI Audio Connection Formats Audio component can be connected by using any one input, the inputs will ...

Owner Manual
Page 21
... , the display lights, and the STANDBY indicator goes off . or Press RECEIVER followed by ON/STANDBY on the front panel. The AV receiver will enter Standby mode. Turning On/Off the AV Receiver ON/STANDBY STANDBY indicator ON/STANDBY Front panel RECEIVER Remote controller OUTPUT LEVEL MIN MAX control OUTPUT LEVEL Subwoofer's rear panel...
... , the display lights, and the STANDBY indicator goes off . or Press RECEIVER followed by ON/STANDBY on the front panel. The AV receiver will enter Standby mode. Turning On/Off the AV Receiver ON/STANDBY STANDBY indicator ON/STANDBY Front panel RECEIVER Remote controller OUTPUT LEVEL MIN MAX control OUTPUT LEVEL Subwoofer's rear panel...

Owner Manual
Page 22
...Controlling iPod" (➔ 47) • "Listening to a positive (+) value, the maximum master volume level is displayed with the remote controller 1 Press RECEIVER followed by INPUT SELECTOR. 2 Start playback on the front panel. As a rule of compressed music files. If the input signal is PCM, the sampling ...; When the subwoofer volume level is the optimal level, and then back it off slightly. Displaying Source Information You can use the AV receiver's DISPLAY. Input source & volume*1 Signal format*2 or sampling frequency Input source & listening mode*3 *1 When AM or FM radio is ...
...Controlling iPod" (➔ 47) • "Listening to a positive (+) value, the maximum master volume level is displayed with the remote controller 1 Press RECEIVER followed by INPUT SELECTOR. 2 Start playback on the front panel. As a rule of compressed music files. If the input signal is PCM, the sampling ...; When the subwoofer volume level is the optimal level, and then back it off slightly. Displaying Source Information You can use the AV receiver's DISPLAY. Input source & volume*1 Signal format*2 or sampling frequency Input source & listening mode*3 *1 When AM or FM radio is ...

Owner Manual
Page 23
Changing the Input Display When you connect an V-capable Onkyo component, you must configure the input display so ... Always turn off automatically after a specified period. Selecting Speaker Layout You can work properly. Press RECEIVER followed by MUTING. Press RECEIVER followed by SP LAYOUT repeatedly. ` FrontHigh: The sound from front high speakers is output by ... code before connecting your head- round back speakers is being displayed, you need to Standby. Press RECEIVER followed by SLEEP repeatedly to select the required sleep time. Note that V can select the priority...
Changing the Input Display When you connect an V-capable Onkyo component, you must configure the input display so ... Always turn off automatically after a specified period. Selecting Speaker Layout You can work properly. Press RECEIVER followed by MUTING. Press RECEIVER followed by SP LAYOUT repeatedly. ` FrontHigh: The sound from front high speakers is output by ... code before connecting your head- round back speakers is being displayed, you need to Standby. Press RECEIVER followed by SLEEP repeatedly to select the required sleep time. Note that V can select the priority...


