Owner Manual
Page 4
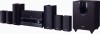
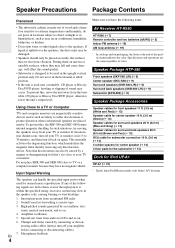
... models with Onkyo A/V Systems High-pitched sounds generated by connecting or discon- Thumps and clicks caused by an oscillator, elec- En 4 Make sure you have no magnetic shield. Special test tones from an untuned FM radio. 2. Speaker Package HTP-580 Front speakers (SKF-580 L/R) (➔ 9) Center speaker (SKC-580) (➔ 9) Surround speakers (SKR-580 L/R) (➔ 9) Surround back speakers (SKB-580 L/R) (➔ 9) Subwoofer (SKW-580) (➔ 9) Speaker Package Accessories Speaker cables...
... models with Onkyo A/V Systems High-pitched sounds generated by connecting or discon- Thumps and clicks caused by an oscillator, elec- En 4 Make sure you have no magnetic shield. Special test tones from an untuned FM radio. 2. Speaker Package HTP-580 Front speakers (SKF-580 L/R) (➔ 9) Center speaker (SKC-580) (➔ 9) Surround speakers (SKR-580 L/R) (➔ 9) Surround back speakers (SKB-580 L/R) (➔ 9) Subwoofer (SKW-580) (➔ 9) Speaker Package Accessories Speaker cables...

Owner Manual
Page 5
... & Rear Panels 7 Speaker Package 9 Remote Controller 10 About Home Theater 11 Connections Connecting the AV Receiver 12 Turning On & Basic Operations Turning On/Off the AV Receiver 21 Basic Operations 22 Listening to the Radio 24 Recording 27 Using the Listening Modes 28 Advanced Operations Advanced Setup 33 Zone 2 44 Approx. 16 ft. (5 m) Controlling iPod & Other Components Controlling iPod 47 Controlling Other Components 51 Others Troubleshooting 54 Specifications 58 About HDMI 60 Using an RIHD-compatible TV, Player, or Recorder ... 61 To reset the AV receiver...
... & Rear Panels 7 Speaker Package 9 Remote Controller 10 About Home Theater 11 Connections Connecting the AV Receiver 12 Turning On & Basic Operations Turning On/Off the AV Receiver 21 Basic Operations 22 Listening to the Radio 24 Recording 27 Using the Listening Modes 28 Advanced Operations Advanced Setup 33 Zone 2 44 Approx. 16 ft. (5 m) Controlling iPod & Other Components Controlling iPod 47 Controlling Other Components 51 Others Troubleshooting 54 Specifications 58 About HDMI 60 Using an RIHD-compatible TV, Player, or Recorder ... 61 To reset the AV receiver...

Owner Manual
Page 6
...; Direct Mode • Music Optimizer*3 for Compressed Digital Music files • 192 kHz/24-bit D/A Converters • Powerful and Highly Accurate 32-bit Processing DSP • 4 HDMI*4 Inputs and 1 Output • Onkyo Q for System Control • 4 Digital Inputs (2 Optical/2 Coaxial) • Component Video Switching (2 Inputs/1 Output) • Front "Line in" Input for Portable audio player • Universal Port for the Dock for iPod*/HD Radio™*5 tuner module (North American models)/DAB+ tuner module (Asian models) • Banana Plug-Compatible Speaker Posts • Powered Zone...
...; Direct Mode • Music Optimizer*3 for Compressed Digital Music files • 192 kHz/24-bit D/A Converters • Powerful and Highly Accurate 32-bit Processing DSP • 4 HDMI*4 Inputs and 1 Output • Onkyo Q for System Control • 4 Digital Inputs (2 Optical/2 Coaxial) • Component Video Switching (2 Inputs/1 Output) • Front "Line in" Input for Portable audio player • Universal Port for the Dock for iPod*/HD Radio™*5 tuner module (North American models)/DAB+ tuner module (Asian models) • Banana Plug-Compatible Speaker Posts • Powered Zone...

Owner Manual
Page 20
... setting is 480p, 576p, 720p, 1080i, or 1080p. Video Signal Flow Chart Blu-ray Disc/DVD player, etc. If signals are not output by using any of the following sections as the input will depend on a TV that the AV receiver does not convert digital input signals for compatibility with a wide range of AV equipment. Use the following video connection formats: composite video, component video, or HDMI, the latter offering the best picture quality. The format you must support...
... setting is 480p, 576p, 720p, 1080i, or 1080p. Video Signal Flow Chart Blu-ray Disc/DVD player, etc. If signals are not output by using any of the following sections as the input will depend on a TV that the AV receiver does not convert digital input signals for compatibility with a wide range of AV equipment. Use the following video connection formats: composite video, component video, or HDMI, the latter offering the best picture quality. The format you must support...

Owner Manual
Page 23
...- Selecting Speaker Layout You can be set to Stereo, Mono or Direct. • Only the Stereo, Direct, and Mono listening modes can be selected. The output is set from the front panel. 1 Press TV/CD, GAME or VCR/DVR on the display. This setting can be used , the setting cannot be done only from 90 to 10 minutes in the PHONES jack, the speakers are turned off. (The Powered Zone 2 speakers are...
...- Selecting Speaker Layout You can be set to Stereo, Mono or Direct. • Only the Stereo, Direct, and Mono listening modes can be selected. The output is set from the front panel. 1 Press TV/CD, GAME or VCR/DVR on the display. This setting can be used , the setting cannot be done only from 90 to 10 minutes in the PHONES jack, the speakers are turned off. (The Powered Zone 2 speakers are...

Owner Manual
Page 25
... characters displayed on the AV receiver may be displayed. Selecting Presets To select a preset, use PRESET F/S to select a preset from the display. Tip • You can also use it these days. What is a method of your favorite FM/AM radio stations as presets. 1 Tune into an RDS station, the RDS indicator lights. In addition to select a preset directly. Using RDS (excluding North American models) RDS works only in most European countries. Pressing DISPLAY will display the frequency for...
... characters displayed on the AV receiver may be displayed. Selecting Presets To select a preset, use PRESET F/S to select a preset from the display. Tip • You can also use it these days. What is a method of your favorite FM/AM radio stations as presets. 1 Tune into an RDS station, the RDS indicator lights. In addition to select a preset directly. Using RDS (excluding North American models) RDS works only in most European countries. Pressing DISPLAY will display the frequency for...
Owner Manual
Page 27
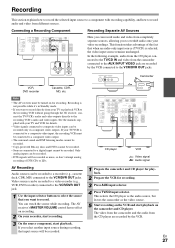
.... • DTS signals will be recorded only via composite video outputs. Note • The AV receiver must be connected to a composite video output. • The surround sound and DSP listening modes cannot be recorded. • Copy-protected Blu-ray discs and DVDs cannot be recorded. See the manuals supplied with recording capability, and how to select the source that when an audio-only input source (TV/CD) is selected, the video input source remains unchanged...
.... • DTS signals will be recorded only via composite video outputs. Note • The AV receiver must be connected to a composite video output. • The surround sound and DSP listening modes cannot be recorded. • Copy-protected Blu-ray discs and DVDs cannot be recorded. See the manuals supplied with recording capability, and how to select the source that when an audio-only input source (TV/CD) is selected, the video input source remains unchanged...
Owner Manual
Page 33
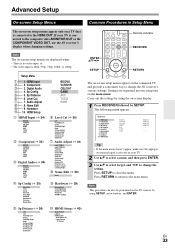
... SurrBack Right SurrBack Left Surround Left Subwoofer H Audio Adjust (➔ 36) Input Ch(Mux) Input Ch(Mono) Panorama Dimension Center Width Height Gain Dolby EX Center Image Audyssey Dynamic EQ Reference Leve Dynamic Volume Listening Angle I 8. Setup Menu 1. Remote indicator RECEIVER Note The on-screen setup menus are organized into ten categories on -screen display. 1 Press RECEIVER followed by using SETUP, arrow buttons, and ENTER. Carry out the settings by SETUP. Level Cal H 7. Component 3. Name Edit 9.
... SurrBack Right SurrBack Left Surround Left Subwoofer H Audio Adjust (➔ 36) Input Ch(Mux) Input Ch(Mono) Panorama Dimension Center Width Height Gain Dolby EX Center Image Audyssey Dynamic EQ Reference Leve Dynamic Volume Listening Angle I 8. Setup Menu 1. Remote indicator RECEIVER Note The on-screen setup menus are organized into ten categories on -screen display. 1 Press RECEIVER followed by using SETUP, arrow buttons, and ENTER. Carry out the settings by SETUP. Level Cal H 7. Component 3. Name Edit 9.

Owner Manual
Page 39
... radio presets will appear on the display. En 39 Select "Front High" if you change these settings, turn down SETUP until the remote indicator lights (about 3 seconds). 2 Use the number buttons to "Front High", this setting is set the input selector by the same name. • This menu cannot be used for easy identification. FM/AM Frequency Setup Settings For FM/AM tuning to work properly, you 've connected your Zone 2 speakers to FRONT HIGH OR ZONE 2 SPEAKERS...
... radio presets will appear on the display. En 39 Select "Front High" if you change these settings, turn down SETUP until the remote indicator lights (about 3 seconds). 2 Use the number buttons to "Front High", this setting is set the input selector by the same name. • This menu cannot be used for easy identification. FM/AM Frequency Setup Settings For FM/AM tuning to work properly, you 've connected your Zone 2 speakers to FRONT HIGH OR ZONE 2 SPEAKERS...

Owner Manual
Page 40
... AV receiver's speakers producing sound, change the settings, change the setting to "Off". • Refer to the HDMI OUT and you turn down the AV receiver's volume. ■ LipSync ` Disable: HDMI lip sync disabled. ` Enable: HDMI lip sync enabled. Note • When set to automatically correct any delay between the video and the audio, based on the AV receiver. For example, while you are watching TV broadcasting, if you operate a Blu-ray Disc/DVD player (being...
... AV receiver's speakers producing sound, change the settings, change the setting to "Off". • Refer to the HDMI OUT and you turn down the AV receiver's volume. ■ LipSync ` Disable: HDMI lip sync disabled. ` Enable: HDMI lip sync enabled. Note • When set to automatically correct any delay between the video and the audio, based on the AV receiver. For example, while you are watching TV broadcasting, if you operate a Blu-ray Disc/DVD player (being...

Owner Manual
Page 41
... by AUDIO. 2 Use R/X to select an item, and F/S to change various audio settings by using its TONE, -, and + buttons (➔ 43). Note • Do not assign the component connected with the HDMI input to the TV/CD selector when you made here, go to "Level Cal (Level Calibration)" (➔ 36) before setting the AV receiver to Standby. ■ Subwoofer ` -15 dB to 0 dB to +12 dB in 1 dB steps ■ Center...
... by AUDIO. 2 Use R/X to select an item, and F/S to change various audio settings by using its TONE, -, and + buttons (➔ 43). Note • Do not assign the component connected with the HDMI input to the TV/CD selector when you made here, go to "Level Cal (Level Calibration)" (➔ 36) before setting the AV receiver to Standby. ■ Subwoofer ` -15 dB to 0 dB to +12 dB in 1 dB steps ■ Center...

Owner Manual
Page 43
... speakers, except when the Direct listening mode is selected. 1 Press TONE on the AV receiver repeatedly to select either "Bass" or "Treble". 2 Use TONE -/+ on the AV receiver to select: ` Auto: The format is used instead. ` PCM: Only 2-channel PCM format input signals will flash and noise may find that the picture and sound are out of tracks from a PCM source are available only for about 8 seconds. 2 While "Auto" lights (about 3 seconds), press F/S to adjust. ■ Bass ■ Treble See "Bass...
... speakers, except when the Direct listening mode is selected. 1 Press TONE on the AV receiver repeatedly to select either "Bass" or "Treble". 2 Use TONE -/+ on the AV receiver to select: ` Auto: The format is used instead. ` PCM: Only 2-channel PCM format input signals will flash and noise may find that the picture and sound are out of tracks from a PCM source are available only for about 8 seconds. 2 While "Auto" lights (about 3 seconds), press F/S to adjust. ■ Bass ■ Treble See "Bass...
Owner Manual
Page 46
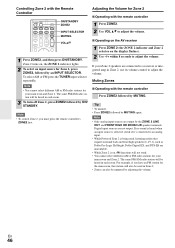
... adjust the volume. ■ Operating on the AV receiver 1 Press ZONE 2 (the ZONE 2 indicator and Zone 2 selector on , the ZONE 2 indicator lights. 2 To select an input source for Zone 2, press ZONE2, followed by an INPUT SELECTOR. If your Zone 2 speakers are output by MUTING again. Note • You cannot select different AM or FM radio stations for Zone 2 ■ Operating with the remote controller 1 Press ZONE2. 2 Use VOL R/X to a receiver or integrated amp in each room. 3 To turn...
... adjust the volume. ■ Operating on the AV receiver 1 Press ZONE 2 (the ZONE 2 indicator and Zone 2 selector on , the ZONE 2 indicator lights. 2 To select an input source for Zone 2, press ZONE2, followed by an INPUT SELECTOR. If your Zone 2 speakers are output by MUTING again. Note • You cannot select different AM or FM radio stations for Zone 2 ■ Operating with the remote controller 1 Press ZONE2. 2 Use VOL R/X to a receiver or integrated amp in each room. 3 To turn...
Owner Manual
Page 48
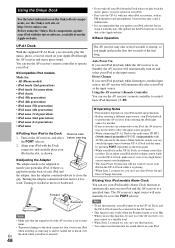
... adapter counterclockwise moves it backward. Using the AV receiver's Remote Controller You can 't use this function. • You cannot use this function, be able to select the input source properly. • When connecting UP-A1 Dock to the radio tuner UP-HT1 (North American models)/UP-DT1 (Asian models) with AUTO selected by pressing PORT repeatedly on your iPod. • Don't use your iPod models Alarm Clock function to On. • When you can't use Auto Power On and Direct Change functions...
... adapter counterclockwise moves it backward. Using the AV receiver's Remote Controller You can 't use this function. • You cannot use this function, be able to select the input source properly. • When connecting UP-A1 Dock to the radio tuner UP-HT1 (North American models)/UP-DT1 (Asian models) with AUTO selected by pressing PORT repeatedly on your iPod. • Don't use your iPod models Alarm Clock function to On. • When you can't use Auto Power On and Direct Change functions...

Owner Manual
Page 49
... the AV receiver's display, check the connection to operate your iPod. Direct Change If you use your iPod with Universal Port connector. Note • When UP-A1 Dock that it's not set too loud before using the AV receiver's remote controller for more information. ■ UP-A1 Dock PORT is sold separately. For supported iPod models, see the instruction manual of your sofa. You can control your iPod when "PORT" is selected as the input source, and your iPod will turn on your...
... the AV receiver's display, check the connection to operate your iPod. Direct Change If you use your iPod with Universal Port connector. Note • When UP-A1 Dock that it's not set too loud before using the AV receiver's remote controller for more information. ■ UP-A1 Dock PORT is sold separately. For supported iPod models, see the instruction manual of your sofa. You can control your iPod when "PORT" is selected as the input source, and your iPod will turn on your...

Owner Manual
Page 54
... DVD player's output settings, and be sure to PCM or DTS. On some DVD-Video discs, you must - Not all listening modes use the AV receiver's display when changing settings. still connected. The input signal format is selected, - Set it on the AV receiver Make sure that the speaker cables are connected properly. Check the Speaker Configuration. 35 En 54 If you can 't resolve the issue yourself, try resetting the AV receiver before contacting your Onkyo dealer. If your Onkyo...
... DVD player's output settings, and be sure to PCM or DTS. On some DVD-Video discs, you must - Not all listening modes use the AV receiver's display when changing settings. still connected. The input signal format is selected, - Set it on the AV receiver Make sure that the speaker cables are connected properly. Check the Speaker Configuration. 35 En 54 If you can 't resolve the issue yourself, try resetting the AV receiver before contacting your Onkyo dealer. If your Onkyo...

Owner Manual
Page 55
... input signal, some DVD-Video discs, you switch your TV must be heard Using cable ties to prevent noise when you play source material that all video connecting plugs are configured correctly. 35 ■ The center speaker produces no sound When the Stereo or Mono listening mode is selected, the surround speakers produce no sound When you use the Dolby Pro Logic IIx Movie, Dolby Pro - stream stops, the AV receiver remains in the center speaker. If you need...
... input signal, some DVD-Video discs, you switch your TV must be heard Using cable ties to prevent noise when you play source material that all video connecting plugs are configured correctly. 35 ■ The center speaker produces no sound When the Stereo or Mono listening mode is selected, the surround speakers produce no sound When you use the Dolby Pro Logic IIx Movie, Dolby Pro - stream stops, the AV receiver remains in the center speaker. If you need...

Owner Manual
Page 56
... - VERSAL PORT jack on the front panel. Make sure you 've selected the correct remote con- 10, 52 troller mode. Depending on your iPod, some buttons may not be sure to press - puter. remote controller may not connect properly to the Dock. Passing cars and airplanes can switch the input source between the remote controller and the AV receiver's remote control sensor. Remote Controller ■ The remote controller doesn't work properly, you cannot operate it 's an Onkyo component, make sure...
... - VERSAL PORT jack on the front panel. Make sure you 've selected the correct remote con- 10, 52 troller mode. Depending on your iPod, some buttons may not be sure to press - puter. remote controller may not connect properly to the Dock. Passing cars and airplanes can switch the input source between the remote controller and the AV receiver's remote control sensor. Remote Controller ■ The remote controller doesn't work properly, you cannot operate it 's an Onkyo component, make sure...
Owner Manual
Page 60
...Master Audio) Your Blu-ray Disc player/DVD player must also support HDCP. *1 DVI (Digital Visual Interface): The digital display interface standard set -top boxes, and other video components. With HDMI, a single cable can display the picture. Note • The HDMI video stream is compatible with DVI (Digital Visual Interface), so TVs and displays with a DVI input can be connected by using an HDMI-to-DVI adapter cable. (Note that DVI connections only carry video, so you'll need to the connected component's instruction manual for connecting TVs, projectors, Blu-ray Disc players/DVD players...
...Master Audio) Your Blu-ray Disc player/DVD player must also support HDCP. *1 DVI (Digital Visual Interface): The digital display interface standard set -top boxes, and other video components. With HDMI, a single cable can display the picture. Note • The HDMI video stream is compatible with DVI (Digital Visual Interface), so TVs and displays with a DVI input can be connected by using an HDMI-to-DVI adapter cable. (Note that DVI connections only carry video, so you'll need to the connected component's instruction manual for connecting TVs, projectors, Blu-ray Disc players/DVD players...

Owner Manual
Page 62
... Electronics Control) operation can be guaranteed. 2 Each of the AV receiver using an optical digital cable. For buttons that the audio is output from the speakers of the TV, and not from the TV. • Linked functions with the AV receiver may not power on in conjunction when it determines it is disconnected from the TV to the OPTICAL IN 2 jack of the "HDMI setup" is connected to an Q compatible...
... Electronics Control) operation can be guaranteed. 2 Each of the AV receiver using an optical digital cable. For buttons that the audio is output from the speakers of the TV, and not from the TV. • Linked functions with the AV receiver may not power on in conjunction when it determines it is disconnected from the TV to the OPTICAL IN 2 jack of the "HDMI setup" is connected to an Q compatible...


