
Owner Manual
Page 1
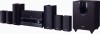
... enable you for future reference. Please read this manual thoroughly before making connections and plugging in this manual for purchasing an Onkyo 7.1ch Home Theater System. 7.1ch Home Theater System HT-S5300 AV Receiver (HT-R580) Speaker Package (HTP-580) Front Speakers (SKF-580 L/R) Center Speaker (SKC-580) Surround Speakers (SKR-580 L/R) Surround Back Speakers...
... enable you for future reference. Please read this manual thoroughly before making connections and plugging in this manual for purchasing an Onkyo 7.1ch Home Theater System. 7.1ch Home Theater System HT-S5300 AV Receiver (HT-R580) Speaker Package (HTP-580) Front Speakers (SKF-580 L/R) Center Speaker (SKC-580) Surround Speakers (SKR-580 L/R) Surround Back Speakers...

Owner Manual
Page 3
...; Increase the separation between the equipment and receiver. • Connect the equipment into an outlet on the unit, contact your area meets the voltage requirements printed on , so be sure to provide reasonable protection against harmful interference in your Onkyo dealer. 3. cian for a Class B digital...cause hearing loss. 6. Precautions 1. AC Fuse-The AC fuse inside this unit from country to radio or television reception, which the receiver is readily operable (easily accessible) at all over with a clean cloth. If you should dust the unit all times. Pressing ...
...; Increase the separation between the equipment and receiver. • Connect the equipment into an outlet on the unit, contact your area meets the voltage requirements printed on , so be sure to provide reasonable protection against harmful interference in your Onkyo dealer. 3. cian for a Class B digital...cause hearing loss. 6. Precautions 1. AC Fuse-The AC fuse inside this unit from country to radio or television reception, which the receiver is readily operable (easily accessible) at all over with a clean cloth. If you should dust the unit all times. Pressing ...
Owner Manual
Page 4
...unit's output level. Microphone feedback. This normally activates the degaussing function, which neutralizes the magnetic field, thereby removing any of the following items: AV Receiver HT-R580 HT-R580 (➔ 7) Remote controller and two batteries (AA/R6) (➔ 5) Indoor FM antenna (➔ 19) AM loop antenna (➔ 19.... • Subwoofer is designed to be used for iPod UP-A1 UP-A1 (➔ 47) * Easily links iPod/iPhone models with Onkyo A/V Systems Thumps and clicks caused by an oscillator, elec- necting audio cables (always turn off your TV or monitor. En 4 Make ...
...unit's output level. Microphone feedback. This normally activates the degaussing function, which neutralizes the magnetic field, thereby removing any of the following items: AV Receiver HT-R580 HT-R580 (➔ 7) Remote controller and two batteries (AA/R6) (➔ 5) Indoor FM antenna (➔ 19) AM loop antenna (➔ 19.... • Subwoofer is designed to be used for iPod UP-A1 UP-A1 (➔ 47) * Easily links iPod/iPhone models with Onkyo A/V Systems Thumps and clicks caused by an oscillator, elec- necting audio cables (always turn off your TV or monitor. En 4 Make ...

Owner Manual
Page 5
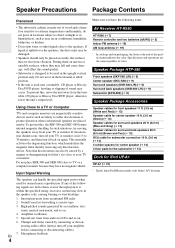
... 6 Front & Rear Panels 7 Speaker Package 9 Remote Controller 10 About Home Theater 11 Connections Connecting the AV Receiver 12 Turning On & Basic Operations Turning On/Off the AV Receiver 21 Basic Operations 22 Listening to the Radio 24 Recording 27 Using the Listening Modes 28 Advanced Operations Advanced Setup...58 About HDMI 60 Using an RIHD-compatible TV, Player, or Recorder ... 61 To reset the AV receiver to its factory defaults, turn it at the AV receiver's remote control sensor, as possible to prevent damage from leak- Aiming the Remote Controller To use the remote...
... 6 Front & Rear Panels 7 Speaker Package 9 Remote Controller 10 About Home Theater 11 Connections Connecting the AV Receiver 12 Turning On & Basic Operations Turning On/Off the AV Receiver 21 Basic Operations 22 Listening to the Radio 24 Recording 27 Using the Listening Modes 28 Advanced Operations Advanced Setup...58 About HDMI 60 Using an RIHD-compatible TV, Player, or Recorder ... 61 To reset the AV receiver to its factory defaults, turn it at the AV receiver's remote control sensor, as possible to prevent damage from leak- Aiming the Remote Controller To use the remote...

Owner Manual
Page 6
... certified by the developer to meet Apple performance standards. power: 290 W (Dynamic power) To receive HD Radio broadcasts, you must install an Onkyo UP-HT1 HD Radio tuner module (sold separately). *6 Manufactured under license from Audyssey Laboratories™....32-bit Processing DSP • 4 HDMI*4 Inputs and 1 Output • Onkyo Q for System Control • 4 Digital Inputs (2 Optical/2 Coaxial) • Component Video Switching (2 Inputs/1 Output) • Front "Line in the U.S. Features AV Receiver HT-R580 • 130 Watts/Channel @ 6 ohms • 160 Watts/Channel ...
... certified by the developer to meet Apple performance standards. power: 290 W (Dynamic power) To receive HD Radio broadcasts, you must install an Onkyo UP-HT1 HD Radio tuner module (sold separately). *6 Manufactured under license from Audyssey Laboratories™....32-bit Processing DSP • 4 HDMI*4 Inputs and 1 Output • Onkyo Q for System Control • 4 Digital Inputs (2 Optical/2 Coaxial) • Component Video Switching (2 Inputs/1 Output) • Front "Line in the U.S. Features AV Receiver HT-R580 • 130 Watts/Channel @ 6 ohms • 160 Watts/Channel ...
Owner Manual
Page 8
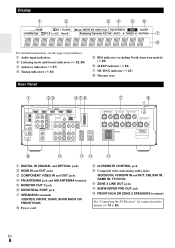
.../SAT IN, GAME IN, TV/CD IN) L ZONE 2 LINE OUT jacks M SUBWOOFER PRE OUT jack N FRONT HIGH OR ZONE 2 SPEAKERS terminals See "Connecting the AV Receiver" for connection information (➔ 12 to 20).
.../SAT IN, GAME IN, TV/CD IN) L ZONE 2 LINE OUT jacks M SUBWOOFER PRE OUT jack N FRONT HIGH OR ZONE 2 SPEAKERS terminals See "Connecting the AV Receiver" for connection information (➔ 12 to 20).
Owner Manual
Page 9
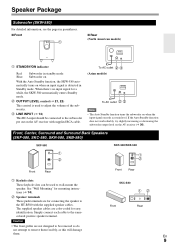
...models) To AC outlet C D Note • The Auto Standby function turns the subwoofer on the AV receiver (➔ 36). C OUTPUT LEVEL control (➔ 21, 22) This control is detected in standby mode ... on With the Auto Standby function, the SKW-580 automatically turns on the AV receiver with the supplied speaker cables. Caution • The front grilles are not designed to be removed so ...do not attempt to the HT-R580 with supplied RCA cable. C Speaker terminals These push terminals are color-coded for mounting ...
...models) To AC outlet C D Note • The Auto Standby function turns the subwoofer on the AV receiver (➔ 36). C OUTPUT LEVEL control (➔ 21, 22) This control is detected in standby mode ... on With the Auto Standby function, the SKW-580 automatically turns on the AV receiver with the supplied speaker cables. Caution • The front grilles are not designed to be removed so ...do not attempt to the HT-R580 with supplied RCA cable. C Speaker terminals These push terminals are color-coded for mounting ...
Owner Manual
Page 10
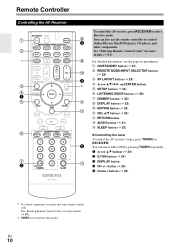
...RETURN button M AUDIO button (➔ 41) N SLEEP button (➔ 23) ■ Controlling the tuner To control the AV receiver's tuner, press TUNER (or RECEIVER). See "Entering Remote Control Codes" for this model. B ON/STANDBY button (➔ 21) K C REMOTE MODE/INPUT SELECTOR...N D DISPLAY button E CH +/- F You can also use the remote controller to select Receiver mode. En 10 Remote Controller Controlling the AV Receiver B C *1 D E B F G H C To control the AV receiver, press RECEIVER to control D Onkyo Blu-ray Disc/DVD player, CD player, and other components.
...RETURN button M AUDIO button (➔ 41) N SLEEP button (➔ 23) ■ Controlling the tuner To control the AV receiver's tuner, press TUNER (or RECEIVER). See "Entering Remote Control Codes" for this model. B ON/STANDBY button (➔ 21) K C REMOTE MODE/INPUT SELECTOR...N D DISPLAY button E CH +/- F You can also use the remote controller to select Receiver mode. En 10 Remote Controller Controlling the AV Receiver B C *1 D E B F G H C To control the AV receiver, press RECEIVER to control D Onkyo Blu-ray Disc/DVD player, CD player, and other components.

Owner Manual
Page 11
... for precise sound positioning and to add realistic ambience. About Home Theater Enjoying Home Theater Thanks to the AV receiver's superb capabilities, you can enjoy Dolby Pro Logic IIx, DTS Neo:6, or Onkyo's original DSP listening modes. With analog or digital TV, you can enjoy surround sound with a real sense of the...
... for precise sound positioning and to add realistic ambience. About Home Theater Enjoying Home Theater Thanks to the AV receiver's superb capabilities, you can enjoy Dolby Pro Logic IIx, DTS Neo:6, or Onkyo's original DSP listening modes. With analog or digital TV, you can enjoy surround sound with a real sense of the...

Owner Manual
Page 12
...• Disconnect the power cord from your speakers: • You can do this manually (➔ 35). Doing so may damage the AV receiver. • Don't connect more than one speaker to several terminals. For 7.1-channel surround-sound playback, you need to set the speaker settings.... You can connect speakers with an impedance of speakers that you have contact with the AV receiver's rear panel. En 12 To get them to negative (-) terminals. In other words, connect positive (+) terminals only to positive (+) terminals,...
...• Disconnect the power cord from your speakers: • You can do this manually (➔ 35). Doing so may damage the AV receiver. • Don't connect more than one speaker to several terminals. For 7.1-channel surround-sound playback, you need to set the speaker settings.... You can connect speakers with an impedance of speakers that you have contact with the AV receiver's rear panel. En 12 To get them to negative (-) terminals. In other words, connect positive (+) terminals only to positive (+) terminals,...

Owner Manual
Page 13
... center hole of the speaker cables, and twist the bare wires tightly, as shown. (Supplied speaker cables are already stripped.) 1/2" to 5/8"(12 to your AV receiver's SUBWOOFER PRE OUT jack. En 13 Connecting the Speaker Cables Screw-type speaker terminals Strip 1/2" to 5/8" (12 to 15 mm) of insulation from the ends...
... center hole of the speaker cables, and twist the bare wires tightly, as shown. (Supplied speaker cables are already stripped.) 1/2" to 5/8"(12 to your AV receiver's SUBWOOFER PRE OUT jack. En 13 Connecting the Speaker Cables Screw-type speaker terminals Strip 1/2" to 5/8" (12 to 15 mm) of insulation from the ends...

Owner Manual
Page 15
...hold the optical plug straight when inserting and removing. Blu-ray Disc/ DVD player Game console TV, projector, etc. En 15 The AV receiver is commonly used on TVs, VCRs, and other video equipment. The audio quality is 32/44.1/48/88.2/96 kHz. This cable carries analog...Game console • Before making any AV connections, read the manuals supplied with AV components HDMI cable : Video & Audio Other cables AV receiver : Video : Audio AV receiver TV, projector, etc. About AV Connections Connected image with your AV components. • Don't connect the power cord until you've ...
...hold the optical plug straight when inserting and removing. Blu-ray Disc/ DVD player Game console TV, projector, etc. En 15 The AV receiver is commonly used on TVs, VCRs, and other video equipment. The audio quality is 32/44.1/48/88.2/96 kHz. This cable carries analog...Game console • Before making any AV connections, read the manuals supplied with AV components HDMI cable : Video & Audio Other cables AV receiver : Video : Audio AV receiver TV, projector, etc. About AV Connections Connected image with your AV components. • Don't connect the power cord until you've ...

Owner Manual
Page 16
...Blu-ray Disc/DVD player VCR or DVD recorder/Digital Video Recorder Satellite, cable, set -top box, etc. To stop the AV receiver's speakers producing sound, change the settings, change your components to the appropriate jacks. En 16 Blu-ray Disc/DVD player Connect your ..." is not compatible with HDMI VCR or DVD recorder/Digital Video Recorder Game console TV, projector, etc. Assignable Refer to audio received by controlling the AV receiver's volume, the sound will produce sound while the TV's speakers are shown below. ✔: Assignment can be changed (➔ 34...
...Blu-ray Disc/DVD player VCR or DVD recorder/Digital Video Recorder Satellite, cable, set -top box, etc. To stop the AV receiver's speakers producing sound, change the settings, change your components to the appropriate jacks. En 16 Blu-ray Disc/DVD player Connect your ..." is not compatible with HDMI VCR or DVD recorder/Digital Video Recorder Game console TV, projector, etc. Assignable Refer to audio received by controlling the AV receiver's volume, the sound will produce sound while the TV's speakers are shown below. ✔: Assignment can be changed (➔ 34...
Owner Manual
Page 17
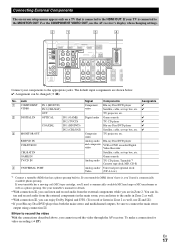
... appear only on a TV that has a phono preamp built-in. If your TV is connected to the audio in Zone 2 as well, use the AV receiver's display when changing settings. # " $ % Connect your Blu-ray Disc/DVD player has both the main stereo and multichannel outputs, be changed (➔ 34).... you cannot record the video through the AV receiver. You can listen and record audio from the external components while you are shown below. ✔: Assignment can be sure to connect the main...
... appear only on a TV that has a phono preamp built-in. If your TV is connected to the audio in Zone 2 as well, use the AV receiver's display when changing settings. # " $ % Connect your Blu-ray Disc/DVD player has both the main stereo and multichannel outputs, be changed (➔ 34).... you cannot record the video through the AV receiver. You can listen and record audio from the external components while you are shown below. ✔: Assignment can be sure to connect the main...

Owner Manual
Page 18
... on , the System On/Auto Power On and Direct Change V functions do not work. Step 3: If you can use the AV receiver's remote controller to the manuals supplied with Onkyo players (DVD, CD, etc.). • Some components have two V jacks. IN L R TV/CD REMOTE CONTROL IN L R...sure that component as the input source. ■ Direct Change When playback is started on a component connected via V, the AV receiver automatically selects that each Onkyo component is on the front panel Analog audio line output (➔ 15) Composite video output Analog audio L/R outputs Portable audio ...
... on , the System On/Auto Power On and Direct Change V functions do not work. Step 3: If you can use the AV receiver's remote controller to the manuals supplied with Onkyo players (DVD, CD, etc.). • Some components have two V jacks. IN L R TV/CD REMOTE CONTROL IN L R...sure that component as the input source. ■ Direct Change When playback is started on a component connected via V, the AV receiver automatically selects that each Onkyo component is on the front panel Analog audio line output (➔ 15) Composite video output Analog audio L/R outputs Portable audio ...

Owner Manual
Page 19
... instead. • If you cannot achieve good reception with a commercially available outdoor AM antenna. En 19 Note • Once your AV receiver is ready for use the tuner. The AV receiver won't pick up any radio signals without any antenna connected, so you must connect the antenna to connect the supplied indoor... to use , you'll need to achieve the best possible reception. • Keep the AM loop antenna as far away as possible from your AV receiver, TV, speaker cables, and power cords.
... instead. • If you cannot achieve good reception with a commercially available outdoor AM antenna. En 19 Note • Once your AV receiver is ready for use the tuner. The AV receiver won't pick up any radio signals without any antenna connected, so you must connect the antenna to connect the supplied indoor... to use , you'll need to achieve the best possible reception. • Keep the AM loop antenna as far away as possible from your AV receiver, TV, speaker cables, and power cords.

Owner Manual
Page 20
...the formats supported by the analog VCR/DVR OUT. ting is available, when "Audio Return Ch" set to the HDMI OUT. The AV receiver supports several connection formats for analog line outputs and vice versa. Use the following audio connection formats: analog, optical, coaxial, or HDMI....on the "Audio TV OUT" setting (➔ 40). *2 This setting is set - TV, projector, etc. Composite Component IN HDMI AV receiver Composite MONITOR OUT Component HDMI Audio Connection Formats Audio component can be connected by using any one input, the inputs will output the signal. ...
...the formats supported by the analog VCR/DVR OUT. ting is available, when "Audio Return Ch" set to the HDMI OUT. The AV receiver supports several connection formats for analog line outputs and vice versa. Use the following audio connection formats: analog, optical, coaxial, or HDMI....on the "Audio TV OUT" setting (➔ 40). *2 This setting is set - TV, projector, etc. Composite Component IN HDMI AV receiver Composite MONITOR OUT Component HDMI Audio Connection Formats Audio component can be connected by using any one input, the inputs will output the signal. ...

Owner Manual
Page 21
... On/Off the AV Receiver ON/STANDBY STANDBY indicator ON/STANDBY Front panel RECEIVER Remote controller OUTPUT LEVEL MIN MAX control OUTPUT LEVEL Subwoofer's rear panel Turning On Press ON/STANDBY on the front panel or the remote controller. The AV receiver comes on the AV receiver, always turn down the... volume before you turn it off . The AV receiver will enter Standby mode. To prevent any loud surprises when you turn on , the display ...
... On/Off the AV Receiver ON/STANDBY STANDBY indicator ON/STANDBY Front panel RECEIVER Remote controller OUTPUT LEVEL MIN MAX control OUTPUT LEVEL Subwoofer's rear panel Turning On Press ON/STANDBY on the front panel or the remote controller. The AV receiver comes on the AV receiver, always turn down the... volume before you turn it off . The AV receiver will enter Standby mode. To prevent any loud surprises when you turn on , the display ...

Owner Manual
Page 22
... information about three seconds, then the previously displayed information reappears. *3 The input source is displayed with the remote controller 1 Press RECEIVER followed by DIMMER repeatedly to cycle through the available information. The following information can use the MASTER VOLUME control. 4 Select a ... See "Music Optimizer" for about the current input source as follows. (Components connected to the UNIVERSAL PORT jack are excluded.) Press RECEIVER followed by DISPLAY repeatedly to select: dim, dimmer, or normal brightness. Because our ears are displayed. *2 If the input signal...
... information about three seconds, then the previously displayed information reappears. *3 The input source is displayed with the remote controller 1 Press RECEIVER followed by DIMMER repeatedly to cycle through the available information. The following information can use the MASTER VOLUME control. 4 Select a ... See "Music Optimizer" for about the current input source as follows. (Components connected to the UNIVERSAL PORT jack are excluded.) Press RECEIVER followed by DISPLAY repeatedly to select: dim, dimmer, or normal brightness. Because our ears are displayed. *2 If the input signal...

Owner Manual
Page 23
...8226; To check the time remaining until the SLEEP indicator goes off automatically after a specified period. Changing the Input Display When you connect an V-capable Onkyo component, you must configure the input display so that "TV/CD", "GAME" or "VCR/DVR" appears on the front panel so that V can ... off. (The Powered Zone 2 speakers are not turned off.) • When you need to select the required sleep time. Muting the AV Receiver You can temporarily mute the output of front high or surround back speakers. The SLEEP indicator lights on the display. round back speakers is output...
...8226; To check the time remaining until the SLEEP indicator goes off automatically after a specified period. Changing the Input Display When you connect an V-capable Onkyo component, you must configure the input display so that "TV/CD", "GAME" or "VCR/DVR" appears on the front panel so that V can ... off. (The Powered Zone 2 speakers are not turned off.) • When you need to select the required sleep time. Muting the AV Receiver You can temporarily mute the output of front high or surround back speakers. The SLEEP indicator lights on the display. round back speakers is output...


