

Owner Manual
Page 4
... a cassette tape. 3. Special test tones from the turntable, CD player or DVD player, otherwise lower the unit's output level. Specifications and operation are placed nearby. In some situations, however, discoloration may flow in which neutralizes the magnetic field, thereby removing any of the following accessories: AV receiver HT-R570 HT-R570 Remote controller and two batteries (AA/R6) Speaker setup microphone Indoor FM antenna AM loop antenna * In catalogs and...
... a cassette tape. 3. Special test tones from the turntable, CD player or DVD player, otherwise lower the unit's output level. Specifications and operation are placed nearby. In some situations, however, discoloration may flow in which neutralizes the magnetic field, thereby removing any of the following accessories: AV receiver HT-R570 HT-R570 Remote controller and two batteries (AA/R6) Speaker setup microphone Indoor FM antenna AM loop antenna * In catalogs and...

Owner Manual
Page 6
... Output Set A: 5.1 channels Set B: 2 channels Set A: 7.1 channels Set B: 2 channels No sound Main Room (speaker set A) Front left speaker Subwoofer Center speaker Front right speaker Surround left speaker Surround back left speaker Surround back right speaker Surround right speaker Sub Room (speaker set B) Front left speaker Front right speaker * While speaker set B is on , speaker set A is on , the surround back speakers output no sound. 6 * Digital input sources are output by speaker set B. Speaker set A should be used in another room and offers 2-channel stereo playback...
... Output Set A: 5.1 channels Set B: 2 channels Set A: 7.1 channels Set B: 2 channels No sound Main Room (speaker set A) Front left speaker Subwoofer Center speaker Front right speaker Surround left speaker Surround back left speaker Surround back right speaker Surround right speaker Sub Room (speaker set B) Front left speaker Front right speaker * While speaker set B is on , speaker set A is on , the surround back speakers output no sound. 6 * Digital input sources are output by speaker set B. Speaker set A should be used in another room and offers 2-channel stereo playback...
Owner Manual
Page 9
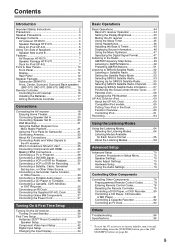
... 7 AV Receiver HT-R570 7 Speaker Package HTP-570 7 Dock for iPod UP-A1L 7 Front & Rear Panels 10 Front Panel 10 Display 11 Rear Panel 12 Speaker Package 14 Subwoofer (SKW-570 14 Front, Center, Surround, Surround Back speakers (SKF-570, SKC-570, SKR-570, SKB-570)........ 15 Remote Controller 16 Controlling the AV receiver 16 Installing the Batteries 17 Aiming the Remote Controller 17 Connections Connecting the AV receiver 18 Enjoying Home Theater 18 Connecting Speaker Set A 20 Connecting Speaker Set B 20 Wall Mounting 21 Using the...
... 7 AV Receiver HT-R570 7 Speaker Package HTP-570 7 Dock for iPod UP-A1L 7 Front & Rear Panels 10 Front Panel 10 Display 11 Rear Panel 12 Speaker Package 14 Subwoofer (SKW-570 14 Front, Center, Surround, Surround Back speakers (SKF-570, SKC-570, SKR-570, SKB-570)........ 15 Remote Controller 16 Controlling the AV receiver 16 Installing the Batteries 17 Aiming the Remote Controller 17 Connections Connecting the AV receiver 18 Enjoying Home Theater 18 Connecting Speaker Set A 20 Connecting Speaker Set B 20 Wall Mounting 21 Using the...

Owner Manual
Page 16
...receiver to change audio settings. F SETUP button Used to On or Standby. K VOL [R]/[X] button (44) Adjusts the volume of the AV receiver regardless of the currently selected remote controller mode. L RETURN button Returns to change settings. You can select AM or FM by pressing the [TUNER] button repeatedly. 1 Arrow [R]/[X] buttons Used to control your DVD/BD player, CD player, and other components. For details on . 4 CH +/- Note: An Onkyo cassette recorder connected via V can also use the remote controller to tune into radio stations. 2 D.TUN button (50) Selects the Direct tuning...
...receiver to change audio settings. F SETUP button Used to On or Standby. K VOL [R]/[X] button (44) Adjusts the volume of the AV receiver regardless of the currently selected remote controller mode. L RETURN button Returns to change settings. You can select AM or FM by pressing the [TUNER] button repeatedly. 1 Arrow [R]/[X] buttons Used to control your DVD/BD player, CD player, and other components. For details on . 4 CH +/- Note: An Onkyo cassette recorder connected via V can also use the remote controller to tune into radio stations. 2 D.TUN button (50) Selects the Direct tuning...

Owner Manual
Page 24
... Optical digital audio cable Coaxial digital audio cable Analog audio cable (RCA) Stereo mini plug cable OPTICAL This offers the best sound quality and allows you to connect left-channel audio inputs and outputs (typically labeled "L"). The audio quality is the same as for optical. This cable carries analog audio. Use red plugs to connect composite video inputs and outputs. Connecting the AV receiver-Continued About AV Connections • Before making any AV connections, read the manuals supplied with your other video equipment. Right! Use white plugs to enjoy Dolby...
... Optical digital audio cable Coaxial digital audio cable Analog audio cable (RCA) Stereo mini plug cable OPTICAL This offers the best sound quality and allows you to connect left-channel audio inputs and outputs (typically labeled "L"). The audio quality is the same as for optical. This cable carries analog audio. Use red plugs to connect composite video inputs and outputs. Connecting the AV receiver-Continued About AV Connections • Before making any AV connections, read the manuals supplied with your other video equipment. Right! Use white plugs to enjoy Dolby...

Owner Manual
Page 25
... HDMI Optical HDMI TV, projector, etc. Video Signal Flow Chart DVD player, etc. The AV receiver supports several connection formats for hookup details) Which Connections Should I Use? Use the following video connection formats: composite video, component video, or HDMI, the latter offering the best picture quality. When you must make an audio connection and a video connection. HDMI sources are output only by the speakers connected to an OPTICAL or COAXIAL input, you connect audio equipment to the AV receiver. Audio signals received by the HDMI IN jacks...
... HDMI Optical HDMI TV, projector, etc. Video Signal Flow Chart DVD player, etc. The AV receiver supports several connection formats for hookup details) Which Connections Should I Use? Use the following video connection formats: composite video, component video, or HDMI, the latter offering the best picture quality. When you must make an audio connection and a video connection. HDMI sources are output only by the speakers connected to an OPTICAL or COAXIAL input, you connect audio equipment to the AV receiver. Audio signals received by the HDMI IN jacks...

Owner Manual
Page 27
... AV receiver's listening modes, turn down the volume on , otherwise no sound. Connecting the AV receiver-Continued Making HDMI Connections If you have an HDMI-compatible player, you can be connected by using an HDMI-to-DVI adapter cable. (Note that DVI connections only carry video, so you'll need to make a separate analog or digital audio connection. Connect one or the other than the HDMI IN jacks are not output by the HDMI OUT. • Audio and video signals received via the HDMI IN jacks...
... AV receiver's listening modes, turn down the volume on , otherwise no sound. Connecting the AV receiver-Continued Making HDMI Connections If you have an HDMI-compatible player, you can be connected by using an HDMI-to-DVI adapter cable. (Note that DVI connections only carry video, so you'll need to make a separate analog or digital audio connection. Connect one or the other than the HDMI IN jacks are not output by the HDMI OUT. • Audio and video signals received via the HDMI IN jacks...
Owner Manual
Page 37
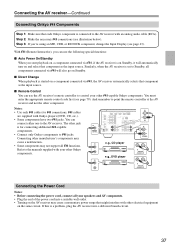
... select that component as the input source. ■ Remote Control You can use the AV receiver's remote controller to V jacks. You can connect either one to the AV receiver with your other jack is for V connections. Refer to the manuals supplied with an analog audio cable (RCA). If this is a problem, plug the AV receiver into a suitable wall outlet. • Turning on the AV receiver may not support all components connected via V will also go on Standby. ■ Direct Change...
... select that component as the input source. ■ Remote Control You can use the AV receiver's remote controller to V jacks. You can connect either one to the AV receiver with your other jack is for V connections. Refer to the manuals supplied with an analog audio cable (RCA). If this is a problem, plug the AV receiver into a suitable wall outlet. • Turning on the AV receiver may not support all components connected via V will also go on Standby. ■ Direct Change...

Owner Manual
Page 45
... set the AV receiver so that it turns off . You can adjust the brightness of the AV receiver. Using the Sleep Timer With the sleep timer, you can be used with any input source. You can temporarily mute the output of the display. To check the remaining sleep time, press the [SLEEP] button. Press the [RECEIVER] button, and then press the remote controller's [SLEEP] button repeatedly to select...
... set the AV receiver so that it turns off . You can adjust the brightness of the AV receiver. Using the Sleep Timer With the sleep timer, you can be used with any input source. You can temporarily mute the output of the display. To check the remaining sleep time, press the [SLEEP] button. Press the [RECEIVER] button, and then press the remote controller's [SLEEP] button repeatedly to select...

Owner Manual
Page 46
... on the remote controller by using [AUDIO] button (see page 76). ■ Bass You can boost or cut low-frequency sounds output by using its [DISPLAY] button. AV receiver Press the [TONE] button repeatedly to adjust. Use the TONE [-]/[+] buttons to select either "Bass" or "Treble". Press the [RECEIVER] button, and then press the [DISPLAY] button repeatedly to the AV receiver's PHONES jack. If the input signal is PCM, the sampling frequency is displayed. Information is selected. The following information can also be displayed: Input source & volume*1 Signal format*2 or...
... on the remote controller by using [AUDIO] button (see page 76). ■ Bass You can boost or cut low-frequency sounds output by using its [DISPLAY] button. AV receiver Press the [TONE] button repeatedly to adjust. Use the TONE [-]/[+] buttons to select either "Bass" or "Treble". Press the [RECEIVER] button, and then press the [DISPLAY] button repeatedly to the AV receiver's PHONES jack. If the input signal is PCM, the sampling frequency is displayed. Information is selected. The following information can also be displayed: Input source & volume*1 Signal format*2 or...

Owner Manual
Page 60
... iPod with this unit. Remove iPod case before using the Dock, update your iPod with the latest software, available from the Dock when you play the music, photo, or movie stored on your Apple iPod through the AV receiver and enjoy great sound. If there's a gap between the back of your iPod and the adapter, turn on and select your iPod as the input source. Then, your iPod will start playback. • Direct Change Function...
... iPod with this unit. Remove iPod case before using the Dock, update your iPod with the latest software, available from the Dock when you play the music, photo, or movie stored on your Apple iPod through the AV receiver and enjoy great sound. If there's a gap between the back of your iPod and the adapter, turn on and select your iPod as the input source. Then, your iPod will start playback. • Direct Change Function...

Owner Manual
Page 61
... the PORT jacks on standby mode slightly increases. While your iPod is connected to the HT-R570's PORT jack, press the [PORT] button. Press it 's in the UP-A1L Dock, which is seated in the Dock, its volume control has no effect. B Arrow [R]/[X] and ENTER buttons Used to select the previous song. UP-A1L Dock for iPod-Continued Operating Notes: • Before selecting a different input source, stop iPod playback to prevent the AV receiver from selecting the iPod input source...
... the PORT jacks on standby mode slightly increases. While your iPod is connected to the HT-R570's PORT jack, press the [PORT] button. Press it 's in the UP-A1L Dock, which is seated in the Dock, its volume control has no effect. B Arrow [R]/[X] and ENTER buttons Used to select the previous song. UP-A1L Dock for iPod-Continued Operating Notes: • Before selecting a different input source, stop iPod playback to prevent the AV receiver from selecting the iPod input source...
Owner Manual
Page 71
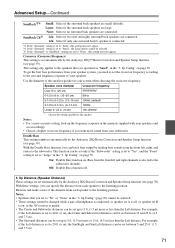
...) surround back speakers are connected. 1ch: Select if only one surround back L speaker is connected. *3 If the "Surround" setting is set up the frequency response in the "3. On: Double Bass function on page 70. For example, if the Left distance is not set to the subwoofer (default). SurrBack Ch*5 2ch: Select if two (left and right channels is set automatically by feeding bass sounds from the front left, right, and center to...
...) surround back speakers are connected. 1ch: Select if only one surround back L speaker is connected. *3 If the "Surround" setting is set up the frequency response in the "3. On: Double Bass function on page 70. For example, if the Left distance is not set to the subwoofer (default). SurrBack Ch*5 2ch: Select if two (left and right channels is set automatically by feeding bass sounds from the front left, right, and center to...

Owner Manual
Page 73
... center speaker. (If you are output (default). Audio Adjust Multiplex/Mono Settings Input (Mux) Main: The main channel is output. Use it to select audio channels or languages with a stereo source. Normally, if you are using a center speaker, the center channel sound is unavailable if no surround speakers are output. Dimension -3 to 7 (default: 3) from 2-channel (stereo) sources. Center Width 0 to +3 (default: 0) With this setting, you can move the sound field forward or backward when using the Dolby Pro Logic II Music or Dolby Pro Logic IIx Music listening mode...
... center speaker. (If you are output (default). Audio Adjust Multiplex/Mono Settings Input (Mux) Main: The main channel is output. Use it to select audio channels or languages with a stereo source. Normally, if you are using a center speaker, the center channel sound is unavailable if no surround speakers are output. Dimension -3 to 7 (default: 3) from 2-channel (stereo) sources. Center Width 0 to +3 (default: 0) With this setting, you can move the sound field forward or backward when using the Dolby Pro Logic II Music or Dolby Pro Logic IIx Music listening mode...

Owner Manual
Page 76
... function is set to Off when the AV receiver is selected. Cinema Fltr Off: CinemaFILTER off (default). Notes: • The Late Night function can be used with certain input sources. On: CinemaFILTER on the AV receiver by the [AUDIO] button. RXFS 3 Use the Left and Right [F]/[S] buttons to select an item. Low: Small reduction in dynamic range. Notes: • To bypass the bass and treble tone circuits, select the Direct listening mode...
... function is set to Off when the AV receiver is selected. Cinema Fltr Off: CinemaFILTER off (default). Notes: • The Late Night function can be used with certain input sources. On: CinemaFILTER on the AV receiver by the [AUDIO] button. RXFS 3 Use the Left and Right [F]/[S] buttons to select an item. Low: Small reduction in dynamic range. Notes: • To bypass the bass and treble tone circuits, select the Direct listening mode...

Owner Manual
Page 78
... [DISPLAY] button until the Remote indicator lights up the appropriate remote control code in the separate Remote Control Codes list. For example, if you connect your DVD player, CD player, and other components. Preprogrammed Remote Control Codes The following REMOTE MODE buttons are correct at the time of printing but subject to change. 78 For details on controlling these components. Onkyo DVD/BD player (page 80) Onkyo CD player (page 81) Onkyo cassette recorder with remote control codes for controlling the components listed. The Remote indicator flashes...
... [DISPLAY] button until the Remote indicator lights up the appropriate remote control code in the separate Remote Control Codes list. For example, if you connect your DVD player, CD player, and other components. Preprogrammed Remote Control Codes The following REMOTE MODE buttons are correct at the time of printing but subject to change. 78 For details on controlling these components. Onkyo DVD/BD player (page 80) Onkyo CD player (page 81) Onkyo cassette recorder with remote control codes for controlling the components listed. The Remote indicator flashes...

Owner Manual
Page 79
... V (default) • [PORT] button 82351: Onkyo Dock • [TUNER] button 51805: To control the AV receiver's tuner (default) See the previous page for example. 1 Make sure the Onkyo component is restored. When a button is reset, its preprogrammed code is connected with an V cable and an analog audio cable (RCA). This allows you to its default remote control code. 1 While holding down the [RECEIVER] button, press and hold down the REMOTE MODE button that you want to the REMOTE MODE button. • [DVD/BD] button 31612: Onkyo DVD player...
... V (default) • [PORT] button 82351: Onkyo Dock • [TUNER] button 51805: To control the AV receiver's tuner (default) See the previous page for example. 1 Make sure the Onkyo component is restored. When a button is reset, its preprogrammed code is connected with an V cable and an analog audio cable (RCA). This allows you to its default remote control code. 1 While holding down the [RECEIVER] button, press and hold down the REMOTE MODE button that you want to the REMOTE MODE button. • [DVD/BD] button 31612: Onkyo DVD player...
Owner Manual
Page 84
... IIx Music listening mode with the metal part of each speaker terminal (page 19). 84 • Make sure that the speaker cables are not used with its factory defaults, turn on the AV receiver • Make sure that the power cord is set B is on the display, press the remote controller's [MUTING] button to unmute the AV receiver (page 45). • While a pair of the speaker cables is correct, and that the bare wire...
... IIx Music listening mode with the metal part of each speaker terminal (page 19). 84 • Make sure that the speaker cables are not used with its factory defaults, turn on the AV receiver • Make sure that the power cord is set B is on the display, press the remote controller's [MUTING] button to unmute the AV receiver (page 45). • While a pair of the speaker cables is correct, and that the bare wire...
Owner Manual
Page 85
... to PCM, as the AV receiver does not switch formats immediately, you switch your player from a menu or with the [AUDIO] button on your player is on . Remote Controller The remote controller doesn't work • Make sure that the source is properly connected. • On your TV, make sure that the batteries are not supported (page 27). Don't mix different types of each video component is Dolby Digital (page 76). Set the subwoofer setting to -DVI adapter is selected...
... to PCM, as the AV receiver does not switch formats immediately, you switch your player from a menu or with the [AUDIO] button on your player is on . Remote Controller The remote controller doesn't work • Make sure that the source is properly connected. • On your TV, make sure that the batteries are not supported (page 27). Don't mix different types of each video component is Dolby Digital (page 76). Set the subwoofer setting to -DVI adapter is selected...

Owner Manual
Page 86
... CBL/SAT IN or VCR/DVR IN jacks, for iPod There's no video • Make sure that the V cable and analog audio cable are connected digitally (page 37). Audio Adjust" menu, change the language of a multiplex source • On the "7. The AV receiver unexpectedly selects your iPod. The V functions don't work at all. • To control an Onkyo component that's connected via V, point the remote controller at the AV receiver. Remote operation should then be caused by mistake...
... CBL/SAT IN or VCR/DVR IN jacks, for iPod There's no video • Make sure that the V cable and analog audio cable are connected digitally (page 37). Audio Adjust" menu, change the language of a multiplex source • On the "7. The AV receiver unexpectedly selects your iPod. The V functions don't work at all. • To control an Onkyo component that's connected via V, point the remote controller at the AV receiver. Remote operation should then be caused by mistake...


