

T-110 Instruction Manual (English)
Page 1
... were produced during the development stages and may differ from the actual product. Keep this manual in this manual. ● The screen and camera illustrations shown in a safe place for purchasing an Olympus digital camera. DIGITAL CAMERA T-110 Instruction Manual ● Thank you for future reference. ● We recommend that you start to use your...
... were produced during the development stages and may differ from the actual product. Keep this manual in this manual. ● The screen and camera illustrations shown in a safe place for purchasing an Olympus digital camera. DIGITAL CAMERA T-110 Instruction Manual ● Thank you for future reference. ● We recommend that you start to use your...

T-110 Instruction Manual (English)
Page 2
... card Contents may vary depending on purchase location. 2 Step Preparing the Camera "Preparing the Camera" (p. 12) F-2AC USB-AC adapter USB cable OLYMPUS Setup CD-ROM 3 Step Shooting and Playing Back Images "Shooting, Viewing, and Erasing" (p. 19) 4 Step How to Use the Camera "Camera Settings" (p. 3) 5 Step Printing "Direct printing (PictBridge)" (p. 46) "Print Reservations (DPOF)" (p. 50...
... card Contents may vary depending on purchase location. 2 Step Preparing the Camera "Preparing the Camera" (p. 12) F-2AC USB-AC adapter USB cable OLYMPUS Setup CD-ROM 3 Step Shooting and Playing Back Images "Shooting, Viewing, and Erasing" (p. 19) 4 Step How to Use the Camera "Camera Settings" (p. 3) 5 Step Printing "Direct printing (PictBridge)" (p. 46) "Print Reservations (DPOF)" (p. 50...

T-110 Instruction Manual (English)
Page 3
.... 10 . 26 12 : 30 Y/M/D 4/30 CANCEL MENU SET OK SINGLE PRINT NORM 12M FILE 100 0004 '10/10/26 12:30 PRINT OK MORE EN 3 Camera Settings Using the Direct Buttons Frequently used .
.... 10 . 26 12 : 30 Y/M/D 4/30 CANCEL MENU SET OK SINGLE PRINT NORM 12M FILE 100 0004 '10/10/26 12:30 PRINT OK MORE EN 3 Camera Settings Using the Direct Buttons Frequently used .

T-110 Instruction Manual (English)
Page 4
... unavailable depending on other related settings or the s mode (p. 26). To select the function menu Use FG to select a menu and use HI to change camera settings such as the shooting mode. Using the Menu Use the menu to select a menu option. Press the H button to display the function menu. Function...
... unavailable depending on other related settings or the s mode (p. 26). To select the function menu Use FG to select a menu and use HI to change camera settings such as the shooting mode. Using the Menu Use the menu to select a menu option. Press the H button to display the function menu. Function...

T-110 Instruction Manual (English)
Page 5
... 5 Press the m button to select the desired page tab and press I. Use FG to complete the setting. The setup menu provides access to a variety of camera settings, including options not listed in the function menu, display options, and the time and date. 1 Press the m button. ● The setup menu is selected...
... 5 Press the m button to select the desired page tab and press I. Use FG to complete the setting. The setup menu provides access to a variety of camera settings, including options not listed in the function menu, display options, and the time and date. 1 Press the m button. ● The setup menu is selected...

T-110 Instruction Manual (English)
Page 7
... ORDER p. 39 ? (Protect p. 39 y (Rotate p. 39 EXIT MENU SET OK Menus for Playback, Editing, and Printing Functions SLIDESHOW EDIT 1 ERASE 1 PRINT ORDER 2? Menus for Other Camera Settings FORMAT BACKUP USB CONNECTION STORAGE 1 1 q POWER ON YES 2 2 KEEP K SETTINGS YES BEEP ON PIXEL MAPPING EXIT MENU SET OK 1 r (Settings 1) MEMORY FORMAT/ FORMAT p. 40...
... ORDER p. 39 ? (Protect p. 39 y (Rotate p. 39 EXIT MENU SET OK Menus for Playback, Editing, and Printing Functions SLIDESHOW EDIT 1 ERASE 1 PRINT ORDER 2? Menus for Other Camera Settings FORMAT BACKUP USB CONNECTION STORAGE 1 1 q POWER ON YES 2 2 KEEP K SETTINGS YES BEEP ON PIXEL MAPPING EXIT MENU SET OK 1 r (Settings 1) MEMORY FORMAT/ FORMAT p. 40...

T-110 Instruction Manual (English)
Page 8
Names of Parts Camera unit 1 34 5 2 1 Strap eyelet p. 9 2 Battery/card compartment cover p. 12 3 Self-timer lamp p. 31 4 Flash p. 30 5 Lens p. 58, 72 6 Microphone p. 35, 37 7 Tripod socket 8 Multi-connector p. 13, 16, 43, 46 6 7 8 8 EN
Names of Parts Camera unit 1 34 5 2 1 Strap eyelet p. 9 2 Battery/card compartment cover p. 12 3 Self-timer lamp p. 31 4 Flash p. 30 5 Lens p. 58, 72 6 Microphone p. 35, 37 7 Tripod socket 8 Multi-connector p. 13, 16, 43, 46 6 7 8 8 EN

T-110 Instruction Manual (English)
Page 9
12 4 5 3 6 7 8 9 10 Attaching the camera strap 1 n button........ p. 4, 17 8 Arrow pad p. 3 INFO button (change information display p. 22, 25 D button (erase p. 24 9 E button (menu guide p. 25 10 m button p. 5 Pull the strap tight so that it does not come loose. p. 20, 22 7 H button (OK) ......... p. 13, 16 6 q button (switch between shooting and playback) ....... EN 9 p. 17, 19 2 Shutter button p. 20 3 Monitor p. 19, 53 4 Zoom buttons p. 21 5 Indicator lamp.........
12 4 5 3 6 7 8 9 10 Attaching the camera strap 1 n button........ p. 4, 17 8 Arrow pad p. 3 INFO button (change information display p. 22, 25 D button (erase p. 24 9 E button (menu guide p. 25 10 m button p. 5 Pull the strap tight so that it does not come loose. p. 20, 22 7 H button (OK) ......... p. 13, 16 6 q button (switch between shooting and playback) ....... EN 9 p. 17, 19 2 Shutter button p. 20 3 Monitor p. 19, 53 4 Zoom buttons p. 21 5 Indicator lamp.........

T-110 Instruction Manual (English)
Page 10
... images p. 34 14 Number of storable pictures (still images p. 19 Continuous recording length (movies p. 21 15 Current memory p. 60 16 AF target mark p. 20 17 Camera shake warning 18 Aperture value p. 20 19 Shutter speed p. 20 10 EN
... images p. 34 14 Number of storable pictures (still images p. 19 Continuous recording length (movies p. 21 15 Current memory p. 60 16 AF target mark p. 20 17 Camera shake warning 18 Aperture value p. 20 19 Shutter speed p. 20 10 EN

T-110 Instruction Manual (English)
Page 12
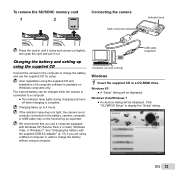
...and then remove the battery. Do not touch the contact area directly. 3 1 2 Battery lock knob Write-protect switch This camera allows the user to take pictures using the camera, be sure to the battery exterior (scratches, etc.) may produce heat or an explosion. 12 EN Slide the battery lock knob... in the ▼ marked side first, with this camera. Insert the card straight until it clicks into place. When using the internal memory even when no SD/SDHC memory card (sold separately) Always use...
...and then remove the battery. Do not touch the contact area directly. 3 1 2 Battery lock knob Write-protect switch This camera allows the user to take pictures using the camera, be sure to the battery exterior (scratches, etc.) may produce heat or an explosion. 12 EN Slide the battery lock knob... in the ▼ marked side first, with this camera. Insert the card straight until it clicks into place. When using the internal memory even when no SD/SDHC memory card (sold separately) Always use...
T-110 Instruction Manual (English)
Page 13
...as expected. EN 13 User registration using the supplied CD Connect the camera to the computer to 4 hours. USB cable (supplied) Charging the ...camera Multi-connector Indicator lamp Press the card in a CD-ROM drive. The camera battery can be displayed. If the indicator lamp does not light, the camera...XP ● A "Setup" dialog will be charged while the camera is connected to display the "Setup" dialog. Charging takes up using... of ib computer software is not correctly connected or the battery, camera, computer, or USB cable may not be displayed. See "Charging the...
...as expected. EN 13 User registration using the supplied CD Connect the camera to the computer to 4 hours. USB cable (supplied) Charging the ...camera Multi-connector Indicator lamp Press the card in a CD-ROM drive. The camera battery can be displayed. If the indicator lamp does not light, the camera...XP ● A "Setup" dialog will be charged while the camera is connected to display the "Setup" dialog. Charging takes up using... of ib computer software is not correctly connected or the battery, camera, computer, or USB cable may not be displayed. See "Charging the...

T-110 Instruction Manual (English)
Page 14
... computer. If the "Setup" dialog is displayed on the camera screen even after connecting the camera to the computer, the battery may be exhausted. If nothing is not displayed, select "My Computer" (Windows XP) or "Computer" (Windows Vista/Windows 7) from the start menu. OLYMPUS Viewer 2 Operating System Windows XP (Service Pack 2 or later...
... computer. If the "Setup" dialog is displayed on the camera screen even after connecting the camera to the computer, the battery may be exhausted. If nothing is not displayed, select "My Computer" (Windows XP) or "Computer" (Windows Vista/Windows 7) from the start menu. OLYMPUS Viewer 2 Operating System Windows XP (Service Pack 2 or later...

T-110 Instruction Manual (English)
Page 15
Charging the battery with the supplied USB-AC adapter The included F-2AC USB-AC adapter (hereafter referred to open the folder containing the camera manuals. OLYMPUS Viewer 2 Operating System Mac OS X v10.4.11-v10.6 Processor Intel Core Solo/Duo 1.5 GHz or better RAM 1 GB or more (2 GB or more recommended) Free ...
Charging the battery with the supplied USB-AC adapter The included F-2AC USB-AC adapter (hereafter referred to open the folder containing the camera manuals. OLYMPUS Viewer 2 Operating System Mac OS X v10.4.11-v10.6 Processor Intel Core Solo/Duo 1.5 GHz or better RAM 1 GB or more (2 GB or more recommended) Free ...
T-110 Instruction Manual (English)
Page 16
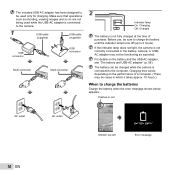
...approx. 10 hours.) When to charge the batteries Charge the battery when the error message shown below appears. Before use, be charged while the camera is connected to the computer. For details on are not being used only for charging. The battery can be sure to charge the battery ... EMPTY Error message 16 EN The included USB-AC adapter has been designed to be used while the USB-AC adapter is connected to the camera. 1 USB cable USB cable (supplied) (supplied) USB connector USB connector Multi-connector Multi-connector 2 Indicator lamp On: Charging Off: Charged The battery is...
...approx. 10 hours.) When to charge the batteries Charge the battery when the error message shown below appears. Before use, be charged while the camera is connected to the computer. For details on are not being used only for charging. The battery can be sure to charge the battery ... EMPTY Error message 16 EN The included USB-AC adapter has been designed to be used while the USB-AC adapter is connected to the camera. 1 USB cable USB cable (supplied) (supplied) USB connector USB connector Multi-connector Multi-connector 2 Indicator lamp On: Charging Off: Charged The battery is...

T-110 Instruction Manual (English)
Page 17
... MENU EN 17 You can also choose the language for the menus and messages displayed in the monitor. 1 Press the n button to turn on the camera. ● The date and time setting screen is displayed when the date and time are saved to select the year for [Y].
... MENU EN 17 You can also choose the language for the menus and messages displayed in the monitor. 1 Press the n button to turn on the camera. ● The date and time setting screen is displayed when the date and time are saved to select the year for [Y].
T-110 Instruction Manual (English)
Page 19
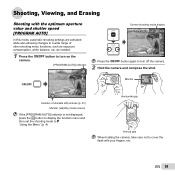
...] indicator P Current shooting mode display PROGRAM AUTO P 0.0 WB AUTO ISO AUTO 12M 4 Press the n button again to turn off the camera. 2 Hold the camera and compose the shot. 0.0 WB AUTO ISO AUTO 12M 4 # Monitor Horizontal grip Number of storable still pictures (p. 61) Monitor (standby ...etc. EN 19 Shooting, Viewing, and Erasing Shooting with your fingers, etc. "Using the Menu" (p. 4) Vertical grip When holding the camera, take care not to cover the flash with the optimum aperture value and shutter speed [PROGRAM AUTO] In this mode, automatic shooting settings...
...] indicator P Current shooting mode display PROGRAM AUTO P 0.0 WB AUTO ISO AUTO 12M 4 Press the n button again to turn off the camera. 2 Hold the camera and compose the shot. 0.0 WB AUTO ISO AUTO 12M 4 # Monitor Horizontal grip Number of storable still pictures (p. 61) Monitor (standby ...etc. EN 19 Shooting, Viewing, and Erasing Shooting with your fingers, etc. "Using the Menu" (p. 4) Vertical grip When holding the camera, take care not to cover the flash with the optimum aperture value and shutter speed [PROGRAM AUTO] In this mode, automatic shooting settings...

T-110 Instruction Manual (English)
Page 20
... PROGRAM AUTO P 0.0 WB AUTO ISO AUTO 12M 4 2 Use HI to set the shooting mode to display the function menu screen. To return to shake the camera. AF target mark P Press halfway 1/400 F3.1 Shutter speed Aperture value "Focusing" (p. 55) 4 To take the picture, gently press the shutter button all ... being careful not to shooting, either press the q button or press the shutter button halfway down to focus on the subject. ● When the camera focuses on the subject, the exposure is locked (shutter speed and aperture value are displayed), and the AF target mark changes to green. ●...
... PROGRAM AUTO P 0.0 WB AUTO ISO AUTO 12M 4 2 Use HI to set the shooting mode to display the function menu screen. To return to shake the camera. AF target mark P Press halfway 1/400 F3.1 Shutter speed Aperture value "Focusing" (p. 55) 4 To take the picture, gently press the shutter button all ... being careful not to shooting, either press the q button or press the shutter button halfway down to focus on the subject. ● When the camera focuses on the subject, the exposure is locked (shutter speed and aperture value are displayed), and the AF target mark changes to green. ●...

T-110 Instruction Manual (English)
Page 23
To play sound recorded with this camera. The display size of the images can be played back with an image, select the image and press the H button. Elapsed time/ Total recording time ... to a TV or PC. To resume playback during movie playback During audio playback The sound recorded in movie mode cannot be played back with this camera. EN 23 "Index view and close-up view" (p. 25) To play sound recordings To play back movies Select a movie, and press the H button. 4/30 Displays...
To play sound recorded with this camera. The display size of the images can be played back with an image, select the image and press the H button. Elapsed time/ Total recording time ... to a TV or PC. To resume playback during movie playback During audio playback The sound recorded in movie mode cannot be played back with this camera. EN 23 "Index view and close-up view" (p. 25) To play sound recordings To play back movies Select a movie, and press the H button. 4/30 Displays...

T-110 Instruction Manual (English)
Page 26
... menu. There are highlighted in M mode. 0.0 WB AUTO 12M 4 26 EN Shooting with automatic settings [iAUTO] According to s. When the camera cannot identify which is caused by using the best mode for the shooting scene [SCENE MODE] 1 Set the shooting mode to the scene, the...shooting mode (P, M, N, s, P, ~, A) can be selected. This is a fully automatic mode that is the optimal mode, [PROGRAM AUTO] will be changed by camera shake and subject movement. 1 Set the shooting mode to N. [DIS MODE] indicator 0.0 WB AUTO 12M 4 # Using the best mode for the shooting scene simply by...
... menu. There are highlighted in M mode. 0.0 WB AUTO 12M 4 26 EN Shooting with automatic settings [iAUTO] According to s. When the camera cannot identify which is caused by using the best mode for the shooting scene [SCENE MODE] 1 Set the shooting mode to the scene, the...shooting mode (P, M, N, s, P, ~, A) can be selected. This is a fully automatic mode that is the optimal mode, [PROGRAM AUTO] will be changed by camera shake and subject movement. 1 Set the shooting mode to N. [DIS MODE] indicator 0.0 WB AUTO 12M 4 # Using the best mode for the shooting scene simply by...

T-110 Instruction Manual (English)
Page 27
... *1 When the subject is dark, noise reduction is set . 2 Hold the camera to align the AF target mark on the subject and press the H button. ● When the camera recognizes the subject, the AF target mark automatically tracks the subject movement to focus on... B PORTRAIT/F LANDSCAPE/ G NIGHT SCENE*1/ M NIGHT+PORTRAIT/C SPORT/ N INDOOR/W CANDLE*1/ R SELF PORTRAIT/S SUNSET*1/ X FIREWORKS*1/V CUISINE/ d DOCUMENTS/ PET The camera takes a picture using the optimum settings for specific shooting scenes. To take pictures of a moving subject continuously (AF Tracking)" (p. 35).
... *1 When the subject is dark, noise reduction is set . 2 Hold the camera to align the AF target mark on the subject and press the H button. ● When the camera recognizes the subject, the AF target mark automatically tracks the subject movement to focus on... B PORTRAIT/F LANDSCAPE/ G NIGHT SCENE*1/ M NIGHT+PORTRAIT/C SPORT/ N INDOOR/W CANDLE*1/ R SELF PORTRAIT/S SUNSET*1/ X FIREWORKS*1/V CUISINE/ d DOCUMENTS/ PET The camera takes a picture using the optimum settings for specific shooting scenes. To take pictures of a moving subject continuously (AF Tracking)" (p. 35).


