

T-110 Instruction Manual (English)
Page 10
... 1 Battery check p. 16 2 Shooting mode ....... p. 19, 26 3 Flash p. 30 Flash standby/flash charge p. 53 4 Macro p. 30 5 Self-timer p. 31 6 Exposure compensation p. 31 7 White balance p. 32 8 ISO p. 32 9 Image size p. 33, 34 10 Setup menu p. 5 11 Recording with sound (movies p. 35 12 World time p. 45 13 Compression (still images p. 34 14 Number of storable pictures (still images p. 19 Continuous recording length (movies p. 21 15 Current memory p. 60 16 AF target mark p. 20 17 Camera shake warning 18 Aperture value p. 20 19 Shutter speed...
... 1 Battery check p. 16 2 Shooting mode ....... p. 19, 26 3 Flash p. 30 Flash standby/flash charge p. 53 4 Macro p. 30 5 Self-timer p. 31 6 Exposure compensation p. 31 7 White balance p. 32 8 ISO p. 32 9 Image size p. 33, 34 10 Setup menu p. 5 11 Recording with sound (movies p. 35 12 World time p. 45 13 Compression (still images p. 34 14 Number of storable pictures (still images p. 19 Continuous recording length (movies p. 21 15 Current memory p. 60 16 AF target mark p. 20 17 Camera shake warning 18 Aperture value p. 20 19 Shutter speed...

T-110 Instruction Manual (English)
Page 12
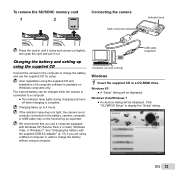
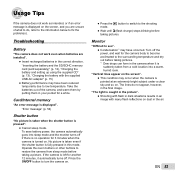
... contact area directly. 3 1 2 Battery lock knob Write-protect switch This camera allows the user to take pictures using the camera, be sure to the battery exterior (scratches, etc.) may produce heat or an explosion. 12 EN Slide the battery lock knob in the ▼ marked side first, with this camera. "Using an SD/SDHC memory card" (p. 59) "Number of storable pictures (still images)/Continuous recording length (movies) in the internal memory and SD/SDHC memory cards" (p. 61) Insert...
... contact area directly. 3 1 2 Battery lock knob Write-protect switch This camera allows the user to take pictures using the camera, be sure to the battery exterior (scratches, etc.) may produce heat or an explosion. 12 EN Slide the battery lock knob in the ▼ marked side first, with this camera. "Using an SD/SDHC memory card" (p. 59) "Number of storable pictures (still images)/Continuous recording length (movies) in the internal memory and SD/SDHC memory cards" (p. 61) Insert...
T-110 Instruction Manual (English)
Page 13
USB cable (supplied) Charging the battery and setting up to display the "Setup" dialog. User registration using a computer. See "Charging the battery with Windows XP (Service Pack 2 or later), Windows Vista, or Windows 7. If the indicator lamp does not light, the camera is complete. EN 13 Charging takes up using the supplied CD Connect the camera to the computer to charge the battery and use a computer equipped with the supplied USB-AC adapter" (p. 15) if you are using a different computer...
USB cable (supplied) Charging the battery and setting up to display the "Setup" dialog. User registration using a computer. See "Charging the battery with Windows XP (Service Pack 2 or later), Windows Vista, or Windows 7. If the indicator lamp does not light, the camera is complete. EN 13 Charging takes up using the supplied CD Connect the camera to the computer to charge the battery and use a computer equipped with the supplied USB-AC adapter" (p. 15) if you are using a different computer...

T-110 Instruction Manual (English)
Page 14
... video RAM with DirectX 9 or later. * See online help for information on using the software. 5 Install the camera manual. ● Click the "Camera Instruction Manual" button and follow the on-screen instructions to the computer, the battery may be exhausted. If a "User Account Control" dialog is displayed on -screen instructions. 14 EN If the "Setup" dialog is not displayed, select "My Computer" (Windows XP) or "Computer" (Windows Vista/Windows 7) from the start menu. Leave the camera connected to open the "OLYMPUS Setup" window...
... video RAM with DirectX 9 or later. * See online help for information on using the software. 5 Install the camera manual. ● Click the "Camera Instruction Manual" button and follow the on-screen instructions to the computer, the battery may be exhausted. If a "User Account Control" dialog is displayed on -screen instructions. 14 EN If the "Setup" dialog is not displayed, select "My Computer" (Windows XP) or "Computer" (Windows Vista/Windows 7) from the start menu. Leave the camera connected to open the "OLYMPUS Setup" window...

T-110 Instruction Manual (English)
Page 15
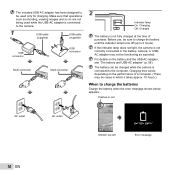
... install the software. Charging the battery with the supplied USB-AC adapter The included F-2AC USB-AC adapter (hereafter referred to as USB-AC adapter) differs depending on using the software, see online help. 3 Copy the camera manual. ● Click the "Camera Instruction Manual" button to open the folder containing the camera manuals. Macintosh 1 Insert the supplied CD in a CD-ROM drive. ● Double-click the CD (OLYMPUS Setup) icon on the desktop. ● Double-click the "Setup" icon to display...
... install the software. Charging the battery with the supplied USB-AC adapter The included F-2AC USB-AC adapter (hereafter referred to as USB-AC adapter) differs depending on using the software, see online help. 3 Copy the camera manual. ● Click the "Camera Instruction Manual" button to open the folder containing the camera manuals. Macintosh 1 Insert the supplied CD in a CD-ROM drive. ● Double-click the CD (OLYMPUS Setup) icon on the desktop. ● Double-click the "Setup" icon to display...
T-110 Instruction Manual (English)
Page 16
... error message shown below appears. Charging time varies depending on the performance of purchase. Make sure that operations such as expected. Before use, be sure to charge the battery until the indicator lamp turns off (up to the computer. The battery can be charged while the camera is connected to 4 hours). The included USB-AC adapter has been designed to be used while the USB-AC adapter is connected to the camera. 1 USB cable USB cable...
... error message shown below appears. Charging time varies depending on the performance of purchase. Make sure that operations such as expected. Before use, be sure to charge the battery until the indicator lamp turns off (up to the computer. The battery can be charged while the camera is connected to 4 hours). The included USB-AC adapter has been designed to be used while the USB-AC adapter is connected to the camera. 1 USB cable USB cable...

T-110 Instruction Manual (English)
Page 17
..., date prints, and other data. You can also choose the language for the menus and messages displayed in the monitor. 1 Press the n button to select the year for [Y]. IMAGE SET OK Operation guide OK ERASE/CANCEL MENU Date, time, time zone, and language The date and time set here are not set. Operation guide Operation guides displayed at the bottom of the screen indicate that the m button, H button, or zoom buttons should be used. X Y M D TIME 2010 Y/M/D CANCEL MENU EN 17 RESET COMPRESSION NORMAL AF MODE FACE/iESP 1 DIGITAL ZOOM...
..., date prints, and other data. You can also choose the language for the menus and messages displayed in the monitor. 1 Press the n button to select the year for [Y]. IMAGE SET OK Operation guide OK ERASE/CANCEL MENU Date, time, time zone, and language The date and time set here are not set. Operation guide Operation guides displayed at the bottom of the screen indicate that the m button, H button, or zoom buttons should be used. X Y M D TIME 2010 Y/M/D CANCEL MENU EN 17 RESET COMPRESSION NORMAL AF MODE FACE/iESP 1 DIGITAL ZOOM...
T-110 Instruction Manual (English)
Page 19
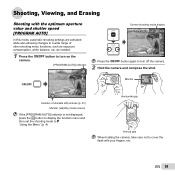
... aperture value and shutter speed [PROGRAM AUTO] In this mode, automatic shooting settings are activated while also allowing changes to a wide range of other shooting menu functions, such as needed. 1 Press the n button to turn on the camera. [PROGRAM AUTO] indicator P Current shooting mode display PROGRAM AUTO P 0.0 WB AUTO ISO AUTO 12M 4 Press the n button again to turn off the camera. 2 Hold the camera and compose the shot. 0.0 WB AUTO ISO AUTO 12M 4 # Monitor Horizontal grip Number of storable still pictures (p. 61) Monitor (standby mode screen...
... aperture value and shutter speed [PROGRAM AUTO] In this mode, automatic shooting settings are activated while also allowing changes to a wide range of other shooting menu functions, such as needed. 1 Press the n button to turn on the camera. [PROGRAM AUTO] indicator P Current shooting mode display PROGRAM AUTO P 0.0 WB AUTO ISO AUTO 12M 4 Press the n button again to turn off the camera. 2 Hold the camera and compose the shot. 0.0 WB AUTO ISO AUTO 12M 4 # Monitor Horizontal grip Number of storable still pictures (p. 61) Monitor (standby mode screen...

T-110 Instruction Manual (English)
Page 20
... down to focus on the subject. ● When the camera focuses on the subject, the exposure is locked (shutter speed and aperture value are displayed), and the AF target mark changes to green. ● The camera was unable to A and then press the H button. [MOVIE] indicator 0.0 WB AUTO 0:34 VGA # Press fully 1/400 F3.1 Image review screen To view images during shooting Pressing the q button enables playback of images. Try focusing again. P Shooting movies [MOVIE] 1 Press the H button to display the function menu screen.
... down to focus on the subject. ● When the camera focuses on the subject, the exposure is locked (shutter speed and aperture value are displayed), and the AF target mark changes to green. ● The camera was unable to A and then press the H button. [MOVIE] indicator 0.0 WB AUTO 0:34 VGA # Press fully 1/400 F3.1 Image review screen To view images during shooting Pressing the q button enables playback of images. Try focusing again. P Shooting movies [MOVIE] 1 Press the H button to display the function menu screen.
T-110 Instruction Manual (English)
Page 29
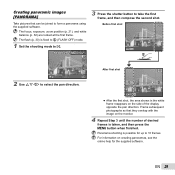
... shooting mode to take the first frame, and then compose the second shot. PANORAMA 3 Press the shutter button to ~. Before first shot SET OK 0.0 WB AUTO ISO AUTO After first shot 12M 4 2 Use FGHI to form a panorama using the supplied software. For information on creating panoramas, see the online help for up to 10 frames. The focus, exposure, zoom position (p. 21), and white balance (p. 32) are locked at the first frame. Creating panoramic images [PANORAMA] Take pictures...
... shooting mode to take the first frame, and then compose the second shot. PANORAMA 3 Press the shutter button to ~. Before first shot SET OK 0.0 WB AUTO ISO AUTO After first shot 12M 4 2 Use FGHI to form a panorama using the supplied software. For information on creating panoramas, see the online help for up to 10 frames. The focus, exposure, zoom position (p. 21), and white balance (p. 32) are locked at the first frame. Creating panoramic images [PANORAMA] Take pictures...

T-110 Instruction Manual (English)
Page 32
... white fluorescent lighting (offices, etc.). The ISO sensitivity is short for "International Organization for digital cameras and film, thus codes such as "ISO 100" are used to the shooting scene. "ISO" is fixed to set . Larger values result in less sensitivity, sharp images can be taken under tungsten lighting. y For shooting under neutral fluorescent lighting (desk lamps, etc.). P 0.0 ISO 200 WB AUTO ISO ISO ISO...
... white fluorescent lighting (offices, etc.). The ISO sensitivity is short for "International Organization for digital cameras and film, thus codes such as "ISO 100" are used to the shooting scene. "ISO" is fixed to set . Larger values result in less sensitivity, sharp images can be taken under tungsten lighting. y For shooting under neutral fluorescent lighting (desk lamps, etc.). P 0.0 ISO 200 WB AUTO ISO ISO ISO...
T-110 Instruction Manual (English)
Page 41
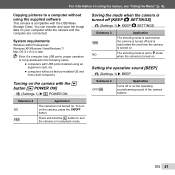
... in playback mode. Copying pictures to a computer without a factory-installed OS and home-built computers Turning on . Setting the operation sound [BEEP] r (Settings 1) X BEEP Submenu 2 OFF/ON Application Turns off and is reactivated the next time the camera is turned on . Saving the mode when the camera is turned off [KEEP K SETTINGS] r (Settings 1) X KEEP K SETTINGS Submenu 2 YES NO Application The shooting mode is saved when the camera is turned off or on using the supplied software This camera is not turned...
... in playback mode. Copying pictures to a computer without a factory-installed OS and home-built computers Turning on . Setting the operation sound [BEEP] r (Settings 1) X BEEP Submenu 2 OFF/ON Application Turns off and is reactivated the next time the camera is turned on . Saving the mode when the camera is turned off [KEEP K SETTINGS] r (Settings 1) X KEEP K SETTINGS Submenu 2 YES NO Application The shooting mode is saved when the camera is turned off or on using the supplied software This camera is not turned...

T-110 Instruction Manual (English)
Page 46
...EN "Viewing images" (p. 22) EASY PRINT START CUSTOM PRINT OK 3 Press I to start printing. 4 To print another image, use HI to the printer's instruction manual. Printing Direct printing (PictBridge*1) By connecting the camera to a PictBridge-compatible printer, you can be printed on the printer, and then connect the printer and camera. The printing modes, paper sizes, and other parameters that can print images directly without using a computer. Multi-connector USB cable (supplied) Y button Printing images at the printer's standard settings [EASY PRINT] In the setup menu, set with...
...EN "Viewing images" (p. 22) EASY PRINT START CUSTOM PRINT OK 3 Press I to start printing. 4 To print another image, use HI to the printer's instruction manual. Printing Direct printing (PictBridge*1) By connecting the camera to a PictBridge-compatible printer, you can be printed on the printer, and then connect the printer and camera. The printing modes, paper sizes, and other parameters that can print images directly without using a computer. Multi-connector USB cable (supplied) Y button Printing images at the printer's standard settings [EASY PRINT] In the setup menu, set with...
T-110 Instruction Manual (English)
Page 53
... taking pictures. *1 Dew drops can form in the camera when it automatically turns off. Operate the zoom buttons or other buttons to the shooting mode. ● Wait until #(flash charge) stops blinking before taking pictures. The lines do , refer to the information below to fix the problem(s). "Inserting the battery and the SD/SDHC memory card (sold separately)" (p. 12), "Charging the battery and setting up using the supplied CD" (p. 13), "Charging the battery...
... taking pictures. *1 Dew drops can form in the camera when it automatically turns off. Operate the zoom buttons or other buttons to the shooting mode. ● Wait until #(flash charge) stops blinking before taking pictures. The lines do , refer to the information below to fix the problem(s). "Inserting the battery and the SD/SDHC memory card (sold separately)" (p. 12), "Charging the battery and setting up using the supplied CD" (p. 13), "Charging the battery...

T-110 Instruction Manual (English)
Page 54
...select [MEMORY POWER OFF MEMORY FORMAT FORMAT], and press the H button. to shoot. Battery problem Charge the battery. "Date, time, time zone, and language" (p. 17) Miscellaneous "The camera makes a noise when taking pictures". ● The camera may activate the lens and make a noise even if no operation is corrupted. PICTURE ERROR Problem with selected image Use photo retouch software, etc. Date and time function "Date and time settings return to the default setting". ● If the batteries are removed and left out of the camera for about a day*2, the date and time settings return...
...select [MEMORY POWER OFF MEMORY FORMAT FORMAT], and press the H button. to shoot. Battery problem Charge the battery. "Date, time, time zone, and language" (p. 17) Miscellaneous "The camera makes a noise when taking pictures". ● The camera may activate the lens and make a noise even if no operation is corrupted. PICTURE ERROR Problem with selected image Use photo retouch software, etc. Date and time function "Date and time settings return to the default setting". ● If the batteries are removed and left out of the camera for about a day*2, the date and time settings return...

T-110 Instruction Manual (English)
Page 55
... take the picture. CANNOT PRINT*4 *1 Before erasing important images, download them to the status where the printer can be unable to print. Shooting tips When you are unsure of how to take a picture that you envision, refer to [FACE/iESP] ● Taking a picture in the center of subjects where autofocus is displayed, for any problems, and then turn the power on the camera. *4 This camera may be used. Error message Corrective action JAMMED SETTINGS CHANGED*3 PRINT ERROR Printer problem Remove...
... take the picture. CANNOT PRINT*4 *1 Before erasing important images, download them to the status where the printer can be unable to print. Shooting tips When you are unsure of how to take a picture that you envision, refer to [FACE/iESP] ● Taking a picture in the center of subjects where autofocus is displayed, for any problems, and then turn the power on the camera. *4 This camera may be used. Error message Corrective action JAMMED SETTINGS CHANGED*3 PRINT ERROR Printer problem Remove...

T-110 Instruction Manual (English)
Page 60
... the internal memory or card unusable. Current memory indicator v: Internal memory is being used w: Card is being used P Current memory indicator Readout/recording process of personal data. 60 EN Never open the battery/card compartment cover or unplug the USB cable. When disposing of the card, damage the card to prevent the disclosure of the card During shooting, the current memory indicator lights in red while the camera is writing data. IMAGE], or [ALL ERASE] is performed, the data in red 0.0 WB AUTO ISO AUTO 12M 4 # 4/30 Shooting mode...
... the internal memory or card unusable. Current memory indicator v: Internal memory is being used w: Card is being used P Current memory indicator Readout/recording process of personal data. 60 EN Never open the battery/card compartment cover or unplug the USB cable. When disposing of the card, damage the card to prevent the disclosure of the card During shooting, the current memory indicator lights in red while the camera is writing data. IMAGE], or [ALL ERASE] is performed, the data in red 0.0 WB AUTO ISO AUTO 12M 4 # 4/30 Shooting mode...
T-110 Instruction Manual (English)
Page 65
... temperatures. • The LCD used in a location where it is a good idea to occasionally place it in playback mode. • In places subject to help save our planet's resources. Due to its color may not apply to you can take a long time to turn the camera off and on again before use these written materials or software, and in color and brightness. Some countries...
... temperatures. • The LCD used in a location where it is a good idea to occasionally place it in playback mode. • In places subject to help save our planet's resources. Due to its color may not apply to you can take a long time to turn the camera off and on again before use these written materials or software, and in color and brightness. Some countries...

T-110 Instruction Manual (English)
Page 68
... of warranty which Olympus does not place and record serial numbers). 3 A detailed description of the problem. 4 Sample prints, negatives, digital prints (or files on disk) if available and related to any film from the Product prior to sending the Product to Olympus for service. IN NO EVENT SHALL OLYMPUS BE RESPONSIBLE FOR SAVING, KEEPING OR MAINTAINING ANY IMAGE OR DATA SAVED ON A PRODUCT...
... of warranty which Olympus does not place and record serial numbers). 3 A detailed description of the problem. 4 Sample prints, negatives, digital prints (or files on disk) if available and related to any film from the Product prior to sending the Product to Olympus for service. IN NO EVENT SHALL OLYMPUS BE RESPONSIBLE FOR SAVING, KEEPING OR MAINTAINING ANY IMAGE OR DATA SAVED ON A PRODUCT...

T-110 Instruction Manual (English)
Page 72
... % (operation)/10 % to 1/2000 sec. SPECIFICATIONS Camera Product type Recording system Still pictures Applicable standards : Digital camera (for Camera File system (DCF)) : Exif 2.2, Digital Print Order Format (DPOF), PRINT Image Matching III, PictBridge Sound with Design rule for shooting and displaying) : Digital recording, JPEG (in .) (excluding protrusions) : 135 g (4.6 oz) (including battery and card) 72 EN of effective pixels : AVI Motion JPEG : Internal memory SD memory card SDHC memory card : 12,000,000 pixels Image pickup device Lens : 1/2.3" CCD (primary color...
... % (operation)/10 % to 1/2000 sec. SPECIFICATIONS Camera Product type Recording system Still pictures Applicable standards : Digital camera (for Camera File system (DCF)) : Exif 2.2, Digital Print Order Format (DPOF), PRINT Image Matching III, PictBridge Sound with Design rule for shooting and displaying) : Digital recording, JPEG (in .) (excluding protrusions) : 135 g (4.6 oz) (including battery and card) 72 EN of effective pixels : AVI Motion JPEG : Internal memory SD memory card SDHC memory card : 12,000,000 pixels Image pickup device Lens : 1/2.3" CCD (primary color...


