
SP-810UZ Instruction Manual (English)
Page 4
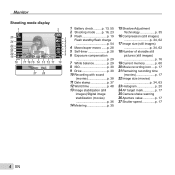
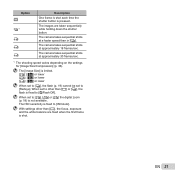
... p. 38 11 Date stamp p. 37 12 World time p. 48 13 Image stabilization (still images)/Digital image stabilization (movies p. 36 14 Metering p. 35 15 Shadow Adjustment Technology p. 35 16 Compression (still images p. 34, 62 17 Image size (still images p. 34, 62 18 Number of storable still pictures (still images p. 16 19 Current memory ...........p. 60 20 Movie recording icon...
... p. 38 11 Date stamp p. 37 12 World time p. 48 13 Image stabilization (still images)/Digital image stabilization (movies p. 36 14 Metering p. 35 15 Shadow Adjustment Technology p. 35 16 Compression (still images p. 34, 62 17 Image size (still images p. 34, 62 18 Number of storable still pictures (still images p. 16 19 Current memory ...........p. 60 20 Movie recording icon...

SP-810UZ Instruction Manual (English)
Page 5
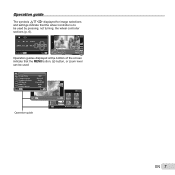
...13 14 1/1000 F3.0 2.0 P ISO WB 100 AUTO NORM 14M FILE 100 0004 '11/10/26 00:00 1 Battery check..........p. 13, 55 2 3D image p. 32 3 Print reservation/number of prints p. 52/p. 51 4 Eye-Fi transferred.........p. 42 5 Protect p. 41 9 6 7 Adding sound .........p. 38, ...39 Current memory ...........p. 60 8 8 Frame number/total number of images p. 20 Elapsed time/total shooting time (movies) p. 21 9 Volume p. 20, 44 10 Histogram p. 20 11 Shutter speed p. 17 12 Aperture value p. ...
...13 14 1/1000 F3.0 2.0 P ISO WB 100 AUTO NORM 14M FILE 100 0004 '11/10/26 00:00 1 Battery check..........p. 13, 55 2 3D image p. 32 3 Print reservation/number of prints p. 52/p. 51 4 Eye-Fi transferred.........p. 42 5 Protect p. 41 9 6 7 Adding sound .........p. 38, ...39 Current memory ...........p. 60 8 8 Frame number/total number of images p. 20 Elapsed time/total shooting time (movies) p. 21 9 Volume p. 20, 44 10 Histogram p. 20 11 Shutter speed p. 17 12 Aperture value p. ...
SP-810UZ Instruction Manual (English)
Page 7
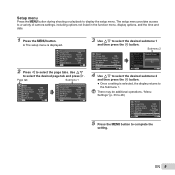
... Compression Shadow Adjust 1 AF Mode 2 ESP/ 3 Digital Zoom Exit MENU 14M Normal Auto Face/iESP ESP Off Set OK Sel. Image Set OK 5/30 Operation guide OK Erase/Cancel MENU EN 7 X Y M D Time 2011 . 10 . 26 00 : 00 Y/M/D Cancel MENU Set OK Single Print 4/30 NORM 14M ...
... Compression Shadow Adjust 1 AF Mode 2 ESP/ 3 Digital Zoom Exit MENU 14M Normal Auto Face/iESP ESP Off Set OK Sel. Image Set OK 5/30 Operation guide OK Erase/Cancel MENU EN 7 X Y M D Time 2011 . 10 . 26 00 : 00 Y/M/D Cancel MENU Set OK Single Print 4/30 NORM 14M ...
SP-810UZ Instruction Manual (English)
Page 9
...Digital Zoom Off Back MENU Set OK 4 Use FG to select the desired submenu 2 and then press the A button. ● Once a setting is displayed. 1 Reset 2 Image Size Compression Shadow Adjust 1 AF Mode 2 ESP/ 3 Digital Zoom Exit MENU 14M Normal Auto Face/iESP ESP Off Set OK 2 Press H to select the desired... to select the desired submenu 1 and then press the A button. Use FG to select the page tabs. "Menu Settings" (p. 33 to 48) 1 Reset 2 Image Size Compression Shadow Adjust 1 AF Mode 2 ESP/ 3 Digital Zoom Exit MENU 14M Normal Auto Face/iESP ESP On Set OK 5 Press the button to...
...Digital Zoom Off Back MENU Set OK 4 Use FG to select the desired submenu 2 and then press the A button. ● Once a setting is displayed. 1 Reset 2 Image Size Compression Shadow Adjust 1 AF Mode 2 ESP/ 3 Digital Zoom Exit MENU 14M Normal Auto Face/iESP ESP Off Set OK 2 Press H to select the desired... to select the desired submenu 1 and then press the A button. Use FG to select the page tabs. "Menu Settings" (p. 33 to 48) 1 Reset 2 Image Size Compression Shadow Adjust 1 AF Mode 2 ESP/ 3 Digital Zoom Exit MENU 14M Normal Auto Face/iESP ESP On Set OK 5 Press the button to...
SP-810UZ Instruction Manual (English)
Page 10
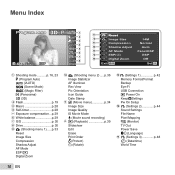
...Menu Index Program Auto 4 14M NORM 3D P 1 2 3 4 0.0 5 WB AUTO 6 ISO AUTO 7 8 MENU 9 1 Reset 0 2 Image Size 14M a Compression Normal b Shadow Adjust Auto c 1 AF Mode Face/iESP d 2 ESP/ ESP e 3 Digital Zoom Off Exit MENU Set... p. 30 8 Drive p. 30 9 p (Shooting menu 1)......p. 33 Reset Image Size Compression Shadow Adjust AF Mode ESP/n Digital Zoom 0 q (Shooting menu 2) .....p. 36 Image Stabilizer AF Illuminat. Rec View Pic Orientation Icon Guide Date Stamp a A (Movie menu p. 34 Image Size Image Quality IS Movie Mode R (Movie sound recording) b q (Playback p....
...Menu Index Program Auto 4 14M NORM 3D P 1 2 3 4 0.0 5 WB AUTO 6 ISO AUTO 7 8 MENU 9 1 Reset 0 2 Image Size 14M a Compression Normal b Shadow Adjust Auto c 1 AF Mode Face/iESP d 2 ESP/ ESP e 3 Digital Zoom Off Exit MENU Set... p. 30 8 Drive p. 30 9 p (Shooting menu 1)......p. 33 Reset Image Size Compression Shadow Adjust AF Mode ESP/n Digital Zoom 0 q (Shooting menu 2) .....p. 36 Image Stabilizer AF Illuminat. Rec View Pic Orientation Icon Guide Date Stamp a A (Movie menu p. 34 Image Size Image Quality IS Movie Mode R (Movie sound recording) b q (Playback p....
SP-810UZ Instruction Manual (English)
Page 11
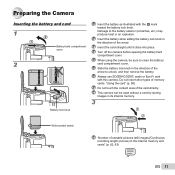
... can be sure to the battery exterior (scratches, etc.) may produce heat or an explosion. When using the camera, be used without a card by storing images in the internal memory and cards" (p. 62, 63) EN 11 Slide the battery lock knob in the direction of storable pictures (still... images)/Continuous recording length (movies) in its internal memory. 3 Write-protect switch "Number of the arrow to unlock, and then remove the battery. Damage to close ...
... can be sure to the battery exterior (scratches, etc.) may produce heat or an explosion. When using the camera, be used without a card by storing images in the internal memory and cards" (p. 62, 63) EN 11 Slide the battery lock knob in the direction of storable pictures (still... images)/Continuous recording length (movies) in its internal memory. 3 Write-protect switch "Number of the arrow to unlock, and then remove the battery. Damage to close ...

SP-810UZ Instruction Manual (English)
Page 15
... date and time are saved to select your language and press the A button. To change the selected time zone. [World Time] (p. 48) 6 Use FGHI to image file names, date prints, and other data. You can be used to select the year for [Y]. X Y M D Time Y / M / D Cancel MENU Date and time setting screen...
... date and time are saved to select your language and press the A button. To change the selected time zone. [World Time] (p. 48) 6 Use FGHI to image file names, date prints, and other data. You can be used to select the year for [Y]. X Y M D Time Y / M / D Cancel MENU Date and time setting screen...

SP-810UZ Instruction Manual (English)
Page 17
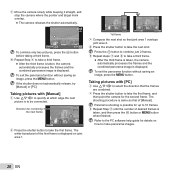
... the camera Press the n button again. 00:34 REC 00:12 Recording time Lights up red when recording The effects of images. P Press fully 1/400 F3.5 Image review screen To view images during shooting Pressing the q button enables playback of the set shooting mode is p, W, (Beauty) or P (some modes), shooting is performed...
... the camera Press the n button again. 00:34 REC 00:12 Recording time Lights up red when recording The effects of images. P Press fully 1/400 F3.5 Image review screen To view images during shooting Pressing the q button enables playback of the set shooting mode is p, W, (Beauty) or P (some modes), shooting is performed...

SP-810UZ Instruction Manual (English)
Page 18
...resolution, after reaching the maximum optical zoom, the camera will automatically resize and crop the image to the selected [Image Size], then enter the digital zoom range if [Digital Zoom] is [On]. Photographs taken...Turning the zoom lever adjusts the shooting range. W side T side [Off] selected for [Digital Zoom]: Image size Zoom bar 14M Optical zoom range Zoom bar P P 00:34 4 14M 0.0 WB AUTO ISO ...WB AUTO ISO AUTO Optical zoom: 36× Digital zoom: 4× To take larger images [Digital Zoom] The type and amount of zoom can be identified from the appearance of the zoom bar...
...resolution, after reaching the maximum optical zoom, the camera will automatically resize and crop the image to the selected [Image Size], then enter the digital zoom range if [Digital Zoom] is [On]. Photographs taken...Turning the zoom lever adjusts the shooting range. W side T side [Off] selected for [Digital Zoom]: Image size Zoom bar 14M Optical zoom range Zoom bar P P 00:34 4 14M 0.0 WB AUTO ISO ...WB AUTO ISO AUTO Optical zoom: 36× Digital zoom: 4× To take larger images [Digital Zoom] The type and amount of zoom can be identified from the appearance of the zoom bar...

SP-810UZ Instruction Manual (English)
Page 20
...by pressing HI. Reading a histogram If the peak fills too much of the frame, the image will appear mostly white. Displays previous image Displays next image During audio playback Press FG to select an image. ● It can be performed by holding HI. Press I to rewind. During pause, fast... the volume Press the A button to fast forward or reverse. To play sound recorded with an image, select the image and press the A button. ! If the peak fills too much of the images can be changed. Press H to fast forward. The display size of the frame, the...
...by pressing HI. Reading a histogram If the peak fills too much of the frame, the image will appear mostly white. Displays previous image Displays next image During audio playback Press FG to select an image. ● It can be performed by holding HI. Press I to rewind. During pause, fast... the volume Press the A button to fast forward or reverse. To play sound recorded with an image, select the image and press the A button. ! If the peak fills too much of the images can be changed. Press H to fast forward. The display size of the frame, the...

SP-810UZ Instruction Manual (English)
Page 21
... display the last frame. Hold I or H to advance or rewind by one frame at a time. Erasing images during playback (Single image erase) 1 Display the image you want to select [Erase], and press the A button. Multiple images or all images can be erased at a time. EN 21 Erase Cancel MENU Erase Cancel Set OK 2 Press FG...
... display the last frame. Hold I or H to advance or rewind by one frame at a time. Erasing images during playback (Single image erase) 1 Display the image you want to select [Erase], and press the A button. Multiple images or all images can be erased at a time. EN 21 Erase Cancel MENU Erase Cancel Set OK 2 Press FG...

SP-810UZ Instruction Manual (English)
Page 22
.../10/26 2 4 W T '11/10/26 4 4 4 4 '11/10/26 00:00 To select an image in index view Use FGHI to select an image, and press the A button to 10x magnification) allows checking of a desired image. Changing the image information display Shooting information settings displayed on the screen can be changed. 1 Press F (INFO.... 1 Turn the zoom lever. "Using the Menu" (p. 8) 22 EN Index view and close -up to display the selected image in single-image view. '11/10/26 00:00 No information Detailed 3D 10 4/30 1/1000 F3.0 2.0 P ISO WB 100 AUTO NORM 14M FILE 100 0004 '11/10/...
.../10/26 2 4 W T '11/10/26 4 4 4 4 '11/10/26 00:00 To select an image in index view Use FGHI to select an image, and press the A button to 10x magnification) allows checking of a desired image. Changing the image information display Shooting information settings displayed on the screen can be changed. 1 Press F (INFO.... 1 Turn the zoom lever. "Using the Menu" (p. 8) 22 EN Index view and close -up to display the selected image in single-image view. '11/10/26 00:00 No information Detailed 3D 10 4/30 1/1000 F3.0 2.0 P ISO WB 100 AUTO NORM 14M FILE 100 0004 '11/10/...

SP-810UZ Instruction Manual (English)
Page 24
...Check the frame appearing around the face detected by the camera, and then press the shutter button to take the picture. ● The unedited image and edited image are pre-programmed for the scene U Pet Mode - Option Application B Portrait/V Beauty/F Landscape/ G Night Scene*1/M Night+Portrait*1/ The camera... the subject. In modes, the optimum shooting settings are both saved. ● If the image cannot be retouched, only the unedited image is saved. ● The [Image Size] of the retouched image is limited to [n] or lower. 4 14M NORM 0.0 WB AUTO MENU 2 Press G to go ...
...Check the frame appearing around the face detected by the camera, and then press the shutter button to take the picture. ● The unedited image and edited image are pre-programmed for the scene U Pet Mode - Option Application B Portrait/V Beauty/F Landscape/ G Night Scene*1/M Night+Portrait*1/ The camera... the subject. In modes, the optimum shooting settings are both saved. ● If the image cannot be retouched, only the unedited image is saved. ● The [Image Size] of the retouched image is limited to [n] or lower. 4 14M NORM 0.0 WB AUTO MENU 2 Press G to go ...

SP-810UZ Instruction Manual (English)
Page 25
...1 Press the shutter button to which the effect has been applied. In P mode, the optimum shooting settings are saved, an unmodified image and an image to take the first frame. 2 Move the camera slightly in some settings cannot be applied depending on installing the PC software, see "...Setting up using the supplied CD" (p. 13). For this reason, some modes. When set to [Auto] or [Manual], [Image Size] (p. 34) is fixed to right EN 25 Shooting mode MAGIC FILTER Option 1 Pop Art 2 Pin Hole 3 Fish Eye 4 Drawing*1 5 Soft Focus 6...
...1 Press the shutter button to which the effect has been applied. In P mode, the optimum shooting settings are saved, an unmodified image and an image to take the first frame. 2 Move the camera slightly in some settings cannot be applied depending on installing the PC software, see "...Setting up using the supplied CD" (p. 13). For this reason, some modes. When set to [Auto] or [Manual], [Image Size] (p. 34) is fixed to right EN 25 Shooting mode MAGIC FILTER Option 1 Pop Art 2 Pin Hole 3 Fish Eye 4 Drawing*1 5 Soft Focus 6...
SP-810UZ Instruction Manual (English)
Page 26
...for up to take a third frame. ● After the third frame is taken, the camera automatically processes the frames and the combined panorama image is taken, and then press the A button or button when finished. If the shutter does not automatically release, try [Manual... button to take a third frame. ● After the third frame is taken, the camera automatically processes the frames and the combined panorama image is possible for details on joint area 1. The white-boxed part of [Manual]. Panorama shooting is displayed. To exit the panorama function without...
...for up to take a third frame. ● After the third frame is taken, the camera automatically processes the frames and the combined panorama image is taken, and then press the A button or button when finished. If the shutter does not automatically release, try [Manual... button to take a third frame. ● After the third frame is taken, the camera automatically processes the frames and the combined panorama image is possible for details on joint area 1. The white-boxed part of [Manual]. Panorama shooting is displayed. To exit the panorama function without...
SP-810UZ Instruction Manual (English)
Page 27
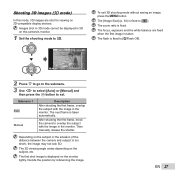
... 1 Set the shooting mode to W. 3D Photo 3D P AUTO To exit 3D shooting mode without saving an image, press the button. The flash is too short), the image may not look 3D. The 3D viewing angle varies depending on the monitor lightly. The focus, exposure and the ... ratio is fixed to overlap the subject with the image in 3D on this mode, 3D images are fixed when the first image is taken automatically. Then manually release the shutter. Decide the position by referencing the image. Images shot in 3D mode cannot be displayed in the monitor. ...
... 1 Set the shooting mode to W. 3D Photo 3D P AUTO To exit 3D shooting mode without saving an image, press the button. The flash is too short), the image may not look 3D. The 3D viewing angle varies depending on the monitor lightly. The focus, exposure and the ... ratio is fixed to overlap the subject with the image in 3D on this mode, 3D images are fixed when the first image is taken automatically. Then manually release the shutter. Decide the position by referencing the image. Images shot in 3D mode cannot be displayed in the monitor. ...

SP-810UZ Instruction Manual (English)
Page 28
..., the picture is taken. to set. Y 2 sec The self-timer lamp blinks for approx. 2 seconds, and then the picture is deactivated. You can shoot the image at close as 1 cm/0.4 in the function menu. Y 12 sec The self-timer lamp turns on for approx. 10 seconds, then blinks for approx. 2 seconds...
..., the picture is taken. to set. Y 2 sec The self-timer lamp blinks for approx. 2 seconds, and then the picture is deactivated. You can shoot the image at close as 1 cm/0.4 in the function menu. Y 12 sec The self-timer lamp turns on for approx. 10 seconds, then blinks for approx. 2 seconds...
SP-810UZ Instruction Manual (English)
Page 30
Or, set . In the ISO setting, although smaller values result in less sensitivity, sharp images can be taken under low light conditions. Larger values result in higher sensitivity, and images can be taken at fast shutter speeds even under fully lit conditions. Return to the selected value. The ISO sensitivity is fixed...
Or, set . In the ISO setting, although smaller values result in less sensitivity, sharp images can be taken under low light conditions. Larger values result in higher sensitivity, and images can be taken at fast shutter speeds even under fully lit conditions. Return to the selected value. The ISO sensitivity is fixed...
SP-810UZ Instruction Manual (English)
Page 31
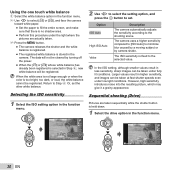
...]. With settings other than [o], the focus, exposure and the white balance are taken sequentially while holding down the shutter button. The images are fixed when the first frame is not available. The camera takes sequential shots at approximately 30 frames/sec. *1... The shooting speed varies depending on the settings for [Image Size/Compression] (p. 36). The [Image Size] is limited. [c]: [n] or lower [d]: [3] or lower [e]: [2] or lower When set to [j], the flash (p. 19)...
...]. With settings other than [o], the focus, exposure and the white balance are taken sequentially while holding down the shutter button. The images are fixed when the first frame is not available. The camera takes sequential shots at approximately 30 frames/sec. *1... The shooting speed varies depending on the settings for [Image Size/Compression] (p. 36). The [Image Size] is limited. [c]: [n] or lower [d]: [3] or lower [e]: [2] or lower When set to [j], the flash (p. 19)...

SP-810UZ Instruction Manual (English)
Page 32
...; button. 32 EN Slideshow MENU Set OK To start a slideshow, press the button. To stop the slideshow, press the or A button. 3D images are deleted on 3D-compatible devices connected to pause playback. For the connection and setting method, see "Connection via HDMI cable" (p. 46) 2 Use the wheel...controller or HI to select [3D Show] and then press the A button. 3 Use the wheel controller or HI to select the 3D image to enlarge/shrink the image. Then turn the zoom lever to play back and then press the A button. Playback direction: Press FGHI to pause playback and scroll ...
...; button. 32 EN Slideshow MENU Set OK To start a slideshow, press the button. To stop the slideshow, press the or A button. 3D images are deleted on 3D-compatible devices connected to pause playback. For the connection and setting method, see "Connection via HDMI cable" (p. 46) 2 Use the wheel...controller or HI to select [3D Show] and then press the A button. 3 Use the wheel controller or HI to select the 3D image to enlarge/shrink the image. Then turn the zoom lever to play back and then press the A button. Playback direction: Press FGHI to pause playback and scroll ...


