

SP-800UZ Instruction Manual (English)
Page 2
... Tips 53 ¾ Appendix 58 2 EN AV cable USB-AC adapter (F-2AC) 2 Step Preparing the Camera "Preparing the Camera" (p. 10) 3 Step Shooting and Playing Back Images "Shooting, Playback, and Erasing" (p. 15) 4 Step How to Use the Camera "Camera Settings" (p. 3) 5 Step Printing "Direct printing (PictBridge)" (p. 48) "Print Reservations (DPOF)" (p. 51) Contents ¾...
... Tips 53 ¾ Appendix 58 2 EN AV cable USB-AC adapter (F-2AC) 2 Step Preparing the Camera "Preparing the Camera" (p. 10) 3 Step Shooting and Playing Back Images "Shooting, Playback, and Erasing" (p. 15) 4 Step How to Use the Camera "Camera Settings" (p. 3) 5 Step Printing "Direct printing (PictBridge)" (p. 48) "Print Reservations (DPOF)" (p. 51) Contents ¾...

SP-800UZ Instruction Manual (English)
Page 3
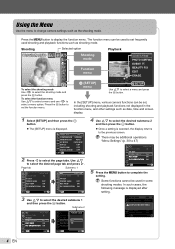
... (p. 18) Operation guides displayed at the bottom of the screen indicate that the wheel controller is to be accessed using the direct buttons. IMAGE SET OK Operation guide OK ERASE/CANCEL MENU EN 3 Zoom lever (p. 16, 19) Shutter button (p. 15, 53) Operation guide The symbols FGHI displayed...functions can be used by pressing, not turning, the wheel controller sections shown below. Camera Settings Using the Direct Buttons Frequently used . 1 IMAGE SIZE 14M 2 COMPRESSION NORMAL SHADOW ADJUST AUTO AF MODE FACE/iESP 1 ESP/ ESP 2 FINE ZOOM OFF 3 DIGITAL ZOOM OFF EXIT MENU ...
... (p. 18) Operation guides displayed at the bottom of the screen indicate that the wheel controller is to be accessed using the direct buttons. IMAGE SET OK Operation guide OK ERASE/CANCEL MENU EN 3 Zoom lever (p. 16, 19) Shutter button (p. 15, 53) Operation guide The symbols FGHI displayed...functions can be used by pressing, not turning, the wheel controller sections shown below. Camera Settings Using the Direct Buttons Frequently used . 1 IMAGE SIZE 14M 2 COMPRESSION NORMAL SHADOW ADJUST AUTO AF MODE FACE/iESP 1 ESP/ ESP 2 FINE ZOOM OFF 3 DIGITAL ZOOM OFF EXIT MENU ...
SP-800UZ Instruction Manual (English)
Page 4
... such as date, time and screen display. 1 Select [SETUP] and then press the A button. ● The [SETUP] menu is displayed. 1 IMAGE SIZE 14M 2 COMPRESSION NORMAL SHADOW ADJUST AUTO AF MODE FACE/iESP 1 ESP/ ESP 2 FINE ZOOM OFF 3 DIGITAL ZOOM OFF EXIT MENU SET OK 2... 1X POW--E.-R-.-S- A-V-:E-- 2 WORLD TIME HOME TV OUT VIDEO OUT POWER SAVEOFF OFF 1 REC VIEW ON 2 PIC ORIENTATION 3 EXIT MENU SET OK 1 IMAGE SIZE 14M 2 COMPRESSION NORMAL SHADOW ADJUST AUTO ACFONMFOLDICETING SETTiIENSGPS 1 ESP/*1 ESP 2 FINE ZOOM OFF 3 DIGITAL ZOOM OFF EXIT MENU SET OK 4 EN...
... such as date, time and screen display. 1 Select [SETUP] and then press the A button. ● The [SETUP] menu is displayed. 1 IMAGE SIZE 14M 2 COMPRESSION NORMAL SHADOW ADJUST AUTO AF MODE FACE/iESP 1 ESP/ ESP 2 FINE ZOOM OFF 3 DIGITAL ZOOM OFF EXIT MENU SET OK 2... 1X POW--E.-R-.-S- A-V-:E-- 2 WORLD TIME HOME TV OUT VIDEO OUT POWER SAVEOFF OFF 1 REC VIEW ON 2 PIC ORIENTATION 3 EXIT MENU SET OK 1 IMAGE SIZE 14M 2 COMPRESSION NORMAL SHADOW ADJUST AUTO ACFONMFOLDICETING SETTiIENSGPS 1 ESP/*1 ESP 2 FINE ZOOM OFF 3 DIGITAL ZOOM OFF EXIT MENU SET OK 4 EN...

SP-800UZ Instruction Manual (English)
Page 5
... p. 27 5 Exposure compensation....p. 27 6 White balance p. 28 7 ISO p. 28 8 Drive p. 29 9 o (SETUP) IMAGE SIZE (Still images p. 30 IMAGE SIZE (Movies) .......p. 30 COMPRESSION (Still images p. 30 IMAGE QUALITY (Movies p. 30 SHADOW ADJUST ...........p. 31 AF MODE p. 31 ESP/n p. 32 FINE ZOOM p. 32 Menus for Playback, ...Editing, and Printing Functions DIGITAL ZOOM p. 32 R (Still images p. 33 R (Movies p. 33 IMAGE STABILIZER (Still images)/ IS MOVIE MODE (Movies p. 33 BKT p. 33 NOISE REDUCT p. 34 SET TIME LAPSE p. 34 FULLTIME AF ...
... p. 27 5 Exposure compensation....p. 27 6 White balance p. 28 7 ISO p. 28 8 Drive p. 29 9 o (SETUP) IMAGE SIZE (Still images p. 30 IMAGE SIZE (Movies) .......p. 30 COMPRESSION (Still images p. 30 IMAGE QUALITY (Movies p. 30 SHADOW ADJUST ...........p. 31 AF MODE p. 31 ESP/n p. 32 FINE ZOOM p. 32 Menus for Playback, ...Editing, and Printing Functions DIGITAL ZOOM p. 32 R (Still images p. 33 R (Movies p. 33 IMAGE STABILIZER (Still images)/ IS MOVIE MODE (Movies p. 33 BKT p. 33 NOISE REDUCT p. 34 SET TIME LAPSE p. 34 FULLTIME AF ...

SP-800UZ Instruction Manual (English)
Page 8
...p. 4, 5 11 Noise reduction p. 34 12 World time p. 45 13 Image stabilization (still images)/ Digital image stabilization (movies) p. 33 14 Metering p. 32 15 Shadow Adjustment Technology p. 31 16 Compression (still images)..... p. 30, 61 17 Image size (still images)......... Monitor Shooting mode display 1 2 25 24 23 22 21 20 00:34...3 4 5 P0.0 6 7 WB AUTO 8 ISO AUTO 9 NR 10 18 17 16 15 14 13 12 11 1/100 F2.8 27 26 Still image 1 Battery check p. 12, 54 2 Shooting mode p. 15, 21 3 Flash p. 26 Flash standby/flash charge .......... p. 30, 61 18 Number of ...
...p. 4, 5 11 Noise reduction p. 34 12 World time p. 45 13 Image stabilization (still images)/ Digital image stabilization (movies) p. 33 14 Metering p. 32 15 Shadow Adjustment Technology p. 31 16 Compression (still images)..... p. 30, 61 17 Image size (still images)......... Monitor Shooting mode display 1 2 25 24 23 22 21 20 00:34...3 4 5 P0.0 6 7 WB AUTO 8 ISO AUTO 9 NR 10 18 17 16 15 14 13 12 11 1/100 F2.8 27 26 Still image 1 Battery check p. 12, 54 2 Shooting mode p. 15, 21 3 Flash p. 26 Flash standby/flash charge .......... p. 30, 61 18 Number of ...

SP-800UZ Instruction Manual (English)
Page 9
... reservation/ number of prints p. 51, 50 3 Protect p. 40 4 Adding sound p. 33, 40 5 Current memory p. 60 6 Number of frame/total number of images (still images p. 17 Elapsed time/total recording time (movies p. 18 7 Histogram p. 17 8 Shutter speed p. 15 9 Aperture value p. 15 10 ISO p. 28 11 Exposure ...compensation p. 27 12 White balance p. 28 13 Compression (still images)..... p. 30, 61 Image quality (movies p. 30, 61 14 Image size p. 30, 61 15 Drive p. 29 16 File number 17 Date and time p. 13 18 Metering p. 32 19 Shadow...
... reservation/ number of prints p. 51, 50 3 Protect p. 40 4 Adding sound p. 33, 40 5 Current memory p. 60 6 Number of frame/total number of images (still images p. 17 Elapsed time/total recording time (movies p. 18 7 Histogram p. 17 8 Shutter speed p. 15 9 Aperture value p. 15 10 ISO p. 28 11 Exposure ...compensation p. 27 12 White balance p. 28 13 Compression (still images)..... p. 30, 61 Image quality (movies p. 30, 61 14 Image size p. 30, 61 15 Drive p. 29 16 File number 17 Date and time p. 13 18 Metering p. 32 19 Shadow...

SP-800UZ Instruction Manual (English)
Page 13
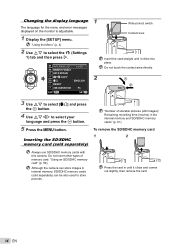
.... ● Use FG to turn on the camera. ● The date and time setting screen is displayed when the date and time are saved to image file names, date prints, and other data. 1 Press the n button to turn daylight saving time ([SUMMER]) on or off. '10.02.26.12:30...
.... ● Use FG to turn on the camera. ● The date and time setting screen is displayed when the date and time are saved to image file names, date prints, and other data. 1 Press the n button to turn daylight saving time ([SUMMER]) on or off. '10.02.26.12:30...
SP-800UZ Instruction Manual (English)
Page 14
... SET OK Write-protect switch Contact area Insert the card straight until it clicks into place. Do not insert other types of storable pictures (still images)/ Remaining recording time (movies) in the internal memory and SD/SDHC memory cards" (p. 61) To remove the SD/SDHC memory card 1 2 Always ...and error messages displayed on the monitor is adjustable. 1 Display the [SETUP] menu. Inserting the SD/SDHC memory card (sold separately) can store images in until it clicks and comes out slightly, then remove the card. 14 EN Do not touch the contact area directly. 3 Use FG to ...
... SET OK Write-protect switch Contact area Insert the card straight until it clicks into place. Do not insert other types of storable pictures (still images)/ Remaining recording time (movies) in the internal memory and SD/SDHC memory cards" (p. 61) To remove the SD/SDHC memory card 1 2 Always ...and error messages displayed on the monitor is adjustable. 1 Display the [SETUP] menu. Inserting the SD/SDHC memory card (sold separately) can store images in until it clicks and comes out slightly, then remove the card. 14 EN Do not touch the contact area directly. 3 Use FG to ...
SP-800UZ Instruction Manual (English)
Page 16
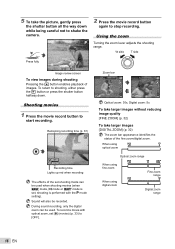
... 0.0 WB WB AUTO AUTO ISO ISO AUTO AUTO 00:34 00:34 4 14M 4 14M Optical zoom: 30x, Digital zoom: 5x To take larger images without reducing image quality [FINE ZOOM] (p. 32) To take the picture, gently press the shutter button all the way down . W side T side Press fully 1/...400 F2.8 Image review screen To view images during shooting Pressing the q button enables playback of images. To record a movie with the P mode setting). Shooting movies 1 Press the movie record button to shooting...
... 0.0 WB WB AUTO AUTO ISO ISO AUTO AUTO 00:34 00:34 4 14M 4 14M Optical zoom: 30x, Digital zoom: 5x To take larger images without reducing image quality [FINE ZOOM] (p. 32) To take the picture, gently press the shutter button all the way down . W side T side Press fully 1/...400 F2.8 Image review screen To view images during shooting Pressing the q button enables playback of images. To record a movie with the P mode setting). Shooting movies 1 Press the movie record button to shooting...

SP-800UZ Instruction Manual (English)
Page 17
... AUTO 00:34 4 14M NORM Reading a histogram If the peak fills too much of the frame, the image will appear mostly white. Displays previous image Displays next image Keep turning the wheel controller to best match the situation, for example, the need for a clear view of the... the order shown below each time the button is pressed. "Shooting mode display" (p. 8) Normal P Viewing images 1 Press the q button. icon appears on images with an image, select the image and press the A button. Changing the shooting information display The display of the screen information can be performed...
... AUTO 00:34 4 14M NORM Reading a histogram If the peak fills too much of the frame, the image will appear mostly white. Displays previous image Displays next image Keep turning the wheel controller to best match the situation, for example, the need for a clear view of the... the order shown below each time the button is pressed. "Shooting mode display" (p. 8) Normal P Viewing images 1 Press the q button. icon appears on images with an image, select the image and press the A button. Changing the shooting information display The display of the screen information can be performed...

SP-800UZ Instruction Manual (English)
Page 18
... MENU ALL ERASE SEL. Press I again to erase and press G (D). The speed at the same time. IMAGE ERASE CANCEL SET OK 2 Press FG to rewind. IMAGE] (p. 39) can be used to erase multiple images at which the recording rewinds increases each time H is paused 18 EN MOVIE PLAY OK '10/02/26... want to increase the fast forward speed. To operate with HI *1 Press I or H pressed for continuous advance or rewind. Erasing images during movie playback Elapsed time/ Total recording time 00:12/00:34 During playback Pausing and restarting playback Press the A button to advance or ...
... MENU ALL ERASE SEL. Press I again to erase and press G (D). The speed at the same time. IMAGE ERASE CANCEL SET OK 2 Press FG to rewind. IMAGE] (p. 39) can be used to erase multiple images at which the recording rewinds increases each time H is paused 18 EN MOVIE PLAY OK '10/02/26... want to increase the fast forward speed. To operate with HI *1 Press I or H pressed for continuous advance or rewind. Erasing images during movie playback Elapsed time/ Total recording time 00:12/00:34 During playback Pausing and restarting playback Press the A button to advance or ...

SP-800UZ Instruction Manual (English)
Page 19
... area. Close-up view (up to 10x magnification) allows checking of a desired image. In event index*1, images are played back. W side T side Single-image view Close-up view, and event index Index view enables quick selection of image details. Normal 10 4/30 W T Index view '10/02/26 2 4 W T... can be changed. 1 Press F (INFO). ● The displayed image information changes in index view Use FGHI to select an image, and press the A button to select the representative image and press the A button. To scroll an image in close -up view W 4/30 4/30 '10/02/26 12...
... area. Close-up view (up to 10x magnification) allows checking of a desired image. In event index*1, images are played back. W side T side Single-image view Close-up view, and event index Index view enables quick selection of image details. Normal 10 4/30 W T Index view '10/02/26 2 4 W T... can be changed. 1 Press F (INFO). ● The displayed image information changes in index view Use FGHI to select an image, and press the A button to select the representative image and press the A button. To scroll an image in close -up view W 4/30 4/30 '10/02/26 12...

SP-800UZ Instruction Manual (English)
Page 20
.../26 12:30 IN-CAMERA MANUAL Search Learn about the camera History Message EXIT SET OK Current viewing area To control panorama image playback Zoom in the playback function or [SETUP] menus, a description of the pressed button. Submenu 2 Search Learn about ... press the A button to set. Playback direction: Press the A button to enlarge/shrink the image. "Creating panoramic images (A mode)" (p. 23) 1 Select a panorama image during playback. Playing back panorama images Panorama images that were combined together using [AUTO] or [MANUAL] can be performed from a term or...
.../26 12:30 IN-CAMERA MANUAL Search Learn about the camera History Message EXIT SET OK Current viewing area To control panorama image playback Zoom in the playback function or [SETUP] menus, a description of the pressed button. Submenu 2 Search Learn about ... press the A button to set. Playback direction: Press the A button to enlarge/shrink the image. "Creating panoramic images (A mode)" (p. 23) 1 Select a panorama image during playback. Playing back panorama images Panorama images that were combined together using [AUTO] or [MANUAL] can be performed from a term or...

SP-800UZ Instruction Manual (English)
Page 22
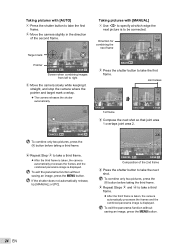
...9679; AUTO recognizes the subject (people, flowers, etc) automatically and blurs the background for specific shooting scenes. Making an overlay image with blurred backgrounds ([1 SOFT BACKGROUND SHOT] mode) 1 Use FG to select [1 SOFT BACKGROUND SHOT], and press the A button to set...shot, press the A button, and then press the shutter button again. 3 Adjust the position of shooting is automatically activated. Making an overlay image ([0 MULTIPLE EXPOSURE] mode) The method of the fireworks that will be changed in [b MULTI FIREWORKS], it continuously. Option B PORTRAIT...
...9679; AUTO recognizes the subject (people, flowers, etc) automatically and blurs the background for specific shooting scenes. Making an overlay image with blurred backgrounds ([1 SOFT BACKGROUND SHOT] mode) 1 Use FG to select [1 SOFT BACKGROUND SHOT], and press the A button to set...shot, press the A button, and then press the shutter button again. 3 Adjust the position of shooting is automatically activated. Making an overlay image ([0 MULTIPLE EXPOSURE] mode) The method of the fireworks that will be changed in [b MULTI FIREWORKS], it continuously. Option B PORTRAIT...

SP-800UZ Instruction Manual (English)
Page 23
... the desired mode and then press the A button to the submenu. Submenu 1 AUTO MANUAL PC Application Three frames are combined into a panorama image using the guide frame and manually releases the shutter. For this reason, some settings cannot be changed in some modes. MAGIC FILTER Creating panoramic...(p. 11). EN 23 POP ART 0.0 WB AUTO 3 Use HI to select the desired effect and then press the A button to set to [AUTO] or [MANUAL], [IMAGE SIZE] (p. 30) is fixed to [2]. The flash (p. 26) is fixed to $ (FLASH OFF) mode. The frames that the target marks...
... the desired mode and then press the A button to the submenu. Submenu 1 AUTO MANUAL PC Application Three frames are combined into a panorama image using the guide frame and manually releases the shutter. For this reason, some settings cannot be changed in some modes. MAGIC FILTER Creating panoramic...(p. 11). EN 23 POP ART 0.0 WB AUTO 3 Use HI to select the desired effect and then press the A button to set to [AUTO] or [MANUAL], [IMAGE SIZE] (p. 30) is fixed to [2]. The flash (p. 26) is fixed to $ (FLASH OFF) mode. The frames that the target marks...
SP-800UZ Instruction Manual (English)
Page 24
...1st frame CANCEL MENU SAVE OK 3 Compose the next shot so that joint area 1 overlaps joint area 2. To exit the panorama function without saving an image, press the m button. Direction for MANUAL combining the next frame 1 2 BACK MENU 2 Press the shutter button to take the next shot. MANUAL 1... 2 CANCEL MENU SAVE OK Composition of the second frame. AUTO Target mark Pointer CANCEL MENU SAVE OK Screen when combining images from left to take a third frame. ● After the third frame is taken, the camera automatically processes the frames and the combined panorama...
...1st frame CANCEL MENU SAVE OK 3 Compose the next shot so that joint area 1 overlaps joint area 2. To exit the panorama function without saving an image, press the m button. Direction for MANUAL combining the next frame 1 2 BACK MENU 2 Press the shutter button to take the next shot. MANUAL 1... 2 CANCEL MENU SAVE OK Composition of the second frame. AUTO Target mark Pointer CANCEL MENU SAVE OK Screen when combining images from left to take a third frame. ● After the third frame is taken, the camera automatically processes the frames and the combined panorama...

SP-800UZ Instruction Manual (English)
Page 25
...to the PC software (ib) help guide for taking the picture. 1 Set the shooting mode to make panorama images. 2 Point the camera toward the subject. The [IMAGE SIZE] of the retouched image is limited to take the first frame, and then compose the second shot. Frame subsequent photographs so that..., and then press the shutter button to [n] or lower. Taking pictures with [PC] 1 Use FGHI to select the direction that they overlap with the image in white reappears on the side of the display opposite the pan direction. EN 25 BEAUTY P 0.0 WB AUTO 4 14M After first shot PC ...
...to the PC software (ib) help guide for taking the picture. 1 Set the shooting mode to make panorama images. 2 Point the camera toward the subject. The [IMAGE SIZE] of the retouched image is limited to take the first frame, and then compose the second shot. Frame subsequent photographs so that..., and then press the shutter button to [n] or lower. Taking pictures with [PC] 1 Use FGHI to select the direction that they overlap with the image in white reappears on the side of the display opposite the pan direction. EN 25 BEAUTY P 0.0 WB AUTO 4 14M After first shot PC ...

SP-800UZ Instruction Manual (English)
Page 28
For shooting under a clear sky. In the ISO setting, although smaller values result in higher sensitivity, and images can be taken at fast shutter speeds even under fully lit conditions. However, high sensitivity introduces noise into the resulting picture, ...button to the selected value. 28 EN Value The ISO sensitivity is fixed to set . Larger values result in less sensitivity, sharp images can be taken under low light conditions. Option Description ISO AUTO The camera automatically adjusts the sensitivity according to the scene. 1 Select the white...
For shooting under a clear sky. In the ISO setting, although smaller values result in higher sensitivity, and images can be taken at fast shutter speeds even under fully lit conditions. However, high sensitivity introduces noise into the resulting picture, ...button to the selected value. 28 EN Value The ISO sensitivity is fixed to set . Larger values result in less sensitivity, sharp images can be taken under low light conditions. Option Description ISO AUTO The camera automatically adjusts the sensitivity according to the scene. 1 Select the white...

SP-800UZ Instruction Manual (English)
Page 29
...be taken automatically. The camera takes sequential shots at approximately 15.2 frames/sec. "7" (p. 33) The camera takes sequential shots automatically for "image quality" (p. 30). The camera takes sequential shots at [ISO AUTO] in the shooting function menu. EN 29 The ISO sensitivity is fi...;xed at a faster speed than in the first frame. Sequential shooting while adjusting the focus for each image. Sleep mode is pressed. Use of the battery/card compartment cover, connecting the camera to [B]. Timelapse shooting Once the shutter button...
...be taken automatically. The camera takes sequential shots at approximately 15.2 frames/sec. "7" (p. 33) The camera takes sequential shots automatically for "image quality" (p. 30). The camera takes sequential shots at [ISO AUTO] in the shooting function menu. EN 29 The ISO sensitivity is fi...;xed at a faster speed than in the first frame. Sequential shooting while adjusting the focus for each image. Sleep mode is pressed. Use of the battery/card compartment cover, connecting the camera to [B]. Timelapse shooting Once the shutter button...

SP-800UZ Instruction Manual (English)
Page 30
...9F (1920×1080) FINE COMPRESSION NORMAL Suitable for viewing pictures on a TV or using pictures on emails and web sites. IMAGE QUALITY FINE/NORMAL Select [FINE] to [FINE]. Menus for Shooting Functions The default settings of the function are highlighted in the... internal memory and SD/SDHC memory cards" (p. 61) Selecting the image quality for movies [IMAGE SIZE/IMAGE QUALITY] A (Movie menu) X IMAGE SIZE/IMAGE QUALITY Available shooting modes:P M s P A Q Submenu 1 Submenu 2 Application IMAGE SIZE 720P VGA (640×480) QVGA (320×240) Select the...
...9F (1920×1080) FINE COMPRESSION NORMAL Suitable for viewing pictures on a TV or using pictures on emails and web sites. IMAGE QUALITY FINE/NORMAL Select [FINE] to [FINE]. Menus for Shooting Functions The default settings of the function are highlighted in the... internal memory and SD/SDHC memory cards" (p. 61) Selecting the image quality for movies [IMAGE SIZE/IMAGE QUALITY] A (Movie menu) X IMAGE SIZE/IMAGE QUALITY Available shooting modes:P M s P A Q Submenu 1 Submenu 2 Application IMAGE SIZE 720P VGA (640×480) QVGA (320×240) Select the...


