LS-10 Instructions (English)
Page 1
Keep the instructions handy for information about using the product correctly and safely. To ensure successful recordings, we recommend that you for purchasing an Olympus Digital Voice Recorder. Please read these instructions for future reference. LINEAR PCM RECORDER LS-10 Linear PCM Recorder INSTRUCTIONS EN Thank you test the record function and volume before use.
Keep the instructions handy for information about using the product correctly and safely. To ensure successful recordings, we recommend that you for purchasing an Olympus Digital Voice Recorder. Please read these instructions for future reference. LINEAR PCM RECORDER LS-10 Linear PCM Recorder INSTRUCTIONS EN Thank you test the record function and volume before use.
LS-10 Instructions (English)
Page 3
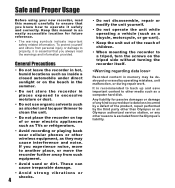
... of Contents 3 Safe and Proper Usage 4 1 Getting Started Main Features 6 Identification of Parts 7 Display (LCD Panel 8 Inserting Batteries 9 Using the AC Adapter 10 Power Supply 11 HOLD 11 Setting Time and Date [Time & Date 12 Changing the Time and Date 13 Inserting and Ejecting a Card 14 Inserting a Card... to the CD 55 Using iTunes 57 Window Names 57 Copying Music from CD 58 Transferring Music File to the Recorder...........59 Copying Voice File to the CD 60 Using as External Memory of the PC 61 6 Other Information Alarm Message List 62 Troubleshooting 63 Technical ...
... of Contents 3 Safe and Proper Usage 4 1 Getting Started Main Features 6 Identification of Parts 7 Display (LCD Panel 8 Inserting Batteries 9 Using the AC Adapter 10 Power Supply 11 HOLD 11 Setting Time and Date [Time & Date 12 Changing the Time and Date 13 Inserting and Ejecting a Card 14 Inserting a Card... to the CD 55 Using iTunes 57 Window Names 57 Copying Music from CD 58 Transferring Music File to the Recorder...........59 Copying Voice File to the CD 60 Using as External Memory of the PC 61 6 Other Information Alarm Message List 62 Troubleshooting 63 Technical ...
LS-10 Instructions (English)
Page 4
... such as they may be destroyed or erased by the third party other than Olympus or an Olympus authorized service station, or any kind occurred due to property, it safely and correctly. General Precautions • Do not leave the recorder in hot, humid locations such as inside a closed automobile under direct sunlight or...
... such as they may be destroyed or erased by the third party other than Olympus or an Olympus authorized service station, or any kind occurred due to property, it safely and correctly. General Precautions • Do not leave the recorder in hot, humid locations such as inside a closed automobile under direct sunlight or...

LS-10 Instructions (English)
Page 6
...recordings with low noise. ● Supports the linear PCM format, which are utilized in 1 the housing for system upgrades through enhanced options and equipment. Can handle the MP3 format (MPEG-1/ MPEG-2 Audio Layer 3), and the Windows Media Audio (WMA) format. In addition, when connected to or surpassing CD-level. Check the Olympus... high capacity recording media. By connecting the computer with its 2 GB built-in a highly compressed manner, thereby allowing for your computer. Hi-Speed, which is capable of recording functions such as the recording level and ...
...recordings with low noise. ● Supports the linear PCM format, which are utilized in 1 the housing for system upgrades through enhanced options and equipment. Can handle the MP3 format (MPEG-1/ MPEG-2 Audio Layer 3), and the Windows Media Audio (WMA) format. In addition, when connected to or surpassing CD-level. Check the Olympus... high capacity recording media. By connecting the computer with its 2 GB built-in a highly compressed manner, thereby allowing for your computer. Hi-Speed, which is capable of recording functions such as the recording level and ...

LS-10 Instructions (English)
Page 7
.... 2 Built-in stereo microphone (R) 3 Built-in stereo speaker (L) % 9 button 7 ERASE button = 0 button q`/OK button w Card cover 6 REC LEVEL dial e EAR jack 7 REC s button r VOLUME dial Recording indicator light (LED) t USB terminal 8 MIC SENSE HIGH/LOW switch y POWER/HOLD switch 9 LOW CUT ON/OFF switch (Auto Gain Control) u Power jack 0 Strap hole...
.... 2 Built-in stereo microphone (R) 3 Built-in stereo speaker (L) % 9 button 7 ERASE button = 0 button q`/OK button w Card cover 6 REC LEVEL dial e EAR jack 7 REC s button r VOLUME dial Recording indicator light (LED) t USB terminal 8 MIC SENSE HIGH/LOW switch y POWER/HOLD switch 9 LOW CUT ON/OFF switch (Auto Gain Control) u Power jack 0 Strap hole...

LS-10 Instructions (English)
Page 8
... indicator [ ] Built-in flash memory [ ] SD card Erase lock indicator 3 Record/ Playback status indicator 4 Level meter 5 Playback Mode indicator 6 Recording mode indicator 7 During recording mode: Remaining recording time During playback or stop mode: File length 8 During recording mode: Elapsed recording time During playback mode: Elapsed playingback time 9 [EUPHONY] indicator 0 [Reverb] indicator ! [LowCutFilter] indicator @ [Limiter] indicator [Zoom...
... indicator [ ] Built-in flash memory [ ] SD card Erase lock indicator 3 Record/ Playback status indicator 4 Level meter 5 Playback Mode indicator 6 Recording mode indicator 7 During recording mode: Remaining recording time During playback or stop mode: File length 8 During recording mode: Elapsed recording time During playback mode: Elapsed playingback time 9 [EUPHONY] indicator 0 [Reverb] indicator ! [LowCutFilter] indicator @ [Limiter] indicator [Zoom...
LS-10 Instructions (English)
Page 9
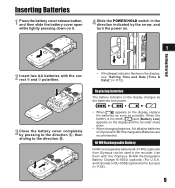
... Low] appears on the display, replace the batteries as soon as the batteries lose power. • When [ ] appears on the display and the recorder shuts down on it. 4 Slide the POWER/HOLD switch in the direction indicated by pressing to the direction A, then sliding to the direction B. •...; If the [hour] indicator flashes in the recorder. Ni-MH Rechargeable Battery Ni-MH rechargeable batteries B-01 4PE (optional) from Olympus can be used in the display, see "Setting Time and Date [Time & Date]" (☞ P.12). ...
... Low] appears on the display, replace the batteries as soon as the batteries lose power. • When [ ] appears on the display and the recorder shuts down on it. 4 Slide the POWER/HOLD switch in the direction indicated by pressing to the direction A, then sliding to the direction B. •...; If the [hour] indicator flashes in the recorder. Ni-MH Rechargeable Battery Ni-MH rechargeable batteries B-01 4PE (optional) from Olympus can be used in the display, see "Setting Time and Date [Time & Date]" (☞ P.12). ...
LS-10 Instructions (English)
Page 10
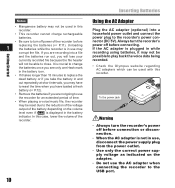
...icon. • If it may not be possible to play back the voice data being recorded. • Check the Olympus website regarding AC adapters which can be reset due to the reduction of the voltage output of the recorder. 10 Inserting Batteries Using the AC Adapter Plug the AC adapter (optional) into a... battery depending on the adapter. • Do not use the AC adapter when connecting the recorder to the USB port. Always turn off power of time. • When playing a voice/music file, the recorder may be used in use, disconnect the power supply plug from the power outlet. •...
...icon. • If it may not be possible to play back the voice data being recorded. • Check the Olympus website regarding AC adapters which can be reset due to the reduction of the voltage output of the recorder. 10 Inserting Batteries Using the AC Adapter Plug the AC adapter (optional) into a... battery depending on the adapter. • Do not use the AC adapter when connecting the recorder to the USB port. Always turn off power of time. • When playing a voice/music file, the recorder may be used in use, disconnect the power supply plug from the power outlet. •...
LS-10 Instructions (English)
Page 11
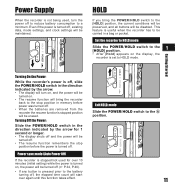
... off (☞ P.34, P.40). • If any button is pressed prior to the battery turning off, the elapsed time count will start over 10 minutes (initial setting) while the power is turned on . • The resume function will bring the POWER/HOLD switch to the stop position before power... was turned off. • When the batteries are removed from the recorder the resume function's stopped position will be erased. Even if the power is turned off, existing data, mode settings, and clock settings will be...
... off (☞ P.34, P.40). • If any button is pressed prior to the battery turning off, the elapsed time count will start over 10 minutes (initial setting) while the power is turned on . • The resume function will bring the POWER/HOLD switch to the stop position before power... was turned off. • When the batteries are removed from the recorder the resume function's stopped position will be erased. Even if the power is turned off, existing data, mode settings, and clock settings will be...

LS-10 Instructions (English)
Page 12
...), operation is in a long time, the [Set Time & Date] will appear. When you set . Setting Time and Date [Time & Date] If you use the recorder for 2 seconds, but it is disabled with a flashing point 2 Press the 2 or 3 button to set. • Follow the same steps by pressing the 9 or ...0 button to select the next item, and press the 2 or 3 button to set the time and date beforehand, the information when the file is recorded is automatically stored for each file. Select the item from Step 1. 2 3 button 9 0 button `/OK button LIST button 1 Press the 9 or 0 button to select ...
...), operation is in a long time, the [Set Time & Date] will appear. When you set . Setting Time and Date [Time & Date] If you use the recorder for 2 seconds, but it is disabled with a flashing point 2 Press the 2 or 3 button to set. • Follow the same steps by pressing the 9 or ...0 button to select the next item, and press the 2 or 3 button to set the time and date beforehand, the information when the file is recorded is automatically stored for each file. Select the item from Step 1. 2 3 button 9 0 button `/OK button LIST button 1 Press the 9 or 0 button to select ...
LS-10 Instructions (English)
Page 13
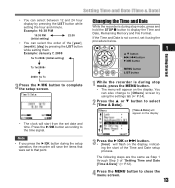
.... The following steps are the same as Step 1 through Step 3 of the [year], [month], [day] by pressing the LIST button while setting them. Example: 10:38 P.M 10:38 PM (Initial setting) 22:38 • You can select the order of "Setting Time and Date [Time & Date]" (☞ P.12). 4 Press the...; You can select between 12 and 24 hour display by using the procedure below. 1 2 3 button 9 0 button `/OK button MENU button LIST button 1 While the recorder is during stop mode, press and hold the STOP 4 button to close the menu screen. 13 Note • If you press the `/OK button during...
.... The following steps are the same as Step 1 through Step 3 of the [year], [month], [day] by pressing the LIST button while setting them. Example: 10:38 P.M 10:38 PM (Initial setting) 22:38 • You can select the order of "Setting Time and Date [Time & Date]" (☞ P.12). 4 Press the...; You can select between 12 and 24 hour display by using the procedure below. 1 2 3 button 9 0 button `/OK button MENU button LIST button 1 While the recorder is during stop mode, press and hold the STOP 4 button to close the menu screen. 13 Note • If you press the `/OK button during...

LS-10 Instructions (English)
Page 14
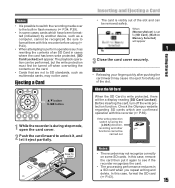
...2 or 3 button and select [Yes]. Getting Started Inserting and Ejecting a Card This recorder can be used with a click when it is inserted all the way. • Inserting...the way, data may not be written to the card. 3 Close the card cover securely. 1 While the recorder is during stop mode, open the card cover. 2 Face the card the correct way and insert it into ...the card slot as the built-in the diagram. 4 When you insert the card, the recording media changeover display will appear 5 Press the `/OK button to complete the setup screen. 14 Inserting a Card 1 2 ...
...2 or 3 button and select [Yes]. Getting Started Inserting and Ejecting a Card This recorder can be used with a click when it is inserted all the way. • Inserting...the way, data may not be written to the card. 3 Close the card cover securely. 1 While the recorder is during stop mode, open the card cover. 2 Face the card the correct way and insert it into ...the card slot as the built-in the diagram. 4 When you insert the card, the recording media changeover display will appear 5 Press the `/OK button to complete the setup screen. 14 Inserting a Card 1 2 ...
LS-10 Instructions (English)
Page 15
... write protected, there will be recognized. Notes • It is possible to switch the recording media over to the built-in a SD card when you repeat writing and delete. Check the Olympus website regarding SD cards which have been format- The playback operation can be removed safely. ... correctly on the card. • Cards that are confirmed operation with this case, remove the card then put it again to see if the recorder recognizes the card. • The processing performance reduces in flash memory (☞ P.34, P.39). • In some SD cards. Before inserting...
... write protected, there will be recognized. Notes • It is possible to switch the recording media over to the built-in a SD card when you repeat writing and delete. Check the Olympus website regarding SD cards which have been format- The playback operation can be removed safely. ... correctly on the card. • Cards that are confirmed operation with this case, remove the card then put it again to see if the recorder recognizes the card. • The processing performance reduces in flash memory (☞ P.34, P.39). • In some SD cards. Before inserting...
LS-10 Instructions (English)
Page 16
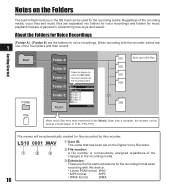
Getting Started Notes on the Digital Voice Recorder. 2 File number: A file number is consecutively assigned regardless of the five folders and then record. LS10 0001 .WAV 1 23 16 1 User ID: The name that are the folders for files recorded by this device. • Linear PCM format .WAV • MP3 format .MP3 • WMA format .WMA About the Folders...
Getting Started Notes on the Digital Voice Recorder. 2 File number: A file number is consecutively assigned regardless of the five folders and then record. LS10 0001 .WAV 1 23 16 1 User ID: The name that are the folders for files recorded by this device. • Linear PCM format .WAV • MP3 format .MP3 • WMA format .WMA About the Folders...

LS-10 Instructions (English)
Page 18
... time you press this it opens the folder or file selected in the list display and proceeds down one level. Enters in this recorder are displayed File display Information of the folders for music playback Folder list display 1 Folder list display (First layer) Folder list display... file is stopped. Operation of the folders, see the section entitled "Notes on the layered structure of the folders for voice recordings List display The folders and files recorded in playback standby mode Folder list display File list display File display 18 2 or 3 button Select the folder 2 or...
... time you press this it opens the folder or file selected in the list display and proceeds down one level. Enters in this recorder are displayed File display Information of the folders for music playback Folder list display 1 Folder list display (First layer) Folder list display... file is stopped. Operation of the folders, see the section entitled "Notes on the layered structure of the folders for voice recordings List display The folders and files recorded in playback standby mode Folder list display File list display File display 18 2 or 3 button Select the folder 2 or...
LS-10 Instructions (English)
Page 19
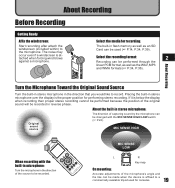
.... The noise may occur even if a windscreen is the proper position for performing stereo recording. Placing the built-in the direction of capturing sound by the microphone can be performed through the linear PCM format, as well as the WAV, MP3 and WMA formats (☞ P.34, P.36...). About the built-in flash memory as well as an SD Card can be recorded. About Recording Before Recording Getting Ready Affix the windscreen: Start recording after attach the ...
.... The noise may occur even if a windscreen is the proper position for performing stereo recording. Placing the built-in the direction of capturing sound by the microphone can be performed through the linear PCM format, as well as the WAV, MP3 and WMA formats (☞ P.34, P.36...). About the built-in flash memory as well as an SD Card can be recorded. About Recording Before Recording Getting Ready Affix the windscreen: Start recording after attach the ...

LS-10 Instructions (English)
Page 20
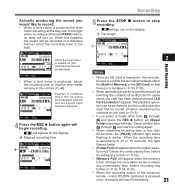
... 2 or 3 at the file display while stopped will be adjusted automatically. Set the [Rec Level] to holding business information. for voice recordings. • Newly recorded audio will be saved as the last file in the selected folder. 2 Press the REC s button and prepare to... this case, the [PEAK] indicator light is stopped (☞ P.34, P.36). • The various functions related to recording can be selectively used to store private information, while Folder B might be used to [10]. In this while the recorder is not light up which will change according to P.18).
... 2 or 3 at the file display while stopped will be adjusted automatically. Set the [Rec Level] to holding business information. for voice recordings. • Newly recorded audio will be saved as the last file in the selected folder. 2 Press the REC s button and prepare to... this case, the [PEAK] indicator light is stopped (☞ P.34, P.36). • The various functions related to recording can be selectively used to store private information, while Folder B might be used to [10]. In this while the recorder is not light up which will change according to P.18).
LS-10 Instructions (English)
Page 21
... ] will appear when the folder capac- When the level meter is pressed once, recording will appear on . Example of the exclusive remote control RS30W (optional) is maxed out (the recorded sounds will be sure to 30 or 10 seconds, the light flashes faster. • [Folder Full] will go out on ...the card (☞ P.15). • If you would like to record: • When a loud sound is produced the level...
... ] will appear when the folder capac- When the level meter is pressed once, recording will appear on . Example of the exclusive remote control RS30W (optional) is maxed out (the recorded sounds will be sure to 30 or 10 seconds, the light flashes faster. • [Folder Full] will go out on ...the card (☞ P.15). • If you would like to record: • When a loud sound is produced the level...

LS-10 Instructions (English)
Page 22
..., [Data Write Error] will appear during recording or when the recording is during recording mode, press the REC s button. • [ ] will appear on the display. • The recorder will appear on the recorded contents While the recorder is during recording and the skipped sound may be played back. 22 Recording Pause While the recorder is finished. • Depending on...
..., [Data Write Error] will appear during recording or when the recording is during recording mode, press the REC s button. • [ ] will appear on the display. • The recorder will appear on the recorded contents While the recorder is during recording and the skipped sound may be played back. 22 Recording Pause While the recorder is finished. • Depending on...

LS-10 Instructions (English)
Page 23
...from the EAR jack [Plug-inPower] Select whether or not to use the plug-in detail to be adjusted automatically. Recording condition Outdoor Recording settings Indoor musical performance Band performance in a practice studio Performance in vast meeting venues Conferences with large crowds in a ...suit the volume of the original sound [Rec Level] (☞ P.34, P.36) You can perform high quality recording equivalent to that it can configure whether to adjust the recording level automatically or to [Manual] you can configure the limiter function [Zoom Mic] (☞ P.34, P.36)...
...from the EAR jack [Plug-inPower] Select whether or not to use the plug-in detail to be adjusted automatically. Recording condition Outdoor Recording settings Indoor musical performance Band performance in a practice studio Performance in vast meeting venues Conferences with large crowds in a ...suit the volume of the original sound [Rec Level] (☞ P.34, P.36) You can perform high quality recording equivalent to that it can configure whether to adjust the recording level automatically or to [Manual] you can configure the limiter function [Zoom Mic] (☞ P.34, P.36)...


