FE-140 Advanced Manual (English)
Page 1
... you start to update or modify information contained in this manual may differ from the actual product. DIGITAL CAMERA FE-130/X-720/X-740 FE-140/X-725 Advanced Manual Detailed explanations of all of the images are based on the FE-130/ X-720/X-740 model. In the interest of continually improving products, Olympus reserves the right to use your...
... you start to update or modify information contained in this manual may differ from the actual product. DIGITAL CAMERA FE-130/X-720/X-740 FE-140/X-725 Advanced Manual Detailed explanations of all of the images are based on the FE-130/ X-720/X-740 model. In the interest of continually improving products, Olympus reserves the right to use your...

FE-140 Advanced Manual (English)
Page 2
... . . . 10 Date and time X 30 DCF 67 DIGITAL ZOOM 18 Search by Objective XXXShooting tips and information gP. 55 5 Getting to know your camera better 5 Getting to know your pocket for a topic XXXTable of the camera buttons by following the illustrations and actually trying them out on the... camera. The batteries are loaded incorrectly • Reload the batteries correctly...
... . . . 10 Date and time X 30 DCF 67 DIGITAL ZOOM 18 Search by Objective XXXShooting tips and information gP. 55 5 Getting to know your camera better 5 Getting to know your pocket for a topic XXXTable of the camera buttons by following the illustrations and actually trying them out on the... camera. The batteries are loaded incorrectly • Reload the batteries correctly...
FE-140 Advanced Manual (English)
Page 3
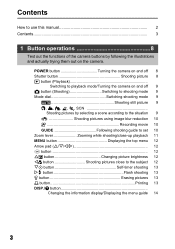
POWER button Turning the camera on and off 9 K button (Shooting Switching to shooting mode 9 Mode dial Switching shooting mode 9 h Shooting still picture 9 i, l, k, L, j, SCN Shooting pictures by selecting a scene according to ... 12 OF button Changing picture brightness 12 X& button Shooting pictures close to playback mode/Turning the camera on the camera. Contents How to use this manual 2 Contents...3 1 Button operations 8 Test out the functions of the camera buttons by following the illustrations and actually trying them out on and off 8 Shutter button Shooting picture...
POWER button Turning the camera on and off 9 K button (Shooting Switching to shooting mode 9 Mode dial Switching shooting mode 9 h Shooting still picture 9 i, l, k, L, j, SCN Shooting pictures by selecting a scene according to ... 12 OF button Changing picture brightness 12 X& button Shooting pictures close to playback mode/Turning the camera on the camera. Contents How to use this manual 2 Contents...3 1 Button operations 8 Test out the functions of the camera buttons by following the illustrations and actually trying them out on and off 8 Shutter button Shooting picture...

FE-140 Advanced Manual (English)
Page 4
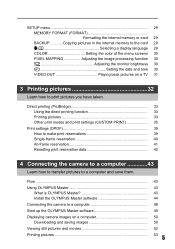
... functions of the pictures 28 PRINT ORDER Making print reservations (DPOF) 28 4 About the menus 15 Using the menus 16 Shooting mode menu 18 CAMERA MENU 18 DIGITAL ZOOM Zooming in a calendar 25 INDEX Viewing the pictures as an index 25 ERASE Erasing pictures 25 SEL. IMAGE Erasing selected picture 25 ALL...
... functions of the pictures 28 PRINT ORDER Making print reservations (DPOF) 28 4 About the menus 15 Using the menus 16 Shooting mode menu 18 CAMERA MENU 18 DIGITAL ZOOM Zooming in a calendar 25 INDEX Viewing the pictures as an index 25 ERASE Erasing pictures 25 SEL. IMAGE Erasing selected picture 25 ALL...
FE-140 Advanced Manual (English)
Page 5
Flow ...Using OLYMPUS Master What is OLYMPUS Master Install the OLYMPUS Master software Connecting the camera to a computer Start up the OLYMPUS Master software Displaying camera images on a TV 31 3 Printing pictures 32 Learn how to print pictures you have taken. Direct printing (PictBridge 33 ...(DPOF 39 How to make print reservations 39 Single-frame reservation 40 All-frame reservation 41 Resetting print reservation data 42 4 Connecting the camera to a computer 43 Learn how to transfer pictures to a computer and save them. SETUP menu 29 MEMORY FORMAT (FORMAT Formatting the ...
Flow ...Using OLYMPUS Master What is OLYMPUS Master Install the OLYMPUS Master software Connecting the camera to a computer Start up the OLYMPUS Master software Displaying camera images on a TV 31 3 Printing pictures 32 Learn how to print pictures you have taken. Direct printing (PictBridge 33 ...(DPOF 39 How to make print reservations 39 Single-frame reservation 40 All-frame reservation 41 Resetting print reservation data 42 4 Connecting the camera to a computer 43 Learn how to transfer pictures to a computer and save them. SETUP menu 29 MEMORY FORMAT (FORMAT Formatting the ...
FE-140 Advanced Manual (English)
Page 6
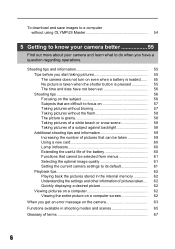
... on a computer 62 Viewing the entire picture on 57 Taking pictures without blurring 57 Taking pictures without using OLYMPUS Master 54 5 Getting to know your camera better 55 Find out more about your camera and learn what to its default 61 Playback tips 62 Playing back the pictures stored in the internal memory...
... on a computer 62 Viewing the entire picture on 57 Taking pictures without blurring 57 Taking pictures without using OLYMPUS Master 54 5 Getting to know your camera better 55 Find out more about your camera and learn what to its default 61 Playback tips 62 Playing back the pictures stored in the internal memory...

FE-140 Advanced Manual (English)
Page 7
Camera care 69 The battery 70 Useful use your camera more effectively. 6 Miscellaneous 69 Read about convenient functions and safety precautions on how to use of the accessories 71 The card 71 AC adapter 73 Safety Precautions 74 Index...77 7
Camera care 69 The battery 70 Useful use your camera more effectively. 6 Miscellaneous 69 Read about convenient functions and safety precautions on how to use of the accessories 71 The card 71 AC adapter 73 Safety Precautions 74 Index...77 7

FE-140 Advanced Manual (English)
Page 8
... button to shoot a picture. Try locking the focus again. Button operations G1 Button operations 1 Button operations 3 4 12 1 5 Monitor 1 POWER button Turning the camera on and off Power on: The camera turns on in shooting mode. • Monitor turns on • Lens extends 2 Shutter button Shooting picture Shooting still picture Set the mode...
... button to shoot a picture. Try locking the focus again. Button operations G1 Button operations 1 Button operations 3 4 12 1 5 Monitor 1 POWER button Turning the camera on and off Power on: The camera turns on in shooting mode. • Monitor turns on • Lens extends 2 Shutter button Shooting picture Shooting still picture Set the mode...

FE-140 Advanced Manual (English)
Page 9
...the arrow pad to view other scene, the settings of each scene will be 1 turned on and off . 4 K button (Shooting) The camera switches to shooting mode. Selecting another scene There are two ways to select another scene. • Turn the mode dial to set to any...lever to switch between close-up playback, index display and calendar display. g "MOVIE PLAY Playing back movies" (P.24) When you press the button again, the camera will return to default except a few settings. i, l, k, L, j, SCN Shooting pictures by selecting a scene according to the situation." (P.21) 9 Switching to...
...the arrow pad to view other scene, the settings of each scene will be 1 turned on and off . 4 K button (Shooting) The camera switches to shooting mode. Selecting another scene There are two ways to select another scene. • Turn the mode dial to set to any...lever to switch between close-up playback, index display and calendar display. g "MOVIE PLAY Playing back movies" (P.24) When you press the button again, the camera will return to default except a few settings. i, l, k, L, j, SCN Shooting pictures by selecting a scene according to the situation." (P.21) 9 Switching to...

FE-140 Advanced Manual (English)
Page 10
...to cancel the shooting guide function first. • When you change the camera setting or playing back images without using image blur reduction This function reduces the blur incurred by a moving subject or camera movement when taking pictures. When the remaining recording time reaches 0, recording stops.... This lights red during movie recording. 00:36 The remaining recording time is not available. n Recording movie The camera switches to display the shooting guide again. • When you press the MENU button or change the mode dial, previously set the ...
...to cancel the shooting guide function first. • When you change the camera setting or playing back images without using image blur reduction This function reduces the blur incurred by a moving subject or camera movement when taking pictures. When the remaining recording time reaches 0, recording stops.... This lights red during movie recording. 00:36 The remaining recording time is not available. n Recording movie The camera switches to display the shooting guide again. • When you press the MENU button or change the mode dial, previously set the ...

FE-140 Advanced Manual (English)
Page 15
...], [PLAYBACK MENU], [EDIT], [ERASE] or [SETUP], the screen for the further settings will be displayed. Top menu Shooting mode Playback mode IMAGE QUALITY CAMERA RESET MENU SETUP EXIT MENU SCN SET OK SLIDESHOW EDIT PRINT ORDER PLAYBACK CALENDAR MENU SETUP INDEX ERASE EXIT MENU SET OK • When you ...
...], [PLAYBACK MENU], [EDIT], [ERASE] or [SETUP], the screen for the further settings will be displayed. Top menu Shooting mode Playback mode IMAGE QUALITY CAMERA RESET MENU SETUP EXIT MENU SCN SET OK SLIDESHOW EDIT PRINT ORDER PLAYBACK CALENDAR MENU SETUP INDEX ERASE EXIT MENU SET OK • When you ...

FE-140 Advanced Manual (English)
Page 16
Set the camera to the desired mode (Shooting mode or playback mode). • In this section, press the K button to set to the shooting mode, and set menu ... menu, and press Y and then press F. 2 Press O/N to use the menus with the [VIDEO OUT] setting as an example. selected. Top menu RESET IMAGE QUALITY CAMERA MENU SETUP EXIT MENU SCN SET OK F MENU button SETUP 1 MEMORY FORMAT 2 BACKUP W ENGLISH COLOR NORMAL PIXEL MAPPING BACK MENU SET OK MENU button This...
Set the camera to the desired mode (Shooting mode or playback mode). • In this section, press the K button to set to the shooting mode, and set menu ... menu, and press Y and then press F. 2 Press O/N to use the menus with the [VIDEO OUT] setting as an example. selected. Top menu RESET IMAGE QUALITY CAMERA MENU SETUP EXIT MENU SCN SET OK F MENU button SETUP 1 MEMORY FORMAT 2 BACKUP W ENGLISH COLOR NORMAL PIXEL MAPPING BACK MENU SET OK MENU button This...

FE-140 Advanced Manual (English)
Page 18
... required. 2 EXIT MENU SET OK g "SETUP menu" *2 Available when SCN (P.29) selected. 4 • The factory default settings are displayed in gray ( ). 1 CAMERA MENU DIGITAL ZOOM Zooming in on your subject OFF /ON The digital zoom can be used to take close-up pictures with stronger magnification than the optical zoom. (Optical zoom ×...
... required. 2 EXIT MENU SET OK g "SETUP menu" *2 Available when SCN (P.29) selected. 4 • The factory default settings are displayed in gray ( ). 1 CAMERA MENU DIGITAL ZOOM Zooming in on your subject OFF /ON The digital zoom can be used to take close-up pictures with stronger magnification than the optical zoom. (Optical zoom ×...

FE-140 Advanced Manual (English)
Page 23
... horizontally. Menu operations y...Rotating pictures +90° / 0° / -90° y y y EXIT OK +90° EXIT OK 0° EXIT OK -90° 2 Pictures taken with the camera held vertically are saved even when the power is turned off. • You can select the picture to rotate by pressing X/Y. 2 SLIDESHOW Playing back pictures...
... horizontally. Menu operations y...Rotating pictures +90° / 0° / -90° y y y EXIT OK +90° EXIT OK 0° EXIT OK -90° 2 Pictures taken with the camera held vertically are saved even when the power is turned off. • You can select the picture to rotate by pressing X/Y. 2 SLIDESHOW Playing back pictures...

FE-140 Advanced Manual (English)
Page 25
...ERASE 2 Erasing pictures Protected pictures cannot be restored. Cancel the protection before erasing to avoid accidentally erasing pictures you want to a camera. 25 IMAGE Erasing selected picture SEL. BACK MENU SET OK ERASE ALL ERASE Erasing all pictures in the internal memory or on the... Check each picture before erasing such pictures. Menu operations 4 CALENDAR Playing back pictures in the internal memory, remove the card from the camera. • To erase pictures stored on the index display. SEL. g"Zoom lever Zooming while shooting/close -up playback" (P.11) 5...
...ERASE 2 Erasing pictures Protected pictures cannot be restored. Cancel the protection before erasing to avoid accidentally erasing pictures you want to a camera. 25 IMAGE Erasing selected picture SEL. BACK MENU SET OK ERASE ALL ERASE Erasing all pictures in the internal memory or on the... Check each picture before erasing such pictures. Menu operations 4 CALENDAR Playing back pictures in the internal memory, remove the card from the camera. • To erase pictures stored on the index display. SEL. g"Zoom lever Zooming while shooting/close -up playback" (P.11) 5...

FE-140 Advanced Manual (English)
Page 29
...internal memory or the card is no card inserted in the internal memory to your camera with this camera. Confirm that the card is inserted in the camera when formatting the card. • Before using non-Olympus cards or cards which have been formatted on a computer, you must format them... with the provided OLYMPUS Master software. 29 Or use an AC adapter. 3W Selecting a display language You can add other languages to the card Insert the optional card into the camera. SETUP menu Shooting mode RESET IMAGE QUALITY CAMERA MENU SETUP EXIT MENU SCN SET OK...
...internal memory or the card is no card inserted in the internal memory to your camera with this camera. Confirm that the card is inserted in the camera when formatting the card. • Before using non-Olympus cards or cards which have been formatted on a computer, you must format them... with the provided OLYMPUS Master software. 29 Or use an AC adapter. 3W Selecting a display language You can add other languages to the card Insert the optional card into the camera. SETUP menu Shooting mode RESET IMAGE QUALITY CAMERA MENU SETUP EXIT MENU SCN SET OK...

FE-140 Advanced Manual (English)
Page 30
...function to operate this function frequently. O/N : Sets the date and time. • The first two digits of the menu screens 5 PIXEL MAPPING Adjusting the image processing function The pixel mapping function allows the camera to the previous or next setting. X/Y : Moves to check and adjust the CCD and image processing functions... in the 24-hour format. • For more accurate setting, press F when the time signal hits 00 seconds. 30 If you turn the camera off during pixel mapping, start again. X x 2006 . 01 . 01 Y MD 00 : 00 MOVE SET OK O/N : Selects the date format...
...function to operate this function frequently. O/N : Sets the date and time. • The first two digits of the menu screens 5 PIXEL MAPPING Adjusting the image processing function The pixel mapping function allows the camera to the previous or next setting. X/Y : Moves to check and adjust the CCD and image processing functions... in the 24-hour format. • For more accurate setting, press F when the time signal hits 00 seconds. 30 If you turn the camera off during pixel mapping, start again. X x 2006 . 01 . 01 Y MD 00 : 00 MOVE SET OK O/N : Selects the date format...

FE-140 Advanced Manual (English)
Page 31
..., Korea, Japan 2 PAL: European countries, China Playing back pictures on a TV Turn off the camera and the TV before connecting the camera to display. Video cable (provided) Settings on the camera Press the q button to turn the camera on. • The last picture taken is sold. Settings on the TV Turn the TV... video output according to your TV's instruction manual. 31 Use the arrow pad to select the picture you want to the TV. To play back camera images on a TV, set TV's setting to video input mode. • For details of switching to video input, refer to your TV's video signal...
..., Korea, Japan 2 PAL: European countries, China Playing back pictures on a TV Turn off the camera and the TV before connecting the camera to display. Video cable (provided) Settings on the camera Press the q button to turn the camera on. • The last picture taken is sold. Settings on the TV Turn the TV... video output according to your TV's instruction manual. 31 Use the arrow pad to select the picture you want to the TV. To play back camera images on a TV, set TV's setting to video input mode. • For details of switching to video input, refer to your TV's video signal...
FE-140 Advanced Manual (English)
Page 32
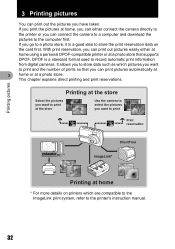
...more details on the card first. With print reservation, you can print out pictures easily either connect the camera directly to the printer or you can print pictures automatically at 3 home or at a photo store. It... allows you to store data such as which pictures you can connect the camera to a computer and download the pictures to store the print reservation data on printers which are compatible ... manual. 32 If you print the pictures at the store Use the camera to select the pictures you go to a photo store, it is a standard format used to record ...
...more details on the card first. With print reservation, you can print out pictures easily either connect the camera directly to the printer or you can print pictures automatically at 3 home or at a photo store. It... allows you to store data such as which pictures you can connect the camera to a computer and download the pictures to store the print reservation data on printers which are compatible ... manual. 32 If you print the pictures at the store Use the camera to select the pictures you go to a photo store, it is a standard format used to record ...
FE-140 Advanced Manual (English)
Page 33
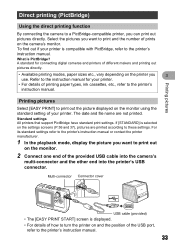
...; Available printing modes, paper sizes etc., vary depending on the monitor. 2 Connect one end of the provided USB cable into the camera's multi-connector and the other end into the printer's USB connector. The date and file name are printed according to these settings. ...display the picture you want to print out on the printer you can print out pictures directly. Refer to the instruction manual for connecting digital cameras and printers of prints on the settings screens (P.36 and 37), pictures are not printed. Multi-connector Connector cover USB cable (provided...
...; Available printing modes, paper sizes etc., vary depending on the monitor. 2 Connect one end of the provided USB cable into the camera's multi-connector and the other end into the printer's USB connector. The date and file name are printed according to these settings. ...display the picture you want to print out on the printer you can print out pictures directly. Refer to the instruction manual for connecting digital cameras and printers of prints on the settings screens (P.36 and 37), pictures are not printed. Multi-connector Connector cover USB cable (provided...


