
E-PM1 Instruction Manual (English)
Page 1
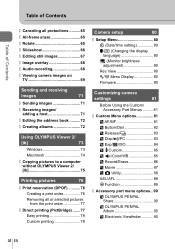
Shooting and viewing movies 5. Customizing camera settings 11. Keep this camera. Using OLYMPUS Viewer 2/[ib] 8. We recommend that you take test shots to get accustomed to your new camera, please read these instructions carefully to... 12. The screen and camera illustrations shown in a safe place for the camera, the contents will differ. For the latest information, please visit the Olympus website. Playback options 6. Sending and receiving images 7. Printing pictures 9. Camera setup 10. SAFETY PRECAUTIONS System chart Index Thank you start to firmware...
Shooting and viewing movies 5. Customizing camera settings 11. Keep this camera. Using OLYMPUS Viewer 2/[ib] 8. We recommend that you take test shots to get accustomed to your new camera, please read these instructions carefully to... 12. The screen and camera illustrations shown in a safe place for the camera, the contents will differ. For the latest information, please visit the Olympus website. Playback options 6. Sending and receiving images 7. Printing pictures 9. Camera setup 10. SAFETY PRECAUTIONS System chart Index Thank you start to firmware...

E-PM1 Instruction Manual (English)
Page 12
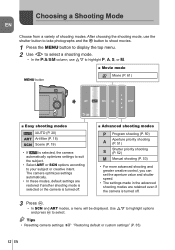
... Q to highlight P, A, S, or M. Choosing a Shooting Mode Basic guide Names of parts and functions Choose from a variety of shooting modes. The camera optimizes settings automatically. • In these modes, default settings are restored if another shooting mode is selected or the camera is turned off . 3 Press Q. • In SCN and ART modes, a menu... MENU button to display the top menu. 2 Use HI to select a shooting mode. • In the P/A/S/M column, use FG to select. % Tips • Resetting camera settings: g "Restoring default or custom settings" (P. 35) 12 EN
... Q to highlight P, A, S, or M. Choosing a Shooting Mode Basic guide Names of parts and functions Choose from a variety of shooting modes. The camera optimizes settings automatically. • In these modes, default settings are restored if another shooting mode is selected or the camera is turned off . 3 Press Q. • In SCN and ART modes, a menu... MENU button to display the top menu. 2 Use HI to select a shooting mode. • In the P/A/S/M column, use FG to select. % Tips • Resetting camera settings: g "Restoring default or custom settings" (P. 35) 12 EN

E-PM1 Instruction Manual (English)
Page 15
... shutter button halfway," that of pressing it there is taken. The camera activates again when you touch any button (the shutter button, q button, etc.). [Sleep]: g "Customizing camera settings" (P. 81) # Cautions • If the camera is used for a minute, the camera enters "sleep" (stand-by) mode to turn the camera off the monitor...
... shutter button halfway," that of pressing it there is taken. The camera activates again when you touch any button (the shutter button, q button, etc.). [Sleep]: g "Customizing camera settings" (P. 81) # Cautions • If the camera is used for a minute, the camera enters "sleep" (stand-by) mode to turn the camera off the monitor...

E-PM1 Instruction Manual (English)
Page 21
...Saturation Cancel 3 Use FG on the arrow pad to highlight an item and press Q to select. Level bar Clear & Vivid 0 Flat & Muted Set 4 Shoot. • Press the shutter button to shoot. • To clear the live guide from the display, press the MENU button. # Cautions... operations 1 Select A as the shooting mode. • g "Choosing a Shooting Mode" (P. 12) 2 After pressing Q to display the live guide settings. [Button Function]: g "Customizing camera settings" (P. 81) EN 21 If [Blur Background] or [Express Motions] is visible in the monitor. • The flash can be used with the...
...Saturation Cancel 3 Use FG on the arrow pad to highlight an item and press Q to select. Level bar Clear & Vivid 0 Flat & Muted Set 4 Shoot. • Press the shutter button to shoot. • To clear the live guide from the display, press the MENU button. # Cautions... operations 1 Select A as the shooting mode. • g "Choosing a Shooting Mode" (P. 12) 2 After pressing Q to display the live guide settings. [Button Function]: g "Customizing camera settings" (P. 81) EN 21 If [Blur Background] or [Express Motions] is visible in the monitor. • The flash can be used with the...
E-PM1 Instruction Manual (English)
Page 22
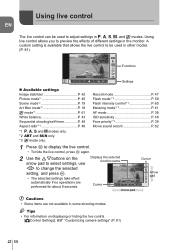
... the monitor. Using live control allows you to change the selected setting, and press Q. • The selected settings take effect automatically if no operations are not available in other modes (P. 81). A custom setting is available that allows the live control. [KControl Settings]: g "Customizing camera settings" (P. 81) 22 EN Displays the selected function name Cursor Cursor P AAUTOO WB...
... the monitor. Using live control allows you to change the selected setting, and press Q. • The selected settings take effect automatically if no operations are not available in other modes (P. 81). A custom setting is available that allows the live control. [KControl Settings]: g "Customizing camera settings" (P. 81) 22 EN Displays the selected function name Cursor Cursor P AAUTOO WB...
E-PM1 Instruction Manual (English)
Page 23
...* d Camera setup (e.g., date and language) * Not displayed at default settings. Custom menus are accessed from the accessory port menu. g "Customizing camera settings" (P. 81) EN 23 This menu is displayed for the EVF and OLYMPUS PENPAL accessories are not displayed by default, and you will need to display... repeatedly to exit the menu. $ Notes • For details on the functions that can be set with the menu, refer to your shooting style: Use the custom menus to customize camera settings to "Menu directory" (P. 107). • A guide is not displayed by default, and you...
...* d Camera setup (e.g., date and language) * Not displayed at default settings. Custom menus are accessed from the accessory port menu. g "Customizing camera settings" (P. 81) EN 23 This menu is displayed for the EVF and OLYMPUS PENPAL accessories are not displayed by default, and you will need to display... repeatedly to exit the menu. $ Notes • For details on the functions that can be set with the menu, refer to your shooting style: Use the custom menus to customize camera settings to "Menu directory" (P. 107). • A guide is not displayed by default, and you...
E-PM1 Instruction Manual (English)
Page 28
...and inserting the battery 4 Inserting and removing cards .....5 Attaching a lens to the camera ...6 Attaching the flash unit 7 Power on 8 Setting the date/time 9 Names of parts and functions...10 Names of parts 10 Camera 10 Choosing a Shooting Mode ......12 Basic operations 14 Taking ... 32 Choosing shooting controls .....32 Displaying information during playback 33 Other uses for the INFO button 34 Restoring default or custom settings 35 Using reset settings 35 Saving Myset 35 Using Myset 35 Choosing a focus mode (AF mode 36 Choosing a focus target (AF target...
...and inserting the battery 4 Inserting and removing cards .....5 Attaching a lens to the camera ...6 Attaching the flash unit 7 Power on 8 Setting the date/time 9 Names of parts and functions...10 Names of parts 10 Camera 10 Choosing a Shooting Mode ......12 Basic operations 14 Taking ... 32 Choosing shooting controls .....32 Displaying information during playback 33 Other uses for the INFO button 34 Restoring default or custom settings 35 Using reset settings 35 Saving Myset 35 Using Myset 35 Choosing a focus mode (AF mode 36 Choosing a focus target (AF target...
E-PM1 Instruction Manual (English)
Page 30
... settings 81 Before Using the Custom/ Accessory Port Menus ..........81 Custom Menu options 81 R AF/MF 81 S Button/Dial 82 T Release/j 83 U Disp/8/PC 83 V Exp/p/ISO 84 W #Custom 85 X K/Color/WB 85 Y Record/Erase 86 Z Movie 87 b K Utility 88 AEL/AFL 88 R Function 89 Accessory port menu options...90 A OLYMPUS PENPAL Share 90 B OLYMPUS PENPAL...
... settings 81 Before Using the Custom/ Accessory Port Menus ..........81 Custom Menu options 81 R AF/MF 81 S Button/Dial 82 T Release/j 83 U Disp/8/PC 83 V Exp/p/ISO 84 W #Custom 85 X K/Color/WB 85 Y Record/Erase 86 Z Movie 87 b K Utility 88 AEL/AFL 88 R Function 89 Accessory port menu options...90 A OLYMPUS PENPAL Share 90 B OLYMPUS PENPAL...
E-PM1 Instruction Manual (English)
Page 32
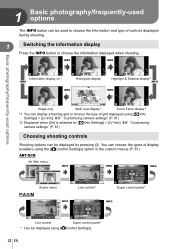
g "Customizing camera settings" (P. 81) *2 Displayed when [On] is selected for [G/Info Settings] > [LV-Info]. ART/SCN Art filter menu ART 1 1 Pop Art SCN 1 Portrait INFO Exit Set Exit Set P Scene menu WB Auto AAUTOO WB Live control* INFO IS OFF j WWBB AAUUTTOO 4:3 LF...INFO WB P 250 F5.6 36 Live control Super control panel* * Can be displayed using the [KControl Settings] option in the custom menus (P. 81). g "Customizing camera settings" (P. 81) Choosing shooting controls Shooting options can be used to choose the information and type of controls ...
g "Customizing camera settings" (P. 81) *2 Displayed when [On] is selected for [G/Info Settings] > [LV-Info]. ART/SCN Art filter menu ART 1 1 Pop Art SCN 1 Portrait INFO Exit Set Exit Set P Scene menu WB Auto AAUTOO WB Live control* INFO IS OFF j WWBB AAUUTTOO 4:3 LF...INFO WB P 250 F5.6 36 Live control Super control panel* * Can be displayed using the [KControl Settings] option in the custom menus (P. 81). g "Customizing camera settings" (P. 81) Choosing shooting controls Shooting options can be used to choose the information and type of controls ...
E-PM1 Instruction Manual (English)
Page 33
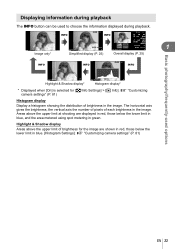
... the information displayed during playback. The horizontal axis gives the brightness, the vertical axis the number of pixels of brightness in blue. [Histogram Settings]: g "Customizing camera settings" (P. 81) EN 33 g "Customizing camera settings" (P. 81) Histogram display Display a histogram showing the distribution of each brightness in green. INFO 2011.05.01 12:30 ×10 INFO... below the lower limit in blue, and the area metered using spot metering in the image. Areas above the upper limit of brightness for [G/Info Settings] > [q Info].
... the information displayed during playback. The horizontal axis gives the brightness, the vertical axis the number of pixels of brightness in blue. [Histogram Settings]: g "Customizing camera settings" (P. 81) EN 33 g "Customizing camera settings" (P. 81) Histogram display Display a histogram showing the distribution of each brightness in green. INFO 2011.05.01 12:30 ×10 INFO... below the lower limit in blue, and the area metered using spot metering in the image. Areas above the upper limit of brightness for [G/Info Settings] > [q Info].
E-PM1 Instruction Manual (English)
Page 34
... button in the 2 Picture Modme emory card or format j D the memory card. Shooting Menu 1 1 Card Setup Reset/MysetDelete all pictures in the custom white balance menu (P. 43). Image Aspect 4:3 Back Set 34 EN Press the INFO button again to choose the tone level. P Capture WB WB WB 1 2 CWB IS OFF j 1 4:3 LF HD...
... button in the 2 Picture Modme emory card or format j D the memory card. Shooting Menu 1 1 Card Setup Reset/MysetDelete all pictures in the custom white balance menu (P. 43). Image Aspect 4:3 Back Set 34 EN Press the INFO button again to choose the tone level. P Capture WB WB WB 1 2 CWB IS OFF j 1 4:3 LF HD...

E-PM1 Instruction Manual (English)
Page 35
... Myset3 Myset4 Reset/Myset Basic Set Set Set Set Back Set EN 35 Reset: Restore default settings. Restoring default or custom settings Camera settings can be stored. Myset: Restore preselected settings for P, A, S, or M mode. Shooting mode is pressed. The shooting mode does not change. Reset Myset1 Myset2 Myset3 Myset4 Reset/Myset Basic Set Set Set Set Back Set Saving Myset 1 Adjust settings in order to save...
... Myset3 Myset4 Reset/Myset Basic Set Set Set Set Back Set EN 35 Reset: Restore default settings. Restoring default or custom settings Camera settings can be stored. Myset: Restore preselected settings for P, A, S, or M mode. Shooting mode is pressed. The shooting mode does not change. Reset Myset1 Myset2 Myset3 Myset4 Reset/Myset Basic Set Set Set Set Back Set Saving Myset 1 Adjust settings in order to save...

E-PM1 Instruction Manual (English)
Page 37
... can be used to toggle [MF]. • Use [R Function] to assign this function to the button. [Button Function]: g "Customizing camera settings" (P. 81) Toggling quickly between the camera and the subject while pressing the shutter button halfway. Press the INFO button and use focus ...target for autofocus. 1 Press the P button (H) to display the AF target. 2 Use FGHI to the button. [Button Function]: g "Customizing camera settings" (P. 81) EN 37 The camera automatically chooses from the following three target types. Select the focus target manually. Focus lock If the camera...
... can be used to toggle [MF]. • Use [R Function] to assign this function to the button. [Button Function]: g "Customizing camera settings" (P. 81) Toggling quickly between the camera and the subject while pressing the shutter button halfway. Press the INFO button and use focus ...target for autofocus. 1 Press the P button (H) to display the AF target. 2 Use FGHI to the button. [Button Function]: g "Customizing camera settings" (P. 81) EN 37 The camera automatically chooses from the following three target types. Select the focus target manually. Focus lock If the camera...

E-PM1 Instruction Manual (English)
Page 38
You can also use autofocus to view the zoom frame and zoom displays. [Button Function]: g "Customizing camera settings" (P. 81) # Cautions • Zoom is normally covered by the AF target. Basic photography/frequently-used options Zoom frame AF/zoom AF You can zoom... in on the resulting photographs. 38 EN Before proceeding, select [On] for [G/Info Settings] > [LV-Info] > [Zoom] (P. 32). 1 g "Customizing camera settings" (P. 81) Q ISO 200 250 F5.6 0.0 LN HD 01:02:03 30 Zoom frame AF Zoom AF 1 Press the INFO button ...
You can also use autofocus to view the zoom frame and zoom displays. [Button Function]: g "Customizing camera settings" (P. 81) # Cautions • Zoom is normally covered by the AF target. Basic photography/frequently-used options Zoom frame AF/zoom AF You can zoom... in on the resulting photographs. 38 EN Before proceeding, select [On] for [G/Info Settings] > [LV-Info] > [Zoom] (P. 32). 1 g "Customizing camera settings" (P. 81) Q ISO 200 250 F5.6 0.0 LN HD 01:02:03 30 Zoom frame AF Zoom AF 1 Press the INFO button ...

E-PM1 Instruction Manual (English)
Page 40
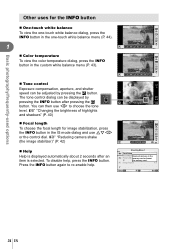
... make pictures darker. Exposure can be adjusted by ±3 EV. 1 Negative (-) No compensation (0) Positive (+) % Tips • To change the exposure adjustment interval. [EV Step]: g "Customizing camera settings" (P. 81) # Cautions • Exposure compensation is not available in A, M, or SCN modes. Previewing the effects of exposure compensation and white balance The effects of highlights...
... make pictures darker. Exposure can be adjusted by ±3 EV. 1 Negative (-) No compensation (0) Positive (+) % Tips • To change the exposure adjustment interval. [EV Step]: g "Customizing camera settings" (P. 81) # Cautions • Exposure compensation is not available in A, M, or SCN modes. Previewing the effects of exposure compensation and white balance The effects of highlights...

E-PM1 Instruction Manual (English)
Page 41
...metering Center weighted H averaging metering I Face Priority]) portrait subject. Choose this position. g AEL P 250 F5.6 0.0 01:02:03 38 "Customizing camera settings" (P. 81) AE lock Exposure locks and a B icon is displayed when the button is selected for general use. P ESP HI SH S-...lock (AE lock) To lock exposure without locking focus, press the R button. Press the shutter button to set metering mode. [AEL Metering]: g "Customizing camera settings" (P. 81) EN 41 This metering mode provides the average metering between the subject and the background lighting, ...
...metering Center weighted H averaging metering I Face Priority]) portrait subject. Choose this position. g AEL P 250 F5.6 0.0 01:02:03 38 "Customizing camera settings" (P. 81) AE lock Exposure locks and a B icon is displayed when the button is selected for general use. P ESP HI SH S-...lock (AE lock) To lock exposure without locking focus, press the R button. Press the shutter button to set metering mode. [AEL Metering]: g "Customizing camera settings" (P. 81) EN 41 This metering mode provides the average metering between the subject and the background lighting, ...
E-PM1 Instruction Manual (English)
Page 43
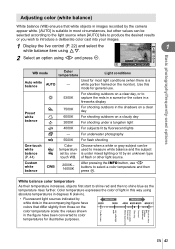
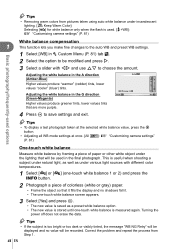
... white. [AUTO] is suitable in most light conditions (when there is under a tungsten light > 4000K For subjects lit by one- Custom white balance CWB 2000K - 14000K After pressing the INFO button, use . White balance color temperature As their temperature increases, objects fi...temperature expresses the color of flash or other values can be white balance P/ temperature used to measure white balance and the subject Q set by fluorescent lights U k For underwater photography n 5500K For flash shooting One-touch Color Choose when a white or gray...
... white. [AUTO] is suitable in most light conditions (when there is under a tungsten light > 4000K For subjects lit by one- Custom white balance CWB 2000K - 14000K After pressing the INFO button, use . White balance color temperature As their temperature increases, objects fi...temperature expresses the color of flash or other values can be white balance P/ temperature used to measure white balance and the subject Q set by fluorescent lights U k For underwater photography n 5500K For flash shooting One-touch Color Choose when a white or gray...
E-PM1 Instruction Manual (English)
Page 44
...Warm Color]: Selecting [n] for white balance only when the flash is used. [#+WB]: g "Customizing camera settings" (P. 81) Basic photography/frequently-used in the G direction Back Set (Green-Magenta) Higher values produce greener tints, lower values tints that are more purple. 4 Press Q ...To display a test photograph taken at the selected white balance value, press the R button. • Adjusting all WB mode settings at once. [All >]: g "Customizing camera settings" (P. 81) One-touch white balance Measure white balance by framing a piece of colorless (white or gray) paper. •...
...Warm Color]: Selecting [n] for white balance only when the flash is used. [#+WB]: g "Customizing camera settings" (P. 81) Basic photography/frequently-used in the G direction Back Set (Green-Magenta) Higher values produce greener tints, lower values tints that are more purple. 4 Press Q ...To display a test photograph taken at the selected white balance value, press the R button. • Adjusting all WB mode settings at once. [All >]: g "Customizing camera settings" (P. 81) One-touch white balance Measure white balance by framing a piece of colorless (white or gray) paper. •...
E-PM1 Basic Manual (English, Espa?ol, Fran栩s)
Page 12
... shooting (P. 50) A Aperture priority shooting (P. 51) S Shutter priority shooting (P. 52) M Manual shooting (P. 53) • For more advanced shooting and greater creative control, you can set the aperture value and shutter speed. • The settings made in the advanced shooting modes are retained even if the camera is selected, the camera automatically optimizes... MENU button to display the top menu. 2 Use HI to select a shooting mode. • In the P/A/S/M column, use FG to select. % Tips • Resetting camera settings: g "Restoring default or custom settings" (P. 35) 12 EN
... shooting (P. 50) A Aperture priority shooting (P. 51) S Shutter priority shooting (P. 52) M Manual shooting (P. 53) • For more advanced shooting and greater creative control, you can set the aperture value and shutter speed. • The settings made in the advanced shooting modes are retained even if the camera is selected, the camera automatically optimizes... MENU button to display the top menu. 2 Use HI to select a shooting mode. • In the P/A/S/M column, use FG to select. % Tips • Resetting camera settings: g "Restoring default or custom settings" (P. 35) 12 EN
E-PM1 Basic Manual (English, Espa?ol, Fran栩s)
Page 22
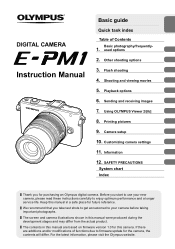
... To hide the live control, press Q again. 2 Use the FGbuttons on displaying or hiding the live control to change the selected setting, and press Q. • The selected settings take effect automatically if no operations are not available in the monitor. Using live control EN The live control can be used to... P AAUTOO WB Auto IS OFF j Arrow WWBB AAUUTTOO 4:3 pad LF HD WB Arrow pad # Cautions • Some items are performed for about 8 seconds. A custom setting is available that allows the live control. [KControl Settings]: g "Customizing camera settings" (P. 81) 22 EN
... To hide the live control, press Q again. 2 Use the FGbuttons on displaying or hiding the live control to change the selected setting, and press Q. • The selected settings take effect automatically if no operations are not available in the monitor. Using live control EN The live control can be used to... P AAUTOO WB Auto IS OFF j Arrow WWBB AAUUTTOO 4:3 pad LF HD WB Arrow pad # Cautions • Some items are performed for about 8 seconds. A custom setting is available that allows the live control. [KControl Settings]: g "Customizing camera settings" (P. 81) 22 EN


