PrintSuperVision Configuration Guide
Page 7
... choice to install a single-user "Easy Configuration" option that is connected to the standard Professional Edition requires re-running the PSV Setup Utility and selecting Professional Edition. 7 • New Names/New Editions It is generally installed on a XP or Vista class Windows laptop or desktop that does not require a server and can be installed on a centrally located Windows server accessible from any browser-enabled device. Both...
... choice to install a single-user "Easy Configuration" option that is connected to the standard Professional Edition requires re-running the PSV Setup Utility and selecting Professional Edition. 7 • New Names/New Editions It is generally installed on a XP or Vista class Windows laptop or desktop that does not require a server and can be installed on a centrally located Windows server accessible from any browser-enabled device. Both...
PrintSuperVision Configuration Guide
Page 15
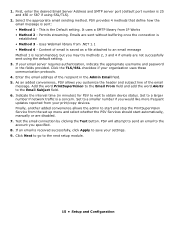
... admin to the next setup module. 15 • Setup and Configuration First, enter the desired Email Server Address and SMTP server port (default port number is received successfully, click Apply to the account you would like more frequent updates reported from the set up menu and select whether the PSV Services should start and stop the PrintSuperVision Service from your settings. 9. If an email is 25 and 456 or 587 if using...
... admin to the next setup module. 15 • Setup and Configuration First, enter the desired Email Server Address and SMTP server port (default port number is received successfully, click Apply to the account you would like more frequent updates reported from the set up menu and select whether the PSV Services should start and stop the PrintSuperVision Service from your settings. 9. If an email is 25 and 456 or 587 if using...
C330/C530/C610/C711 DIMM Install Sheet
Page 5
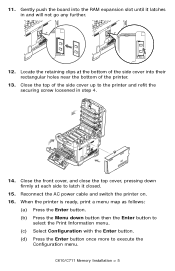
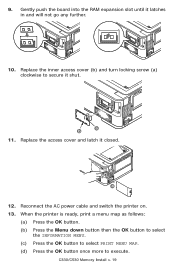
... go any further. 12. When the printer is ready, print a menu map as follows: (a) Press the Enter button. (b) Press the Menu down firmly at the bottom of the side cover into the RAM expansion slot until it closed. 15. Close the top of the printer. 13. C610/C711 Memory Installation > 5 Reconnect the AC power cable and switch the printer on. 16. 11. Gently push...
... go any further. 12. When the printer is ready, print a menu map as follows: (a) Press the Enter button. (b) Press the Menu down firmly at the bottom of the side cover into the RAM expansion slot until it closed. 15. Close the top of the printer. 13. C610/C711 Memory Installation > 5 Reconnect the AC power cable and switch the printer on. 16. 11. Gently push...
C330/C530/C610/C711 DIMM Install Sheet
Page 19
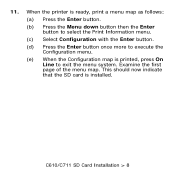
... the AC power cable and switch the printer on. 13. C330/C530 Memory Install > 19 a b 11. When the printer is ready, print a menu map as follows: (a) Press the OK button. (b) Press the Menu down button then the OK button to select the INFORMATION MENU. (c) Press the OK button to select PRINT MENU MAP. (d) Press the OK button once more to secure it shut. Replace the inner access cover (b) and turn locking screw...
... the AC power cable and switch the printer on. 13. C330/C530 Memory Install > 19 a b 11. When the printer is ready, print a menu map as follows: (a) Press the OK button. (b) Press the Menu down button then the OK button to select the INFORMATION MENU. (c) Press the OK button to select PRINT MENU MAP. (d) Press the OK button once more to secure it shut. Replace the inner access cover (b) and turn locking screw...
SD Card Install
Page 8
This should now indicate that the SD card is printed, press On Line to execute the Configuration menu. (e) When the Configuration map is installed. When the printer is ready, print a menu map as follows: (a) Press the Enter button. (b) Press the Menu down button then the Enter button to select the Print Information menu. (c) Select Configuration with the Enter button. (d) Press the Enter button once more to exit the menu system. C610/C711 SD Card Installation > 8 Examine the first page of the menu map. 11.
This should now indicate that the SD card is printed, press On Line to execute the Configuration menu. (e) When the Configuration map is installed. When the printer is ready, print a menu map as follows: (a) Press the Enter button. (b) Press the Menu down button then the Enter button to select the Print Information menu. (c) Select Configuration with the Enter button. (d) Press the Enter button once more to exit the menu system. C610/C711 SD Card Installation > 8 Examine the first page of the menu map. 11.

SD Card Install
Page 32
Examine the first page of the menu map. When the printer is ready, print a menu map as follows: (a) Press the Enter button. (b) Press the Menu down button then the Enter button to select the Print Information menu. (c) Select Configuration with the Enter button. (d) Press the Enter button once more to exit the menu system. 11. C530 SD Card Installation > 32 This should now indicate that the SD card is printed, press On Line to execute the Configuration menu. (e) When the Configuration map is installed.
Examine the first page of the menu map. When the printer is ready, print a menu map as follows: (a) Press the Enter button. (b) Press the Menu down button then the Enter button to select the Print Information menu. (c) Select Configuration with the Enter button. (d) Press the Enter button once more to exit the menu system. 11. C530 SD Card Installation > 32 This should now indicate that the SD card is printed, press On Line to execute the Configuration menu. (e) When the Configuration map is installed.

Duplex Installation Instructions
Page 1
... the password (default password is the right way up (about 1 minute). 2. Press Enter. 8. b. Configuration, Execute displays. 5. Press the down key. Windows Vista, Windows 7: Click Start > Control Panel > Printers. 2. Click OK. 6. Switch the printer off. (No need to Installable Options and select options. Ensure that the duplex unit is aaaaaa). 5. Switch the printer on each user's machine. 1. Press the Enter key. 3. Print Information displays. 4. Press Enter. The report prints and the printer goes back on line. 3 Engage Duplex Printing...
... the password (default password is the right way up (about 1 minute). 2. Press Enter. 8. b. Configuration, Execute displays. 5. Press the down key. Windows Vista, Windows 7: Click Start > Control Panel > Printers. 2. Click OK. 6. Switch the printer off. (No need to Installable Options and select options. Ensure that the duplex unit is aaaaaa). 5. Switch the printer on each user's machine. 1. Press the Enter key. 3. Print Information displays. 4. Press Enter. The report prints and the printer goes back on line. 3 Engage Duplex Printing...
C610, C711 User's Guide (English)
Page 7
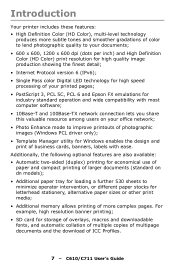
... models); • Additional paper tray for loading a further 530 sheets to improve printouts of photographic images (Windows PCL driver only); • Template Manager utility for storage of overlays, macros and downloadable fonts, and automatic collation of multiple copies of multipage documents and the download of ICC Profiles. 7 - C610/C711 User's Guide Additionally, the following optional features are also available: • Automatic two-sided (duplex) printing for economical use of paper...
... models); • Additional paper tray for loading a further 530 sheets to improve printouts of photographic images (Windows PCL driver only); • Template Manager utility for storage of overlays, macros and downloadable fonts, and automatic collation of multiple copies of multipage documents and the download of ICC Profiles. 7 - C610/C711 User's Guide Additionally, the following optional features are also available: • Automatic two-sided (duplex) printing for economical use of paper...
C610, C711 User's Guide (English)
Page 12
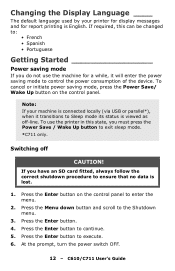
... button to execute. 6. C610/C711 User's Guide Note: If your printer for display messages and for a while, it transitions to Sleep mode its status is viewed as off CAUTION! Changing the Display Language ____ The default language used by your machine is connected locally (via USB or parallel*), when it will enter the power saving mode to control the power consumption of the device. Press the Enter button on the control panel. To use the machine for report printing...
... button to execute. 6. C610/C711 User's Guide Note: If your printer for display messages and for a while, it transitions to Sleep mode its status is viewed as off CAUTION! Changing the Display Language ____ The default language used by your machine is connected locally (via USB or parallel*), when it will enter the power saving mode to control the power consumption of the device. Press the Enter button on the control panel. To use the machine for report printing...
C610, C711 User's Guide (English)
Page 24
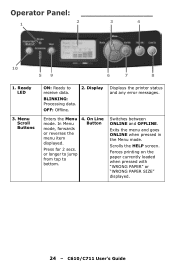
Menu Scroll Buttons ON: Ready to bottom. 4. BLINKING: Processing data. Display Displays the printer status and any error messages. Forces printing on the paper currently loaded when pressed with "WRONG PAPER" or "WRONG PAPER SIZE" displayed. 24 - On Line Button Switches between ONLINE and OFFLINE. Ready LED 3. Enters the Menu mode. or longer to jump from top to receive data. Scrolls the HELP screen. C610/C711 User's Guide In Menu mode, forwards or reverses the menu item displayed. Operator Panel 2 3 4 1 10 59 6 7 8 1. Press for 2 secs...
Menu Scroll Buttons ON: Ready to bottom. 4. BLINKING: Processing data. Display Displays the printer status and any error messages. Forces printing on the paper currently loaded when pressed with "WRONG PAPER" or "WRONG PAPER SIZE" displayed. 24 - On Line Button Switches between ONLINE and OFFLINE. Ready LED 3. Enters the Menu mode. or longer to jump from top to receive data. Scrolls the HELP screen. C610/C711 User's Guide In Menu mode, forwards or reverses the menu item displayed. Operator Panel 2 3 4 1 10 59 6 7 8 1. Press for 2 secs...

C610, C711 User's Guide (English)
Page 56
... in TRC compensation. Calibration ITEM Auto Density Mode Adjust Density Adjust Registration Print Tuning Pattern SETTINGS EXPLANATION On/Off Execute Execute Execute Selects whether density adjustment and TRC compensation is automatically adjusted to adjust TRC. Prints the pattern for the user to the recommended levels through the Adjust Density/TRC Compensation function. 56 - If Execute is selected, the printer will be reflected as offset...
... in TRC compensation. Calibration ITEM Auto Density Mode Adjust Density Adjust Registration Print Tuning Pattern SETTINGS EXPLANATION On/Off Execute Execute Execute Selects whether density adjustment and TRC compensation is automatically adjusted to adjust TRC. Prints the pattern for the user to the recommended levels through the Adjust Density/TRC Compensation function. 56 - If Execute is selected, the printer will be reflected as offset...
C610, C711 User's Guide (English)
Page 61
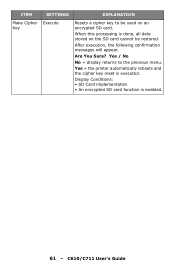
When this processing is executed. Yes = the printer automatically reboots and the cipher key reset is done, all data stored on the SD card cannot be used on an encrypted SD card. Yes / No No = display returns to be restored. C610/C711 User's Guide Are You Sure? After execution, the following confirmation messages will appear. ITEM SETTINGS EXPLANATION Make Cipher Execute Key Resets a cipher key to the previous menu. Display Conditions: • SD Card implementation • An encrypted SD card function is enabled. 61 -
When this processing is executed. Yes = the printer automatically reboots and the cipher key reset is done, all data stored on the SD card cannot be used on an encrypted SD card. Yes / No No = display returns to be restored. C610/C711 User's Guide Are You Sure? After execution, the following confirmation messages will appear. ITEM SETTINGS EXPLANATION Make Cipher Execute Key Resets a cipher key to the previous menu. Display Conditions: • SD Card implementation • An encrypted SD card function is enabled. 61 -
C610, C711 User's Guide (English)
Page 62
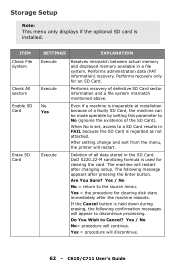
...? Performs administration data (FAT information) recovery. When No is held down during erasing, the following message appears after pressing the Enter button. Storage Setup Note: This menu only displays if the optional SD card is regarded as not attached. ITEM Check File System Check All Sectors Enable SD Card Erase SD Card SETTINGS EXPLANATION Execute Execute No Yes Execute Resolves mismatch between actual memory and displayed memory available...
...? Performs administration data (FAT information) recovery. When No is held down during erasing, the following message appears after pressing the Enter button. Storage Setup Note: This menu only displays if the optional SD card is regarded as not attached. ITEM Check File System Check All Sectors Enable SD Card Erase SD Card SETTINGS EXPLANATION Execute Execute No Yes Execute Resolves mismatch between actual memory and displayed memory available...
C610/C711 Software Setup Guide (English, Fran栩s, Espa?ol, Portugu鱩
Page 3
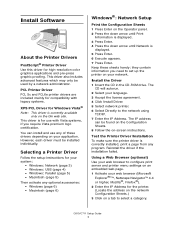
...each driver must be used by a network administrator. Install Software About the Printer Drivers PostScript® Printer Driver Use this driver for your system: • Windows: Network (page 3) • Windows: USB (page 4) • Windows: Parallel (page 5) • Macintosh (page 5) Then activate any optional accessories: • Windows (page 6) • Macintosh (page 6) Windows®: Network Setup Print the Configuration Sheets 1 Press Enter on the Operator panel. 2 Press the down arrow until Print Information is displayed. 3 Press Enter. 4 Press the down arrow until Network is...
...each driver must be used by a network administrator. Install Software About the Printer Drivers PostScript® Printer Driver Use this driver for your system: • Windows: Network (page 3) • Windows: USB (page 4) • Windows: Parallel (page 5) • Macintosh (page 5) Then activate any optional accessories: • Windows (page 6) • Macintosh (page 6) Windows®: Network Setup Print the Configuration Sheets 1 Press Enter on the Operator panel. 2 Press the down arrow until Print Information is displayed. 3 Press Enter. 4 Press the down arrow until Network is...

C610/C711 Software Setup Guide (English, Fran栩s, Espa?ol, Portugu鱩
Page 4
.../IP enabled network, you can configure the options automatically using the Two-Way Communications feature. Test the Printer Driver Installation To make sure the printer driver is correctly installed, print a page from the CD installer menu bar. 2 Click Install User's Guide. 3 Follow the on-screen instructions to reflect the options currently installed on the printer. 1 Click Start -> Control Panel -> Print- To Configure PostScript Driver Options Automatically If you can automatically update your printer driver to complete the installation. 4 To view the manuals...
.../IP enabled network, you can configure the options automatically using the Two-Way Communications feature. Test the Printer Driver Installation To make sure the printer driver is correctly installed, print a page from the CD installer menu bar. 2 Click Install User's Guide. 3 Follow the on-screen instructions to reflect the options currently installed on the printer. 1 Click Start -> Control Panel -> Print- To Configure PostScript Driver Options Automatically If you can automatically update your printer driver to complete the installation. 4 To view the manuals...
C610/C711 Software Setup Guide (English, Fran栩s, Espa?ol, Portugu鱩
Page 5
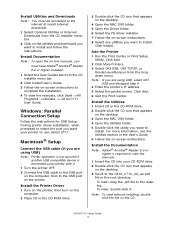
... printer driver installation, when prompted to select the port you are using USB, select OKI USB and disregard step 4. 4 Enter the printer's IP address. 5 Select the printer model. Click Add. 2 Click More Printers. 3 Select OKI USB, OKI TCP/IP, or Rendezvous/Bonjour from the dropdown menu. Note: To view without installing, doubleclick the file on -screen instructions to complete the installation. 4 To view the manuals, click Start ->All Programs ->OkiData -> C610/C711 User Guide. Install Documentation Note: To open...
... printer driver installation, when prompted to select the port you are using USB, select OKI USB and disregard step 4. 4 Enter the printer's IP address. 5 Select the printer model. Click Add. 2 Click More Printers. 3 Select OKI USB, OKI TCP/IP, or Rendezvous/Bonjour from the dropdown menu. Note: To view without installing, doubleclick the file on -screen instructions to complete the installation. 4 To view the manuals, click Start ->All Programs ->OkiData -> C610/C711 User Guide. Install Documentation Note: To open...
C610/C711 Software Setup Guide (English, Fran栩s, Espa?ol, Portugu鱩
Page 6
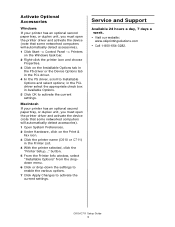
... paper tray, or duplex unit, you must open the printer driver and activate the device (note that some networked computers will automatically detect accessories). 1 Click Start -> Control Panel -> Printers on the Windows task bar. 2 Right-click the printer icon and choose Properties. 3 Click on the Print & Fax icon. 3 Click the printer name (C610 or C711) in Available Options. 5 Click OK to activate the current settings. C610/C711 Setup Guide 6 button...
... paper tray, or duplex unit, you must open the printer driver and activate the device (note that some networked computers will automatically detect accessories). 1 Click Start -> Control Panel -> Printers on the Windows task bar. 2 Right-click the printer icon and choose Properties. 3 Click on the Print & Fax icon. 3 Click the printer name (C610 or C711) in Available Options. 5 Click OK to activate the current settings. C610/C711 Setup Guide 6 button...
C610 Handy Reference (English, Fran栩s, Espa?ol, Portugu鱩
Page 14
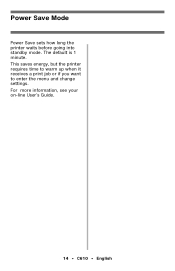
For more information, see your on-line User's Guide. 14 • C610 • English The default is 1 minute. Power Save Mode Power Save sets how long the printer waits before going into standby mode. This saves energy, but the printer requires time to warm up when it receives a print job or if you want to enter the menu and change settings.
For more information, see your on-line User's Guide. 14 • C610 • English The default is 1 minute. Power Save Mode Power Save sets how long the printer waits before going into standby mode. This saves energy, but the printer requires time to warm up when it receives a print job or if you want to enter the menu and change settings.
C610 Safety Warranty Regulatory Guide
Page 4
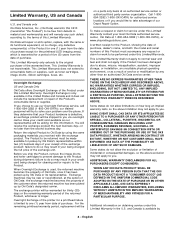
... purchase, dealer's name, and both the model and serial numbers of our Depot Repair Option. A written receipt for work to be returned must accompany any defective component(s) of the Product for the printhead (LED imaging array), which is only available in the U.S. Oki Data will be performed under this Limited Warranty in the United States and Canada and it has...
... purchase, dealer's name, and both the model and serial numbers of our Depot Repair Option. A written receipt for work to be returned must accompany any defective component(s) of the Product for the printhead (LED imaging array), which is only available in the U.S. Oki Data will be performed under this Limited Warranty in the United States and Canada and it has...
C610 Safety Warranty Regulatory Guide
Page 5
... have the model number and serial number for warranty work. Service and Support, US and Canada U.S. go to -the-minute Oki information specifically for times and availability of our customers. Oki Data Contact Locations United States Oki Data Americas, Inc. 2000 Bishops Gate Blvd. contacting the Oki Data dealer from whom the Product was purchased, by contacting Oki Data directly at any time. Spanish Only: call 1-800-654-3282 (1-800-OKI-DATA). Canada Only...
... have the model number and serial number for warranty work. Service and Support, US and Canada U.S. go to -the-minute Oki information specifically for times and availability of our customers. Oki Data Contact Locations United States Oki Data Americas, Inc. 2000 Bishops Gate Blvd. contacting the Oki Data dealer from whom the Product was purchased, by contacting Oki Data directly at any time. Spanish Only: call 1-800-654-3282 (1-800-OKI-DATA). Canada Only...


