
C330/C530 Safety Warranty Regulatory Guide
Page 3
... and/or injury. To avoid risk of the product outside this can cause fraying and may cause a fire. Do not throw toner cartridges or image drum cartridges into the ventilation holes or operate this product for use, to which may occur. Operation of fire and electric shock, do not touch the...
... and/or injury. To avoid risk of the product outside this can cause fraying and may cause a fire. Do not throw toner cartridges or image drum cartridges into the ventilation holes or operate this product for use, to which may occur. Operation of fire and electric shock, do not touch the...

C330/C530 Safety Warranty Regulatory Guide
Page 4
...for work to abuse, misuse, misapplication, accident, improper storage, or installation, an unsuitable physical operating environment, or as toner cartridges, image drums, ribbon cartridges, fuses, etc. For the remaining printhead warranty period, replacement will remedy any other than the second business day. To make... DESCRIBED ABOVE. This Limited Warranty does not extend to solve your receipt of the exchange product: failure to take advantage of Oki Data, once it does not include the replacement or repair of the Product for one (1) year from defects in your being...
...for work to abuse, misuse, misapplication, accident, improper storage, or installation, an unsuitable physical operating environment, or as toner cartridges, image drums, ribbon cartridges, fuses, etc. For the remaining printhead warranty period, replacement will remedy any other than the second business day. To make... DESCRIBED ABOVE. This Limited Warranty does not extend to solve your receipt of the exchange product: failure to take advantage of Oki Data, once it does not include the replacement or repair of the Product for one (1) year from defects in your being...

Safety Warranty Manual
Page 3
... so as this product may lead to prevent any risk of injury. The product battery should be heavy. Do not throw toner cartridges or image drum cartridges into the ventilation holes or operate this product with a wet hand as to prevent overheating and any risk of overheating. After installing additional memory...
... so as this product may lead to prevent any risk of injury. The product battery should be heavy. Do not throw toner cartridges or image drum cartridges into the ventilation holes or operate this product with a wet hand as to prevent overheating and any risk of overheating. After installing additional memory...

Safety Warranty Manual
Page 4
..., or installation, an unsuitable physical operating environment, or as toner cartridges, image drums, ribbon cartridges, fuses, etc. When Overnight Exchange is only available in your local Oki Data authorized service center, Oki Data at its representative. THERE ARE NO EXPRESS WARRANTIES OTHER THAN THOSE ON THE...machine has been picked up by Oki Data's representative within two (2) business days of your receipt of the exchange unit. If they determine that your problem over the phone. Before you ship the Product, remove the image drums and toner cartridges to prevent damage...
..., or installation, an unsuitable physical operating environment, or as toner cartridges, image drums, ribbon cartridges, fuses, etc. When Overnight Exchange is only available in your local Oki Data authorized service center, Oki Data at its representative. THERE ARE NO EXPRESS WARRANTIES OTHER THAN THOSE ON THE...machine has been picked up by Oki Data's representative within two (2) business days of your receipt of the exchange unit. If they determine that your problem over the phone. Before you ship the Product, remove the image drums and toner cartridges to prevent damage...
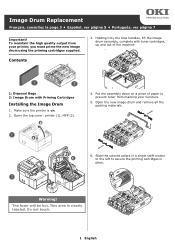
Image Drum Replacement Instructions (English, Fran栩s, Espa?ol, Poetugu鱩
Page 1
...! Contents 3. Open the top cover: printer (1), MFP (2). Open the new image drum and remove all the packing materials. c 6. This area is on a piece of the machine 1: Disposal Bags 2: Image Drum with toner cartridges, up and out of paper to secure the priming cartridges in a... swift motion to the left to prevent toner from your furniture. 5. Holding it by the blue handles, lift the image drum assembly, complete with Priming Cartridges Installing the Image Drum 1. b Warning! Do not touch. 1 English b a 4. Slide the colored collars in a place. The fuser will...
...! Contents 3. Open the top cover: printer (1), MFP (2). Open the new image drum and remove all the packing materials. c 6. This area is on a piece of the machine 1: Disposal Bags 2: Image Drum with toner cartridges, up and out of paper to secure the priming cartridges in a... swift motion to the left to prevent toner from your furniture. 5. Holding it by the blue handles, lift the image drum assembly, complete with Priming Cartridges Installing the Image Drum 1. b Warning! Do not touch. 1 English b a 4. Slide the colored collars in a place. The fuser will...
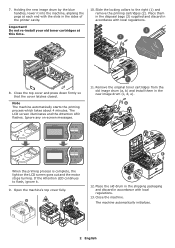
Image Drum Replacement Instructions (English, Fran栩s, Espa?ol, Poetugu鱩
Page 2
... the priming process is complete, the light on -screen messages. 11. Close the machine. The machine automatically initializes. 2 English Holding the new image drum by the blue handles, lower it . 9. Place them in accordance with local regulations. 8. Open the machine's top cover fully. Place the old.... 13. Note The machine automatically starts the priming process which takes about 4 minutes. Remove the original toner cartridges from the old image drum (a, b) and install them in the disposal bags (3) supplied and discard in the sides of the printer cavity. If the Attention LED ...
... the priming process is complete, the light on -screen messages. 11. Close the machine. The machine automatically initializes. 2 English Holding the new image drum by the blue handles, lower it . 9. Place them in accordance with local regulations. 8. Open the machine's top cover fully. Place the old.... 13. Note The machine automatically starts the priming process which takes about 4 minutes. Remove the original toner cartridges from the old image drum (a, b) and install them in the disposal bags (3) supplied and discard in the sides of the printer cavity. If the Attention LED ...
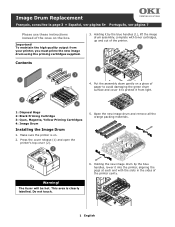
Image Drum Replacement: Priming Cartridges Separate
Page 1
...1: Disposal Bags 2: Black Priming Cartridge 3: Cyan, Magenta, Yellow Priming Cartridges 4: Image Drum Installing the Image Drum 1. Holding it from your printer, you must prime the new image drum using the priming cartridges supplied. Image Drum Replacement Français, consultez la page 3 • Español, ver p&#...Português, ver página 7 Please use these instructions instead of the ones on . 2. Warning! Holding the new image drum by the blue handles (1), lift the image drum assembly, complete with the slots in the sides of the printer cavity. 1 English Open the new image...
...1: Disposal Bags 2: Black Priming Cartridge 3: Cyan, Magenta, Yellow Priming Cartridges 4: Image Drum Installing the Image Drum 1. Holding it from your printer, you must prime the new image drum using the priming cartridges supplied. Image Drum Replacement Français, consultez la page 3 • Español, ver p&#...Português, ver página 7 Please use these instructions instead of the ones on . 2. Warning! Holding the new image drum by the blue handles (1), lift the image drum assembly, complete with the slots in the sides of the printer cavity. 1 English Open the new image...
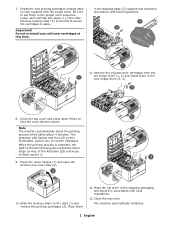
Image Drum Replacement: Priming Cartridges Separate
Page 2
..., the light on -screen messages. Slide the locking collars to secure the cartridges in place. Remove the original toner cartridges from the old image drum (1, 2) and install them c 12. The Attention LED flashes and the LCD screen illuminates. Close the top cover. Do not re-install your... the top cover and press down firmly so that the cover latches closed. If the Attention LED continues to put them in the new image drum (3, 4). Place them in the proper color sequence. Install the new priming cartridges (orange label on top) supplied with local regulations. 11. ...
..., the light on -screen messages. Slide the locking collars to secure the cartridges in place. Remove the original toner cartridges from the old image drum (1, 2) and install them c 12. The Attention LED flashes and the LCD screen illuminates. Close the top cover. Do not re-install your... the top cover and press down firmly so that the cover latches closed. If the Attention LED continues to put them in the new image drum (3, 4). Place them in the proper color sequence. Install the new priming cartridges (orange label on top) supplied with local regulations. 11. ...


