
PrintSuperVision Configuration Guide
Page 58
... The Toner Change Report is particularly helpful in the Professional Edition. Toner Changes Report The "Toner Changes" Report shows the dates of the last toner cartridge replacement for a group of devices and indicates if there was any toner remaining at the bottom of changing the...
... The Toner Change Report is particularly helpful in the Professional Edition. Toner Changes Report The "Toner Changes" Report shows the dates of the last toner cartridge replacement for a group of devices and indicates if there was any toner remaining at the bottom of changing the...
C3400n Safety, Warranty and Regulatory Information (English, Fran栩s, Espa?ol, Portugu鱩
Page 2
...the replacement or repair of the Printer's consumable items or supplies. Call 1-800-OKI-DATA for pickup by Oki Data's representative within two (2) business days of your credit card available as toner cartridges, image drums, etc. THERE ARE NO EXPRESS WARRANTIES OTHER THAN THOSE ON ... . Canada Only: call 1-856-222-7496. Limited Warranty: U.S. & Canada Oki Data Americas, Inc. (Oki Data) warrants this Oki C3400n Printer (hereinafter "the Printer") to be new or reconditioned, at the option of Oki Data: the exchange machine becomes the property of the customer when the returned machine...
...the replacement or repair of the Printer's consumable items or supplies. Call 1-800-OKI-DATA for pickup by Oki Data's representative within two (2) business days of your credit card available as toner cartridges, image drums, etc. THERE ARE NO EXPRESS WARRANTIES OTHER THAN THOSE ON ... . Canada Only: call 1-856-222-7496. Limited Warranty: U.S. & Canada Oki Data Americas, Inc. (Oki Data) warrants this Oki C3400n Printer (hereinafter "the Printer") to be new or reconditioned, at the option of Oki Data: the exchange machine becomes the property of the customer when the returned machine...

C3400n Handy Reference
Page 15
.... Toner Cartridges Color OKI Part # Black 43459304 Cyan 43459303 Magenta 43459302 Yellow 43459301 Image Drums Color OKI Part # Black 43460204 Cyan 43460203 Magenta 43460202 Yellow 43460201 Other Replacement Parts Item Oki Part # Fuser, 120 V 43377001 Fuser, 220 V 43377002 Transfer Belt 43378001 15 Take Advantage of OKI's Supply Manager! • Calculates your C3400n. • Consult an Oki Data...
.... Toner Cartridges Color OKI Part # Black 43459304 Cyan 43459303 Magenta 43459302 Yellow 43459301 Image Drums Color OKI Part # Black 43460204 Cyan 43460203 Magenta 43460202 Yellow 43460201 Other Replacement Parts Item Oki Part # Fuser, 120 V 43377001 Fuser, 220 V 43377002 Transfer Belt 43378001 15 Take Advantage of OKI's Supply Manager! • Calculates your C3400n. • Consult an Oki Data...

Guide: User's, C3400n (English)
Page 4
... USB menu 71 System adjustment menu 71 Maintenance menu 72 Usage menu 73 Printing settings 74 Changing the display language 74 Part Numbers 75 Toner cartridge replacement 76 Image drum replacement 82 Fuser replacement 86 Replacing the belt unit 89 Cleaning the LED head 94 Installing additional memory 95 Part Numbers... Color Correction Utility 115 Color Swatch Utility 130 Direct Network Printing Utility (LPR 134 Network Printer Status Utility 136 Network Setup Utility 141 Index 142 C3400n User's Guide 4
... USB menu 71 System adjustment menu 71 Maintenance menu 72 Usage menu 73 Printing settings 74 Changing the display language 74 Part Numbers 75 Toner cartridge replacement 76 Image drum replacement 82 Fuser replacement 86 Replacing the belt unit 89 Cleaning the LED head 94 Installing additional memory 95 Part Numbers... Color Correction Utility 115 Color Swatch Utility 130 Direct Network Printing Utility (LPR 134 Network Printer Status Utility 136 Network Setup Utility 141 Index 142 C3400n User's Guide 4
Guide: User's, C3400n (English)
Page 9
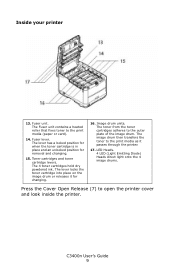
... onto the 4 image drums. Press the Cover Open Release (7) to the print media (paper or card). 14. Toner cartridges and toner cartridge levers. The toner from the toner cartridges adheres to the print media as it for removal and changing. 15. Fuser lever. The image drum then transfers the toner... to the outer plate of the image drum. The lever locks the toner cartridge into place on the image drum or releases it passes through the printer. 17. Image drum units. C3400n User's Guide 9 Fuser unit. The lever has a locked position for when the toner...
... onto the 4 image drums. Press the Cover Open Release (7) to the print media (paper or card). 14. Toner cartridges and toner cartridge levers. The toner from the toner cartridges adheres to the print media as it for removal and changing. 15. Fuser lever. The image drum then transfers the toner... to the outer plate of the image drum. The lever locks the toner cartridge into place on the image drum or releases it passes through the printer. 17. Image drum units. C3400n User's Guide 9 Fuser unit. The lever has a locked position for when the toner...

Guide: User's, C3400n (English)
Page 68
Normally this will take up immediately. Performs fine adjustment of image timing in natural daylight conditions. C3400n User's Guide 68 If a 500 drum count interval occurs during a print job it will occur at the end of that job, and will ..., magenta and yellow images to the black image component. Performs automatic color registration adjustment. The items on , when a new image drum or toner cartridge is installed, and at appropriate intervals, optimising the printed output for special or particularly difficult print jobs. COLOR MENU ITEM DENSITY ADJUSTMENT MODE SETTINGS AUTO...
Normally this will take up immediately. Performs fine adjustment of image timing in natural daylight conditions. C3400n User's Guide 68 If a 500 drum count interval occurs during a print job it will occur at the end of that job, and will ..., magenta and yellow images to the black image component. Performs automatic color registration adjustment. The items on , when a new image drum or toner cartridge is installed, and at appropriate intervals, optimising the printed output for special or particularly difficult print jobs. COLOR MENU ITEM DENSITY ADJUSTMENT MODE SETTINGS AUTO...

Guide: User's, C3400n (English)
Page 76
... brush it off the printer and allow the fuser to cool for cyan, magenta, yellow and black. Have a sheet of the old cartridge responsibly by placing it in your eyes, drink a little water or bathe your eyes liberally in . Press the cover release and open ... CAUTION! If this printer is displayed through the Status Monitor. Seek medical attention immediately. Before changing the toner cartridge, switch off . C3400n User's Guide 76 toner cartridge(s) until "TONER EMPTY" is a very fine dry powder. They will make stains permanent. To avoid toner wastage and possible toner...
... brush it off the printer and allow the fuser to cool for cyan, magenta, yellow and black. Have a sheet of the old cartridge responsibly by placing it in your eyes, drink a little water or bathe your eyes liberally in . Press the cover release and open ... CAUTION! If this printer is displayed through the Status Monitor. Seek medical attention immediately. Before changing the toner cartridge, switch off . C3400n User's Guide 76 toner cartridge(s) until "TONER EMPTY" is a very fine dry powder. They will make stains permanent. To avoid toner wastage and possible toner...

Guide: User's, C3400n (English)
Page 77
ID Positions_Fig1_04.jpg 1. cover open button_F5_23.jpg WARNING! Do not touch this area. 2. Yellow cartridge 2. Note the positions of the 4 cartridges. If the printer has been powered on, the fuser may be hot. Cyan cartridge 3. Black cartridge C3400n User's Guide 77 This area is clearly labelled. Magenta cartridge 4.
ID Positions_Fig1_04.jpg 1. cover open button_F5_23.jpg WARNING! Do not touch this area. 2. Yellow cartridge 2. Note the positions of the 4 cartridges. If the printer has been powered on, the fuser may be hot. Cyan cartridge 3. Black cartridge C3400n User's Guide 77 This area is clearly labelled. Magenta cartridge 4.
Guide: User's, C3400n (English)
Page 78
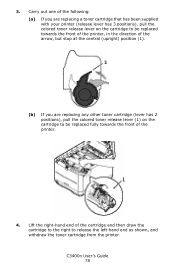
...you are replacing a toner cartridge that has been supplied with your printer (release lever has 3 positions), pull the colored toner release lever on the cartridge to be replaced towards the front of the arrow, but stop at the central (upright) position (1). Toner unLock_F5_01.jpg 4. C3400n User's Guide 78 Lift the... right-hand end of the cartridge and then draw the cartridge to the right to be replaced fully towards the front of the printer, in the direction of...
...you are replacing a toner cartridge that has been supplied with your printer (release lever has 3 positions), pull the colored toner release lever on the cartridge to be replaced towards the front of the arrow, but stop at the central (upright) position (1). Toner unLock_F5_01.jpg 4. C3400n User's Guide 78 Lift the... right-hand end of the cartridge and then draw the cartridge to the right to be replaced fully towards the front of the printer, in the direction of...

Guide: User's, C3400n (English)
Page 79
... a black plastic bag to keep it to be out of the printer for more than this, please wrap the cartridge inside the cartridge. Tape.jpg C3400n User's Guide 79 CAUTION! Gently shake the new cartridge from the underside of paper to direct sunlight or very bright room lighting. 6. Shake.jpg 8. If the drum unit...
... a black plastic bag to keep it to be out of the printer for more than this, please wrap the cartridge inside the cartridge. Tape.jpg C3400n User's Guide 79 CAUTION! Gently shake the new cartridge from the underside of paper to direct sunlight or very bright room lighting. 6. Shake.jpg 8. If the drum unit...

Guide: User's, C3400n (English)
Page 80
...first, pushing it against the spring on the cartridge to the right, lower it is firmly seated, push the colored lever (1) towards the rear of the cartridge onto the image drum unit. C3400n User's Guide 80 This will lock the cartridge into place and release toner into the printer ...over the image drum unit from which the old cartridge was removed. 10. Toner_replace_F5_03.jpg 11. Pressing gently ...
...first, pushing it against the spring on the cartridge to the right, lower it is firmly seated, push the colored lever (1) towards the rear of the cartridge onto the image drum unit. C3400n User's Guide 80 This will lock the cartridge into place and release toner into the printer ...over the image drum unit from which the old cartridge was removed. 10. Toner_replace_F5_03.jpg 11. Pressing gently ...

Guide: User's, C3400n (English)
Page 82
Switch off the printer and allow the fuser to cool for about 10 minutes before opening the cover. Static sensitive devices, handle with care. Note the positions of the 4 cartridges. Antistatic symbol.jpg The printer contains four image drums: cyan, magenta, yellow and black. 1. C3400n User's Guide 82 Image drum replacement WARNING! This area is clearly labelled. Do not touch. cover open the printer's top cover fully. If the printer has been powered on, the fuser will be hot. CAUTION! Press the cover release and open button_F5_23.jpg 2.
Switch off the printer and allow the fuser to cool for about 10 minutes before opening the cover. Static sensitive devices, handle with care. Note the positions of the 4 cartridges. Antistatic symbol.jpg The printer contains four image drums: cyan, magenta, yellow and black. 1. C3400n User's Guide 82 Image drum replacement WARNING! This area is clearly labelled. Do not touch. cover open the printer's top cover fully. If the printer has been powered on, the fuser will be hot. CAUTION! Press the cover release and open button_F5_23.jpg 2.

Guide: User's, C3400n (English)
Page 83
Black cartridge 3. Put the old unit down gently onto a piece of paper where the old ID unit was placed. Yellow cartridge 4. Take the new image drum unit, complete with toner cartridge (assembled according to the installation guide) and place it by its top center, lift the image drum, complete with its toner cartridge (1), up and out of the printer. ID going out_Fig1_12.jpg 4. Holding it on the piece of paper to prevent toner from marking your furniture. 5. Magenta cartridge 3. C3400n User's Guide 83 Cyan cartridge 2. ID Positions_Fig1_04.jpg 1.
Black cartridge 3. Put the old unit down gently onto a piece of paper where the old ID unit was placed. Yellow cartridge 4. Take the new image drum unit, complete with toner cartridge (assembled according to the installation guide) and place it by its top center, lift the image drum, complete with its toner cartridge (1), up and out of the printer. ID going out_Fig1_12.jpg 4. Holding it on the piece of paper to prevent toner from marking your furniture. 5. Magenta cartridge 3. C3400n User's Guide 83 Cyan cartridge 2. ID Positions_Fig1_04.jpg 1.

Guide: User's, C3400n (English)
Page 84
Remove the protective sheets from light. CAUTION! Never expose the drum to normal room light for more than this, please wrap the cartridge inside the packaging material for longer than 5 minutes. Do not touch it and do not expose it away from the image drum unit. Pack the ... the base of the printer for disposal. Holding the complete assembly by its top center, lower it the same way round as the old unit. C3400n User's Guide 84 The green image drum surface at each end (1) into place in the sides of the printer cavity. Toner_remove paper _Fig1_24.jpg 7. If...
Remove the protective sheets from light. CAUTION! Never expose the drum to normal room light for more than this, please wrap the cartridge inside the packaging material for longer than 5 minutes. Do not touch it and do not expose it away from the image drum unit. Pack the ... the base of the printer for disposal. Holding the complete assembly by its top center, lower it the same way round as the old unit. C3400n User's Guide 84 The green image drum surface at each end (1) into place in the sides of the printer cavity. Toner_remove paper _Fig1_24.jpg 7. If...

Guide: User's, C3400n (English)
Page 89
...is essential that they go back in the same order. Do not touch. ID Positions_Fig1_04.jpg 1. Cyan cartridge 3. It is clearly labelled. WARNING! Note the positions of the 4 cartridges. Magenta cartridge 4. Press the cover release and open button_F5_23.jpg 2. If the printer has been powered on, the ... cover fully. Switch off the printer and allow the fuser to cool for about 10 minutes before opening the cover. 1. Black cartridge C3400n User's Guide 89 Replacing the belt unit The belt unit is located under the four image drums. This unit requires replacement approximately ...
...is essential that they go back in the same order. Do not touch. ID Positions_Fig1_04.jpg 1. Cyan cartridge 3. It is clearly labelled. WARNING! Note the positions of the 4 cartridges. Magenta cartridge 4. Press the cover release and open button_F5_23.jpg 2. If the printer has been powered on, the ... cover fully. Switch off the printer and allow the fuser to cool for about 10 minutes before opening the cover. 1. Black cartridge C3400n User's Guide 89 Replacing the belt unit The belt unit is located under the four image drums. This unit requires replacement approximately ...

Guide: User's, C3400n (English)
Page 90
... rear, out of the printer and place them in a safe place away from direct sources of the printer for more than this, please wrap the cartridge inside a black plastic bag to keep it to direct sunlight or very bright room lighting. CAUTION! Locate the two fasteners (1) at the front end...
... rear, out of the printer and place them in a safe place away from direct sources of the printer for more than this, please wrap the cartridge inside a black plastic bag to keep it to direct sunlight or very bright room lighting. CAUTION! Locate the two fasteners (1) at the front end...

Guide: User's, C3400n (English)
Page 92
belt_roll in place. drive gear into the printer in the correct positions as shown. belt_lock_F5_09_1.jpg 9. This will secure the belt unit in _ F5_09.jpg 8. Replace the 4 image drums, complete with their toner cartridges, into the gear inside the printer by the rear left corner of the unit, and lower the belt unit flat inside the printer. C3400n User's Guide 92 Turn the two fasteners (1) 90° to the right until they lock.
belt_roll in place. drive gear into the printer in the correct positions as shown. belt_lock_F5_09_1.jpg 9. This will secure the belt unit in _ F5_09.jpg 8. Replace the 4 image drums, complete with their toner cartridges, into the gear inside the printer by the rear left corner of the unit, and lower the belt unit flat inside the printer. C3400n User's Guide 92 Turn the two fasteners (1) 90° to the right until they lock.

Guide: User's, C3400n (English)
Page 93
Magenta cartridge 4. C3400n User's Guide 93 ID Positions_Fig1_04.jpg 1. Yellow cartridge 2. Black cartridge 10. Finally, close the top cover and press down firmly at both sides so that the cover latches closed. Cyan cartridge 3.
Magenta cartridge 4. C3400n User's Guide 93 ID Positions_Fig1_04.jpg 1. Yellow cartridge 2. Black cartridge 10. Finally, close the top cover and press down firmly at both sides so that the cover latches closed. Cyan cartridge 3.

Guide: User's, C3400n (English)
Page 101
Magenta cartridge 3. ID going out_Fig1_12.jpg C3400n User's Guide 101 Holding it by its top center, lift the cyan image drum, complete with its toner cartridge (1), up and out of the 4 cartridges. Note the positions of the printer. ID Positions_Fig1_04.jpg 1. Cyan cartridge 2. Yellow cartridge 4. Black cartridge It will be necessary to remove the four image drums to gain access to the paper path. 4. 3.
Magenta cartridge 3. ID going out_Fig1_12.jpg C3400n User's Guide 101 Holding it by its top center, lift the cyan image drum, complete with its toner cartridge (1), up and out of the 4 cartridges. Note the positions of the printer. ID Positions_Fig1_04.jpg 1. Cyan cartridge 2. Yellow cartridge 4. Black cartridge It will be necessary to remove the four image drums to gain access to the paper path. 4. 3.

Guide: User's, C3400n (English)
Page 102
Put the cartridge down gently onto a piece of the remaining image drum units. Do not touch it and do not expose it C3400n User's Guide 102 Repeat this removal procedure for more than 5 minutes. 6. Look into the printer to check whether any sheets of paper are visible ... unit. 8. Cover the image drum units to protect them from marking your furniture and to prevent toner from direct light. Remove any part of the cartridge is very delicate and light sensitive. 5. IDs _ all out_cover_2_F8_19.jpg 7. The green image drum surface at the front of the belt (1), carefully lift the...
Put the cartridge down gently onto a piece of the remaining image drum units. Do not touch it and do not expose it C3400n User's Guide 102 Repeat this removal procedure for more than 5 minutes. 6. Look into the printer to check whether any sheets of paper are visible ... unit. 8. Cover the image drum units to protect them from marking your furniture and to prevent toner from direct light. Remove any part of the cartridge is very delicate and light sensitive. 5. IDs _ all out_cover_2_F8_19.jpg 7. The green image drum surface at the front of the belt (1), carefully lift the...


