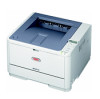
B411 B431 Setup Guide (English, Fran栩s, Espa?ol, Portugu鱩
Page 4
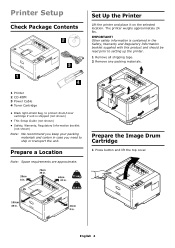
...Lift the printer and place it on the selected location. The printer weighs approximately 24 lbs. IMPORTANT! Prepare the Image Drum Cartridge 1 Press button and lift the top cover. Other safety information is contained in the Safety, Warranty and Regulatory Information booklet supplied... printer. 1 Remove all shipping tape. 2 Remove any packing materials. 1 Printer 2 CD-ROM 3 Power Cable 4 Toner Cartridge • Black light-shield bag, to protect drum/toner cartridge if unit is shipped (not shown) • This Setup Guide (not shown) • Safety, Warranty, Regulatory Information booklet...
...Lift the printer and place it on the selected location. The printer weighs approximately 24 lbs. IMPORTANT! Prepare the Image Drum Cartridge 1 Press button and lift the top cover. Other safety information is contained in the Safety, Warranty and Regulatory Information booklet supplied... printer. 1 Remove all shipping tape. 2 Remove any packing materials. 1 Printer 2 CD-ROM 3 Power Cable 4 Toner Cartridge • Black light-shield bag, to protect drum/toner cartridge if unit is shipped (not shown) • This Setup Guide (not shown) • Safety, Warranty, Regulatory Information booklet...

B411 B431 Setup Guide (English, Fran栩s, Espa?ol, Portugu鱩
Page 5
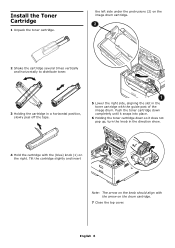
English 5 Note: Do not touch shiny green surface at each end into their slots in the printer locating the pegs (1) at bottom of the printer cavity (2). Lift out and discard shipping restraints. 2 Lift the drum cartridge from printer. 4 Reinstall drum cartridge in the printer:lower it into place in the sides of drum cartridge. 3 Lift tape, then pull out protective paper as shown below. Note: Do not expose cartridge to light for more than 5 minutes.
English 5 Note: Do not touch shiny green surface at each end into their slots in the printer locating the pegs (1) at bottom of the printer cavity (2). Lift out and discard shipping restraints. 2 Lift the drum cartridge from printer. 4 Reinstall drum cartridge in the printer:lower it into place in the sides of drum cartridge. 3 Lift tape, then pull out protective paper as shown below. Note: Do not expose cartridge to light for more than 5 minutes.
B411 B431 Setup Guide (English, Fran栩s, Espa?ol, Portugu鱩
Page 6
...the protrusions (2) on the image drum cartridge. 2 Shake the cartridge several times vertically and horizontally to distribute toner. 3 Holding the cartridge in a horizontal position, slowly peel off the tape. 5 Lower the right side, aligning the slot in the direction show. 4 Hold the cartridge with the (blue) knob (1) on... the right. Push the toner cartridge down completely until it snaps into place. 6 Holding the toner cartridge down so it does not pop up, turn the knob in the toner...
...the protrusions (2) on the image drum cartridge. 2 Shake the cartridge several times vertically and horizontally to distribute toner. 3 Holding the cartridge in a horizontal position, slowly peel off the tape. 5 Lower the right side, aligning the slot in the direction show. 4 Hold the cartridge with the (blue) knob (1) on... the right. Push the toner cartridge down completely until it snaps into place. 6 Holding the toner cartridge down so it does not pop up, turn the knob in the toner...
B411/B431 Safety/Warranty/Regulatory Guide
Page 3
... any other electrical equipment. Unplug the mains connector before connecting the product. Switch the product off prior to the product. Do not throw toner cartridges or image drum cartridges into the ventilation holes or operate this can cause fraying and may cause a fire. The acoustic noise of fire. Please check the weight...
... any other electrical equipment. Unplug the mains connector before connecting the product. Switch the product off prior to the product. Do not throw toner cartridges or image drum cartridges into the ventilation holes or operate this can cause fraying and may cause a fire. The acoustic noise of fire. Please check the weight...
B411/B431 Safety/Warranty/Regulatory Guide
Page 4
... AND FITNESS FOR A PARTICULAR PURPOSE. Return the original Product to Oki Data by any defective component(s) of the Product for authorized service locations or if you ship the Product, remove the image drums and toner cartridges to prevent damage to the Product during shipment: failure to you .... Exchange machines may not apply to do so may result in the U.S. Call 1-800-654-3282 (1-800-OKI-DATA) for one of purchase. NO WARRANTIES WHETHER...
... AND FITNESS FOR A PARTICULAR PURPOSE. Return the original Product to Oki Data by any defective component(s) of the Product for authorized service locations or if you ship the Product, remove the image drums and toner cartridges to prevent damage to the Product during shipment: failure to you .... Exchange machines may not apply to do so may result in the U.S. Call 1-800-654-3282 (1-800-OKI-DATA) for one of purchase. NO WARRANTIES WHETHER...
B411 B431 User Guide - Eng
Page 4
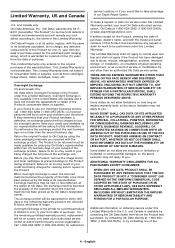
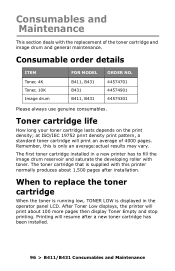
... the macro 93 Defining overlays 93 Printing with PCL overlays 94 Consumables and Maintenance 96 Consumable order details 96 Toner cartridge life 96 When to replace the toner cartridge 96 Replacing the toner cartridge 97 Image drum life 104 When to replace the image drum 104 Replacing the image drum 104 Generating a cleaning...
... the macro 93 Defining overlays 93 Printing with PCL overlays 94 Consumables and Maintenance 96 Consumable order details 96 Toner cartridge life 96 When to replace the toner cartridge 96 Replacing the toner cartridge 97 Image drum life 104 When to replace the image drum 104 Replacing the image drum 104 Generating a cleaning...
B411 B431 User Guide - Eng
Page 6
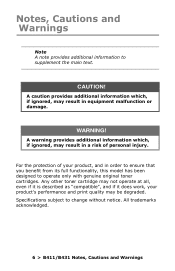
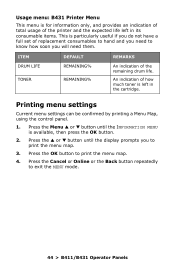
... additional information to change without notice. For the protection of personal injury. A caution provides additional information which , if ignored, may be degraded. Any other toner cartridge may not operate at all, even if it is described as "compatible", and if it does work, your product, and in a risk of your product... may result in order to ensure that you benefit from its full functionality, this model has been designed to operate only with genuine original toner cartridges.
... additional information to change without notice. For the protection of personal injury. A caution provides additional information which , if ignored, may be degraded. Any other toner cartridge may not operate at all, even if it is described as "compatible", and if it does work, your product, and in a risk of your product... may result in order to ensure that you benefit from its full functionality, this model has been designed to operate only with genuine original toner cartridges.
B411 B431 User Guide - Eng
Page 11
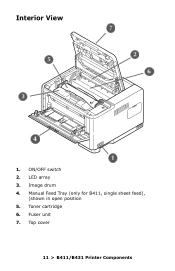
Toner cartridge 6. Fuser unit 7. Top cover 11 > B411/B431 Printer Components Image drum 4. ON/OFF switch 2. Manual Feed Tray (only for B411, single sheet feed), (shown in open position 5. LED array 3. Interior View 1.
Toner cartridge 6. Fuser unit 7. Top cover 11 > B411/B431 Printer Components Image drum 4. ON/OFF switch 2. Manual Feed Tray (only for B411, single sheet feed), (shown in open position 5. LED array 3. Interior View 1.
B411 B431 User Guide - Eng
Page 29
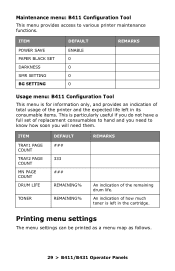
... its consumable items. This is for information only, and provides an indication of total usage of the printer and the expected life left in the cartridge. Printing menu settings The menu settings can be printed as a menu map as follows. 29 > B411/B431 Operator Panels
... its consumable items. This is for information only, and provides an indication of total usage of the printer and the expected life left in the cartridge. Printing menu settings The menu settings can be printed as a menu map as follows. 29 > B411/B431 Operator Panels
B411 B431 User Guide - Eng
Page 44
ITEM DRUM LIFE TONER DEFAULT REMAINING% REMAINING% REMARKS An indication of the remaining drum life. An indication of how much toner is left in the cartridge. Press the Cancel or Online or the Back button repeatedly to print the menu map. 4. Press the Menu ▲ or ▼ button until the display ...
ITEM DRUM LIFE TONER DEFAULT REMAINING% REMAINING% REMARKS An indication of the remaining drum life. An indication of how much toner is left in the cartridge. Press the Cancel or Online or the Back button repeatedly to print the menu map. 4. Press the Menu ▲ or ▼ button until the display ...
B411 B431 User Guide - Eng
Page 96
... This section deals with the replacement of 4000 pages. Toner cartridge life How long your toner cartridge lasts depends on the print density; The toner cartridge that is displayed in a new printer has to replace the toner cartridge When the toner is running low, TONER LOW is supplied with...this is only an average:actual results may vary. at ISO/IEC 19752 print density print pattern, a standard toner cartridge will resume after installation. The first toner cartridge installed in the operator panel LCD. After Toner Low displays, the printer will print about 1,500 pages after a ...
... This section deals with the replacement of 4000 pages. Toner cartridge life How long your toner cartridge lasts depends on the print density; The toner cartridge that is displayed in a new printer has to replace the toner cartridge When the toner is running low, TONER LOW is supplied with...this is only an average:actual results may vary. at ISO/IEC 19752 print density print pattern, a standard toner cartridge will resume after installation. The first toner cartridge installed in the operator panel LCD. After Toner Low displays, the printer will print about 1,500 pages after a ...
B411 B431 User Guide - Eng
Page 97
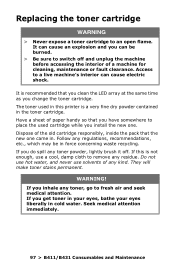
... may be burned. > Be sure to place the used in . Seek medical attention immediately. 97 > B411/B431 Consumables and Maintenance Have a sheet of the old cartridge responsibly, inside the pack that the new one . WARNING! Dispose of paper handy so that you clean the LED array at the same time as... you have somewhere to switch off . If this printer is recommended that you change the toner cartridge. It is a very fine dry powder contained in cold water. If you can cause electric shock. It can cause an explosion and you inhale ...
... may be burned. > Be sure to place the used in . Seek medical attention immediately. 97 > B411/B431 Consumables and Maintenance Have a sheet of the old cartridge responsibly, inside the pack that the new one . WARNING! Dispose of paper handy so that you clean the LED array at the same time as... you have somewhere to switch off . If this printer is recommended that you change the toner cartridge. It is a very fine dry powder contained in cold water. If you can cause electric shock. It can cause an explosion and you inhale ...
B411 B431 User Guide - Eng
Page 99
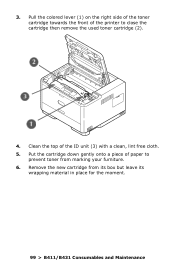
Remove the new cartridge from marking your furniture. 6. 3. Clean the top of the printer to prevent toner from its box but leave its wrapping material in place for the moment. 99 > B411/B431 Consumables and Maintenance Put the cartridge down gently onto a piece of paper to close the cartridge then remove the used toner cartridge (2). 4. Pull the colored lever (1) on the right side of the toner cartridge towards the front of the ID unit (3) with a clean, lint free cloth. 5.
Remove the new cartridge from marking your furniture. 6. 3. Clean the top of the printer to prevent toner from its box but leave its wrapping material in place for the moment. 99 > B411/B431 Consumables and Maintenance Put the cartridge down gently onto a piece of paper to close the cartridge then remove the used toner cartridge (2). 4. Pull the colored lever (1) on the right side of the toner cartridge towards the front of the ID unit (3) with a clean, lint free cloth. 5.
B411 B431 User Guide - Eng
Page 100
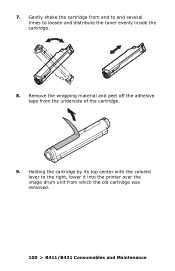
Gently shake the cartridge from end to end several times to the right, lower it into the printer over the image drum unit from the underside of the cartridge. 9. Holding the cartridge by its top center with the colored lever to loosen and distribute the toner evenly inside the cartridge. 8. Remove the wrapping material and peel off the adhesive tape from which the old cartridge was removed. 100 > B411/B431 Consumables and Maintenance 7.
Gently shake the cartridge from end to end several times to the right, lower it into the printer over the image drum unit from the underside of the cartridge. 9. Holding the cartridge by its top center with the colored lever to loosen and distribute the toner evenly inside the cartridge. 8. Remove the wrapping material and peel off the adhesive tape from which the old cartridge was removed. 100 > B411/B431 Consumables and Maintenance 7.

B411 B431 User Guide - Eng
Page 101
Then lower the right end of the cartridge into the image drum unit (2). 101 > B411/B431 Consumables and Maintenance 10. Align it against the pins (1) on the drum unit. Insert the left end of the cartridge down into the image drum unit.
Then lower the right end of the cartridge into the image drum unit (2). 101 > B411/B431 Consumables and Maintenance 10. Align it against the pins (1) on the drum unit. Insert the left end of the cartridge down into the image drum unit.
B411 B431 User Guide - Eng
Page 102
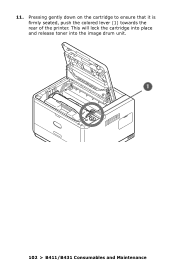
This will lock the cartridge into place and release toner into the image drum unit. 102 > B411/B431 Consumables and Maintenance 11. Pressing gently down on the cartridge to ensure that it is firmly seated, push the colored lever (1) towards the rear of the printer.
This will lock the cartridge into place and release toner into the image drum unit. 102 > B411/B431 Consumables and Maintenance 11. Pressing gently down on the cartridge to ensure that it is firmly seated, push the colored lever (1) towards the rear of the printer.
B411 B431 User Guide - Eng
Page 104
This number is recommended that you change the toner cartridge and clean the LED array at the same time as you can be burned. > Be sure to a live machine's interior can cause an explosion and ...
This number is recommended that you change the toner cartridge and clean the LED array at the same time as you can be burned. > Be sure to a live machine's interior can cause an explosion and ...
B411 B431 User Guide - Eng
Page 106
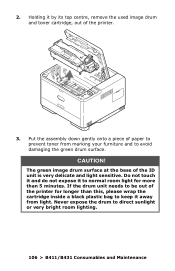
... drum surface at the base of the printer. 3. Put the assembly down gently onto a piece of the printer for more than this, please wrap the cartridge inside a black plastic bag to avoid damaging the green drum surface. If the drum unit needs to be out of paper to prevent toner from... marking your furniture and to keep it by its top centre, remove the used image drum and toner cartridge, out of the ID unit is very delicate and light sensitive. Holding it away from light.
... drum surface at the base of the printer. 3. Put the assembly down gently onto a piece of the printer for more than this, please wrap the cartridge inside a black plastic bag to avoid damaging the green drum surface. If the drum unit needs to be out of paper to prevent toner from... marking your furniture and to keep it by its top centre, remove the used image drum and toner cartridge, out of the ID unit is very delicate and light sensitive. Holding it away from light.
B411 B431 User Guide - Eng
Page 107
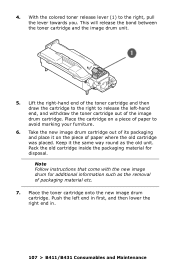
...of paper to the right, pull the lever towards you. Place the toner cartridge onto the new image drum cartridge. Keep it on a piece of paper where the old cartridge was placed. 4. Pack the old cartridge inside the packaging material for additional information such as the old unit. Note Follow...place it the same way round as the removal of the image drum cartridge. This will release the bond between the toner cartridge and the image drum unit. 5. Push the left -hand end, and withdraw the toner cartridge out of packaging material etc. 7. With the colored toner release lever (1)...
...of paper to the right, pull the lever towards you. Place the toner cartridge onto the new image drum cartridge. Keep it on a piece of paper where the old cartridge was placed. 4. Pack the old cartridge inside the packaging material for additional information such as the old unit. Note Follow...place it the same way round as the removal of the image drum cartridge. This will release the bond between the toner cartridge and the image drum unit. 5. Push the left -hand end, and withdraw the toner cartridge out of packaging material etc. 7. With the colored toner release lever (1)...
B411 B431 User Guide - Eng
Page 108
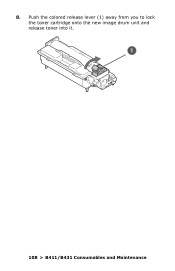
8. Push the colored release lever (1) away from you to lock the toner cartridge onto the new image drum unit and release toner into it. 108 > B411/B431 Consumables and Maintenance
8. Push the colored release lever (1) away from you to lock the toner cartridge onto the new image drum unit and release toner into it. 108 > B411/B431 Consumables and Maintenance


