

Instruction Manual
Page 1
Model No. Write the serial number in this manual before using this manual for reference. Save this equipment. Serial Number Decal CUSTOMER SERVICE UNITED KINGDOM Call: 0330 123 1045 From Ireland: 053 92 36102 Website: iconsupport.eu E-mail: ...: ICON Health & Fitness PO Box 635 WINSTON HILLS NSW 2153 AUSTRALIA CAUTION Read all precautions and instructions in the space above for future reference. USER'S MANUAL iconeurope.eu
Model No. Write the serial number in this manual before using this manual for reference. Save this equipment. Serial Number Decal CUSTOMER SERVICE UNITED KINGDOM Call: 0330 123 1045 From Ireland: 053 92 36102 Website: iconsupport.eu E-mail: ...: ICON Health & Fitness PO Box 635 WINSTON HILLS NSW 2153 AUSTRALIA CAUTION Read all precautions and instructions in the space above for future reference. USER'S MANUAL iconeurope.eu

Instruction Manual
Page 2
... RECYCLING INFORMATION Back Cover WARNING DECAL PLACEMENT This drawing shows the locations of this manual and request a free replacement decal. If a decal is missing or illegible, call the telephone number on the front cover of the warning decals. NORDICTRACK and IFIT are registered trademarks of Google LLC. Note: The decals may not...
... RECYCLING INFORMATION Back Cover WARNING DECAL PLACEMENT This drawing shows the locations of this manual and request a free replacement decal. If a decal is missing or illegible, call the telephone number on the front cover of the warning decals. NORDICTRACK and IFIT are registered trademarks of Google LLC. Note: The decals may not...

Instruction Manual
Page 3
... by someone responsible for their safety. 4. The incline trainer is not intended for use by persons with at least 2.4 m (8 ft.) of this manual and all warnings on each side. To protect the floor or carpet from damage, place a mat under age 16 and pets away from the incline... if the incline trainer is not working properly. (See MAINTENANCE AND TROUBLESHOOTING on the incline trainer, the noise level of all users of this manual. 5. Always stand on any surface that could become caught in sandals. 13. Do not operate the incline trainer where aerosol products are recommended ...
... by someone responsible for their safety. 4. The incline trainer is not intended for use by persons with at least 2.4 m (8 ft.) of this manual and all warnings on each side. To protect the floor or carpet from damage, place a mat under age 16 and pets away from the incline... if the incline trainer is not working properly. (See MAINTENANCE AND TROUBLESHOOTING on the incline trainer, the noise level of all users of this manual. 5. Always stand on any surface that could become caught in sandals. 13. Do not operate the incline trainer where aerosol products are recommended ...

Instruction Manual
Page 4
...before cleaning the incline trainer, and before performing the maintenance and adjustment procedures described in general. 23. Servicing other than the procedures in this manual. SAVE THESE INSTRUCTIONS 4 Adjust the speed in small increments to move the incline trainer. 21. Never leave the incline trainer unattended while ...and properly tighten all parts each time the incline trainer is intended only as an exercise aid in determining heart rate trends in this manual should be able to safely lift 20 kg (45 lbs.) to do so by an authorized ser- If you feel faint, if...
...before cleaning the incline trainer, and before performing the maintenance and adjustment procedures described in general. 23. Servicing other than the procedures in this manual. SAVE THESE INSTRUCTIONS 4 Adjust the speed in small increments to move the incline trainer. 21. Never leave the incline trainer unattended while ...and properly tighten all parts each time the incline trainer is intended only as an exercise aid in determining heart rate trends in this manual should be able to safely lift 20 kg (45 lbs.) to do so by an authorized ser- If you feel faint, if...

Instruction Manual
Page 5
... the incline trainer. If you have questions after reading this manual, please see the front cover of features designed to make your benefit, read this manual carefully before contacting us. To help us assist you for selecting the revolutionary NORDICTRACK® COMMERCIAL X22I incline trainer. Before reading further, please familiarize yourself with the...
... the incline trainer. If you have questions after reading this manual, please see the front cover of features designed to make your benefit, read this manual carefully before contacting us. To help us assist you for selecting the revolutionary NORDICTRACK® COMMERCIAL X22I incline trainer. Before reading further, please familiarize yourself with the...

Instruction Manual
Page 6
Extra parts may be included. 3/8" Star Washer (3)-12 3/8" x 5 1/2" Screw (1)-4 6 Note: If a part is not in parentheses below to see whether it is the quantity used for assembly. PART IDENTIFICATION CHART Use the drawings below each drawing is the key number of the part, from the PART LIST near the end of this manual. The number in the hardware kit, check to identify small parts used for assembly. The number following the key number is preattached.
Extra parts may be included. 3/8" Star Washer (3)-12 3/8" x 5 1/2" Screw (1)-4 6 Note: If a part is not in parentheses below to see whether it is the quantity used for assembly. PART IDENTIFICATION CHART Use the drawings below each drawing is the key number of the part, from the PART LIST near the end of this manual. The number in the hardware kit, check to identify small parts used for assembly. The number following the key number is preattached.

Instruction Manual
Page 7
... included hex keys • After shipping, there may be an oily substance on the exterior of this manual). Do not dispose of this manual) 7 This is an oily substance on the front cover of this manual. • your receipt (make sure to keep a copy) • your name, address, and telephone number • the...
... included hex keys • After shipping, there may be an oily substance on the exterior of this manual). Do not dispose of this manual) 7 This is an oily substance on the front cover of this manual. • your receipt (make sure to keep a copy) • your name, address, and telephone number • the...
Instruction Manual
Page 14
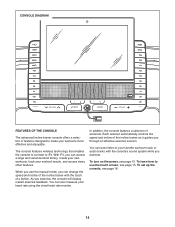
... to your heart rate using the chest heart rate monitor. To turn on the power, see page 16. 14 To learn how to use the manual mode, you through an effective exercise session. With iFit, you use the touch screen, see page 15. You can access a large and varied workout library...
... to your heart rate using the chest heart rate monitor. To turn on the power, see page 16. 14 To learn how to use the manual mode, you through an effective exercise session. With iFit, you use the touch screen, see page 15. You can access a large and varied workout library...

Instruction Manual
Page 16
... your name on the screen will guide you use several other features that the console offers. 2. Next, select the settings main menu. To use the manual mode, see page 19. IMPORTANT: If there are sheets of measurement and your wireless network. Next, select the maintenance section. Before using your time zone...
... your name on the screen will guide you use several other features that the console offers. 2. Next, select the settings main menu. To use the manual mode, see page 19. IMPORTANT: If there are sheets of measurement and your wireless network. Next, select the maintenance section. Before using your time zone...

Instruction Manual
Page 17
...0.5 Km/H. Note: If the walking belt is moving at a low speed. To restart the walking belt, press the Start button. 4. HOW TO USE THE MANUAL MODE 1. See HOW TO TURN ON THE POWER on the screen. Monitor your progress with the display modes. You can show the following workout information...trainer, you have burned Note: When the incline setting is shown. Insert the key into the console. The console offers several display modes. Touch the Manual Start button on the screen or press the Start button on the incline trainer, the screen can also touch the + button on page 22). 5. ...
...0.5 Km/H. Note: If the walking belt is moving at a low speed. To restart the walking belt, press the Start button. 4. HOW TO USE THE MANUAL MODE 1. See HOW TO TURN ON THE POWER on the screen. Monitor your progress with the display modes. You can show the following workout information...trainer, you have burned Note: When the incline setting is shown. Insert the key into the console. The console offers several display modes. Touch the Manual Start button on the screen or press the Start button on the incline trainer, the screen can also touch the + button on page 22). 5. ...

Instruction Manual
Page 21
... Settings • Maintenance • Wi-Fi About • Legal 21 Select the main menu. Next, select the main menu. Slide or flick the screen to manually move the walking belt at the desired speed. Select the settings main menu. Use your console to the main menu. 4. You may cause your body...
... Settings • Maintenance • Wi-Fi About • Legal 21 Select the main menu. Next, select the main menu. Slide or flick the screen to manually move the walking belt at the desired speed. Select the settings main menu. Use your console to the main menu. 4. You may cause your body...

Instruction Manual
Page 26
...console. IMPORTANT: Do not spray liquids directly onto the incline trainer. Then, thoroughly dry the incline trainer with a damp cloth and a small amount of this manual. SYMPTOM: The power does not turn on the incline trainer frame near the power cord. b. Check the power switch (see the front cover of this... manual. 26 If the power cord is inserted into the off during use only a 3-conductor, 14-gauge (2 mm2) cord that the key is plugged in, unplug...
...console. IMPORTANT: Do not spray liquids directly onto the incline trainer. Then, thoroughly dry the incline trainer with a damp cloth and a small amount of this manual. SYMPTOM: The power does not turn on the incline trainer frame near the power cord. b. Check the power switch (see the front cover of this... manual. 26 If the power cord is inserted into the off during use only a 3-conductor, 14-gauge (2 mm2) cord that the key is plugged in, unplug...

Instruction Manual
Page 27
... cord is needed, use only a 3-conductor, 14-gauge (2 mm²) cord that the walking belt needs more lubricant, see the front cover of this manual. 27 Then, remove the key and UNPLUG THE POWER CORD. Next, locate the Reed Switch Top View (103) and the 105 Magnet (111) on ,... see the front cover of this manual. Turn the Pulley until the walking belt is properly tightened, you suspect that is overtightened, incline trainer performance may decrease and the walking belt may...
... cord is needed, use only a 3-conductor, 14-gauge (2 mm²) cord that the walking belt needs more lubricant, see the front cover of this manual. 27 Then, remove the key and UNPLUG THE POWER CORD. Next, locate the Reed Switch Top View (103) and the 105 Magnet (111) on ,... see the front cover of this manual. Turn the Pulley until the walking belt is properly tightened, you suspect that is overtightened, incline trainer performance may decrease and the walking belt may...

Instruction Manual
Page 34
For information about ordering replacement parts, see the back cover of this manual. *These parts are subject to change without notice. Qty. 101 5 102 8 103 1 104 1 105 1 106 1 107 2 Description #8 x 3/4" Machine Screw 5/16" x 3/4" Screw Reed Switch Reed Switch Clip #8 x 3/4" Clip Screw Motor Isolator Motor Bushing Key No. Qty. 108 2 109 1 110 1 111 1 112 1 * - Description 5/16" Washer #8 Nut Filter Magnet Ferrite Box User's Manual Note: Specifications are not illustrated. 34 Key No.
For information about ordering replacement parts, see the back cover of this manual. *These parts are subject to change without notice. Qty. 101 5 102 8 103 1 104 1 105 1 106 1 107 2 Description #8 x 3/4" Machine Screw 5/16" x 3/4" Screw Reed Switch Reed Switch Clip #8 x 3/4" Clip Screw Motor Isolator Motor Bushing Key No. Qty. 108 2 109 1 110 1 111 1 112 1 * - Description 5/16" Washer #8 Nut Filter Magnet Ferrite Box User's Manual Note: Specifications are not illustrated. 34 Key No.

Instruction Manual
Page 40
...in municipal waste. ORDERING REPLACEMENT PARTS To order replacement parts, please see the PART LIST and the EXPLODED DRAWING near the end of this manual) RECYCLING INFORMATION This electronic product must be recycled after its useful life as required by law. Please use recycling facilities that are authorized to... when contacting us: • the model number and serial number of the product (see the front cover of this manual) • the name of the product (see the front cover of this manual) • the key number and description of the replacement part(s) (see the front cover of this...
...in municipal waste. ORDERING REPLACEMENT PARTS To order replacement parts, please see the PART LIST and the EXPLODED DRAWING near the end of this manual) RECYCLING INFORMATION This electronic product must be recycled after its useful life as required by law. Please use recycling facilities that are authorized to... when contacting us: • the model number and serial number of the product (see the front cover of this manual) • the name of the product (see the front cover of this manual) • the key number and description of the replacement part(s) (see the front cover of this...


